All-terrain vehicles are a universal means of transportation that can take you to the right place in catastrophically bad weather conditions.
All-terrain vehicles are most often used in the northern and eastern parts of our large country, where frosts, heavy rains and terrain that cannot be passed by an ordinary car prevail.
It should be noted that all-terrain vehicles move using wheels and tracks. The latter just likes to break down often and cause its owners a lot of problems in repairing or completely replacing this component.
As you might have guessed, we will talk about how to make tracks for an all-terrain vehicle with your own hands.
Tools and materials
In the vast majority of cases, snowmobile tracks are formed from a conveyor belt or tires. But making tires is complex, time-consuming and too painstaking. In some cases, the propeller of a snowmobile is made from V-belts. In various versions, tracks are also made from chains and plastic pipes.
To work you will need:
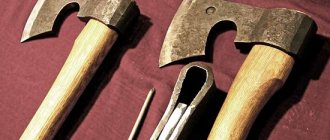
- large knives with a well-sharpened blade;
- electric jigsaw with fine teeth;
- bolts;
- nuts;
- wrenches;
- fishing line (helps strengthen the edges);
- cable or similar material that helps strengthen the track;
- hammer and sharp tool for preparing holes;
- rectangular profile pipe;
- Grover;
- washers;
- fittings
What are the prices and where to buy?
The cost of a mini snowmobile depends on its functionality, its main characteristics and the manufacturer. You can purchase such a vehicle for 60-150 thousand rubles.
You can purchase a mini snowmobile at a specialized store that sells various equipment or at a store that sells fishing accessories. The ideal option is to order online. Firstly, it may cost a little less, and secondly, there is a wider selection, which allows you to choose exactly the model that is most suitable. Although there are pitfalls here too. There is a real opportunity to acquire a fake on the Internet.
A mini snowmobile can be an indispensable vehicle for anglers, especially in snowy winters. In addition, such products can be assembled and disassembled in a matter of minutes, and their dimensions allow the equipment to be stored in conditions where there is a lack of usable space.
Source: fishingday.org
Manufacturing options
The photo below shows a possible scheme for creating a track for a snowmobile. The length of the main section is 5.8 m. In this case, rollers measuring 0.07 m are used. The center-to-center distance is taken to be 0.9 m.
Advanced people may not limit themselves to this drawing and study another version of the kinematic diagram of the snowmobile as a whole.
Making a snowmobile track with your own hands if you have the drawings is very simple. But if you take even the best conveyor belt in its pure form, it will quickly wear out during operation. Stitching along the edges with thick fishing line helps correct the situation. There is no need to come up with anything original here - you just have to act in the same way as when sewing, you overcast the edges of the fabric.
It is the perimeter that is the most vulnerable link, and it does not matter whether the caterpillar is made 1 meter, 2 meters or some other length.
The rubber strip must be looped. Some people simply sew the ends together, but this technique is not reliable enough. It would be much better to use a hinge that is matched to a piano hinge.
Important: the thickness of the tape must be selected according to the engine power. In most cases, a thickness of 1 cm is sufficient, as on agricultural machines.
But some people note that tires removed from an old motorcycle (manufactured before 1990) are also suitable for a snowmobile track. True, such a resource is, for obvious reasons, rare. An alternative solution is to make a track propulsion system based on belts. Grousers of their own design are added to the wedge-shaped blade. Most often, rivets or a nut-bolt combination are used for clutch.
The belts are equipped with holes at the factory, which can easily be adjusted to the main sprocket of the snowmobile. You just need to leave a certain gap between the stripes. Fastening of such a structure is done using a cable of small diameters and other durable materials.
Important: do not rush. Otherwise, there is a high risk that the entire assembly will fall apart while moving.
It is useful to consider alternative solutions (of which, in fact, there are a lot). One of the schemes also involves the use of a conveyor belt. Additionally, you will need a profile pipe of rectangular cross-section. Nuts, bolts, engravers and washers are used for fastening. They begin work with a homemade propulsion unit, forming track blanks.
They are simply cut exactly to the width of the track using an angle grinder. When the rough blanks are made, they need to be given a special shape by pressing on a machine.
Recommendation: the edges of the tracks should be lubricated with used oil.
After this, limiting fangs and fittings resembling the letter Y are welded on. The resulting specimens are checked and adjusted to the place where they should fit.
Assembling the caterpillar yourself, once the tracks are made, is no longer difficult. You just need to make holes in the tape using a tube sharpened at the end. The side of the tube is also equipped with a hole, which helps remove crumb rubber and dust. The tracks are drilled with an electric drill; there should be two holes on each edge. Assembly with such blanks is not difficult.
But there are a few more subtleties that need to be taken into account in any case. If increased cross-country ability is in the foreground, then you need to make a two-track snowmobile, which is also more stable than one with one support. There is no practical difference in the work, unless you have to make one more caterpillar additionally.
The movers themselves sometimes have to be modified by tenoning with self-tapping screws. This procedure is designed to increase the vehicle’s cross-country ability to the maximum.
On a snowmobile without studs, as practice shows, it is very difficult to drive onto icy shores and slippery serpentines. If the procedure is performed correctly, you can forget about this problem for at least one season. However, it is worth considering that studded tracks turn worse, especially on asphalt. But safety in difficult conditions is worth it. It is also necessary to pay attention to the rear suspension, which must work well in conjunction with the tracks.
Linked suspensions are used in sports and cargo models. But in deep snow and when using long tracks, unlinked suspensions are better. This design enhances traction and perfectly distributes the weight load.
Important: shock absorbers must also match the tracks. In addition to the main points, it is advisable to take into account several additional nuances.
Advantages and disadvantages of homemade snowmobiles
Anyone who has the skills to work with a welding machine, skill and a little ingenuity can make a snowmobile. You cannot do this without basic knowledge, otherwise the unit will not be reliable and may fail at the most inopportune moment.
Even if you have the skills and abilities, homemade equipment of this type has its advantages and disadvantages, which we will consider further.
The advantages include:
- assembly quality control, everyone selects the necessary parts for themselves and looks at their quality;
- the presence of skis and tracks will increase the cross-country ability of the snowmobile; it will not be afraid of snowdrifts and loose snow on virgin soil;
- easy to operate, the steering system is located entirely in front;
- reliability and high cross-country ability;
- The cost, assembling a snowmobile yourself is about five times cheaper than buying it in a store or even second-hand.
You can assemble such a unit based on many unnecessary things available in the household. Most often, the basis is chainsaws, walk-behind tractors, and motorcycles; in this case, a snowmobile will cost even less.
A self-made vehicle also has disadvantages:
- you will have to manufacture many components yourself, since spare parts are available for sale only for strictly established dimensions;
- You won’t be able to order tuning components online, they are not designed for homemade products;
- caterpillars and some other components will have to be made independently.
In all other respects, homemade snowmobiles in many characteristics are one step higher than factory models.
Making tracks from tires
This option for constructing rubber tracks has a number of advantages. There is plenty of material to be found. In case of urgent need, it will not be difficult to carry out repair work in a very short time. To make rubber tracks, you should choose truck tires. In addition, the tread must be identical in pattern to the rest of the tires - this will significantly simplify further work.
Manufacturing process:
- Initially, a tire is taken. A transverse cut is made to create a strip. The sides are cut out of it - a kind of treadmill should be formed. The procedure requires a lot of patience, because cutting out excess parts of the tire is quite labor-intensive. The tools used are a large knife with a good sharp blade.
- Rubber is easy to cut if the knife is soaked in warm, soapy water. Wetting needs to be done periodically. To achieve greater ease of operation, you should use an electric jigsaw with a fine tooth blade. The blade is also soaked in soapy liquid from time to time.
- If the tire hardness is high, it is recommended to remove a couple of layers of rubber from the inside - this is very difficult, so it is easier to find a tire with a soft structure. In case of dissatisfaction with the tread pattern, new cutting of the lugs is allowed at your discretion.
- A rubber track made by yourself has a huge advantage - it is a closed loop. With this advantage, reliability and strength are significantly increased. The only thing you need to pay attention to is securing the individual elements of the tire when creating a track for a snowmobile. Often, some tire options are not suitable in width. In this case, you should find material for specific parameters or tighten individual pieces with a small cable.
What materials are required
To convert wheel modules into tracks, a powerful engine is required. It must have an axle block. Power is important, since the walk-behind tractor will be driven on difficult roads. Without improvement, it is impossible to achieve good maneuverability. Basic building materials required:
- Motoblock machine with gearbox, 4-stroke engine, axle block option.
- Several extra wheels to put the caterpillar on.
- The track attachments themselves.
Depending on the building material used in the manufacture, two tires of good diameter and a transport belt may be useful. If you include a platform here, you get a compact tractor.
On a note! An additional platform will allow you to use the vehicle as an all-terrain vehicle when moving along a snowy road.
When selecting building materials to make tracks for a walk-behind tractor with your own hands, it is important to take into account that it should not be heavy. The walk-behind tractor is not equipped with a powerful engine; it simply cannot cope with a heavy load and will break. Tracked modules are made from:
- Motorcycle tires.
- Chains.
- Tubes.
- Belts.
- Conveyor belt in symbiosis with a bushing and roller chain.
Usually, attachments for walk-behind tractors are made from tires - these elements can be converted without any problems. It is correct to choose tires for large trucks, taking into account the existing tread pattern and shape, because the pattern will improve traction with the road. Tractor tires or elements from other large machines are perfect.
The tread pattern can provide full contact with wet ground, icy roads, and snowy roads. In addition to the materials for the tracked module, to create a full-fledged device you need a walk-behind tractor with a gearbox, as well as several car wheels. If necessary, they secure the cart and, if desired, even on runners in order to transport significant weights through the snowdrifts.
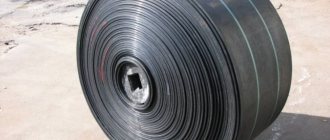
Transport belt for caterpillar
This material is very common. Therefore, it will not be particularly difficult to find a transport tape. You can purchase it in used condition or, if possible, simply ask your friends.
Manufacturing process:
The conveyor belt may soon deteriorate during operation, so it is necessary to stitch the sides of the material using thick fishing line. You need to do it the way seamstresses sew the edges of fabric using the overcasting method. If you do not do the work, then after some time the edges will turn into rags, therefore, the tape cannot be avoided. To give the rubber strip the appearance of a ring, stitching the ends is used, but the method is not very reliable. It is easier to use a hinge based on the type of piano hinge.
The thickness of the conveyor belt depends on the power of the motor. A strip 1 cm thick shows excellent results. It is used in agricultural machinery. It is allowed to use tape from old Soviet motorcycles.
The advantages lie in the abundance of resources. If a homemade track breaks down, it can be restored in a short time without professional tools. Before purchasing a full-fledged track, you can use the belt version for quite a long time.
Purpose and design features
The key role of tracks is to maintain the performance of the snowmobile. This device helps the vehicle overcome winter off-road conditions, including slopes, as unhindered as possible, and, therefore, more comfortable and safe for the driver and passengers. This result is achieved due to the fact that, thanks to the tracks, the pressure of the machine on the surface of the earth decreases, and accordingly, the cross-country ability increases significantly.
A snowmobile track is a circular transport belt, which consists of tracks and reinforced metal edging. The inside of the structure is smooth, and the outside is equipped with lugs. Tracks usually also include the following elements:
- drive (in most cases it is a belt variator);
- drive sprocket;
- road wheels;
- plastic slides;
- metal rings.
Track belts
This option is very easy to manufacture and does not require any skills. The material is quite common. There will be no difficulties in purchasing it.
Manufacturing process:
- The belts are wedge-shaped, therefore, creating a single piece of fabric is very simple. And the lugs can be made at your own request. Bolts and nuts or rivets are used as coupling.
- The belts are convenient because they have holes that can easily be adjusted to the snowmobile's drive sprocket. For these purposes, a gap is left between the strips during operation.
- For fastening, it is allowed to use any durable material, for example, a small diameter cable. It is important that the work is done efficiently, otherwise the entire structure will fall apart when driving.
There are actually many more methods for making DIY tracks. It also doesn’t hurt to use your imagination and come up with something better and replace the tires and rubber with a more practical material. But, nevertheless, tire tracks are considered the best solution. They are simple to manufacture, and the time spent on work will be minimal.
Famous models and brands
There are several developments, both domestic and foreign, that are widely popular. After all, mini-snowmobiles are in demand not only in the domestic market, but also in European countries. The most popular models include:
Domestic fishermen speak well of domestic developments such as “Burlak” and “Razgulay”. These models are lightweight and small in size, and when disassembled they can be stored in an ordinary apartment. The vehicle is assembled in a short period of time. Despite the presence of two anglers with equipment, it can reach speeds of up to 20 km/h.
Mini-snowmobiles " Vyuga " are distinguished by the presence of all the necessary data for movement on snow. The method of controlling the device is quite simple, which is accessible even to a beginner. Thanks to the presence of comfortable and powerful skis, the snowmobile can move through deep snow or off-road without any problems.
The “ Husky ” model is characterized by fairly small dimensions, so it can even fit on a balcony, naturally when disassembled. The product is assembled or disassembled within 2-3 minutes.
The “ Tourist ” design has a very simple control system. Therefore, even a teenager can master the control of this model. The development is lightweight and compact, as well as fuel-efficient. This unit starts in any conditions and in any frost. A fairly successful design that is in wide demand.
When choosing one of the snowmobile designs for yourself, you should pay attention to reliability, build quality and safety. How to do it? Yes, very simple! You should always opt for well-known models that already have their own buyer and a lot of positive reviews.
It is very important that the model consumes little fuel. Nowadays, saving comes first.
Recommendations
The thickness of the tape is selected according to the engine power. On a snowmobile where a motorcycle engine is installed, there is also enough belt like that used in agricultural conveyors. If truck tires are used as a basis, then you need to select them according to the tread pattern to simplify the work. The beads are cut out of the tires, but areas are left for treadmills.
Important: the knife must be extremely sharp for such work; Wetting the blade in a soap solution helps reduce the complexity of manipulations, although it is better to use an electric jigsaw.
Whatever option is chosen, one must strive to make the entire structure as light as possible. Then traveling on loose virgin snow will not be difficult. To drive homemade tracks from the engine, some enthusiasts take drive sprockets from old Burans. The lugs can be attached to furniture bolts with a diameter of 6 mm; the same distance must be maintained between them. Cutting pipes will work better if you work alternately on both sides and do not try to cut through.
Installation of “barrels” (slides) is optional. Snowmobiles without such an element do not ride much worse. Any drawing or diagram must be adapted to the available consumables. It is advisable to take longer bolts so as not to experience inconvenience. There is also the most radical way to make a caterpillar for a snowmobile with your own hands - cut the standard propeller from the Buran in half.
Hanging equipment
To make a snowmobile fast and strong, you need to put a good engine on the frame. If you install a low-power motor, then such a structure will move poorly. You also need to correctly calculate the caterpillar. If the area is too small, it will drown in large snow and will not pull even on flat terrain. Particular attention should be paid to skis, which should create good stability and safety when moving at high speed.
DIY rubber caterpillar
To easily move through the snow, it is very important to give your homemade snowmobile a good rubber track. It is not easy to make such a device with your own hands and it is better to purchase it in a store completely with rollers. Installing a standard factory track on a homemade structure is not difficult. To do this, you just have to secure the drive shaft and rollers with bearings to the frame. If your financial situation does not allow you to buy the entire device, then the most expensive parts can be easily made yourself. For this you will need:
- Conveyer belt.
- Plastic pipe.
- Bolts, washers and nuts.
A cheap homemade snowmobile track is usually made using a thin conveyor belt. To do this, plastic pipe blanks are sawed off to fit the width of the rollers. Then they are cut lengthwise into two equal parts and holes are drilled for small bolts. After this, the halves of the plastic pipes are secured to the conveyor belt with bolts, washers and nuts. The caterpillar is ready and further construction needs to begin.
.
Homemade skis
It's no secret that in winter it is much more convenient to travel on deep snow on skis. They also serve well as a control device on a snowmobile. It is not difficult to make a wooden structure, but only strong boards made of birch or oak are suitable for this. They need to be well dried, planed, and then heated and the ends bent. It's no more difficult to make metal skis. To do this, you will need to cut two plates from sheet steel and weld a thin corner on the sides.
In order for the skis to turn freely, metal pipe stands are welded to them. In working order, they are held in the front bushings of the frame, where they rotate easily
.
Washers or large nuts are welded to the top of the racks, into which rods are inserted to control the snowmobile.
The steering wheel itself is easy to make with your own hands, or it’s easier to remove it from an old motorcycle. Thus, all that remains is to install the motor, as well as the driver’s seat, and you can hit the road.
Making caterpillars from car tires
You can make your own caterpillar using car tires. To carry out the work, you need to select tires borrowed from trucks; it is recommended to use a suitable tread pattern, and you will spend less effort when working with the tire. The manufacture of such a caterpillar must be done by cutting out the sides from the tire, while leaving space for a treadmill.
It is worth considering that this work is quite labor-intensive and requires the application of a lot of patience and effort; in this case, it is necessary to use only a well-sharpened shoe knife.
In order to spend less effort when making a caterpillar for a car with your own hands, you can wet the blade from time to time using a soap solution. As an alternative solution, you can use a device designed for cutting; it is also possible to use an electric jigsaw. On the latter you first need to attach a file with small teeth, the file must also be pre-moistened with water, during the work such manipulations must be done periodically.
How much will it cost
Calculating the cost of such a caterpillar is not at all difficult, but the only nuance is worth considering. If you already have a tire or cover, then the cost immediately decreases; if you also buy a base for the track, then the cost will be slightly higher.
| necessary component | price |
| car tire | from 1200 rubles |
| bicycle tire | from 380 rub. |
| truck tire | from 9,000 rub. |
| plastic pipe | about 150 rub. per meter |
| bolts | 55 rub. a piece |
Next, we select the appropriate components and calculate the cost, it will be several times lower than the factory-assembled store-bought equivalent. A snowmobile track made from a tire is easy to make with your own hands, as practice has shown. The main thing is to have the desire and put in a little effort.
Work technology
Do-it-yourself tracks for a car must be made using a technology that involves the initial removal of the tire beads, then, if necessary, you need to remove the excess layers that are located on the wrong side of the formed ring; this is necessary if the track has increased hardness.
If the tread pattern is not suitable, then you need to cut a new structure, which will be necessary so that the structure can cling to the soil.
A snowmobile track made with your own hands according to the scheme described above will have many advantages, even if compared with the option described above. This is due to the fact that it has a closed loop, which indicates reliability. But there are also disadvantages, one of which is expressed in the limited width of the track, but if there is a need, then a double width can be used.
Snowmobile Rybak 2-MR
Rybak 2MR is a collapsible two-seater mini-snowmobile of the motor-transformer type, designed for movement on loose and deep snow. The equipment is equipped with a four-stroke internal combustion engine, an automatic clutch, a trunk, a front bumper-seal and a reinforced towbar, which allows you to use the snowmobile as a motorized dog (motorized towing vehicle) in difficult terrain. Reviews from mini snowmobile owners characterize the Rybak 2 MR as a snowmobile for lovers of winter fishing and hunting due to its low pressure on the snow and its efficiency.
Manufacturing of structural elements
Before starting to manufacture structural elements, prepare a drawing, required materials and tools. You can take ready-made drawings based on the Bullfinch or Vepr snowmobiles. Tools you will need:
- welding machine;
- pipe bender or finished frame;
- hammer;
- screwdrivers.
Since the design of the mini snowmobile is low, the seat is made of durable waterproof material. The fuel tank is made of metal. Its volume should be from 10 to 15 liters. You can use a motorcycle chain as a drive.
Snowmobile assembly.
Engines of the Lifan type are very suitable for building snowmobiles; the author decided to use a similar 200 cc engine with 6.5 horsepower, the Sadko GE 200 R.
This engine already comes with a reduction gear (½) and a centrifugal automatic clutch, which is activated when the engine speed increases, which is ideal for homemade snowmobiles, walk-behind tractors, go-karts and other equipment.
The photo shows a Chinese-made Sadko engine.
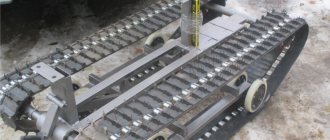
The snowmobile frame is made of a 25 x 25 profile pipe with a wall thickness of 2 mm.
The caterpillar is made of a conveyor belt 3 mm thick, the width of the belt is 300 mm, the belt itself was cut in half lengthwise at 150 mm.
The tracks are made of plastic water pipe with a diameter of 40 mm and a wall thickness of 5 mm. The pipe is cut lengthwise.
The tracks are screwed to the conveyor belt with M6 bolts with a wide head, the bolts are tightened with a nut through a washer and a screw. The edges of the tape are connected with the same bolts.
Track drive axle.
Guided star from Minsk.
Stars for the caterpillar track from the Buran snowmobile, homemade guide drums.
The support ski removes part of the load from the track; there are guide rollers at the top.
The rear axle moves along the frame along a guide, which allows you to tension the snowmobile track.
The front axle is stationary.
Driven and driven sprockets, as well as a chain from a Minsk motorcycle. Chain drive with a gear ratio of 1 to 3.
Steering rack.
The hinges are made using a threaded connection, nut and stud on M16.
The skis are taken from a children's snowmobile and reinforced with a profile pipe.
The photo shows how the star engages the track track.
Read also: Nozzles for the engraver, which ones are used for what
The seat is made of plywood in the form of a box, in front there is room for a child, in the back for two adults.
Middle support ski.
The equipment is ready for testing.
The snowmobile moves confidently when fully loaded.
In the photo is the author of the homemade product: Evgeniy Venglovsky.
I recommend the author’s interesting video about assembling a tracked snowmobile and testing it.
How to make a snowmobile track
A snowmobile track is created from tires or conveyor belt. The work will be difficult and time-consuming if tires are used as the basis. The sides are cut out of them, so the work requires a sharp shoe knife or an electric jigsaw. To facilitate the process, tires are selected with a suitable tread pattern. Making a homemade caterpillar:
The sides of the tire are cut out with a knife. If the knife blade is periodically moistened in a soapy solution, the cutting process will become easier. When using an electric jigsaw, install a blade with small teeth and moisten it with water.
If, when cutting, the track turns out to be hard or extra layers have formed on the wrong side, they are also cut off.
Cutting a new structure is done when there is a mismatch in the tread pattern. The structure made must cling to the soil, so the structure of the pattern must be correct.
A caterpillar made according to this design is quite reliable due to the fact that it has a closed loop. Its disadvantage is its narrow width. To make a larger size, it is doubled. If the caterpillar is made from a conveyor belt, then it is combined into a single ring.
This can be done in 2 ways:
- like a piano hinge (with a hinge);
- ribbon stripes.
You need to choose the appropriate thickness of the tape if it is sewn on. Its thickness should be suitable for the engine power. A homemade snowmobile from an IZH motorcycle requires the use of a 10 mm thick tape. To increase the service life of the snowmobile, the edges of the conveyor belt are stitched with fishing line. The seams are made according to the method of overcasting the edges with an interval of 1 cm.
Frame construction
Before you begin building a snowmobile, you will first need to select a material. The easiest way is to make a homemade frame from wooden blocks. The result is a very light and fairly durable structure, which is considered the cheapest and easiest to manufacture. For this you will need:
- Wooden bars.
- Sheet iron.
- Metal scissors.
- Drill and drill bits.
- Hand saw.
- Bolts and nuts.
The advantages of building such a structure are undeniable. In the event of a breakdown, the wooden model will not be difficult to repair far from a populated area. In the forest it is easy to find scrap materials that can be used for repairs. But the main advantage is that this snowmobile rarely falls through the ice and does not sink in water.
Wooden structure
It is known that bars and boards made of wood do not have particular strength in their places
connections. Therefore, before starting construction, it is necessary to make additional metal corners. To do this, take sheet iron and cut square plates with scissors along the width of the bars. The places for the bolts are marked in them with a tape measure, and then four holes are drilled with a drill. After this, the plates are bent in half exactly 90 degrees. These will be excellent devices for firmly fastening wooden blocks in the corners of a homemade frame.
Usually they start construction after making a drawing with exact dimensions. And four bars are cut along them with a hacksaw, and holes for bolts are drilled in the corners with a drill. Then they are placed on a flat floor surface in the form of a regular rectangle. Metal corners are applied to the connection points, bolts are inserted and tightened tightly with nuts.
To mount the engine and track, two additional crossbars made of bars with holes for bolts at the ends are installed on the frame. But before that, the corners for fastening are first made. They are cut out of triangular-shaped iron sheets and holes are drilled in the corners
.
It’s better to make eight pieces at once and place them on top and bottom. Then the fastenings will be more durable and reliable in operation.
When they are ready, the crossbars are inserted inside the frame and the triangles are placed on top. Holes are drilled into them exactly to size using a drill through the bars. Then long bolts are inserted there and tightened tightly with nuts. At this point, a strong wooden frame will be ready, which will serve for a long time on a homemade device.
It is much more difficult to build homemade metal products. This requires special tools and devices that not everyone may have. Significant costs will be required to purchase or rent them. However, this building will be much stronger and more durable than a wooden structure.
. Here you will need:
In addition, to build a metal frame you will need more durable materials. You will definitely have to buy them in the store, since today they are not found anywhere else. And I don’t really want to build a new homemade snowmobile from old parts due to poor reliability. Therefore, only good materials will be used here:
- Metal pipes.
- Iron corner.
- Sheet steel.
- Channel.
As a rule, before you start building a frame, you need to make a simple drawing. Using a grinder, cut the pipes according to its parameters and use a welding machine to connect them into a rectangle. Inside the frame, insert a couple more partitions from the corner to install the engine and track. If you make them from channel bars, the structure will be much stronger and more reliable in operation.
After this, you just need to cut off two small bushings from the metal pipe.
And then weld them to the corners of the front part, where the swivel ski supports will be inserted. The metal frame is ready and you can begin construction, as well as installation of the main units and components.
Tackles
A trolley is a movable platform that protects the chassis of equipment from unnecessary mechanical loads. The platform is used when it is necessary to drive a snowmobile into a garage. For its manufacture, a metal pipe of medium diameter (6×6 mm), rollers and a bearing system are used. The wheels are installed with rubber coating and metal discs. Their diameter must correspond to the weight of the equipment.
Snowmobile skis consist of a base, a shock-absorbing part, a rod, a fork and bipod, and a link leg.
Skis can be made in different designs from different materials. If plastic linings are used for the base, they are supplemented with expanders. The extensions are mounted with fastenings to the snowmobile chassis. The plastic design is suitable for small equipment. For large and medium-sized snowmobiles, you will need metal skis.
- To give the skis a shape, cut out the base from a cardboard stencil. At the same time, a bend is formed in front. The amount of bending is done at your own discretion. A ski track with a large bend glides poorly and collects snow. And this creates unnecessary braking. Therefore, you should not make it too large. The approximate size of the ski track is 2.5 cm wide and 100 cm long.
- A pipe is welded along the edges of each part. This gives additional rigidity to the product and protects it from stones that come along the way.
- Where the bend passes, the pipe is welded along the contour.
- Shock-absorbing parts are fixed to the skis. Bolts are used as fastening elements.
- The platform and the nose of the skis are connected by a hydraulic pipe. The top part is ready.
- For the lower part, the hydraulic pipe is fixed at 4 points and compressed.
- Then the polyethylene pipe is attached with self-tapping screws, having previously cut it. Instead of a polyethylene pipe, you can use polypropylene.
Top popular walk-behind tractor models on tracks
Tracked walk-behind tractors are a rarity; in most cases, manufacturers produce gooseneck attachments that can be installed on wheeled models. Most often, there are specialized snow-removing walk-behind tractors on tracks.
- Caiman Vario is one of the most famous crawler walk-behind tractors. The machine consists of a standard walk-behind tractor on Caiman Vario 70S pneumatic wheels with a Japanese 7 hp engine, removable tracks and a two-seater sled. In this winter configuration, it can be used as a snowmobile for fishing or hunting trips. For work related to the transportation of goods over rough terrain, the walk-behind tractor is equipped with cargo sleds and weights. To remove snow, you can install a shovel blade or a snow removal attachment.
- Yard-Man YM 7110 DET – snow plow walk-behind tractor with a 10 hp 4-stroke engine. Working width – 710 mm, working height – 530 mm, snow throw range – up to 15 m. 8-speed drive (6 forward, 2 reverse) with friction clutch and tracks with directional tread guarantee high performance even in difficult areas.
- HUTER 8100C is a self-propelled snow blower equipped with a four-stroke single-cylinder 11 hp engine, designed for effective clearing of snow drifts in emergency winter conditions. The snow blower's chute covers a snowdrift of 700 mm in width and 540 mm in height. The power plant of the unit is equipped with an electric starter, heated handles and an autonomous fuel supply.
Do you use a crawler walk-behind tractor for snow removal, cross-country driving, winter fishing or hunting?
Another option for making a caterpillar
Before you make a caterpillar with your own hands, you need to choose a technology for carrying out the work. It is also possible to use the method presented below. The propulsion frame can be welded using pipes that have a rectangular cross-section. It is recommended to connect them using a frame, this will make the structure collapsible. The splined part can be borrowed from the Buran, this will make it possible to make drive shafts; the splined part of the shafts, which are borrowed from the Oka, must be welded to them. It will also be necessary to use brake discs. When working on the front shafts, you need to install brake mechanisms on them. Some part of the gearbox housing needs to be cut off.
Making a caterpillar with your own hands will allow you not only to save money, but also to move through snowy areas without any problems. This design can be used for a long time without the need for repairs.
Do-it-yourself caterpillar for a motorized towing vehicle
A motorized towing vehicle, popularly called a “motor dog,” is ideally suited for use in northern latitudes with good snow cover. Using a walk-behind tractor, you can independently make an alternative to a dog sled, a high-speed tracked vehicle that can tow a sled with a person or a small load in the snow.
Making a caterpillar for a motorized dog with your own hands is not at all difficult.
You can use an old gooseneck from a Buran snowmobile. To increase the chassis, you should cut it in half and build it up using inserts. The tracks can be carriages from the old Buran. Three carriages with rollers are enough. They also need to be sawn and extended with inserts.
In the absence of old spare parts, a caterpillar for a motorized towing vehicle can be made from improvised materials using one of the methods described above. For example, from a conveyor belt.
For production you will need:
- conveyor belt with a width of 22 cm;
- metal bars for reinforcement;
- hardwood timber blocks for track tracks.
We bring to your attention a video showing the caterpillar manufacturing process.
Making tracks for a walk-behind tractor is a simple process, although it requires a sufficient amount of time. It is also necessary to make every effort and skill to ensure that all links of the goose are located at an equal distance from each other. This will help to avoid distortions and sliding of the caterpillar track from the load-bearing surfaces.
As soon as winter begins in our country, given the climate, two-wheeled vehicles are put away in the garage until spring. It may be impossible to use a car for transportation due to heavy snow. And here, a snowmobile on tracks, which you can make from a walk-behind tractor with your own hands, comes to the aid of all motorists who want to move along a snowy road.
Not everyone has the opportunity to buy an additional vehicle, but everyone can independently construct a homemade tracked snowmobile from a walk-behind tractor.
The principle of movement of caterpillar vehicles
For a tracked vehicle of any purpose, be it a tank or a snowmobile, forward motion is provided by a tracked propulsion unit (CT).
It uses two motivating factors:
- torque Mk transmitted from the engine/power drive to the drive wheels;
- adhesion of tracks to the ground.
A caterpillar or caterpillar chain of a main engine is a link structure, which is a continuous continuous belt or chain.
For full traction with the ground surface, the caterpillar is equipped with raised protrusions that serve as active lugs.
The caterpillar principle is illustrated by the kinematic diagram of the main engine operation located below. The following positions are indicated on the diagram:
- pos. 1 – caterpillar;
- pos. 2 – support rollers that prevent the track belt from sagging;
- pos. 3 – drive sprocket (drive wheel), which converts torque from the engine into traction force necessary for the forward movement of the machine;
- pos. 4 – support rollers, ensuring full contact of the track belt with the surface of the ground support;
- pos. 5 – shock absorbers;
- pos. 6 – guide wheel, which serves to direct the forward movement of the machine and transfers part of its weight to the ground.
Movement according to the caterpillar principle is carried out as follows:
- Torque Mk is supplied to the drive sprocket (item 3).
- The rotating sprocket rewinds the continuous track belt/chain (item 2).
- The caterpillar (item 2) is in close adhesion to the support surface (soil, loose soil, etc.). It is affected by:
- force Rz – reaction of the supporting surface that the caterpillar transmits to the vehicle frame;
- weight load G;
- tangential reaction of the ground support Pk.
The rewindable track belt/chain is continuously laid in the direction of forward motion of the vehicle on the surface of the ground support under the road wheels, creating a path for the vehicle wheels with lower resistance to movement than on soft ground.
During movement, the caterpillar belt rises from the supporting surface and transfers the pushing force to the vehicle frame.
The specific pressure on the support (soil) along the length of the track is uneven - increased in the area of the drive sprockets, decreased in the front part in the area of the guide wheel (item 6). The maximum pressure on the ground from the main engine is in the area of the road wheels (item 4).
Design features of the device
Making homemade caterpillar components for a walk-behind tractor with your own hands allows you to save money on the purchase of factory devices and further operation of the equipment. If everything is done correctly, then self-made tracks for a walk-behind tractor increase the cross-country ability.
Compared to their wheeled counterparts, tracked walk-behind tractors are not as widespread. This is explained simply. Wheel units from Texas, Patriot, Cayman, Viking, Forza are best suited for plowing land. This design is best suited for soil-related work.
Remaking a wheeled walk-behind tractor is a job consisting of attaching one additional wheel on each side. It turns out to be a four-wheeled walk-behind tractor on which you can put tracks. They can, in turn, be purchased or homemade. Additional wheels can be made removable. This allows you to promptly transform the unit into a standard walk-behind tractor, ideal for working in the garden.
To do this, the wheels are attached to the axle, which are already provided in the design, by means of a rigid or flexible transmission. This solution is considered appropriate, since the need for installing additional fasteners disappears. As for the design of these walk-behind tractors, they fully comply with the parameters of wheeled modifications:
- Engine. It is powerful, four-stroke. It has an axis locking function. Due to this, the tracked walk-behind tractor can turn in place without describing a full circle.
- Transmission. The standard set includes a gearbox, clutch system and gearbox.
- Chassis. Caterpillars are used here. They replace the wheelbase. If a modification is made, then one roll is added to the existing pair of wheels on each side. They put a homemade caterpillar on them.
- Control bodies. Located on the control handle. Includes emergency stop mechanisms and various types of clutch levers.
Before you start making your own, you need to evaluate the offers in stores that specialize in selling such equipment. Particular attention is paid to the price of certain types of tracks for well-known manufacturers of walk-behind tractors. Let’s say a caterpillar for a Neva walk-behind tractor costs about 28,000 rubles. This is a fully functional snowmobile attachment. You can buy a seat for drivers separately, thanks to which the walk-behind tractor takes on the features of a mini tracked tractor, albeit with less impressive performance characteristics. The technical parameters here are:
- develops a speed of about 18 km per hour;
- The total weight of the console is 37 kg;
- width - 60 cm;
- length - 100 cm;
- height - 34 cm.
Accommodates one driver and one passenger on board. In addition, on sale you can find an attachment to a walk-behind tractor on tracks, which is intended for the Salyut and Agat models. Its cost ranges from 25 to 27 thousand rubles. This design does not provide for attaching a driver's seat. Because of this, some restrictions are imposed on the functional features of this device. But for driving on off-road and snow, such a vehicle is quite suitable.
Online stores offer a large number of different models of snowmobile attachments mounted on tracks to a walk-behind tractor. This indicates the popularity of such models.
Their feature is the ability to control not only with two hands, walking behind a walk-behind tractor, but also while sitting in a folding sleigh. The latter will have to be purchased separately. Considering that the average cost of a set-top box is about 30 thousand rubles, not counting the price of folding sleds, we can say that making tracks yourself can save a lot of money.
Tracked platform, types, modifications
This equipment is produced by both domestic companies and foreign manufacturers. As a result of this, there are many modifications that differ:
- according to form;
- according to the installation principle;
- by use.
Module forms
From the variety of models, two main forms can be distinguished:
- Rectangular axial;
- Triangular gear.
Axial attachments consist of:
- platforms;
- axles;
- four rollers;
- two gears;
- two caterpillars.
The platform is attached to the walk-behind tractor with bolted connections. Four rollers are attached to the bottom of the axle. The rollers create the necessary tension on the track. Two gears located on both sides of the track, falling into the groove, set the platform in motion.
The triangular gear attachment consists of the following elements (for each track separately):
- big gear;
- rigid frame;
- eight rollers;
- caterpillar belt.
Triangular track drive
Large gears are mounted on an axis coming from the walk-behind tractor gearbox. The rollers are fixed in the lower part of the rigid frame; they are located in pairs on both edges of the caterpillar track. This structure allows for the necessary tension of the track when moving. Unlocking the differential allows the walk-behind tractor to perform various maneuvers - turns, turns, etc.
This is important to know!
When deciding to buy (or make your own) a crawler drive for a walk-behind tractor, you need to take into account the following characteristics of the attachment:
- The optimal speed of movement of a walk-behind tractor on caterpillar tracks. Powerful models can provide speeds from 18 to 20 km/h.
- Load capacity of attachment. In most cases, models with a carrying capacity of 200 kg are purchased, but each owner of the equipment has the right to choose and select this characteristic to suit his needs, taking into account the engine power of the walk-behind tractor.
- The maximum permissible height of snow masses (if you plan to use the attachment and walk-behind tractor as a snowmobile). The main limiter is the engine height. Modern attachments allow you to comfortably move through snow up to 50 cm high.
- The permissible level of liquid dirt and water also ranges from 45 to 50 cm. The reason is the same - the height of the engine.
In order to ensure long service life and serviceability of all module elements, it is necessary to regularly (before and after each operation) perform the following actions:
- Inspect the track attachment before driving.
- Check the tension of the rollers.
- Check the reliability of fasteners.
- Pay attention to the integrity of the tracks and the condition of the caterpillar tracks.
- Regularly lubricate all moving components and parts of the track structure.
Model SP MB-S
This is also a very popular drive. For example, this tracked attachment is suitable for the Salyut walk-behind tractors, which are owned by many summer residents and farmers in Russia. All SP MB models, including the C series drive, have the same technical characteristics. That is, on a walk-behind tractor with such an attachment you can drive at a speed of about 18 km/h and transfer loads of up to 200 kg.
Farmers and summer residents include, among other things, the advantages of the SP MB-S drive, ease of control, the absence of the need for any modifications to the walk-behind tractor during installation, the presence of three pairs of rollers, etc.