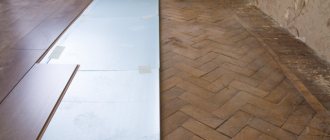
Laying tiles diagonally on the floor is quite a difficult operation even for experienced tilers. Moreover, such a decision should be made with a certain degree of caution if it is intended to be done for the first time. However, the desire to decorate the interior of one of the rooms in an original way leads to bold attempts to try your hand at it.
Laying tiles diagonally on the floor
Having chosen this method of laying flooring, you should prepare yourself in advance for painstaking work that requires patience. In addition, it will be useful to practice cutting tiles. For a beginner, this process can be the most difficult. Especially in the absence of accumulated experience and in the absence of the special tools necessary for its implementation.
Expert opinion: Afanasyev E.V.
Chief editor of the Stroyday.ru project. Engineer.
If you entrust floor tiling diagonally to professionals, it will cost much more than conventional masonry. Therefore, by doing this work yourself, you can save a decent amount. So there is a reason to try!
Advantages and disadvantages of laying tiles diagonally
pros
The advantages of this method include the following points:
- Visual increase in space. If the room in which the renovation is being carried out has a small square area, then it is the diagonally located seams that help visually lengthen the floor. Combining two or three shades will help achieve a greater effect.
- Effectiveness. Because few people risk decorating the space of their rooms in this way, this arrangement looks untidy and quite new.
- Masking of irregularities. It often happens that the location of the walls is not parallel to each other. If in the case of straight laying such a defect immediately catches the eye, then the diagonals help smooth out the effect of unevenness, drawing all attention to themselves.
- Accuracy. This arrangement of plates looks more elegant.
- Zoning of space. When using two different installations, you can visually divide the space into two parts.
Minuses
The obvious disadvantages include:
- Labor intensity. The time and money costs are significantly higher than with the standard installation method. Moreover, precise marking is required.
- Material consumption. Due to the need for constant trimming of tiles, a certain amount of material becomes unusable and is disposed of. Consequently, there is a need for additional expenses.
- Having experience. This means that even skilled craftsmen sometimes find it difficult to lay out tiles without making mistakes, let alone beginners and those who have not previously dealt with marking and cutting slabs.
What you need for work
The difficulty of laying diagonally begins already from the preparatory stage. First of all, you must calculate the required number of tiles (more details: “How to calculate tiles for the floor using different installation methods”). If during normal installation it is quite simple to select the right amount of material, here you will have to resort to more complex calculations.
First, you must draw a layout diagram on paper, keeping to scale. You will have several types of elements on the sheet:
- Whole tiles;
- Cut in half or more;
- Very small details.
First, count the number of whole tiles, and then add to them the number of elements of the second type (they are counted as a whole tile). Small elements complete the calculations. You can combine them by size into one tile and add them to the previous result. It is best to add another 5-10% to the resulting figure, which you can ruin when cutting.
The next thing we need are tools. The list of them is quite wide:
- Roulette;
- Container for solution;
- Mallet;
- Glue;
- Grout;
- Spatulas;
- Level;
- Crosses and spacers;
- Threads and chalk with which you will make markings;
- Tile cutter or grinder;
- Mallet.
Calculation of the number of tiles
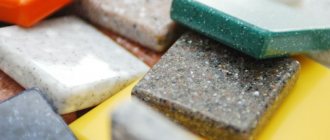
Before you start purchasing the tile you like, you should pay attention to its characteristics. Moreover, it is necessary to compare the sizes of slabs of the same type, attaching them to the same ones, but from different packages.
- Remember, when there are discrepancies of at least a couple of millimeters, it will not be possible to put together a neat drawing, which will entail a violation of aesthetic perception. That is why, when buying tiles, pay attention exclusively to high quality products and a trusted brand.
- When checking the characteristics of the material, look at the purpose of the tile. Yours should be intended exclusively for flooring. The box must have a special icon depicting a foot print.
This requirement is justified by the fact that wall tiles will not last long if used to lay the floor. Plus, the treatment of such tiles should include anti-slip properties. This is evidenced by the image of shoes on an inclined surface.
It would not be amiss to make preliminary calculations of the required amount of material, taking into account that it will be necessary to purchase an additional 20-25% of the material from the total amount due to the higher consumption.
Review the parameters of the tile you like in advance. Then, draw a drawing that takes into account all the protrusions and niches. If you want to combine several different plates, a drawing is required.
There are two methods of calculation:
- Without drawing: the area of the room is divided by the area of one slab.
- With a drawing: the diagram includes a graphic representation of the design that is planned to be applied to the floor, taking into account the dimensions of all elements.
Two tiles should be counted as one when most of them are cut off.
TOP 3 popular manufacturers of ceramic tiles
| Photo | Name | Rating | Price | |
| #1 | Kerama Marazzi | ⭐ 99 / 100 | More details | |
| #2 | Keramin | ⭐ 98 / 100 | More details | |
| #3 | Fap Ceramiche | ⭐ 95 / 100 | More details |
Kerama Marazzi
The largest share of the domestic market in the budget and mid-price segment is occupied by Kerama Marazzi. This manufacturer of ceramic tiles manages to gain popularity due to the combination of affordable prices and Italian quality.
Kerama Marazzi
pros
- Good assortment.
- Innovative technologies in the production of tiles and glazes for them.
- Durability of tiles.
- Developed trading network.
- Affordable price.
Minuses
Not all collections have the ideal combination of wall and floor tiles.
floor tiles Kerama Marazzi
Keramin
The products of the Belarusian company Keramin are well known to Russian consumers. The manufacturer's catalog is varied and you can find interesting design solutions in it.
pros
- high quality products;
- acceptable price;
- wide product range;
- long service life.
Minuses
- inaccurate geometry found in products.
ceramic floor tiles
Fap Ceramiche
The tiles produced by the Italian company stand out among competitors thanks to their unique design and bright, vibrant color.
Fap Ceramiche
pros
- original manufacturing technology;
- a wide range of.
Minuses
- high price.
Fap Ceramiche tiles
Choosing tiles for diagonal laying
Materials include:
- Water;
- Cemented glue;
- Grout of a suitable color;
- Crosses.
Material selection
Repairs will be carried out independently or with the help of specialists; in any case, it all starts with drawing up an estimate and purchasing materials.
When purchasing the necessary tiles, it is advisable to consider the following points:
The floor covering must be hard; wall tiles are not suitable; they are more fragile and are not resistant to external, mechanical influences. It is advisable to purchase class A and AA tiles; they are not afraid of aggressive chemical agents when caring for them. For each type of room, manufacturers offer tiles of a certain class and wear resistance. Over time, the floor covering wears off, so it is important to know that each type of tile has its own wear resistance. For corridors 2 class, bathrooms 3, for the kitchen 4. It is advisable to opt for a rough coating or embossed
This option is safer. Do not forget that the floor should fit harmoniously into the interior in color and texture.
Performance characteristics of tilesSource opora-stroy.ru
Adhesive mixtures
It is important to know that the manufacturer offers ready-made adhesive mixtures in plastic buckets of different sizes and dry in bags or bags.
The dry mixture can be diluted in the required quantitySource www.rubi.com
In the second option, the advantage is that you can prepare it before starting work, and in the required quantity. It is necessary to follow the attached instructions, observe the proportions. Another plus is that dry formulations are cheaper.
Laying floor tiles is also carried out using cement-sand mortar. This method is suitable if you need to hide any defects, irregularities or bumps. The downside is that it is harder to work with such a composition, but cheaper. Experts advise combining sand, adhesive mixture and cement. Profitable and reliable composition.
Grout
Used to fill joints between tiles. It comes in different colors, so you can choose a shade to match the color of the coating, and it will look like a solid solid canvas.
Grout to match the color of the tileSource vanna-expert.ru
To emphasize the pattern and lines, you need to choose a bright, contrasting putty
Please note that different types of grout are used for residential and industrial premises.
Tools
To work you will need the following set of tools:
- Roulette;
- Level;
- Tile cutter;
- Cord for marking;
- Wide spatula with serrated edges;
- Spatula 10-15 cm wide;
- Paint roller and related accessories;
- Rubber spatula;
- Glue container;
- Drill with a special attachment;
- Rubber coated hammer;
- Gloves and knee pads.
Other options
Even plain tiles will look very stylish in the hallway, but if you want, the design of this and other rooms can be significantly improved.
A more complex version of diagonal tile laying is done with a shift so that small inserts can be placed between the tiles. Installation begins from the center to the edges, and lastly the outer elements are adjusted.
Tiled flooring laid out using combined methods looks original, when a space is allocated for diagonal laying with inserts in the center of the room. Unlike the previous option, the corners for the inserts in the tiles are cut off in advance.
It is important! A lot of facing material will be wasted, which needs to be taken into account in advance.
As you can see, despite some difficulties, you can lay tiles yourself, transforming the room or even the entire apartment.
Preparing the base for laying tiles
First of all, after purchasing everything you need, the master needs to level the floor. Any tile will look bad if glued to an uneven, lumpy floor.
Moreover, all the elements will look disjointed. That is why, after removing the previous coating, it must be well leveled.
This case consists of 4 steps:
- Dismantling the previous covering. Not only the old tile is removed, but also everything that remains from the glue.
- Cleaning. It is necessary to sweep away all the debris with a special broom or brush, after which cleaning with a vacuum cleaner is allowed.
- Conducting an audit. Using a level, determine how uneven the base is and mark the highest and lowest points of the base. Inspect the floor for various cracks, chips, and so on.
- Elimination of defects.
Once the running surface is in good condition, some measures can be taken to improve traction. In other words, the floor is primed so that the tiles stick better. This procedure is carried out twice.
Step-by-step instruction
The diamond-shaped floor cladding is installed in 5 stages:
Preparing the base
According to the instructions of ceramic manufacturers, the subfloor must ensure the creation of an adhesive layer under the tiles with a thickness of 2-15 mm, and under the mosaic covering - up to 20 mm.
The base should be:
- Smooth. According to SP 29.13330.2011 “Floors. Updated edition of SNiP 2.03.13-88" the permissible difference is no more than 2 mm for each meter of surface. All defects, including cracks, bumps and the like must be eliminated in advance;
Checking the foundation.
- Dry. It is better to measure the percentage of residual moisture with a professional moisture meter. At the same time, the permissible level for cement-containing floors is up to 6%, anhydrite - no more than 1.5%, wood-containing floors - up to 12%;
- Durable. According to the above set of rules, the recommended strength level for civil engineering floors is at least 15 MPa;
- Clean.
From the surface you need to remove debris, dust, oil stains, bitumen, old paintwork materials, soot and anything else that may interfere with the adhesion of the tile adhesive and the base. Cleaning the base.
After checking, it is advisable to prime the subfloor with a suitable composition to strengthen, enhance adhesive properties or equalize its absorbency. If necessary, carry out waterproofing measures and be sure to check that all types of communications have outlets to the surface in accordance with the design of the room.
We wrote in detail about preparing the base for tiles here.
Marking and dry laying
The primary task is to build the correct centerlines of the room. Connect the midpoints of opposite walls to obtain a longitudinal and transverse axis. On vertical enclosing structures, mark the expected level of the finished floor, which will help to quickly correct minor defects.
Diagonal marking simple scheme
Since we are laying the tiles in a diamond shape, in addition to the basic center lines, diagonal lines connecting opposite corners will be required. If the area of the room is large, you can stretch the mooring cord along the axes or install so-called lighthouse tiles. At the same time, the manufacturers' instructions recommend laying out from the center, and in small baths and hallways (for single-color or two-color tiles) - from the far corner of the room.
Combined scheme.
Before applying the adhesive composition, it is necessary to lay the ceramic coating on a dry floor. This will allow you to double-check the accuracy of the drawing, as well as make adjustments or trimming.
Preparation of tile adhesive
The tiles can be laid on a homogeneous mortar with a low flow rate. The dry mixture must be mixed with clean water without impurities and stirred with a mixer at the speed recommended by the manufacturer. The finished mass has a short open period - up to 60 minutes, during which it must be completely worked out.
If a polymer adhesive mass is used, it must be mixed with a spatula or an activator must be added and carefully worked with a drill or screwdriver with a small mixing attachment.
How to choose tile adhesive - advice from our expert.
Laying tiles
Installation work begins from a reference point - from the center of the room or from the far corner. The adhesive solution is applied to the base to a width of 1-3 rows or small squares, after which you need to lay down the lining, lightly press it in, level it, and tap it with a mallet if necessary. Excess glue in the gaps is removed and spacer crosses or SVPs are inserted. The evenness of the floor is periodically checked using a hydraulic level.
Checking installation by level.
If the project includes panels, carpets, ornaments and friezes, then installation begins with decorative inserts.
When using large-format materials, adhesive must be applied to the floor and to the underside of the tiles. This information is always indicated in the description of the collection on the packaging or in the manufacturer's catalog.
Marking tiles for diagonal laying
A lot depends on the correct marking, but first of all, how evenly and beautifully the tiles will be laid. A paint cord is used for this.
Do not take into account the walls, as they may be uneven in terms of parallels and perpendiculars relative to each other. If you rely on them, you can get an extremely uneven drawing.
The installation itself can be done in two ways.
Laying from the corner
This method is good for relatively small rooms, when there is very little free space. But at the same time, this method has certain difficulties. For example, it is necessary to re-measure the lines each time. And the installation itself begins with half a tile.
Laying from the center
First of all, you need to decide where the central point of the room is located. To do this, you need to draw two lines connecting opposite corners. The point of their intersection will be the center. This is where the work begins.
Important: the cut slabs are laid out last.
Beginning of work
Laying any floor covering begins with preparing the base. To make the process of laying tiles easier, you should level the surfaces: walls and floor.
The floor is leveled quite simply: use self-leveling screeds for this. You will purchase a dry mixture that needs to be dissolved in water, then evenly distributed with a roller over the floor surface and left for several days. After drying, you will get a flat floor on which it is convenient to lay tiles.
Leveling the walls is much more difficult. If the unevenness is insignificant, then you can easily hide them with putty mixtures, but you will not be able to hide large distortions, so you will have to cover the walls with plasterboard sheets. Here we can highlight another disadvantage of diagonal laying, because it highlights all the unevenness of the walls.
Once you have corrected the surfaces, you can proceed to the next step - priming. Using a cheap primer, you should apply it several times; with more expensive samples, one coat is enough. At this stage it is also worth hiding small pores in the concrete, which will significantly improve the adhesion of the tiles and the surface. This can be done using tile adhesive applied to the surface in a thin layer (less than 1 mm).
The final stage of preparatory work is marking. Everyone does it in their own way, but most measure the center, make an even perimeter and approximately lay the tiles without a fastening compound, after which they make control notes and begin laying.
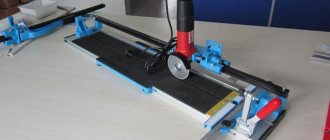
It is worth mentioning separately about cutting tiles: it can be done using several tools:
- A grinder is a rough and not very convenient tool, which can ruin the material; in addition, after cutting you will have to trim the edges with a file.
- A tile cutter is the best solution, but you should only buy it if you have extra money or are planning to lay tiles professionally.
- A glass cutter is great for cutting wall tiles, but it is not at all suitable for our case, because you will have to cut a large amount of material, which will quickly exhaust you and take a lot of time.
Photo of laying tiles on the floor diagonally
Laying tiles
Before laying tiles on the floor, treat the self-leveling floor with deep penetration soil.
When the waterproofing has completely hardened, you can begin laying the tiles.
The glue is mixed with water in the proportions specified by the manufacturer and mixed for 3-5 minutes. You need to let the mixture sit for 10 minutes and stir it again before using.
Apply glue with a regular spatula in a thick layer.
Remove excess with a notched spatula, holding it vertically or at an angle of 45 degrees. The angle must always be the same, otherwise the thickness of the glue will be different. As a result, grooves are formed that will allow the tiles to be glued in an even layer.
Laying tiles on the floor begins from the most visible place - the entrance.
The tile is glued with firm pressure to the surface: thanks to the thin layer and the same amount of mortar, the tile will lie almost evenly. To make adjustments while pressing, move the tile back and forth in a circular motion.
Check the position relative to the adjacent tile with a short level.
Check the general horizon using a long rule (1.5 m).
To create equal seams between the slabs, use tile crosses. Due to insufficient calibration of the tiles, you may have to resort to using plastic wedges - they help to more accurately adjust the seams. They are also suitable for creating a small gap against the wall.
Align the second row with the first.
The second row is ready.
- Do not wet the base or tiles.
- Do not use glue that has been standing for more than 40 minutes.
- If you “glue” both the base and the tile, adhesion will increase. In this case, it is enough for one of the elements to apply the mixture “scraping” - apply it and immediately remove it with a spatula. The remaining thin layer will enhance adhesion.
- To prevent the glue from sticking to the comb, keep it constantly in water.
Surface preparation
One of the important parts of the answer to the question of how to lay tiles diagonally on the floor lies in preparing the surface. It is desirable that it be as even as possible. If no screed was laid, the old coating should be repaired and leveled. For example, seal cracks, fill large holes and potholes.
If new tiles are laid on previously laid tiles, then read here how to prepare the surface.
The installation base must be thoroughly cleaned. To do this, sweep away all debris and carry out wet cleaning. After drying, the surface is degreased, washing away grease stains and other similar contaminants with solvents. After this, wet cleaning is carried out again and the base is dried. The final operation is double priming. Before it is carried out, loose or weak concrete bases can be treated with strengthening agents.
Initial marking
To make the pattern on the floor look neat, you need to carefully calculate how to lay the tiles on the floor diagonally. To do this, the following actions are taken:
- determine the center of the diagonal laying. To do this, in a rectangular room, it is enough to stretch two strings from corner to corner;
- create the direction of the angles, relative to which the tiles will be located diagonally on the floor. To do this, pull the threads through the center (pre-determined) of the laying area perpendicular to the corresponding walls.
- Using two directrix guides, you can easily position the tiles. Using strings stretched from corner to corner, it is easy to orient the centers of the sides of the installation element, and along lines perpendicular to the wall - the corners of the ceramics.