SHARE ON SOCIAL NETWORKS
FacebookTwitterOkGoogle+PinterestVk
A grinder is a special grinding device that has an electric drive and an abrasive-coated belt. This device is used for finishing metal, wood, and polymer surfaces. The main thing you need to pay attention to when assembling a grinder with your own hands: drawings with dimensions, stages of work, selection of suitable materials.
The grinder allows you to grind products made of wood, plastic, metal, as well as process any surfaces
What is a grinder
A homemade grinder, assembled with your own hands, is a stationary machine that has a main belt for grinding parts. With the help of two rollers (drive and guide), the tape rotates around a certain axis.
The number of revolutions depends on the power of the design, the motor (drive) used and the quality of self-assembly. On the lower contour, such accessories have several clamps, with the help of which the machine is secured to a workbench or other working surface.
Often, clamps for fastening are additionally mounted on the side contour (reliable fastening allows for optimal processing, without gross defects).
Drawings with the dimensions of a simple grinder for do-it-yourself work will allow you to optimally observe the basic principles of the design, ensuring the further operation of the machine.
Grinders from Chapai
Currently, a large number of designs of belt grinding tools are offered in the literature and on the Internet. Some of them are considered more successful, others are difficult to implement.
The designs of grinders from Chapai are recognized as one of the successful developments. Developer Andrey Chapai offers professional tools and versions for the home workshop. One of the significant advantages of these models is the wide range of machining angles. To solve this problem, the author proposed an original design of a rotary table. This design formed the basis of all grinders in the professional line. These include: GC 10, GC 12 and GC 16. They received a fairly high rating among specialists. To expand the functionality, the author equipped his products with a device for mounting a disk. A rotating frame assembled from two metal sheets 12 millimeters thick ensures high reliability of the entire tool.
In addition to professional versions, Chapai has developed mobile versions (GCh610-63 and GCh610-71). They are easy to use and demonstrate good consumer characteristics.
Possible uses of the grinder
An installation of this type, industrial or homemade, has several main areas of practical use. A well-assembled structure can be used in the following cases:
Processing of metal sheets after cutting (for example, additional processing of sheet iron before assembling a certain structure). Using a grinder belt allows you to get rid of sharp nicks, scale, and irregularities.
Sanding wooden surfaces in the manufacture of furniture (or its restoration), picture and mirror frames. All wood parts can be processed with a plane, but the quality of sanding in this case depends entirely on the skills and practical skills of the craftsman.
When using a grinding machine, a belt moving evenly along the axis produces high-quality processing, removing all roughness, nicks, and sharp knots.
Sharpening knives and scissors. Very often you have to deal with the problem of a dull kitchen knife or textile scissors. This issue is especially relevant for seamstresses who operate from home. In such cases, having a sanding machine on hand will be an obvious advantage.
Today there is a wide variety of professions and hobbies. Most of them require specialized tools, including a grinder.
You can assemble a machine of this type with your own hands, using step-by-step instructions and a series of video tutorials. Drawings with dimensions and videos on assembling a grinder with your own hands can be found on practical construction web portals.
Submersible evaporator for chiller
A plate evaporator is used for more powerful installations, usually with a cooling capacity of 10-15 kW, since with such powers a submersible (twisted) evaporator will be too bulky and will require a large container, which must be completely filled with cooled liquid, which is often the case in a production line not provided. Or the container should be inside the chiller, which, compared to a plate heat exchanger, will increase the dimensions of the chiller several times.
And in the production of industrial chillers with capacities over 150-200 kW, as a rule, shell-and-tube evaporators are used.
To a client wishing to buy an industrial chiller, the chiller manufacturer recommends one or another type of evaporator, indicating the pros and cons of its use.
The compressor-condensing unit for the production of a chiller can be taken in fact, almost any one in which the compressor corresponds to the temperature regime and the required cooling capacity (medium or low temperature). If this is a former air conditioner (or rather a split system), then you can unsolder the three-way valve and connect everything directly, if you do not need a heat pump function, as in a standard refrigeration unit - KM-KD-Receiver-TRV. And instead of an electronic board with a remote control designed for a split system, install conventional automatic motors and starters, block pressure switches, as well as a microprocessor controller with a temperature sensor.
The Internet is replete with various manuals and videos on how to make a chiller yourself; there are two main points that are often not mentioned anywhere, although their understanding is critical for high-quality assembly of the chiller.
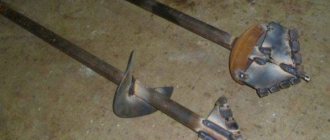
Most often, those who want to assemble a chiller themselves use a submersible - twisted evaporator, as the cheapest and simplest option that can be made independently. The question is mainly about the correct manufacture of the evaporator, regarding the power of the compressor, the choice of the diameter and length of the pipe from which the future heat exchanger will be made.
To select a pipe and its quantity, you need to use a thermal engineering calculation, which can be easily found on the Internet. For those who do not want to make an accurate thermal calculation of the evaporator, for some reason, fixed power values will be given below. For the production of chillers with a power of up to 15 kW, with a twisted evaporator, the following diameters of copper pipes are most applicable: 1/2; 5/8; 3/4. Pipes with a large diameter (from 7/8) are very difficult to bend without special machines, so they are rarely used for submersible evaporators. The most optimal in terms of ease of use and power per 1 meter of length is a 5/8 pipe. Under no circumstances should an approximate calculation of the pipe length be allowed. If the chiller evaporator is not manufactured correctly, then it will not be possible to achieve either the required superheat, the required subcooling, or the freon boiling pressure, as a result the chiller will not work efficiently or will not cool at all.
Below are data on the thermal power that one meter of pipe can transmit. The data are not reference data, they were obtained by a combination of thermal engineering calculations and an empirical method, but at the same time they have been successfully used in the calculation of submersible evaporators for many years. The power values include a margin of ~3%.
Chiller evaporator data:
— Pipe 3/8 ~ 0.14 kW/1 meter of pipe = 0.029 m2 of heat transfer surface.
— Pipe 1/2 ~ 0.19 kW/1 meter of pipe = 0.039 m2 of heat transfer surface.
— Pipe 5/8 ~ 0.25 kW/1 meter of pipe = 0.049 m2 of heat transfer surface.
— Pipe 3/4 ~ 0.29 kW/1 meter of pipe = 0.059 m2 of heat transfer surface.
— Pipe 7/8 ~ 0.33 kW/1 meter of pipe = 0.069 m2 of heat transfer surface.
In practice, we have not used pipes with a diameter of more than 7/8 in the production of industrial chillers.
Also, one more nuance, since the cooled medium is water (most often), then the boiling point when (using water) should not be lower than -9C, with a delta of no more than 10K between the boiling point of freon and the temperature of the cooled water. In this regard, the low pressure emergency relay should be set to an emergency level not lower than the pressure of the freon used, at its boiling point -9C. Otherwise, if there is an error in the controller sensor and the water temperature drops below +1C, the water will begin to freeze on the evaporator, which will reduce and, over time, reduce its heat exchange function to almost zero - the water cooler will not work correctly.
Advantages of a homemade machine
A belt grinder can be purchased at any hardware store, but a hand-assembled machine has many advantages for the owner:
- Minimum costs for labor and materials.
- The ability to independently prepare a drawing (or use a ready-made project) with the proper dimensions, type of design and principle of operation.
- Most consumables are available in every craftsman's household; you just have to search in your own barn, pantry, or garage.
- The missing elements and accessories can be purchased at a construction supply store (fastening clips, guide and drive rollers, sanding belt). You can also make rollers for the grinder yourself.
- A large collection of videos on assembling a grinder with your own hands from scrap materials.
Masters are always presented with web portals with a large number of step-by-step instructions on how to make a grinder with your own hands, diagrams and ready-made drawings, and practical advice.
Why don't they cut
Before you start sharpening, you need to identify the reason why the scissors stopped cutting. There is a situation when the blades are still quite sharp, and it is almost impossible to process fabric or paper with them. The reasons may be:
- Loosening the fastening bolt. In this case, it is enough to tighten it a little tighter. It should be taken into account that tight blades will complicate operation - your hand will get tired. It is better to tighten the instrument when it is fully opened.
- A gap appeared between the ends. When you try to cut thin fabric, it will only become pinched. To eliminate the gap, you need to adjust the stop heel near the hole with the bolt. You cannot bend the blades to better fit each other - the tool will no longer work, as it will deteriorate. The gap between the blades should be less than a tenth of a millimeter.
- The blades have become dull. Only sharpening the scissors will allow them to be used further.
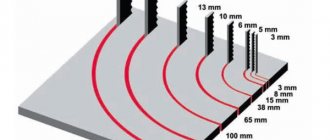
To properly sharpen scissors, it is necessary to determine the factory straightening angle. This will help to carry out work more efficiently and increase the service life of the tool. It is known that the size of the corners is made depending on the functions of the device.
The sharpening angle of scissors is determined by the following rules:
- For cutting soft materials - paper, fabric, it is usually maintained at 60 degrees.
- If you need to cut something harder - 70-75 degrees.
If the blade is tight, cutting the material will also be difficult. This problem can be easily corrected by dripping a little machine oil onto the area where the parts are held together.
What can a machine be assembled from?
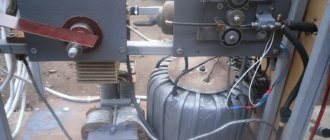
The most important question for a master is where to start working. Of course, from the choice of material. The main material for the drive can be:
- The engine is from an old washing machine.
- Motor from a drill.
- The engine is from a grinder. A do-it-yourself grinder made from a grinder is a practical and convenient option.
You should not rush and scrap old tools. Most of them (with a “live” engine) can be useful on the farm. Before starting work, you should carefully inspect the engine, freed from the housing and other parts, for integrity, quality of its operation, and power.
Note!
Do-it-yourself compressor: selection of materials and tools for assembly at home + step-by-step instructions for making and assembling yourself- Homemade products for the garage with your own hands: options for products for arranging a garage, detailed diagrams and drawings for creating with your own hands
- Do-it-yourself press - design features, choice of manufacturing materials. Step-by-step instructions for making it yourself + simple diagrams and drawings
The presence of cracks, defects and malfunctions is a direct contraindication to using the motor. In this case, you should look for another engine or buy a small unit in a store.
Description of industrial chiller
Chiller (water-cooling machine) is a device for cooling liquid through a vapor-compression or absorption refrigeration cycle. After the temperature has decreased, the liquid is used to cool the air in the heat exchanger (fan coil) or to remove heat from equipment.
Operating principle of an industrial chiller
The device is used in various industries. A cooling unit in a connected system with a fan coil is used in some models of air conditioners.
Operating principle of an industrial refrigeration plant
In production, special absorption chillers are used as a rapid heat removal unit. It is necessary to ensure the operation of various industrial equipment that generates heat. The chiller selects and removes excess heat and maintains the optimal temperature and thermal conditions of the equipment. Lithium bromide in water is used in industrial installations as a liquid that absorbs gas in full.
During the cooling process of water, excess heat is released, which is released into the environment.
The industrial installation consists of two blocks:
- top - generating hot container with relatively high pressure;
- lower - includes an evaporation tank and a section with an absorbent.
Nature of operation of the installation:
- The heat from the generator affects the absorbent, which releases water vapor.
- The steam is transferred to the condenser and turns into a liquid state, giving off heat to a special reservoir of water.
- Having lost heat, water from the condenser is supplied to the evaporator.
- Here the water evaporates under pressure, absorbing heat from the refrigerated circuit (chiller).
- By pumping boiling water through a pumping unit, heat transfer is enhanced.
- At this time, the remaining absorbent concentrate is transferred to the absorber, where gas is absorbed from the evaporator and heat is released.
- The exhaust circuit removes heat from the absorbent container outside the installation.
- After the heat is removed, the resulting water and absorbent are again transferred to the generator.
Advantages of chillers over compression refrigerators:
- small amount of energy consumed;
- low noise emission during operation;
- environmental friendliness, because the working substance is plain water, not freon;
- absorb the released energy;
- long period of effective operation;
- industrial safety;
- ease of control.
Flaws:
- price;
- the need for a source of hot energy;
- heavy weight;
- high water consumption of the system.
Chiller for beer production
Water cooling machines are actively used in beer production. It is used to cool the wort. When receiving malt liquor, you need to quickly reduce the temperature. The quality of the drink depends on this. This broth contains beneficial and harmful bacteria. Beneficial elements are preserved at temperatures above 60°C, and all harmful bacteria die. But with slow cooling after 60°C, the likelihood of the appearance of harmful microorganisms increases. Therefore, it is necessary to reduce the temperature quickly.
The importance of the speed of the production process is also reflected in the fact that the fermentation process and the addition of yeast can only be carried out at a favorable temperature of about 20°C.
When the broth cools slowly, a large number of bacteria are formed. Yeast, when added, will not be able to absorb excess microorganisms. The drink will be spoiled. Slow cooling also impairs the commercial quality of the product.
Step-by-step assembly of the structure
Assembling a grinding machine is a full-fledged construction work that requires the master to concentrate his attention, prepare a drawing, process parts and certain experience.
To work, you should prepare a workplace:
- A tabletop with sufficient area for processing parts, assembling the structure and checking the operation of the finished device.
- Light source (a combination of natural and artificial lighting will be optimal).
- Protective equipment for eyes and mucous membranes (metal shavings, dust, anti-corrosion compounds have a direct irritant effect, which requires additional protection of the face and hands).
A ready-made workplace is the key to successful work for a master.
Grinders from Rustam
The most common model is GR-1. They are equipped with two types of motors: single-phase or three-phase. The grinder from Rustam has a 1.1 kW motor. This power is quite enough to provide the necessary characteristics. The developed design uses rollers that are coated with a layer of propylene. This significantly reduces noise levels and reduces heat during rotation.
The original design of the rotary table allows processing of parts of various geometric shapes.
Preparing a drawing for the machine
The next step is to prepare a drawing of the grinder yourself. If desired, the master can find ready-made plan projects, which are currently freely available. The following parameters are displayed on independent diagrams:
- Dimensions and appearance of the entire structure in two projections.
- Dimensions and type of parts (rollers, frame on which the sanding belt is located, drive bed, location of fasteners).
Note!
- Do-it-yourself winch: classification, manufacturing materials, description of work stages + instructions for DIY construction
Do-it-yourself clamp - step-by-step production and description of options for using a clamp
- DIY knife | A step-by-step description of how and from what materials to make a homemade knife
It is possible to draw up a high-quality drawing if you have certain artistic skills; otherwise, it is better to use a ready-made image.
How to choose a ribbon
There are a lot of grinder models, but the most popular option is the band grinder. When choosing a sanding belt, you should focus on a number of criteria:
- The purpose of the grinding machine (processing wooden surfaces is very different from processing metal parts, artificial or natural stone).
- Required belt stiffness.
Carefully choose not only the type of sanding belt, but also its width. Videos, drawings, tips on choosing a belt and assembling a grinder with your own hands will help you optimally carry out your independent work.
Advantages and disadvantages
The advantages of grinding machines include:
- Quality and speed of processing.
- High performance.
- The ability to obtain the surface of the desired roughness.
- The ability to process not only the wood itself, but also pre-grind the finishing layer.
The disadvantages are:
- Release of a large amount of dust, requiring the organization of a dust removal system.
- Large quantities of consumables (abrasive) of several sizes.
- Difficult to manufacture and maintain (this especially applies to belt installations).
Considering the existing shortcomings, before starting assembly, you need to decide how necessary the machine is. If it will be used only occasionally, it is not practical to spend time on manufacturing - you can get by with hand tools.
Assembly of the finished structure
Further operation of the structure depends entirely on the quality of the assembly of the machine (mini-grinder) with your own hands. In his work, the master must take into account absolutely all the details, the smallest details and subtleties of assembly. Instructions on how to make a grinder with your own hands at home:
The first to install is the frame on which the belt for sanding parts and surfaces will be located. Most often, this is a metal plate that can withstand significant loads (vibration, mechanical stability).
Note!
- DIY vices: simple and reliable homemade vices from A to Z (190 photos)
- Do-it-yourself vibrating table - selection of materials, components and assemblies for a vibrating table with a step-by-step manufacturing description
- Do-it-yourself grain crusher - operating principle, types and features of creating a device for processing grain crops
Two rollers are attached to the side surface of the frame: a guide roller and a drive roller. One of them should be significantly larger in diameter, which makes the rotation of the belt more efficient.
Along the side contour of the frame, it is necessary to make a bed for the drive: this is a small platform that reliably holds the motor while the sanding belt moves. Most often, the platform is made of metal, complemented by sides and internal rubber gaskets, which reduce the degree of vibration.
Connect the drive to the drive roller, check the speed and quality of rotation of both rollers (if there are gross defects, they can be eliminated at this stage).
A small platform is mounted on the front surface of the grinder, which helps to hold the workpiece. Also, do not forget about additional clamps.
Working with sanding most materials involves the risk of damaging the eyes and skin of the hands, so be sure to install a protective screen (most often made of acrylic). The master will be helped by ready-made drawings with the dimensions of the grinder for doing it yourself.
Sharpening methods
Before sharpening scissors, you need to understand the features of their use. The methods used for knives are not suitable in this case. This is due to the use of the edge cutting method, which requires sharpening angles of 300 or more.
Smaller edge angles are bad because the blade becomes dull faster and the cutting process is simplified. An important feature of the tool is the need to maintain the factory angle, since the design is adjusted to it.
You can sharpen the blades of the tool using the following methods:
- On a special machine. High quality processing, productivity.
- On the grindstone. The method is painstaking and difficult to implement due to the low accuracy of the sharpening angle.
- Sharpening stone. Simplicity and accessibility of the method. Turning is only possible on a perfectly flat surface, angle control is difficult, and grinding speed is low.
To quickly sharpen scissors, you can use the following tools and methods:
- foil;
- bottle;
- with a pin;
- by sharpening with a needle.
Sharpening scissors on a machine
How to position the machine correctly
After a final check of the operation of the grinding machine, it should be optimally placed in a workshop or garage. In this case, you should pay attention to a number of parameters:
- Convenient working area near the machine. The processed part needs to be placed somewhere.
- Distance to the outlet and length of the network cable.
- Convenient tabletop height for long-term work of the master.
- Possibility of protecting children from the working structure (height, protective casing and screen).
- Availability of light sources and their location (above the grinder or on the side of the structure).
When choosing an installation location, they also focus on fire safety requirements. There should be no flammable liquids or surfaces near the installation.