Sharpening a hacksaw
Like any other tool, a hacksaw will work well if it is sharp.
With frequent use, the question of sharpening a hacksaw for wood very soon arises. A hand saw for wood becomes less sharp over time; the teeth wear down, becoming rounder on the sides and in front of the edge. Therefore, it becomes more difficult to operate the saw. To restore the previous sharpness of the teeth, it is worth sharpening them. Please note that before and after sharpening, the teeth must have their original height and angle pitch.
It is also worth considering the fact that not every hacksaw can be sharpened. For example, a tool that has small teeth should not be sharpened. In addition, hardened steel teeth cannot be sharpened. A large wood hacksaw lends itself best to sharpening.
Before you start sharpening, you should separate the teeth. To ensure free movement along the workpiece, as well as to avoid pinching the tool, the teeth must be moved apart smoothly as they deepen.
The alignment of the teeth must be bent in different directions to a specific distance. After this, the width of the cut will increase and will have a larger width compared to the thickness of the teeth. There are gaps on the sides. Upon completion of the layout, the hacksaw will easily move back and forth, and the blade will not touch the surface of the cut, as a result of which the master will freely remove the wood with each layer.
When setting, it is worth considering the fact that as the width of the teeth increases, the cut will widen. Therefore, you will avoid the hacksaw getting jammed. However, this does not mean at all that if the teeth are set excessively (increasing the width), a wide cut will be obtained; on the contrary, the teeth will tear the wood and the work will become harder. The optimal width of the teeth is one and a half to two times greater than the thickness of the hacksaw blade. For this reason, to cut raw wood, the teeth should be set aside by 0.5 - 1 mm, and dry wood - less than 0.5 mm.
A special tool called a setting tool will help you bend the teeth. This is a small metal or wooden plate with a small slot, the width of which is greater than the thickness of the hacksaw. Often the wiring is equipped with an adjusting screw, with which you can achieve an even bending pitch of the teeth.
Wiring procedure:
- clamp the saw in a vise so that only one teeth peeks out
- fix the vice on a convenient flat surface, for example, on a table
- bend the teeth using an adjustable device in the opposite direction
- do not bend the teeth completely, otherwise they will break
- at the end of the setting, you need to check that the teeth are at the same distance and do not look out.
Sharpening a tool can be called a real art, for this reason it is worth following certain rules:
- securely fix the hacksaw. The blade must be secured in a vice or other wooden device that is installed in a well-lit place and on a stable surface. High-quality sharpening will not work on your knees, chair or brick.
- use high quality tools. Don't save money by buying cheap tools. You should definitely buy a quality file
- For long service life of a hacksaw, it must be cleaned with a wire brush and rubbed with charcoal. This is necessary so that the hacksaw does not clog or become dull.
- The handle of the hacksaw should be held in the right hand, and the end should be supported with the left, pointing the file at the teeth. It is necessary to press the teeth smoothly, pointing the file in one direction. When returning the file, try not to touch the teeth.
- you need to try to remove the metal from the edge of the teeth evenly. For convenience, you can count the number of movements; for each tooth it should be the same
- A file that has a velvet notch will help you get rid of burrs from your teeth. The notches on the side edges of the hacksaw must be removed using a whetstone.
At the end of sharpening, you should definitely check the quality of sharpening and the sharpness of the teeth. A well-sharpened edge does not shine.
Sharpening process
To sharpen the saw, you need to firmly fix it so that when a file is applied to it, it does not vibrate. Otherwise, the quality of work will be low.
The hacksaw blade is fixed vertically, often in a vice, or in homemade clamps, but if there is neither one nor the other, then you can do without them.
The method of fixation without special devices is “on the edge of the workbench.” The hacksaw blade is laid so that only the saw teeth hang from the edge of the table. However, the handles of the saw are always thicker than the blade, and therefore the place next to it cannot be placed tightly to the workbench. Therefore, you need to use the corner of the table, and then the saw handle will not interfere.
Fixing the saw
If you have a clamp, you can fix it like this.
And this is a method without a clamp; fixation is done only with the hand of the sharpener. It is quite convenient and safe.
Fixing the saw without a clamp
1 Take a file or needle file in your right hand, and, pressing the hacksaw blade with your left hand, begin sharpening.
2 Sharpen the saw teeth one at a time. The movements of the file with this method are from top to bottom. The file is applied to the tooth being sharpened and moved downwards with force.
3 The file must be held tilted in two planes. In horizontal mode it is about 30 degrees. In vertical – about 60 degrees. The angles of inclination are individual for each saw, because they can differ both in the shape of the tooth and in its size.
4 Sharpening the left edge of the tooth.
Sharpening the left edge of the tooth
5 Sharpening the right edge of the tooth.
Sharpening the right edge of the tooth
6 This is what should happen: to the right of the file pointer are machined teeth, to the left are not.
To the right of the file pointer are machined teeth, to the left are not
Tool used
Triangular file
Since saws differ in shape and purpose, their teeth are also different. And to sharpen a hacksaw efficiently, you need different tools.
Triangular file with one working side. The profile of this tool is not standard; if a regular triangular file has all sides equal and are working, then this file has one working side and is shaped like an isosceles triangle with a very large base.
This triangular file with one working side is convenient for processing small or oblique teeth. When working, it acts only on the surface being treated; on others it only glides. There is no risk of grinding down the adjacent tooth.
Regular triangular file. A compact tool that is convenient for sharpening most standard wood hacksaws.
Regular triangular file
Triangular file. Ideal for sharpening saws with large teeth.
Triangular file
How to set a saw and what it is
Sharpening a hacksaw is not a complicated procedure that begins with a process called setting the teeth. This procedure is carried out with one simple goal - to provide free movement of the blade when working with the tool. The lack of routing leads to the fact that the tool will get stuck in the thickness of the workpiece being cut, which will cause inconvenience in work.
Setting the teeth of a hacksaw is a procedure that involves straightening the teeth in different directions. The main thing is that each tooth is bent the same amount as the previous one. The greater the deviation of the tooth from the plane of the blade, the greater the width of the cut. The greater the width of the cut, the higher the process of removing chips from the cut, which means the faster the useful work is done.
The possibility of jamming of the blade depends on the width of the teeth. The greater the width of the routing, the less likely it is that the blade will jam inside the workpiece being cut. Not many people know what the tooth spread should be. However, this parameter must be taken into account, since the quality of the tool’s work depends on it. The size of the tooth set primarily depends on the thickness of the steel blade. This parameter is usually from 0.5 to 2 mm. It all also depends on the type of wood (dry or wet) with which you plan to work:
- For raw wood, the deflection value should be in the range from 0.5 to 1 mm. The thicker the canvas, the greater the bend should be
- For dry wood, the deflection value is from 0.3 to 0.5 mm
To determine the size of the wiring, a special device is used - a template, which you can make yourself from a piece of timber. A photo of such a device is shown below.
Number 1 shows the template, 2 is the tooth set value, and 3 is the hacksaw blade.
When you know the amount by which you need to set the teeth, you can get down to business. To implement the action, special devices are used. It is not necessary to use these devices, as a regular screwdriver with a wide blade will do. The disadvantage of a special device for setting the teeth of a hacksaw is that the price of such a device in the form of pliers is quite high.
Instead of special pliers, you can use adjustable plates. This tool is designed with manual adjustment and stop. The straightening process begins with the fact that the blade needs to be fixed in the jaws of the vice, and then get down to business. First you need to go along one side, and then repeat the procedure on the other. Moreover, you need to bend the teeth not at the cutter itself (the base or sharp part), but from the middle.
This is interesting!
As soon as the teeth are straightened to the same distance, you will also need to carry out the procedure for leveling the height of the cutting parts. To identify which teeth have a greater height in relation to others, you should press the blade with the cutting part to a sheet of paper. An imprint will be displayed on a piece of paper, from which it is not difficult to identify which teeth need to be shortened. To shorten them, you can use a flat file.
Divorce Devices
For divorce, there are special divorce devices that are distinguished by great variety and functionality. Today, many experts appreciate the KEDR saw setting device for its reliability, simplicity and ease of use, as well as its low price.
It is a manual machine that provides a layout accuracy of 5 microns. The machine is equipped with special support stands to facilitate its use. The presence of a dial indicator on the machine maximizes the accuracy of the layout.
The carefully thought-out design of the KEDR adjusting device ensures productive and efficient use of the entire resource of the saw specified by the manufacturer. It can be easily adjusted to the required setting parameters to ensure the optimal cutting width. As a result, you can get by with less engine power, since the friction forces during sawing are reduced.
This setting machine easily and simply provides setting with minimum sawing resistance.
Each type of wood has a characteristic hardness. Depending on this characteristic, the pitch of the saw teeth should vary. For hard breeds the step should be smaller.
Despite the obvious advantages of this machine over other devices of similar purposes, it has an affordable price, which also contributes to its increasing recognition throughout Russia.
The machine for setting up band saws “KEDR” has the following technical characteristics:
- overall dimensions – 28.5x12.1x36 cm;
- Width of cutting saws – up to 5 cm;
- the pitch of the saw blades is 2.2 cm;
- weighing 5.2 kg.
Let us also remind you about simpler devices for setting up hacksaw saws. Their use for band saws is associated with low accuracy and high labor intensity. Their use is justified only in the absence of special devices.
Wiring
Sharpening a hacksaw for wood with your own hands
If the instructions for the blade do not indicate the exact parameters, the layout is done according to the general rules: The width of the cutting edge overhang should be 1.5 - 2 times the thickness of the blade. Wider routing is done for wet wood, or in the case of cutting along the grain. If, when processing such wood, the width of the teeth is small, the blade will jam in the cut.
On the contrary, with a wide spread, it will be inconvenient to process normal wood across the grain. The cut will be uneven and you will have to put more effort into cutting the saw.
There are convenient tools for setting teeth, with which you can straighten a long blade in a few minutes. However, such pliers are expensive.
Most DIYers use traditional adjustable plates the old fashioned way, with manual adjustment and stop.
The blade is clamped in a vice, or pressed against a workbench using a long block and clamps. The teeth are aligned one after another, first one side, then the other.
Then you need to level the height of the cutting edges. To do this, place a sheet of paper on a soft, flat board, and vertically press the blade against it (with the cutting part). The imprint will show which teeth have different heights.
Sharpening a hacksaw on wood with your own hands video from the master handyMEN
It is advisable to adjust the size to one level, otherwise you will have to put more effort when cutting. Of course, if one or two teeth are ground down more, it is unreasonable to align the rest to this height. If most of the incisors are discordant, it is necessary to equalize their sizes as much as possible.
After leveling, you can start sharpening the hacksaw on wood. The easiest to maintain is a hacksaw with a large tooth. For sharpening, you can use a finely cut file and a regular vice.
Why and when to sharpen
The tool in question is subjected to various loads during operation, which leads to dulling of the teeth. If you cut with a saw that has dull teeth, the result will be much less effective compared to a sharp one. In addition, using a saw with dull teeth is not recommended for the following reasons:
Needs sharpening
- Reduced tool performance. Not only the master’s strength will be wasted, but also his time.
- Reduced accuracy of work. It is impossible to cut wood materials smoothly with a hacksaw with blunt teeth, much less do it accurately.
- Danger of using the tool. During the work, the saw will get stuck, jam, and move off the cutting line, so such work can be dangerous for the master.
A sharp hacksaw is not only easier to work with, but also much safer.
To determine that the time has come to sharpen the wood hacksaw blade, you should pay attention to the following factors:
- The canvas makes a characteristic dull sound. If a master often uses a hacksaw, then it will not be difficult for him to identify such a sound.
- The tips of the teeth are rounded.
- The file, when trying to cut wood, refuses to perform its task.
These factors indicate that it’s time to sharpen your wood hacksaw yourself. But before you take up the file, you should determine whether these links can be sharpened.
How to Move a Saw Through Wood
How to sharpen a hacksaw for wood correctly
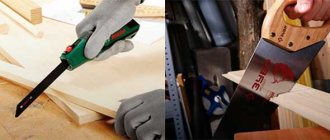
Despite the abundance of power tools for woodworking, hand hacksaws are still popular among home craftsmen. The advantages are obvious - low price, small dimensions and instant readiness for work (especially if there is no source of electricity).
Any cutting and sawing tool must be sharp; not only work efficiency, but also safety depends on this. If you exert enormous force when working with blunt equipment, you can lose control and cause injury to yourself. In addition, the quality of the cut made with a sharp hacksaw will be higher.
To understand how to properly sharpen a hacksaw for wood, let’s look at the structure of a popular tool:
It would seem that nothing could be simpler - an iron strip with cut teeth. But any design is developed individually; the shape and placement of the cutting parts depend on the type of wood.
If you do not follow this rule, the tool will jam in the cut as it goes deeper into the material. This means, at a minimum, you need to separate the teeth of the hacksaw. The cutting edge also has features - and this directly depends on the hardness of the wood and the cutting method.
Classification of hacksaws
- Canvas length. The comfort of work depends on this value (you make the least amount of reciprocating movements), and the teeth on a long hacksaw do not clog as actively. A generally accepted rule is that a hacksaw blade for wood should be twice as long as the size of the workpiece.
Turning process step by step
When manually sharpening with a file, it is easier to control the material removal and set the correct edge angles. The blade must be clamped in a miter box or vice, ensuring that the teeth protrude above the jaws by about 30–35 mm. Setting is done before sharpening for three reasons:
- so that the cutting edges are not subsequently damaged;
- so that a slightly stronger spread is ensured in advance, which is compensated by removing a certain amount of metal from the teeth;
- so that the direction of the cutting edges and the teeth set are uniform.
The most important rule for sharpening wood hacksaws is: the tooth must have a flat side on the side in which it was set. Thus, the cutting edges of adjacent set teeth are directed towards each other, that is, inside the channel formed by the set.
After clamping the blade, it is necessary to clarify the sharpening angle of the cutting edges. Ideally, it should be determined by the hardness of the wood being processed, but since a hacksaw is used for sawing various types of wood, a universal value of 60–75° from the plane of the tooth is set for all types of profiles. There is a certain difficulty in determining the sharpening angle relative to the plane of the blade in order to confidently control the position of the tool. This can be done using a flat metal plate, choosing the least worn tooth as a standard; usually this can be found closer to the handle.
When sharpening, you need to process those teeth that have their edges facing you. Maintaining the correct angle between the edge of the file and the blade, and also slightly tilting the file towards the edges, you need to remove 2-3 material from the cutting edges, applying pressure while moving away from you. After each pass, you need to ensure that the metal is removed over the entire surface of the edge, adjusting the position of the file if necessary. To ensure uniform sharpening, the number of file movements on each tooth must be the same. A good result of sharpening is considered to be uniform lightening of the blade descent over the entire area.
Sharpening a blade on an abrasive wheel is more difficult due to the fact that the blade does not have a stop. However, with proper skill, you can achieve accurate removal of metal from both sides of each tooth. As with hand sharpening, the movement of the cutting tool should be directed towards the flat part of the tooth, thus the entire blade is sharpened twice with a revolution.
How to determine when a hacksaw needs sharpening?
People with extensive experience simply determine this moment by the sound made by the equipment during operation, also by the change in the color of the teeth. Newcomers need to pay attention to the following signs:
- working with a hacksaw becomes difficult and requires enormous physical effort;
- it becomes very difficult to make a perpendicular cut of wood;
- it becomes difficult to hold the blade along the mowing line during operation, it begins to deviate in different directions;
- The hacksaw blade often jams.
Wiring
Before restoring the sharpness of the saw, it is necessary to adjust the teeth, in other words, move them apart. Setting is the installation of cutting teeth at a certain angle relative to the blade and each other. If you look at the set saw, you can see that they, alternating, deviate to the right and to the left from the blade itself. This configuration gives the hacksaw freedom in the deepest cuts. It doesn’t get stuck because it doesn’t touch the walls with its entire plane.
To set the correct angle for each tooth “by eye”, you need a lot of experience, which not every carpenter has. It comes after many 10s of sharpened saws. For the least experienced carpenters, there is a tool called a setting tool. A simpler version is a flat iron plate with a slot. A hacksaw is inserted into this gap with the smallest gap, into the tension.
The wiring process looks like this:
- Secure the hacksaw in a vice like this. It is necessary to ensure that the teeth protrude 2 cm above the jaws.
- The teeth are clamped in the groove and then bent in the middle.
- First you need to bend all the even teeth in one direction, then bend the odd ones in the opposite direction.
- At the end, you can spread the jaws of the vice according to the calculated width of the spread and try to pass the saw between them.
- An excessively bent tooth will hit the vice. Use pliers to bend it a little further.
Sharpening a hacksaw for wood with your own hands
If the instructions for the blade do not indicate the exact parameters, the layout is done according to the general rules: The width of the cutting edge overhang should be 1.5 - 2 times the thickness of the blade. Wider routing is done for wet wood, or in the case of cutting along the grain. If, when processing such wood, the width of the teeth is small, the blade will jam in the cut.
On the contrary, with a wide spread, it will be inconvenient to process normal wood across the grain. The cut will be uneven and you will have to put more effort into cutting the saw.
There are convenient tools for setting teeth, with which you can straighten a long blade in a few minutes. However, such pliers are expensive.
Most DIYers use traditional adjustable plates the old fashioned way, with manual adjustment and stop.
The blade is clamped in a vice, or pressed against a workbench using a long block and clamps. The teeth are aligned one after another, first one side, then the other.
Then you need to level the height of the cutting edges. To do this, place a sheet of paper on a soft, flat board, and vertically press the blade against it (with the cutting part). The imprint will show which teeth have different heights.
Sharpening a hacksaw on wood with your own hands video from the master handyMEN
It is advisable to adjust the size to one level, otherwise you will have to put more effort when cutting. Of course, if one or two teeth are ground down more, it is unreasonable to align the rest to this height. If most of the incisors are discordant, it is necessary to equalize their sizes as much as possible.
After leveling, you can start sharpening the hacksaw on wood. The easiest to maintain is a hacksaw with a large tooth. For sharpening, you can use a finely cut file and a regular vice.
Why and when to sharpen
The tool in question is subjected to various loads during operation, which leads to dulling of the teeth. If you cut with a saw that has dull teeth, the result will be much less effective compared to a sharp one. In addition, using a saw with dull teeth is not recommended for the following reasons:
Needs sharpening
- Reduced tool performance. Not only the master’s strength will be wasted, but also his time.
- Reduced accuracy of work. It is impossible to cut wood materials smoothly with a hacksaw with blunt teeth, much less do it accurately.
- Danger of using the tool. During the work, the saw will get stuck, jam, and move off the cutting line, so such work can be dangerous for the master.
A sharp hacksaw is not only easier to work with, but also much safer.
To determine that the time has come to sharpen the wood hacksaw blade, you should pay attention to the following factors:
- The canvas makes a characteristic dull sound. If a master often uses a hacksaw, then it will not be difficult for him to identify such a sound.
- The tips of the teeth are rounded.
- The file, when trying to cut wood, refuses to perform its task.
These factors indicate that it’s time to sharpen your wood hacksaw yourself. But before you take up the file, you should determine whether these links can be sharpened.
How to Properly Move a Saw Along Wood
How to properly cut wood with a hacksaw
Despite the variety of power tools available for woodworking, hand saws are still popular among DIYers. The advantages are obvious: low cost, compactness and availability (especially if there is no power source).
Any tool for cutting and sawing must be sharp, because this depends not only on the efficiency of the work, but also on safety. Working too hard with a blunt tool can cause you to lose control and injure yourself. In addition, the quality of the cut made with a sharp hacksaw will be higher.
To understand how to properly sharpen a hacksaw on wood, we will disassemble the structure of a popular tool:
It would seem that it is simpler. steel strip with cut teeth. However, each design is developed individually; the shape and location of the cutting elements depend on the type of wood.
If you do not follow this rule. the tool will wedge into the cut as you go deeper into the material. Therefore, at the very least, it is necessary to spread the teeth on a hacksaw. The cutting edge also has features. and this directly depends on the hardness of the wood and the sawing method.
Sharpen a hacksaw on wood with your own hands
If the instructions for the canvas do not indicate exact parameters, wiring is carried out in accordance with the general rules: The radius of the cutting edge should be 1.5-2 times the width of the blade. Wider wiring is performed for damp wood or in case of sawing along the grain. If the width of the teeth is small when processing such wood, the blade will get stuck in the cut.
Conversely, with wide wiring it will be inconvenient to process normal wood along the grain. The cut will be uneven and you will have to put more force into the saw.
There are handy tooth connection devices that can help you straighten a long blade in a few minutes. However, such pliers are expensive.
Three ways to separate the teeth of a hacksaw with your own hands
How to properly dilute
and sharpen a hacksaw with a file with your own hands Playlists: Fishing.
Most DIYers do the old fashioned way of using traditional folding plates with manual adjustments and accents.
The fabric is clamped in a vise or pressed against a bench using a long rod and clamps. The teeth are aligned through one side, the first side, then the other.
Then you need to level the height of the cutting edges. To do this, a sheet of paper is placed on a soft flat board, and the blade (with the cutting part) is pressed vertically against it. The printout will show which teeth have different heights.
Do-it-yourself hacksaw cutting on wood video from the master
It is advisable to adjust the size to one level, otherwise you will have to put more effort when cutting. Of course, if one or two teeth are more severely worn, it is unreasonable to align the others at this height. If most of the incisors are in disagreement, you should equalize their sizes as much as possible.
Once level, you can start sharpening the hacksaw on the wood. A hacksaw with a large tooth is the easiest to maintain. For sharpening you have a small notch and regular teak.
How to sharpen a hacksaw using a file
The tool is held relative to the tooth at an angle of 60°.75°. At first, even the incisors go through so as not to change the position of the hand. The blade is then rotated 180° and the procedure is repeated for odd teeth. Since ancient times, large saws for collecting firewood have been sharpened this way. Real craftsmen did it “by eye” with high quality.
This way you can sharpen the saw. But carpentry and carpentry tools require more precision. Not everyone can afford to buy a machine for sharpening hacksaws. If you have some compact sandpaper, you can make a homemade bed that will work just as well as a factory one.
You can sharpen a hacksaw using a Bulgarian. The power tool is fixed at a certain angle to the workbench. The hacksaw is moved manually along the guides so that each tooth is fed to the sanding disc in the same plane. The depth of the sharpener is set.
The principle is the same as for manual sharpening. Even the teeth go through first, then the canvas is unrolled and an odd number is processed.
[note] Attention! If you need to align the height of the incisors. The Bulgarian tool will do this quickly and accurately. [/ The note]
These machines are useful when you regularly sharpen tools, do large construction, or repair woodwork. If the question “how to sharpen a saw” happens once or twice a year. use a simpler device. For sale, there are various manuals for the file or nap file to hold it at a certain angle.
The device is especially useful for sharpening compact blades, when an error of a couple of degrees leads to damage to the tool. If you want to save even more. you can make the manual yourself.
The general principle is shown in the figure.
The fabric is fixed at a certain angle
, for a file or a nadfile, the limiter is installed parallel to the workplace, and in turn, 2-3 passes are taken for each tooth. Then rotate the canvas (without changing the angle of the guide) and go through the second side. The advantage of such devices is that they can be used for setting and sharpening teeth.
Again, such devices are suitable for simple hacksaws, with traditional cutters.
How to sharpen a hacksaw
When working with wood in various ways, a tool such as a hacksaw is actively used. Over time, the cutting surface of the tool wears out, and the process of sawing wood becomes more and more difficult. Wear of the working edge is as follows:
- the pointed tops of the teeth are rounded;
- their side cutting edges become dull.
As a result, the tool loses functionality and needs to be sharpened.
How to determine when a hacksaw needs sharpening?
People with extensive experience can easily determine this moment by the sound made by the tool during operation, as well as by the change in color of the teeth. Beginners need to pay attention to the following signs:
- working with a hacksaw becomes difficult and requires great physical effort;
- it becomes very difficult to make perpendicular cuts in wood;
- it becomes difficult to hold the canvas along the line during operation, it begins to deviate in different directions;
- The hacksaw blade often jams.
Teeth setting
The setting of the saw is the deviation of the tops of the teeth from the plane of the blade. The teeth, one after another, are deflected in different directions: odd teeth in one direction, even teeth in the other.
You need to know that the quality of the wiring has a strong influence on the sawing process. Therefore, all teeth must be bent in different directions alternately by the same amount, otherwise:
- if some teeth are deflected at a greater angle than the rest, they will interfere with the movement of the tool and wear out faster;
- if the deviation is less than necessary, then the width of the cut will not allow the blade to move freely.
To set the saw teeth, a special tool is used - a setter. The simplest wiring looks like a small metal plate with a handle. It has a slot, the width of which is slightly greater than the thickness of the hacksaw blade. The teeth are set as follows:
- the saw is clamped in a vice so that the jaws of the vice end at the base of the teeth;
- then the teeth are alternately placed in the setting slot and, bending in the middle part, are moved to the side at a given angle;
- Periodically, the quality of the wiring is checked visually or using a caliper;
- To check the quality of the setting, the jaws of the vice are moved apart to the width of the setting and the saw is pulled between them (in this case, excessive bending of any tooth will not allow the blade to move freely between the jaws).
Checking the height of the hacksaw teeth
Therefore, before sharpening the hacksaw, you need to check the height of the cutting elements. This is done as follows:
- Place a sheet of paper on a flat and smooth surface and press the saw tightly against it;
- the profile is clearly imprinted on the paper, and the teeth become clearly visible;
- if higher teeth are found than the rest, then the saw is clamped in a vice and they are shortened to the desired height using a flat file.
Sharpening a hacksaw
For sharpening you will need the following tool:
- vice;
- hammer;
- calipers;
- pliers;
- emery block;
- sandpaper.
You should also have the following types of files in your arsenal:
- flat and diamond-shaped with a medium-sized notch;
- triangular file;
- triangular with velvet notch;
- needle files with notches of different calibers.
For sharpening, a special device is used that allows you to fix the blade at angles of 45 and 90 degrees. If you need to sharpen a cross saw, proceed as follows:
- the canvas is fixed at an angle of 45 degrees;
- sharpening is carried out with a triangular file with an apex angle of 60 degrees;
- the file is directed onto the hacksaw tooth at an angle of 60 to 75 degrees;
- first, with several movements of the file away from you, the left edges of the odd teeth are processed;
- After this, the hacksaw is turned over and the left edges of the even teeth are processed.
When sharpening a longitudinal hacksaw, proceed as follows:
- the canvas is fixed vertically;
- for sharpening, a rhombic file with a fine notch is used (needles can be used);
- during sharpening, the file is directed strictly parallel to the table;
- otherwise the process is similar to the previous one.
Burrs that appear on the edges of the teeth must be removed using an emery block or a file with a velvet cut.
The process of sharpening a saw for the first time is quite difficult, so it is better to carry it out in complete silence and with maximum concentration. It’s worth doing this a few times, and then things will become habitual and go “like clockwork.”
How to sharpen and sharpen a saw correctly
Like any tool, hand hacksaws require care and maintenance. It is possible to ensure high accuracy and cleanliness of the cut only if the teeth are properly sharpened and set apart. This does not require separate equipment, just a simple tool and basic knowledge.
How to sharpen and sharpen a saw correctly
Theoretical part
To ensure high quality cuts, it is necessary to understand the mechanism of action of the edges of the hacksaw teeth on the material being processed. Unlike steel and plastic, wood is a heterogeneous material, and it is precisely because of this quality that several types of saws have been developed, differing in the profile of the teeth, their sharpening angle and the degree of defectiveness. All types of hacksaws for wood, their characteristics and technical data are specified in GOST 26215–84.
How to sharpen and sharpen a saw correctly
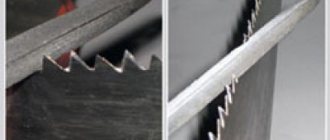
Basic types of wood hacksaw teeth. 1 - for cross cutting Type 1; 2 - for cross cutting Type 2; 3 - for longitudinal cutting Type 1; 4 - for longitudinal sawing Type 2; 5 - for universal cutting
There are 3 types of hacksaws: for cross cutting, longitudinal cutting, and also universal. The main difference lies in the cutting principle: when sawing wood across the grain, fragments of different densities appear along the path of the tooth.
On the one hand, this circumstance plays into the hands: the resulting chips are smaller in size and are simply removed from the contact zone, which allows for the presence of sharpening on both sides of the sawing tooth, both in the forward and reverse feed direction.
On the other hand, cutting across the fibers occurs partly due to impact; accordingly, more obtuse angles of cutting edges are needed.
Sawing wood along the grain can be characterized as micro-planing cycles occurring again. The force exerted on the tooth is uniform in this case, because the teeth have an asymmetrical shape and are directed with their tip towards the cutting direction. At the same time, the edge formed at the top of the tooth is directed vertically to the plane of the blade.
When sawing along the fibers, elongated chips are formed, the removal of which from the contact zone is difficult. In addition, when longitudinal cutting there is a greater release of moisture, resins and adhesives, which, in combination with the 1st factor, does not allow sawing in both directions. Chip removal occurs when the tool is fed directly: the perpendicular direction of the edge promotes the ejection of sawdust in the sawing direction.
The reverse movement ensures the elimination of chip residues and self-cleaning of the edges.
How to sharpen and sharpen a saw correctly
The teeth of all types of hacksaws are set; they are alternately inclined in different directions from the longitudinal axis of the blade. Due to this, in the longitudinal profile of a row of hacksaw teeth, a kind of dovetail is formed - two sets of cutting wedges formed by the tips of the cutting edges of the teeth. Accordingly, the hacksaw forms 2 grooves at the bottom of the cut, which ensures uniform stepwise removal and effective removal of chips.
Tools and devices, preparation for work
Wood saw blades are made from corrosion-resistant alloy steels with a hardness of 40–50 HRC units. Thanks to the use of such material, the instrument retains its own qualities, even if it has not been used for several decades.
To return even an old rusty blade to service, you just need to properly sharpen and set the teeth, and for this you will need some kind of tool and equipment.
Let’s make a reservation at the same time that modern hacksaws with a hardened serrated edge (where the tarnished colors are visible) are not sharpened or sharpened, except after annealing the blade.
Reliable fastening of the hacksaw is ensured by using a piece of board, at the end of which a cut is made parallel to the wide side. The cut must be made with the same hacksaw that is being processed; the depth is about 70–80 mm. The blade must be inserted into the cut with the butt down so that the teeth protrude from the cut to a height of at least 50 mm. The wooden miter box itself must be clamped in a vice, or secured to any stationary object, immobilizing the blade using a wide and thin wedge
How to sharpen and sharpen a saw correctly
As a further improvement to the miter box, it is possible to use a similar holder for quick fixation of the saw blade
Processing of metals of such hardness is possible manually and mechanized. In the first case, it is possible to use files with a hardness of 60 or 65 HRC, or diamond needle files.
For mechanical processing, an electric sharpener is used with a white electrocorundum stone mounted on it in a vulcanite binder. The optimal diameter of the circle is 120...
160 mm, it is desirable that the thickness does not exceed 8 mm, otherwise you will need to tuck the end to the disc profile. The grain size of the abrasive particles should be P 120–140 or higher.
To perform the dissolution of teeth, a tool called setting is required. This is a thin plate on the handle that has one or more transverse cuts of different widths. The butt of the hacksaw should fit into one of the cuts so tightly that the tilt of the handle in relation to the blade is at a right angle +/- 2°. To ensure that the divorce is measured and symmetrical in both directions, an adjustable angular limiter in the form of a metal arc is attached to the wiring.
How to sharpen and sharpen a saw correctly
Saw teeth set
The hacksaw teeth are deceived before they are sharpened. The blade must be tightly clamped in a vice, the teeth must be cleaned of resin and fine wood dust. Before setting the teeth, it is necessary to calibrate the tool.
To do this you will need a set of probes and a metal ruler. The amount by which the teeth should be bent is established by the standard and forms on average 1/10 of the pitch or distance between the vertices.
Having measured the pitch of the teeth, it is necessary to select the appropriate set of feeler gauges or shims, the total thickness of which is equal to the separation distance.
To begin with, you should select an arbitrary tooth and bend it a certain amount, achieving the correct bend value by eye. After this, a set of spacer pads is pressed against the plane of the canvas, the total thickness of which is equivalent to the size of the divorce. The edge of the metal ruler must be pressed against the pads and ensure that when passing past the top of the tooth, only a light touch is provided.
Teeth setting
The teeth deviate from the plane of the blade in a checkerboard pattern, for example, all even ones to the left, all odd ones to the right. Only very experienced carpenters are able to position saws on wood “by eye.” This skill comes after several hundred diluted saws. Less experienced craftsmen are better off using a special tool - a setting tool. The simplest version of the tool is a flat plate made of durable metal with a slot into which the blade fits tightly, with minimal clearance. The saw blade should be clamped in a bench vice. The teeth should protrude slightly from the jaws. The teeth, one after another, are clamped into the groove of the plate tool and bent in the middle part. The wiring angle must be constantly monitored. First, bend all the even-numbered teeth in one direction, then all the odd-numbered teeth in the other. Once the wiring is complete, you can spread the jaws to the width of the wiring and stretch the fabric between them. If any of the teeth are bent more than necessary, they will hit the vice. They need to be fixed.
Teeth setting
Canvases with hardened teeth are not subject to routing.
How to set teeth on a circular saw
For longitudinal and cross cutting of solid wood on circular saws, circular saws are used. It is recommended to use circular saws
whose parameters correspond to the work being performed, are properly prepared and do not have mechanical damage. Often, if operating recommendations are not followed, circular saws fail prematurely - bulges and dents with characteristic burn marks appear on the body of the saw, chips of the hard alloy form on the teeth or their deformation.
Wood and wood-based materials are usually sawed using hand saws, and only in some cases it turns out to be rational to use electric saws.
The most important part of any saw is the blade with teeth, which must be either hardened, made of high-strength steel, or reinforced on the side of the non-working edge (back), which gives it the necessary strength and rigidity.
Sharpening a hacksaw
- vice;
- hammer;
- calipers;
- pliers;
- emery block;
- sandpaper.
You should also have the following types of files in your arsenal:
- flat and diamond-shaped with a medium-sized notch;
- triangular file;
- triangular with velvet notch;
- needle files with notches of different calibers.
For sharpening, a special device is used that allows you to fix the blade at angles of 45 and 90 degrees. If you need to sharpen a cross saw, proceed as follows:
- the canvas is fixed at an angle of 45 degrees;
- sharpening is carried out with a triangular file with an apex angle of 60 degrees;
- the file is directed onto the hacksaw tooth at an angle of 60 to 75 degrees;
- first, with several movements of the file away from you, the left edges of the odd teeth are processed;
- After this, the hacksaw is turned over and the left edges of the even teeth are processed.
When sharpening a longitudinal hacksaw, proceed as follows:
- the canvas is fixed vertically;
- for sharpening, a rhombic file with a fine notch is used (needles can be used);
- during sharpening, the file is directed strictly parallel to the table;
- otherwise the process is similar to the previous one.
Burrs that appear on the edges of the teeth must be removed using an emery block or a file with a velvet cut.
The process of sharpening a saw for the first time is quite difficult, so it is better to carry it out in complete silence and with maximum concentration. It’s worth doing this a few times, and then things will become habitual and go “like clockwork.”
A saw is often used to process wooden blanks and change length and shape. This tool is represented by a combination of a working part and a handle. In this case, the working part is represented by a metal plate with cutting elements, which are located in a certain sequence relative to each other. Only with proper and timely maintenance can the possibility of product wear be eliminated. An example is the setting of the teeth, which is performed from time to time to ensure smooth movement of the tool along the resulting cut.
How to set the teeth of a wood hacksaw
A saw is often used to process wooden blanks and change length and shape. This tool is represented by a combination of a working part and a handle.
In this case, the working part is represented by a metal plate with cutting elements, which are located in a certain sequence relative to each other. Only with proper and timely maintenance can the possibility of product wear be eliminated.
An example is the setting of the teeth, which is performed from time to time to ensure smooth movement of the tool along the resulting cut.
How to properly spread the teeth of a hacksaw?
A fairly common question is how to set the teeth of a hacksaw on wood. If they are offset in one line, the cut is narrow and the working part gets stuck in one place.
In this case, the metal quickly heats up, due to which it begins to expand. In order to set the teeth efficiently, it is recommended to use special mechanisms.
Recommendations for the work being carried out are as follows:
- The saw is clamped in a vice for secure fixation. You can eliminate the possibility of damage to the working part by using plywood as a lining.
- All cutting elements are bent one at a time to the recommended angle.
When considering how to make a cut on a hacksaw, we note that several elements deflected at a larger angle can make sawing more difficult.
Requirements for hacksaw wiring
In order to carry out the wiring correctly, you need to pay attention to the basic requirements. They are as follows:
- The procedure is carried out while fixing the instrument.
- The required angle must be strictly maintained; deviation from it causes a decrease in the quality of the resulting cut.
- At the time of work, care is taken to ensure that the surface is free of defects.
It is worth considering that too high an indicator causes an increase in the cutting width, which reduces the productivity indicator. That is why a special device must be used to set the teeth.
Setting teeth at home
Today, at home, you almost never find special devices designed for servicing hacksaws for metal. However, even in its absence, it is possible to carry out the work with improvised tools. The recommendations are as follows:
- To begin with, the hacksaw must be securely fastened in a vice. This is due to the fact that bending requires a lot of force.
- You can bend it using pliers. In order to maintain the correct angle, you must first create a template.
- You cannot skip more than one element of the cutting edge. In this case, attention should be paid to the condition of the surface, since identified defects indicate that the wood hacksaw cannot be used.
Even at home, in the absence of a special mechanism, you can carry out the correct wiring and significantly extend the service life of the wood saw. In this case, it is important to maintain the required angle, since a cut that is too wide causes a significant decrease in productivity, while a cut that is too narrow leads to heating of the working part and its severe wear.
Some companies provide services related to such work. Note that the cost of a special mechanism is relatively small, so it is best to purchase it and the procedure can be carried out repeatedly.
, please select a piece of text and press Ctrl+Enter.
Tool Features
Classification of saws.
A standard wood hacksaw is made of a metal blade, the side edge of which is designed for cutting wood.
This cutting edge is made in the form of a series of teeth with certain parameters.
Based on the size of the teeth, they are divided into large (teeth cutting pitch - 4-8 mm), medium (teeth cutting pitch - 3-3.8 mm) and small (teeth pitch - 1.8-2.8 mm).
The shape of the cutting elements varies depending on the purpose of the tool.
A cross saw (cutting wood across the grain) has isosceles teeth with an apex angle of about 40° (soft wood) or 50-60° (hard wood). The longitudinal variety of the instrument has oblique incisors. In this case, the angle of inclination (relative to the vertical) is in the range of 8-20°. If you want to have a universal saw, you can choose a hacksaw with teeth inclined by 10°.
If you cut wood with a completely flat blade, you will definitely experience the effect of sticking.
To eliminate this phenomenon, the cutting elements are set - a slight, versatile inclination of the cutters to the side.
Normal sawing of wood occurs under the following condition: the thickness of the blade in the cutting zone is 1.6-2 times greater than the thickness of the upper part.
The quality of fiber cutting is ensured by the sharpness of each cutter. For this purpose, the teeth along their side edge are sharpened in one direction. The sharpening angle is within 60-74°.
The need for sharpening operation
Sharpening a hacksaw with your own hands.
Prolonged use of the tool leads to wear of the cutting part: rounding of the cutter at the tip, dulling of the cutting edge, change in the setting angle. Wear may be uniform over the entire canvas, or may concern individual elements.
As a result, the following problems are observed: slow cutting, the blade moving away from a straight line, jamming during operation, etc.
The specific moment of the need for sharpening is determined by the actual manifestations: sawing requires additional effort, the duration of the operation increases, and the quality deteriorates. The blade often gets stuck in the wood. The need for sharpening can be determined by a change in the color of the cutters and the appearance of an extraneous sound when sawing.
Setting the teeth
The practice of using hacksaws shows that the optimal thickness of the blade in the area of the cutting edge exceeds 1.6-2 times (for hard wood) and 2.2-3 times (soft wood) the thickness of the base.
Thus, for the most common blade made of steel sheet with a thickness of 1 mm, the tooth set in one direction is recommended to be 0.25-0.45 mm and 0.5-0.9 mm, respectively. The quality of the set significantly affects the operational characteristics of the saw.
In this regard, the following basic requirements are set: all teeth must bend strictly at the same angle; the incisors bend strictly alternately in different directions from the vertical; the width of the wiring along the entire length of the canvas should be the same; the tooth is bent in its middle part (bending at the base leads to destruction of the metal).
Teeth spreading process
Cutting and sharpening the saw.
The procedure for spreading the cutting elements is carried out using a special device - setting. Its simple design is made in the form of a small steel plate with a handle.
A slot is formed in the center of the plate with dimensions slightly larger than the cross-sectional dimensions of the tooth in its middle part.
A more complex and reliable wiring contains a stop, the installation of which is changed by a screw and a thumb, which allows you to control the process of bending the element.
The wiring procedure is carried out as follows. The hacksaw blade is fixed in a vice so that only the teeth are located above the jaws.
The elements are inserted one by one into the wiring slot and bent in their middle part to the required angle, first in one direction.
After the cutters are bent along the entire length of the blade, the hacksaw is rearranged and bent in the opposite direction. The operation is carried out with a smooth hand movement and extreme caution.
The quality of the work performed is controlled visually and with a caliper. You can eliminate excessive bending of any element using a simple test.
If there is excessive bending, the hacksaw will get stuck, and the culprit is easily identified, which allows you to immediately eliminate the error.
Cutting edge alignment
The next step in fully preparing the hacksaw is aligning the teeth in height.
This stage is necessary for a simple reason: only the higher elements of the cutting part are practically involved in sawing the wood, removing other cutters from the process, which significantly reduces the efficiency of the entire tool.
Control and adjustment of the height of the elements should be carried out before final sharpening of the blade.
The most common elementary method for assessing the height of the incisors: the hacksaw is pressed tightly against a paper sheet on a smooth, even surface, and its toothed part is clearly imprinted on the sheet. You will get a visual sketch on which you can compare the sizes of all elements.
If an increased height of individual cutters is detected, the saw is secured in a vice and a file is used, which simply grinds off the excess.
Hacksaw techniques.
Proper sharpening of saws requires certain requirements to be met. First of all, the saw should be clearly secured at the desired angle or perpendicular to the surface of the workbench.
For these purposes, a device is used that is installed on a workbench. You can make it yourself.
To do this, 2 equilateral right-angled triangles from a steel strip 2 cm wide and 2.5-3.5 mm thick are attached to a wooden block measuring 0.2x0.5 m and at least 2 cm thick.
A wooden plate measuring 15x40 cm and about 2 cm thick is installed on them. A pressure plate of similar size is attached to this plate using hinges from below.
SO CAN Anyone Blade and sharpen saws (wood saws)
My method of cutting and sharpening a hacksaw
(on
wood
)
Techniques for setting saws.
To be able to make a divorce with a hacksaw, it is better to use special devices to perform the work. The essence of setting the saw is to bend the teeth from the center of the blade to the sides. The simplest device for this is wiring. It is made from a piece of metal plate, with slots made across it. The width of the slot corresponds to the cross section of the tooth, and the depth must be within 1/3 of the height of the tooth. You can make the wiring yourself by cutting the required recess in a metal plate with a hacksaw. If the width of the hacksaw blade is not enough for all this, then a double blade is used.
When working to establish the correct distinction between the cutting parts, the saw blade is clamped in a bench or carpenter's vice. At the same time, plywood gaskets are used. It is necessary to install the saw blade so that only the teeth protrude above the edge of the jaws. The layout is put on the cutting part with its cut. The required deviation is made. The teeth bend through one alternately.
How to spread the teeth of a wood hacksaw? — Metals, equipment, instructions
When working with wood in various ways, a tool such as a hacksaw is actively used. Over time, the cutting surface of the tool wears out, and the process of sawing wood becomes more and more difficult. Wear of the working edge is as follows:
- the pointed tops of the teeth are rounded;
- their side cutting edges become dull.
As a result, the tool loses functionality and needs to be sharpened.
How to determine when a hacksaw needs sharpening?
People with extensive experience can easily determine this moment by the sound made by the tool during operation, as well as by the change in color of the teeth. Beginners need to pay attention to the following signs:
- working with a hacksaw becomes difficult and requires great physical effort;
- it becomes very difficult to make perpendicular cuts in wood;
- it becomes difficult to hold the canvas along the line during operation, it begins to deviate in different directions;
- The hacksaw blade often jams.
Teeth setting
The setting of the saw is the deviation of the tops of the teeth from the plane of the blade. The teeth, one after another, are deflected in different directions: odd teeth in one direction, even teeth in the other.
You need to know that the quality of the wiring has a strong influence on the sawing process. Therefore, all teeth must be bent in different directions alternately by the same amount, otherwise:
- if some teeth are deflected at a greater angle than the rest, they will interfere with the movement of the tool and wear out faster;
- if the deviation is less than necessary, then the width of the cut will not allow the blade to move freely.
To set the saw teeth, a special tool is used - a setter. The simplest wiring looks like a small metal plate with a handle. It has a slot, the width of which is slightly larger than the thickness of the hacksaw blade. The teeth are set as follows:
- the saw is clamped in a vice so that the jaws of the vice end at the base of the teeth;
- then the teeth are alternately placed in the setting slot and, bending in the middle part, are moved to the side at a given angle;
- Periodically, the quality of the wiring is checked visually or using a caliper;
- To check the quality of the setting, the jaws of the vice are moved apart to the width of the setting and the saw is pulled between them (in this case, excessive bending of any tooth will not allow the blade to move freely between the jaws).
Checking the height of the hacksaw teeth
Therefore, before sharpening the hacksaw, you need to check the height of the cutting elements. This is done as follows:
- Place a sheet of paper on a flat and smooth surface and press the saw tightly against it;
- the profile is clearly imprinted on the paper, and the teeth become clearly visible;
- if higher teeth are found than the rest, then the saw is clamped in a vice and they are shortened to the desired height using a flat file.
Sharpening a hacksaw
For sharpening you will need the following tool:
- vice;
- hammer;
- calipers;
- pliers;
- emery block;
- sandpaper.
You should also have the following types of files in your arsenal:
- flat and diamond-shaped with a medium-sized notch;
- triangular file;
- triangular with velvet notch;
- needle files with notches of different calibers.
For sharpening, a special device is used that allows you to fix the blade at angles of 45 and 90 degrees. If you need to sharpen a cross saw, proceed as follows:
- the canvas is fixed at an angle of 45 degrees;
- sharpening is carried out with a triangular file with an apex angle of 60 degrees;
- the file is directed onto the hacksaw tooth at an angle of 60 to 75 degrees;
- first, with several movements of the file away from you, the left edges of the odd teeth are processed;
- After this, the hacksaw is turned over and the left edges of the even teeth are processed.
When sharpening a longitudinal hacksaw, proceed as follows:
- the canvas is fixed vertically;
- for sharpening, a rhombic file with a fine notch is used (needles can be used);
- during sharpening, the file is directed strictly parallel to the table;
- otherwise the process is similar to the previous one.
Burrs that appear on the edges of the teeth must be removed using an emery block or a file with a velvet cut.
The process of sharpening a saw for the first time is quite difficult, so it is better to carry it out in complete silence and with maximum concentration. It’s worth doing this a few times, and then things will become habitual and go “like clockwork.”
How to Separate the Teeth of a Wood Saw
Development of tooth set
hacksaws
There is an opinion among craftsmen that 90% of all work is done by the tool, not the master. A properly made hacksaw is easy to use and significantly reduces the effort and time spent
for cutting. There are many components in the design of a hacksaw that make it easy to use.
An important place in a number of parts of preparation for work is occupied by setting teeth
hacksaws. In any hacksaw, the cutting parts are necessarily separated. An exception is essentially a hacksaw with a cross-section of the cutting blade in the shape of a trapezoid, the base being occupied by the arrangement of the teeth.
This type of saw does not require tooth alignment.
A saw with a correctly made tooth set significantly reduces the effort and time spent cutting.
The effect of tooth set on hacksaw work
The simpler it is to set the teeth, the larger the area to be sawed. If the teeth are set
is not wide enough, then during operation the upper part of the blade will heat up during friction against the edges of the cut. For this reason, the saw expands, which leads to jamming.
To avoid this phenomenon, the teeth of the hacksaw are set apart and the width of the set is constantly kept under control. The presence of set teeth creates a gap between the hacksaw blade and the cutting surface. The saw moves simply, without friction and, accordingly, without heating.
If there is no gap, a hacksaw
begins to involuntarily deviate away from the appropriate cutting direction.
To perform this work, various tools and devices are used: from pliers to devices using a dial indicator.
With this device you can control the difference in the cutting element to exactly 0.01 mm. The most experienced craftsman will certainly ensure the quality of the wiring using pliers, clamping the hacksaw between his knees. Even an ordinary screwdriver with a sharp blade and a wishbone is used to provide the required force.
A screwdriver is used for smaller teeth.
How to correctly set hand saws on wood
Discounts on hand and power tools - Hand saws for wood
and metal here.
So maybe someone can cheat and sharpen the saw (wood saw)
My method of cutting and sharpening a hacksaw
(on
wood
)
Techniques for setting saws.
To be able to make a divorce with a hacksaw, it is better to use special devices to perform the work. The essence of setting the saw is to bend the teeth from the center of the blade to the sides. The simplest device for this is wiring.
It is made from a piece of metal plate, with slots made across it. The width of the slot corresponds to the cross section of the tooth, and the depth must be within 1/3 of the height of the tooth. You can make the wiring yourself by cutting the required recess in a metal plate with a hacksaw.
If the width of the hacksaw blade is not enough for all this, then a double blade is used.
When working to establish the correct distinction between the cutting parts, the saw blade is clamped in a bench or carpenter's vice. At the same time, plywood gaskets are used. It is necessary to install the saw blade so that only the teeth protrude above the edge of the jaws. The layout is put on the cutting part with its cut. The required deviation is made. The teeth bend through one alternately.
The total difference is equal to the size of the cut. A cut that is wider than the thickness of the blade greatly simplifies the sawyer’s work. But a very wide cut requires more wood to be converted into sawdust and more energy consumption.
It has been established that the best cutting width depends on the moisture content of the wood. When the board is dry, a narrower cut is beneficial. When the board is moistened, the edge of the cut has an elastic recovery, so tooth separation is expected to be easier.
When working with wood of varying humidity, it is more convenient to use various hacksaws.
With dry wood, a deviation of the cutting strip from 1/4 to 1/2.7 mm on each side from the axis of the blade is required. For moistened wood, this size is 0.5 - 1.0 mm. You should keep in mind that you cannot bend the tooth at the base. This causes breakdown.
What is a "stapler"
If desired, a tool for cutting teeth on a hacksaw blade can be made at home in the workshop. The main component of the tool is a matrix with a triangular cutout resembling the shape of a saw tooth. Of course, you also need a punch included in the matrix, which can rotate around its axis. To adjust the height of the cut teeth, the tool uses an adjustable stop that moves to the right or left. Its parameters change using several holes and fixing bolts.
Important: the matrix and the punch must extend into each other with a minimum gap, and the working edges of both parts must form an angle of 90 degrees