In beer production, there is a need to quickly cool the wort before adding yeast to minimize the chance of contamination. In this article, we'll look at the benefits of quickly cooling wort after boiling, and we'll also make a simple immersion chiller using copper tubing, which can be purchased at your local hardware store. Cooling your wort quickly after boiling will greatly improve the clarity and flavor of your finished beer. Some of the benefits include:
- Reduced chance of infection
– Your wort is vulnerable to bacterial infection when it is already less hot and without added yeast. You can minimize the possibility of contamination by quickly cooling and pitching the yeast in no time. - Improved Clarity
– When you sharply cool hot wort, many of the heavy proteins and tannins become no longer soluble and fall out of the wort. Pumping the wort during a “cold break” will increase clarity and improve flavor. - Reduction of volatile compounds
- dimethyl sulfide (DMS), which gives beer a strong smell of “sweet boiled corn”. DMS may continue to break down after the boil and may be noticeable in the finished beer if the wort is not cooled quickly.
It is possible to quickly cool 20-40 liters of boiling hot wort and here are some solutions for the home brewer. Ideally you want to reach fermentation temperature as quickly as possible and in the range of around 10-20 minutes is acceptable. Commercial brewers achieve these goals by using complex two-stage glycol heat exchangers to achieve the final fermentation temperature. Homebrewers often opt for something less complex and below are some popular wort cooling systems for home brewing.
Submersible chiller:
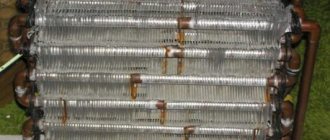
The simplest solution for most home brewers, an immersion chiller (pictured above) is a coil of 10-15 meter copper tubing that is immersed in hot wort in a pan. The piping is connected to a faucet or garden hose and cold water constantly flows through the chiller to cool the wort. Starting from 15 meters the copper pipeline has a large contact area, 20-40 liters of wort can be cooled very quickly using this method. Immersion chillers may also include a two-stage system consisting of an additional coil that sits in front of the main coil and is immersed in an ice water bath to lower the temperature of the main water that passes into the wort and cools it. The two-stage immersion chiller cools even faster and helps when the temperature of the tap water entering the chiller is above or near the required fermentation temperature. Immersion chillers are also very easy to make, as will be described below, and are also easy to clean on the outside of the coil, simply wiping and washing after use.
DIY copper tube chiller
Private microbreweries are far from uncommon today. In addition, the availability of technology and equipment allows you to brew this invigorating drink yourself.
Cooking recipes are beyond the scope of this material: we will talk about a device without which homemade beer can be hopelessly ruined at the preparation stage: a beer chiller.
In fact, this is an ordinary cooler, reminiscent of a coil in moonshine. It just works the other way around: it itself is a source of cold.
Counterflow chillers:
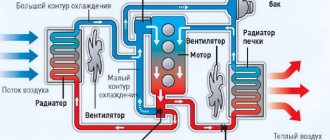
A counterflow chiller consists of a coil that contains two tubes of different diameters, one located inside the other. Cold water is supplied through the outer tube, and the wort is pumped in the opposite direction (against the flow) through the inner tube. Counter-flow chillers are extremely efficient and can cool wort in no time. The only downside to homebrewers is that they can be more difficult to clean and sterilize. Once you have finished cooling using a counter-flow chiller, you will need to give it a quick rinse with hot water and run cleaning fluid through it. It is also a little more difficult to make at home.
Do-it-yourself water cooling chiller
Private microbreweries are far from uncommon today. In addition, the availability of technology and equipment allows you to brew this invigorating drink yourself.
Cooking recipes are beyond the scope of this material: we will talk about a device without which homemade beer can be hopelessly ruined at the preparation stage: a beer chiller.
In fact, this is an ordinary cooler, reminiscent of a coil in moonshine. It just works the other way around: it itself is a source of cold.
Homemade chiller made from copper pipe - video
Bottom line: If you are making your own brewer and are looking to minimize costs, a homemade chiller is what you need.
You can find a used refrigerator with a working compressor for several hundred rubles; copper tubes are also not in short supply.
And the time and energy spent are more than compensated by freshly brewed beer.
Do-it-yourself water cooling chiller - Metalist's Handbook
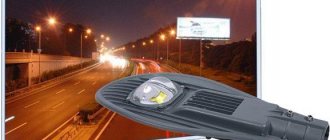
Everyone involved in the topic of ventilation, air conditioning and water cooling knows what a chiller is. But not every ordinary person knows what a chiller for cooling water is.
But this is, in fact, the same air conditioner, only of significant, industrial size.
In this article we will outline the essence of how chillers work, their design and talk about what types they come in.
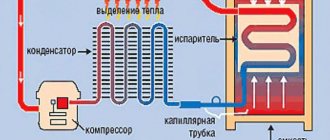
A chiller, in fact, is a special refrigeration unit that is used to cool a wide variety of liquids. Chillers are used in many areas of production:
- in the alcohol industry;
- in the food industry;
- in medicine;
- in mechanical engineering.
There are always 3 main components in the design of any chiller, namely:
- compressor;
- capacitor;
- evaporator.
Today, the most popular type of device is the classic monoblock chiller.
Its main advantage is, in fact, its monoblock design - due to this parameter, the workspace is significantly saved, since all the elements are already integrated into the device.
Installation of a monoblock chiller is very simple - you just need to connect the device, pour in water and press the “on” button. However, one of the disadvantages of these models is the lack of a tank enlargement function.
Another model of the device is a chiller with a remote-type condenser.
A distinctive feature of this equipment format is its increased efficiency in warm weather and the ability to connect to large water tanks.
Manufacturing of a submersible chiller
The immersion chiller (shown in the photo above) is simple for the average brewer to make and use. And the basic materials can be purchased at your local hardware store and can be assembled in 30 minutes. Necessary materials:
- 15 meter copper tube with 3/8″ outer diameter
- 6 meter plastic hose (tube) with 3/8″ internal diameter
- 4-6 pcs. 3/8″ hose clamps
- Compression fitting/adapter for connecting garden hose to 3/8″ copper tubing
Start making coils of larger diameter copper tubing. Make the coil large enough to fit into your boiling pot. The best way to create a coil shape is to wrap the tube around a beer keg, or any other large cylinder. Leave the two ends of the copper tube sticking out at the top above the height of your boiler, and bend them 90 degrees so the edges are horizontal. Attach a garden hose fitting/adapter to one end, and attach a plastic hose to a clamp to the other end. Attach a garden hose and run water through it to check for leaks. For a two-stage chiller, bend a second smaller reel and attach a garden hose with fitting to one end. Then connect the two coils together with a long plastic hose (tube). When working, place the smaller coil in a cold bath of ice water and the larger one in your wort. The cold water will flow through the wort, making your system more efficient.
DIY refrigerator - Bachelor's life
Hello beer magnates!
For some, selling 8-10 varieties of draft beer is a blessing, but for others, 30 is not enough. If in the first case one or two flow coolers are quite enough, then in the second we will already need a refrigeration chamber.
This construction is expensive, but necessary given such sales volumes. Naturally, the room we choose must have a certain configuration and area.
Let's look at how to make a refrigerator with your own hands, so that it is of high quality and cheaper.
I want to make it clear right away: we need the camera for storage, and selling draft beer with its help is an additional option. After all, beer is different from beer.
One unpasteurized variety, the so-called live one, is stored for an average of three days, while the other, pasteurized variety can last up to six months in a closed keg. With an assortment of 30-50 varieties, their strains also vary greatly.
Light beer will always be drunk better, a thirty keg usually goes out in a day, and dark, and even expensive, beer can be sold from a week to a month. The purpose of the refrigerator is to increase the shelf life of beer by 3-4 times.
Refrigeration chamber device
There are two options for its execution. The first one is cheap and capital. Here we ourselves make the camera frame from timber, the width of which is at least 5 cm, preferably 10.
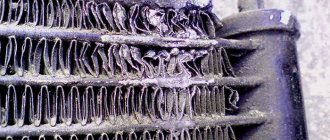
Sheets of 5-10 cm of foam plastic/expanded polystyrene/penoplex are inserted inside the frame, all joints are foamed to eliminate cold bridges (plan the sections of the frame to fit the size of the foam sheet so as not to cut it in vain).
Then, using a furniture stapler, we cover the insulation on both sides with a rolled vapor barrier, preferably on a foil base, with the shiny side facing out. This vapor barrier holds heat and cold better and also protects our foam from moisture. If you don’t know, wet insulation loses up to half of its thermal insulation qualities.
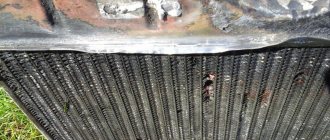
After this, we seal the insulation joints with aluminized tape and attach sheets of 10 mm plywood or OSB with self-tapping screws from the inside and outside as wall cladding. Ideally, it is also advisable to insulate the floor, take thicker plywood and lay it on top with tin.
If you have enough money, the walls can also be covered with painted millimeter steel. This is done for their safety, because you move the kegs, they can scratch and even break through the plywood sheathing. Inside, along the wall, we assemble a durable rack from timber or metal corners.
In principle, kegs can be stacked on top of each other, but if there is a mismatch, then you will be tortured to pull out the bottom one.
You determine the dimensions of the refrigeration chamber yourself, based on the store premises and the number of kegs stored. You need to plan for a width of at least 1.5 m, otherwise you won’t be able to turn around.
Also remember: the larger the interior space, the more powerful and expensive cooler we will have to install. The chamber door is also insulated, and a rubber seal is attached along its edge.
It is also necessary to provide a reliable deadbolt for tight locking.
The second option for arranging a refrigerator compartment: assemble it yourself from ready-made sandwich panels (polystyrene or polyurethane foam is laid between two metal sheets, width 30 mm). Advantages: camera mobility (ease of assembly and disassembly), better thermal insulation with a smaller wall thickness, takes up less space. Disadvantages: high cost of finished panels.
This is exactly how serious companies make refrigerators and freezers for sale. The price tag here starts from 100 thousand rubles for a small chicken coop for a dozen kegs. But we can save on the refrigeration unit, because in such a chamber there are only kegs, and hoses stick out - we don’t go inside. Therefore, a small monoblock is usually used for cooling.
Split system or monoblock?
The desired temperature in our refrigerator is about +5 degrees. Household air conditioners are not capable of this, so we will need a serious freezing unit. In a monoblock, as you may have guessed from the name, all the cooler elements are collected in one housing.
It is cheaper than a split system, but it requires space for installation, as well as a well-ventilated room, since the external radiator gets very hot and makes noise. The monoblock is built directly into the wall or ceiling of the refrigerator compartment and you need to buy it before construction begins, because you will have to do frame made of timber according to size.
A heat-insulating gasket is installed between the indoor and outdoor units, which ensures the tightness of the chamber (included in the kit).
The monoblock is easy to assemble and install (detailed instructions are included with each), is unpretentious in operation and is suitable for small cameras (including those made from panels). When choosing, pay attention to the maximum volume of the refrigerated room. It is expressed in cubic meters. I hope I don't need to remind you that volume is calculated by simply multiplying length by width and height
Prices for monoblocks start from 30 thousand rubles. Domestic manufacturers: Ariada, Sever, Polair. Imported: Italians Zanotti and Technoblock. I don’t recommend buying used freezing units, and also refrain from buying Chinese coolers - as practice shows, they are unreliable.
The split system is designed for medium-sized chambers. It consists of two blocks, one is mounted in the cell, the second on the street. To install a split system, I recommend turning to specialists; there are subtleties of connecting freon pipes and electrics.
The price of such units starts from 50 thousand rubles, the manufacturers are the same as monoblocks. Unlike the latter, split systems are more convenient, since the external unit is noisy and heats up somewhere on the street.
In addition, the configuration of the room may not allow the installation of a monoblock, because it cannot be mounted close to the wall. Chamber volumes when using split systems range from 5 to 50 cubic meters.