Benjamin Forstner patented his cylindrical drill bit for woodworking in 1874. Since then, many varieties of this instrument have appeared. Some samples only vaguely resemble a Forstner drill, but they all work on its principle. Three types of cutting surface are used: the central tip sets the direction, the rim trims the contour of the hole diameter, and the paired inner edges select the thickness of the material along the plane, like rotating planes.
Purpose
The Forstner drill bit was designed for making blind, flat-bottomed holes in soft and hard wood. Currently, it is also used to work with MDF, chipboard, fiberboard and their modifications.
Blind recesses with a flat bottom are most often drilled for the installation of various furniture fittings (door hinges, locks, eccentric and threaded ties). In production, material is saved, the minimum permissible thickness is used, and through holes for furniture are not practiced.
You need a sufficient hole depth for mounting fittings and smooth and neat edges. A Forstner wood drill bit creates a perfect hole with a flat bottom. In this case, only 1–2 mm may remain before the drill comes out. Conventional screw drills, sharpened to a cone, cannot ensure planeness, and feather and crown drills cannot ensure the cleanliness and accuracy of the side surfaces.
DrillPro Forstner Drill Set with Depth Stop
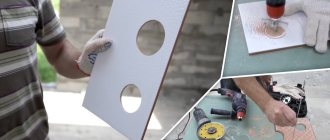
Good day! In general, they offered me for review drills from DrillPro, which act as a feather drill for wood, but with one difference - the drills in question have a depth limiter. The purpose of this equipment is ideal for making through and blind holes for hinges. In short, you can take it! Disclaimer
. Chukchi is not a carpenter and I don’t know the correct technical terms. Please do not throw tomatoes in the comments. This set arrives in a wooden box with a lock. Box dimensions - 16*12*4.5cm.
Inside, the cutters themselves are located on a wooden backing, and on the top there is a foam lining. The set also contains two hexagons, the essence of which is to tighten the limiter screws.
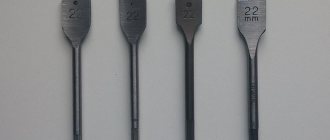
The cutters are made of high quality steel (as it says on the product page). The upper part with the incisors, as well as the ends, are painted red. The size range is indicated on the backing itself.
Let's take a closer look at one cutter. On one side of the body the diameter of the cutter is indicated, on the reverse side there is a marking in centimeters for setting the clamp to the desired depth. The diameter of the base of the cutters differs from each other: - Ф15, Ф20, Ф25 - have a thickness of 7 mm; - F30, F35 - have a thickness of 8mm. The marking starts from 10 and ends at 30mm, and the 0 position is taken from the outer knives.
The sharpening of the cutters is at a good level, but the quality of the casting is poor in places (I think the red color was not chosen by chance and partially covers up the flaws). Full sizes are perfectly illustrated on the product page:
The limiter is made in the shape of the guides of the cutter itself. Installation is carried out at the required distance, as well as in the correct position relative to the base of the cutter. The correct installation looks like this:
They put a scale on one cutter, but forgot to enter the values.
Well, the color is lame in places.
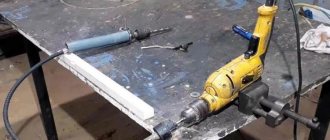
As a person who manufactures wooden stairs told me, these cutters are designed for collet clamping of routers and using them in a screwdriver or drilling machine is fundamentally wrong. But since there were no hand-held milling cutters nearby, but the above-mentioned tools are available, we will test them. To begin with, a Makita 18V screwdriver with a maximum speed of 1700 per minute. When using this combination, no problems were found, except for an obvious lack of speed (apparently there are still drawdowns under load). The edge of the tree does not tear, but towards the end the gap between the cutter and the stop becomes clogged. I had to remove the drill and clean it. Next, we remember about the correct installation of the limiter relative to the cutter itself and make attempt number 2. And here it is clearly getting better. The only remaining problem is that the edges are a little ragged when I start working. To eliminate the human factor, we use a drilling machine and take a new block. Since we didn’t have a clamp at hand, we held the block with our hands.
We step aside and hand over the reins to the turner, he is an elderly man, he has been married for several years, as they say. When the clamp is installed correctly, sawdust collects in the space between it and the cutter, without interfering with the work. The drill goes in easily, like a hot knife through butter. The final sample turned out smooth, the edges and base were smooth. There are no torn edges at the base.
The next one who will test is a carpenter, a man of the old school. After work, he noticed a desire to get this set, he really liked it. Let's take this as a compliment! In the end, I would like to say the following: if you close your eyes to the painting flaws and lame workmanship in places, then the DrillPro kit has a clear right to life. The men who tested the set were satisfied, praising the quality of sharpening and the work of the equipment in general. They also said that it was more pleasant to work with than with a regular feather drill. Whether it is worth the money or not is not for me to judge, but I tried to show this instrument from different sides.
The product was provided for writing a review by the store. The review was published in accordance with clause 18 of the Site Rules.
Design
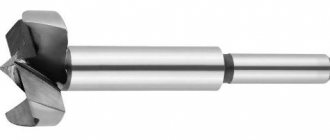
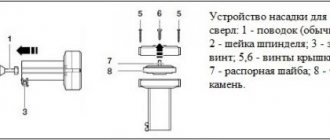
The working part has two main cutting edges and a short centering point. The profile of the drill resembles a beech Z with rounded top and bottom parts (a mirror image of the letter S). On the jumper there is a selective cutting edge, and along the circumference there is a cutting edge, which, after the formation of the hole, also acts as a limiter, holding the tool in the working diameter.
The chips are thrown upward, which prevents the drill from jamming. Circumferential cuts are made for machine sharpening. The selected edge can be adjusted manually. To do this, use a file with a fine notch or diamond coating.
The material used is mainly high-speed steel. It withstands moderate heating of the working area well. Some tool manufacturers additionally make titanium coating or carbide brazing. Often teeth are cut on the working edges. This reduces overheating and increases drilling speed with a slight loss of cleanliness of the machined surface.
You can use a drill with a standard chuck. For example, a 15–26 mm Forstner drill has an 8 mm shank, and a tool with a large (28–60 mm) working area diameter has a 10 mm shank.
Which Forstner drill is better?
How to choose the right Forstner drill so that it serves for a long time and is of high quality - this is the question asked by many beginners who are buying this type of tool for the first time.
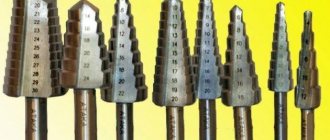
It must be said that four main types of Forstner drills are currently produced.
Types of Forstner drills
Of those shown in the figure, drill number 1 can be classified as a real Forstner drill. This drill has a small sharp tip, the cutting edge is interrupted in two places by the main blades. This drill bit is not intended for machine sharpening and must only be sharpened by hand. Such drills are rare in our markets; they are produced in the United States. They have increased wall thickness, which protects the instrument from overheating. The holes obtained with their help are of different quality. Their price is much higher than others.
If we consider product No. 2, it belongs to a more modern type of drill. The central tip is longer, and there are cutouts in the rim located behind the inner blades, which allow the tool to be sharpened on sharpening machines. This greatly reduces operating costs.
The drill number 3 has carbide plates that are soldered to the body, as well as a soldered tip. Their price is comparable to the cost of real drills, they are not subject to overheating, last much longer than conventional modernized ones, but are subject to significant vibration during operation. This leads to the fact that the drills may break off before deepening begins; they are not recommended for drilling end holes or holes at an angle.
Drill No. 4 has special cutters on its cutting edge, which in their shape resemble the teeth of a saw. The shape of the drill itself is similar to the modernized one, but due to the fact that the sharp bit has less contact with the material, the drill overheats less during operation. This is especially good for drilling holes larger than 25mm in circumference. The disadvantage is also frequent breakdowns, especially among beginners. Therefore, it is not advisable to use on end and angled holes.
A beginner will also be interested in how to sharpen a Forstner drill. You need to remember the following rules.
Sharpening a Forstner drill
The bezel is never sharpened. Its cutting edge must be strictly in one plane, which requires special equipment for sharpening. To sharpen the internal incisors, use a small file, as in the photo, with a minimum grain size. You can use a sharpening stone or a tape. You need to start with a flat front edge, remove the burr from the back using a fine-grit sharpening stone.
The internal cutters are sharpened using a belt sharpener, and during sharpening, the front edge is pressed against the support plate along its entire plane.
Sharpening should be done in such a way that very little metal is removed per pass, especially on internal incisors, since this can change the very geometry of the edges.
Working methods
A centering point is used to accurately position the drill at the beginning of work. It is placed at the intended point and pressed into the material until it evenly touches the circular plane. Drilling begins at low speeds. The drills are designed for operating speeds in the range of 800–1800 rpm.
The larger the diameter of the working area, the slower the cutting speed should be. This mode must be observed to avoid overheating of the working edges. At high speeds there is a high probability of drill failure.
For safety and ease of work, as well as in cases with critical parts, it is convenient to use a Forstner drill with a limiter. He will stop the tool in time and ensure the required depth of the hole.
If it is necessary to drill a hole in thin material, when there is a danger of the centering tip coming out, you can use two Forstner drills of the same diameter. Start working with a regular tool and use it to form the initial diameter.
The centering tip of the second drill is ground off. They finish the deepening with it. The drill is held in the hole from being torn off by the side planes and there is no danger of it coming out. You can leave the minimum acceptable wall.
Advantages
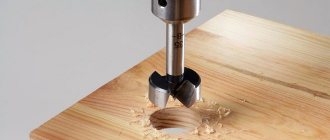
The Forstner drill (photo above) has two important advantages in comparison with other designs: the cleanliness of the surfaces being processed and the fact that it holds the given direction well. This is possible even on blocked holes, or when their diameters extend beyond the edges of the workpiece.
The quality of the cut of the side walls is achieved by cutting the fibers around the circumference even before they are touched by the main cutting edge. This allows you to avoid chipping and tearing of the material outside the processed diameter.
The second advantage is ensured by the fact that the direction is held not by the centering tip, but by the side annular cutting edge and the entire cylindrical plane of the working surface. After starting to sample the material, the drill is held tightly in the formed hole.
Modifications
Currently, many companies produce Forstner wood drills. Some focus on quality materials and traditional configurations, while others try to improve the tool for different conditions. This is how a drill adapted for machine sharpening appeared. His rim behind the central incisors has a larger incision.
Such a drill loses part of the cutting surface around its circumference, which is fraught with increased vibration during operation and possible breakdowns. On the other hand, this design significantly reduces the cost of the tool.
There is a Forstner drill with carbide plates soldered on the inner cutting edges. In other designs, the side circles have teeth, like a saw. The cleanliness of the side surfaces in the material being processed when using such a tool is lower in class, but the drill does not overheat as much and provides a higher drilling speed.
The history of the drill
The inventor of such a tool was the famous American gunsmith Benjamin Forstner. His woodworking drill was first patented in 1874 and brought him unprecedented success and profit. Forstner drills are still manufactured to this day, but since that time many other types of similar tools have appeared. In some cases, the appearance of the samples is only vaguely reminiscent of the first invented drill, but they all continue to work on the same principle.
Price
When choosing a Forstner drill, you are usually guided by the quality/cost ratio. It makes sense to decide for what purpose it is purchased: for professional production or domestic needs. For frequent or constant use, it is more advisable to choose high-quality drills from well-known and well-established companies. Their products may cost an order of magnitude more, but there is a guarantee that the tool will last a long time and meet the stated characteristics.
On the other hand, if there is a need to use drills of different diameters, then their total cost will be quite high. In this case, it may be better to purchase a set that is affordable, but includes a wide range of sizes or modifications.
You should pay attention to the condition of the cutting surfaces. Sometimes the opaque packaging of a drill makes it impossible to check the absence of burrs, burrs or chips on its edges. It is better not to purchase such products. It can be very difficult to manually correct serious defects without changing the profile and geometry of the cutting edges.