In ceramic tiles, which are actively used for finishing the surfaces of walls and floors, it is often necessary to drill round holes of large diameter, which are indispensable when laying communications, as well as when installing electrical sockets, fastening and decorative elements. A tool with which such holes can be made as accurately as possible is a ballerina.
Skillful use of the “ballerina” guarantees an accurate hole with neat edges
Device Features
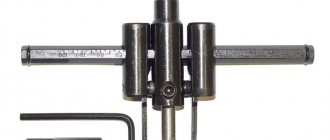
The ballerina got its name due to its external similarity, because it consists of a central stabilizer and a drill that passes through the stabilizer on the side and exits through the other side. The device looks like a compass and actually works the same.
However, the ballerina alone will not be able to make the required hole of a certain diameter in the tile. To do this, you will need a regular drill and suitable tile drills.
Drilling technique
The purposes of drilling tiles can be very different - from creating a small hole for a screw to drilling an entire circle for a pipe or socket.
Large holes
The best option for creating capacious perforation is to use a ballerina with a tip of the required diameter. It is recommended to first practice on waste tiles in order to “feel” the tool. If a ballerina is not at hand, a hole saw will come to the rescue, which even an owner inexperienced in construction can successfully handle.
Another method of drilling step by step:
- Mark the center of the planned hole and draw a circle of the required diameter.
- Using any tile drill, make several holes along the diameter of the circle, trying to place them close to each other.
- The drilled sectors are carefully pressed, and the remaining pieces are removed with wire cutters.
- The edges are sanded to give the correct shape.
Small holes
Step-by-step instruction:
- Marks are placed on the surface of the ceramic for the hole.
- To prevent the drill from slipping, stick masking tape or lightly chip off the enamel in the center of the future hole.
- Disable the impact mode function on the drill and connect the device to the network.
- Place the drill at an angle of 90° to the tile and start drilling at low speed.
- Gradually the speed is increased, punching the tile to the very base.
- Change the drill to a new one, suitable for the type of wall base (concrete, brick, wood) and continue drilling to the required depth.
The diameter of the second drill should not exceed the size of the first, otherwise the tile will be damaged.
How to use a ballerina correctly
First of all, it is worth noting that all work in this case is carried out exclusively on the front side of the facing material.
- First of all, you need to measure a point on the tile that will mark the middle of the required hole.
- Next, you need to use a drill with suitable drill bits, drill at the indicated point about 2/3 of the total thickness of the tile, at this stage you will need to remove the tile drill.
- Instead, a ballerina is installed, the central stabilizer of which is installed in a pre-drilled, blind recess in the tile.
Thus, using a drill, the ballerina is used as an attachment, with the help of which it is possible to carefully make a hole of the required diameter. All you need to do is put the stabilizer in the right place and start the device.
What is required for drilling
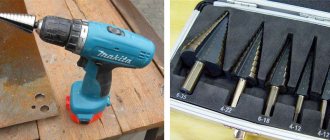
An electric drill or screwdriver will be needed in any case.
When choosing a drill, it is important to pay attention to whether the intensity of rotation can be adjusted. The higher the speed, the more difficult it will be to achieve a quality result. The ideal mode for drilling tiles is low speed, i.e.
low rotation speed of the drill. For screwdrivers, this indicator is at the optimal level, so there are no problems, but not every tool is able to withstand long-term loads. To make large holes, it is better to use a drill. For a low-speed drill, you will need a set of cutting and measuring tools. For marking you will need:
The ideal mode for drilling tiles is low speed, i.e. low rotation speed of the drill. For screwdrivers, this indicator is at the optimal level, so there are no problems, but not every tool is able to withstand long-term loads. To make large holes, it is better to use a drill. For a low-speed drill, you will need a set of cutting and measuring tools. For marking you will need:
- square, to maintain a right angle;
- tape measure to accurately transfer specified dimensions;
- a pencil, or better yet a marker, for making marks on the glossy surface of the tile;
- building level to achieve perfect horizontal or vertical lines;
- masking tape.
The selection of cutting tools depends on the tile material, size and number of holes. A couple of holes can be made even with not the most suitable tool. If you need to drill a lot, then it is better to stock up on the necessary materials and tools in advance.
Choosing a drill or auger
Tile is a hard surface material that requires special tools to process. These are different types of drills:
- with carbide tipped;
- with diamond-coated spear-shaped;
- crown (diamond-coated tube);
- drill with SDS shank (for hammer drill).
The most affordable option is a carbide-tipped pen drill. When sharpened, it copes with the task quite well, but “shrinks” quickly and requires periodic sharpening. Poor contact with concrete and metal.
A spear-shaped drill with two or four edges is more expensive due to diamond coating, but also lasts longer. It is used for drilling ceramics and glass.
A tube-shaped drill with a diamond edge (crown) is most often used for drilling porcelain stoneware. Such a tool has a minimal cutting area, makes the process easier, but requires some skill. The tube is thin-walled and can be easily damaged if excessive force is applied. But diamond coating can cut any materials.
If the only power tool you have is a hammer drill, then you can make a hole in the tile using a drill with an SDS shank. This is an extreme case that requires more effort.
The diameter of the drill must correspond to the size of the dowel for which the hole is made.
What other tools can you use?
It happens that you need to make a large hole. What to do in this case? A ballerina drill will help here. This is a device equipped with a central (axial) drill and carbide cutters that can be adjusted to the required size. This is a universal tool, since each “ballerina” has its own range of possible drilling sizes.
A carbide cutter does not have such flexibility in size. Here the diameter is fixed. As a rule, cutters have standard (the most popular) dimensions, so they are often sold in sets.
When the tiles have not yet been glued to the wall, but you need to make a large hole, you can use a hacksaw. To do this, you will need a tungsten-coated cloth.
What drills to use
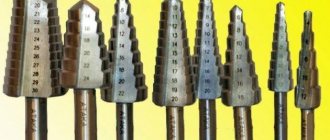
The central stabilizer can be replaced, this is due to the different characteristics of the materials for which it can be used. It is worth noting that conical drills are not allowed for use on tiles.
This is due to the fact that, due to the peculiarities of their design, they can slide off the intended, pre-deepened point and scratch the front surface of the tile.
For this reason, it is recommended to use auger or type 1 drills for these purposes. They are ideal for these tasks. It is worth noting that it is not always necessary to drill with a ballerina until the inner circle is completely separated from the tile, thus forming a hole.
- Some tiles have an extra layer at the back that is not tile, a hard material designed to improve the tile's adhesion to the stucco wall surface.
- In such cases, it is enough to drill with a ballerina to a depth of no more than 2/3 of the total thickness. After this, you can carefully knock out the resulting circle. The disadvantage of this method is that on the reverse side, when knocking out, chips form on the material.
However, you shouldn’t worry about this, because the back side of the tile will be attached to the wall using a primer, so the chips will be hidden from view. In addition, they will not affect the quality of adhesion between the surface of the slab and the wall, because the vast majority of the area's materials remain intact.
Basic principles of drilling holes in ceramics
The tile does not have plasticity, it cannot be bent, so it is problematic to drill.
When drilling, consider the following:
At first there are only small revolutions, then they gradually increase. You can only work with a tool that has a speed control. If you are drilling with a drill, make sure you turn off the jackhammer function
If you don't do this, expect cracked tiles. Apply optimal pressure on the tool: enough to drill through the glaze layer and ceramic, but not too much so that it cracks. Important condition: the tile and tool should not overheat. Wet the surface and the tile drill with water.
Check the strength of the base: the tiles must be securely fixed, the glue underneath must dry and harden. There should be no voids under the tiles: tap the ceramics. If the sound is booming, there is emptiness there, so it is not advisable to drill here.
Drilling small holes
Small holes are made for dowels, onto which shelves, hangers, hooks, etc. will then be attached.
Make markings. A pencil doesn't write well on ceramics, so it's better to use a marker.
Please note: Make the markings on top of the masking tape. This way the mark will be clearly visible, and the tape will serve as a kind of fixation for the drill at the beginning of work
The tape will secure the drill bit so it doesn't jump off and scratch the icing.
- The glaze and the top layer of ceramics are passed at low speeds. Apply gentle pressure to the tool, remembering that too much pressure will cause the tile to crack.
- Gradually increase the speed until you feel the drill go through the ceramic.
- You need to drill to the length of the dowel so that it can be securely driven into the base.
- Once you've gone through the ceramic layer, replace the tile drill bit with a brick or concrete drill bit. There is no need to dull an expensive ceramic drill bit on brick or concrete.
Which tool to use
- Drill with speed control. Remember to adjust the speed to avoid damaging the tiles.
- A screwdriver with a rotation speed of at least 800-1000 rpm.
To work with ceramics, it is better to use special spear-shaped drills. In common parlance they are called “feathers”. Such “feathers” easily bite into ceramics, and the pobedite tip will serve you for a long time.
Buy a diamond drill bit for porcelain tiles. Porcelain stoneware has greater density and strength, so you will need a hard alloy and a sharp tip. Diamond drills have these qualities. A regular concrete drill is suitable for working with ceramics. It must be made of hard alloy and have a pobedite tip.
You need to work carefully and carefully, but you can drill a few holes anyway
Large holes
How to arrange a hole for a meter, mixer or pipes? Drills and crowns with diamond coating. Kits with crowns of various diameters are sold, so you can choose which diameter you need.
When working with diamond core bits, do not forget to wet the tile and tool with water, because overheating will wear off the diamond coating faster.
It is better to buy crowns with a centering drill. Otherwise, it will be difficult to control the crown and it will slip on the tile.
But small crowns do not have a centering drill. In this case, you need to work carefully and slowly. There are jigs on sale - devices for fixing crowns.
- Crown with pobedite teeth. There are different diameters, but up to a maximum of 15 cm, so you get holes for pipes, for a mixer or socket. The pobedit analogue of diamond coating will not last long; after 10-15 holes, the crown can be thrown away. But the affordable price encourages some to buy such crowns. You need to work with them carefully so that the edges are as smooth and neat as possible.
- Ballerina. Old fashioned but practical. In the tail part of the ballerina there is a bracket with which you can adjust the diameter of the hole. A spear or cylinder tile drill bit will go through the ceramic and make a clean hole. The advantage of the tool is that it is handmade, which makes it possible to regulate the speed of rotation. The cheapness of the ballerina allows every novice master to have one.
Adjusting the ballerina
Before you begin, you need to loosen the tightening screw on the central stabilizer of the device. This screw clamps the working drill, through which drilling occurs.
By loosening the working drill moves from the axis of the central stabilizer to the required distance, indicating the required circumference of the hole in the tile.
After the desired value has been set, the tightening screw must be tightened back, securely fixing the working drill in the central stabilizer. The design is very simple, which allows you to make a similar tool with your own hands.
- If you are using not a classic ballerina, but a two-incisor one, the adjustment process is slightly different.
- First of all, it is worth noting that the cutters will be located in a fixed bracket at the same distance from each other.
- It is necessary to adjust each cutter separately, while maintaining the same distance from the central stabilizer in the bracket.
- Clamping screws are also used as a fastener; this design is very similar to the classic one.
A design with two or more cutters is more convenient to use, because drilling occurs several times faster than when using the classic model. However, adjusting the cutters is much more difficult; if the distance of the cutters from the axis is different, it will not be possible to create an even circle, as a result the tile will be damaged.
Types of instruments
In addition to the classic two-cutting version of a circular drill, there are one- and three-cutting models. In the design of a single-cut drill, the cutting part is directly fixed to the rod. The cutter and centering lance are equipped with carbide plates. They make it easier for a ballerina to work on tiles.
In three-incisor models, the incisors are mounted on a round platform on which there are grooves. The cutters move along these grooves. They have a scale. Correctly set size allows you to cut more accurately and quickly.
Currently, some models are equipped with a protective grille made of plastic. It improves work efficiency and convenience.
The ballerina for metal is equipped with plates made of hard alloy with sharpening of a cutting turning tool. High cutting force dictates the use of stationary or portable radial drilling machines. Basically, holes are cut in galvanized sheets, the thickness of which does not exceed one millimeter.
Recommendations for using a ballerina
Before using this tool, please read the instructions and operating instructions carefully.
- Particular attention must be paid to the selection of drills to create a recess at the central point.
- If the shape and type of drill are unsuitable, the tile will simply crack, making it completely unsuitable for further use.
- The drill should be of small diameter to avoid cracking the material during drilling.
You also need to pay special attention to the fastening of the cutters in the ballerina; if the working surfaces are not securely fastened, they may fly off during work, which will lead to damage to the material.
In addition, there is a danger of injury to the master’s hands. Therefore, it is necessary to comply with all safety requirements, wear a protective mask and gloves, and respiratory protection to avoid injury.
Disadvantages of the device
In addition to the advantages, working with circular drills has its disadvantages. These include:
- thread breakage of the clamping screw;
- vibration when using a single-cut tool;
- cutter wear;
- difficulty of working with a three-cut device;
- intermittent operation to avoid overheating of the nozzle;
- frequent breakage of a cutter or drill, including during operation;
- breakage of the material during the drilling process.
To work with a circular drill, you need a good tool, high-quality material, and work skills.
Photo of a ballerina on tiles
Drill
And let's start considering the issue by choosing a drill. Choosing this tool is quite simple if you understand the needs. Some experts still recommend using a hand tool because it allows you to more sensitively control the speed of the drill. As a result, sudden jerks are eliminated, which will allow you to leave the tile intact.
It is also important that there is no vibration in this procedure, which negatively affects the material. But such a tool is quite difficult to find and purchase today.
Besides, why use outdated products if the market is full of useful new products?
But such a tool is quite difficult to find and purchase today. Besides, why use outdated products if the market is full of useful new products?
DIY making
When you don’t have a device at hand that can cut a circle from wood or other material, you can try to make it yourself. To do this, you will need a collet holder and a set of the required size of feather drills. A collet holder is a clamping mechanism that is used to clamp a rotating cutting tool. It can be made from a bolt, the diameter of which depends on the chuck of the rotator, machine tool or drill. The head of the bolt needs to be cut off and sawed crosswise along the thread side.
The center drill is sharpened into a cone, and the cutting drill into a wedge. In this case, the end of the center drill should be 3-5 mm longer.
The drill is held in place by two nuts: one is a clamping nut, the other is a guide. If holes with a constant radius are cut, then the drill can be welded to the holder.
Specifications
To obtain a high-quality hole of the required size in such cases, you will need a special tool - a ballerina (round drill).
| Tool Options | Parameter values |
| Tool weight | 0.1-0.110 kg |
| Length | 90-120 mm |
| Shank type | Cylindrical |
| Shank length | 8-9 mm |
| Maximum outer circle diameter | 140-160 mm |
| Minimum outer circle diameter | 20-30 mm |
| Diameter of support bar | 7 mm |
| Working surface processing depth | 30 mm |
| Number of working cycles (for ballerina on tiles) | 30-40 |
Characteristics of metal for drill
The ballerina is made of high-quality carbon (tool) steel, which does not contain alloying additives or impurities. Carbon steel is used for the manufacture of high-strength static cutting tools that experience significant mechanical and physical stress.
The properties of carbon steel provide the ballerina with the following characteristics:
| Characteristic | |
| Hardness | Ensures that the drill remains in a vertical position when working with it |
| Strength | Ensures uninterrupted operation of the ballerina when drilling deep layers of the working surface |
| Cyclic strength | Maintains performance characteristics after repeated use |
| Plastic | Possibility of adjusting cutters |
| Heat resistance | Possibility of maintaining the working qualities of the tool when drilling at high speeds and heating |
| Wear resistance | Long tool life and resistance to corrosion processes |
Characteristics of a metal drill
The ballerina allows craftsmen to work with metal surfaces (steel, cast iron, brass, aluminum, bronze) up to 14 mm thick. Using this type of drill, mounted in a drill or in a tabletop drilling machine, you can cut a hole with a radius of 22-105 mm in a metal surface.
Choosing equipment
This tool can be used to install various types of attachments designed for ceramic tiles and porcelain stoneware:
Feather on tiles
A special drill for ceramics, the tip of which has the shape of a spear with two blades. For drilling holes for dowels at home, this is one of the best options (provided that the amount of work is small). The convenience of the pen is that it does not require preliminary punching due to its sharpness. Provides high safety of the material.
The downside is the low resource: on tiles the pen will be enough for a couple of dozen holes, on porcelain tiles it will be possible to drill no more than 10 times.
If you have to “pull out” everything that is possible from the pen on the tile, drill at low speed - this will preserve the coating and prevent overheating. It would also be a good idea to use water for cooling.
Expert opinion Mezentsev Sergey Petrovich Master of repair and finishing of residential premises
On a note. The simplest water cooler can be made in a matter of minutes from scrap materials - a PET drink bottle and a plastic juice or cola straw. A hole is drilled or pierced in the lid into which the tube is inserted. The joint is treated with glue, sealant, plasticine or even used chewing gum. When pressing on the bottle, the jet is directed using a tube to the drilling site.
Concrete drill
Unlike a drill, a drill has fairly blunt blades, the purpose of which is to chisel, not drill.
However, this will not work with tiles - we switch the hammer drill to non-impact mode and, little by little, applying force, we begin to drill a hole in the tile or porcelain stoneware.
It may take a lot of time, but it is better not to increase the pressure. After passing through the ceramic material, hammer drilling is started again.
Tubular drill
It is used in cases where a hole needs to be made of medium diameter - from 8 to 20 mm. A tubular drill is a kind of hybrid of standard drill equipment and a miniature elongated bit.
It has a cutting edge coated with abrasive, as well as a window for removing crushed material. A tubular drill also requires cooling - in this case it will last much longer.
Due to alignment difficulties when working with a tubular tile drill, it is advisable to use a template or jig.
Ballerina
Under this beautiful name, a circular drill appears among craftsmen. This is a standard feather base, located in the center and clamped in a chuck, as well as a side cutter, which is moved back and fixed at the desired distance from the center.
The equipment works on the principle of a compass - the side cutter outlines a circle as it rotates.
It is advisable to use a ballerina for drilling large holes in tiles. It is not suitable for porcelain stoneware - it is too hard.
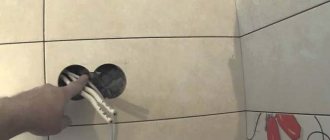
Drilling tiles for a socket or pipe
How to drill tiles, what tools can be used for this?
Drilling with a hammer drill with a diamond-coated crown installed
The cost of diamond-coated crowns depends directly on their quality, but it is still an expensive pleasure.
- Before drilling into a tile, it must be placed on a flat, not very hard surface (possibly wood).
- Mark the drilling location on the front side of the tile.
- Using a hammer drill, drill a hole of the required size.
This method is the fastest and safest.
Drilling with a diamond bit
How to drill tiles correctly?
You need to do the following:
- Mark the location for the hole.
- Drill into the face of the tile without pressing too hard on the drill.
- If the diamond-coated crown is in good condition, you can make a hole of the required diameter in two to five minutes.
Drilling tiles with a drill
Drilling with a circular tile drill – “ballerina”
How to drill tiles if you need to drill a hole of a non-standard size?
- Set the desired hole diameter (for example, if it is 5 cm, then the distance between the drills must be set to 2.5 cm).
- Mark the drilling location.
- Start drilling the tile.
Advice: you cannot swing the drill while drilling; you can use a special tripod for the drill.
Drilling with a drill with a diamond tip installed
This method can be used in cases where it is not possible to purchase a crown.
How to drill tiles?
- On the front side of the tile, mark the diameter of the desired hole. If it is a switch or socket, then you can take a box of a certain size, attach it to the tile and trace it with a pencil. If the hole is for a water pipe, then you can use a compass.
- Drill a drill along the entire contour of the hole so that the edge protrudes beyond the intended line by at least 1-2 mm (up to 20 holes 4-6 mm in diameter).
- Carefully knock out the core.
- The remaining teeth must be broken out with wire cutters or pliers.
- Sand the cut surface.
This method is the longest and requires a lot of patience and skill.
Drilling along the contour
Drilling with a tungsten core bit and a center drill
This method is suitable when the tiles have already been laid.
- To prevent the crown from slipping or moving during the drilling process, it is advisable to use a special template with the required hole diameter.
- Press the template against the wall.
- Press down with a drill and make a hole.
Drilling ceramic tiles is a rather difficult task for many people, because they do not know how and what to drill into tiles.
Most often you have to drill through tiles that have already been laid on a wall or floor, so you have to act carefully so as not to damage the entire masonry. The main thing is to select the right drill, which is better than others for the intended purpose. When the walls in the bathroom and toilet shine with brand new tiles, it’s a pleasure to look at them
But the renovation is not finished yet - we need to hang the shelves and fix the mirror. But not everyone knows how to drill ceramic tiles correctly to prevent accidental chips. Alas, fragile ceramics are very easy to damage, and then a wonderful repair will go down the drain. In order not to rack your brains about where to get tiles to replace damaged ones, you need to know how to work with them. Read more about it
When the walls in the bathroom and toilet shine with brand new tiles, it’s a pleasure to look at them. But the renovation is not finished yet - we need to hang the shelves and fix the mirror. But not everyone knows how to drill ceramic tiles correctly to prevent accidental chips. Alas, fragile ceramics are very easy to damage, and then a wonderful repair will go down the drain. In order not to rack your brains about where to get tiles to replace damaged ones, you need to know how to work with them. Read about it further.