close ×
A forge is equipment that allows you to heat metal to a temperature of 1200 degrees. Its dimensions vary widely. Some are large and stationary, others are small and portable.
You can make a forge with your own hands of any design, which will work on both solid and gaseous fuel.
Device and principle of operation
In order to understand how to make a forge with your own hands, you need to understand its design. Physical processes are based on the combination of carbon and oxygen. In other words, the process of carbon combustion occurs, releasing heat.
To prevent complete combustion of the metal, the amount of oxygen is not supplied in full. This is regulated by air blowing. You shouldn’t overcook the workpiece in the forge either. The metal will dry out and become hard but brittle. The classic example is cast iron.
A homemade forge for forging consists of the following parts:
- Table made of refractories.
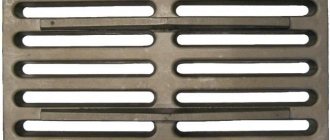
- A firebox or hearth with a grate.
- Air chamber.
- Air drainage.
- Supply air duct.
- Air valve.
- Camera.
- Window through which workpieces are fed.
- Umbrella.
- Chimney.
- Crucible.
- Quenching bath.
- Gas-air chamber.
Figure 1: Drawing of a forge
For lining a table with your own hands, use refractory bricks. The hearth is based on a form that includes a firebox, grate bars and an air chamber. With the help of air drainage, the blowing is adjusted. The chimney is designed to remove accumulated gases. A hardening chamber is not always necessary. It is required in the case of forging damask steel so that the product undergoes the necessary heat treatment. The crucible is the place where the maximum temperature is maintained. At home, it is made of fireclay bricks.
How to do it?
Simple closed version
Required materials:
- 6 bricks;
- soldering iron;
- grid made of steel strips, less than 3 mm wide.
Construction stages:
- 2 bricks set the bottom layer - a simple foundation.
- 2 pipes plus a grill are laid on top. There must be a gap between the elements.
- In order for the fire to catch the grate slats, you need to bend them, then the flames will be directed upward.
- The walls are made of 2 bricks laid on the sides.
- The last 2 are placed on top of the structure.
- A heated soldering iron is placed in front of a homemade forge, and coke is poured onto the grate. The burning of the lamp ignites the coals. The process is maintained, the flame is directed towards maximum temperature maintenance.
- To ensure complete safety of the structure, a fireproof shield (fence) must be mounted between the forge and the soldering iron.
Alternative forge option
A gas oven will become a safe alternative. It is distinguished by its ease and simplicity of construction. But it has its own negative features. If industry uses monogases of a special composition that do not spoil the final performance properties of the metal, then household gas containing sulfur and wood combustion products has a detrimental effect on the material being processed. There are 2 ways to solve the existing problem:
- Passing gas from a cylinder through a container of naphthalene immediately before entering the burner.
- Use gas when heating parts that will not be subjected to significant loads. In this way, it is possible to process decorative forging elements.
Fuel
The following can be used as fuel:
- Small coke. Pre-kindling is done with firewood, on which coal is placed. The ignition temperature of coke is up to 600 degrees, so it is placed last.
- Charcoal burns better because it has a microporous structure.
- Coal. When burned, it should reach the carbon stage. It burns worse than coke, so it is used for forging less critical products.
- Firewood. They are burned in the shell so that harmful impurities do not reach the metal.
- Working with waste oil.
Some features
There are several types of fuel - solid fuel, charcoal or coal, firewood and coke. Experienced blacksmiths prefer fuel such as coke, but it costs much more than regular coal. Although its consumption is much less than coal, about 5 times.
Experienced blacksmiths recommend using coke for ignition.
If we talk about forging metal in an artistic style, then this is the best fuel to use. Coke will give a fairly high hearth temperature. And because of all this, forging will be performed well, and there will not be a lot of soot and waste in the form of slag.
If you have decided on coke, then it is best to purchase coke. This is the same coke, only much smaller. If you take a large one, you will still need to split it into small pieces. This will take a lot of time, which you can spend usefully.
There are also furnaces that run on gas or liquid fuel, but this fuel option is usually used in larger-scale production.
The forge furnace is quite simple to operate.
The working surface is the place where the main forging work is done. Coal burns on it, which will heat the steel blanks. At the moment, there is a wide variety of structures and designs of such forges. They have their differences due to the fuel that is used on them.
Solid fuel forges
To figure out how to make a forge that runs on solid fuel, you need to study the instructions and decide on the type. A closed-type forge furnace is better suited for working on coal or wood. It is made at home from scrap materials. A charcoal forge does not require special equipment.
Necessary materials:
- Availability of refractory bricks.
- Injection burner.
- Hood.
Manufacturing procedure:
- At the preparatory stage, drawings for the forge are developed.
- A cube is being made from bricks. There remains a cavity with a hole inside.
- Using reinforcement, the frame is secured.
- A burner is installed in one of the side bricks.
- There is a hood on top, which creates safe working conditions.
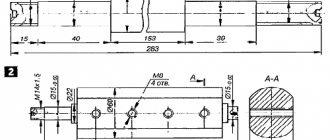
Figure 2: Drawing of a forge using solid fuel
Making a forge for heating metal with your own hands makes it possible to adjust it to the necessary conditions. The material used must only be of high quality to ensure fire safety is maintained.
Gas horn
A DIY gas forge should be practical. Its walls are made of fireclay bricks.
The manufacturing procedure is as follows:
- Refractory bricks are being prepared.
- The walls of the forge are folded. The amount of material varies depending on the complexity and size of the case.
- Surfaces are processed using a hacksaw.
- All elements fit tightly. The presence of cracks is not allowed.
- A threshold is installed in the front part.
- A rectangular hole is cut at the back. It serves both for ventilation and for working with long workpieces.
- A hole of the appropriate diameter is cut out on the side for the gas burner.
- The gas burner is made of stainless steel. This is a pipe welded at one end and with a metal mesh at the other.
Such a forge has its advantages:
- The furnace is structurally simpler than a coal forge.
- Simple fuel supply and simple temperature adjustment.
- Light weight.
- Low cost.
There are other types of gas forges made of metal. There are no fundamental differences between them.
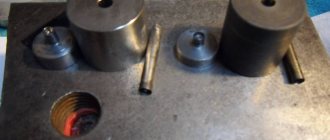
Figure 3: Burner drawing for a gas forge
Burner design
A standard homemade burner functions this way. Gas is supplied under pressure through a special hose from the cylinder. Most often, propane is used as such gas. The volume of gas supplied is changed by a regulating operating valve located on the cylinder. Therefore, installation of an additional reduction gearbox is not required.
The shut-off valve is located behind the main valve and is mounted on the gas cylinder. It is used to open or close the gas supply. All other adjustments (length and intensity of the flame) of the burner itself are carried out using the so-called working tap. The gas supply hose through which gas is supplied is connected to a special nozzle. It ends with a nipple. It allows you to set the size (length) and intensity (speed) of the flame. The nipple together with the tube is placed in a special liner (metal cup). It is in it that the creation of a combustible mixture occurs, that is, the enrichment of propane with atmospheric oxygen. The created combustible mixture under pressure flows through the nozzle into the combustion area. To ensure a continuous combustion process, special holes are structurally provided in the nozzle. They perform the function of additional ventilation.
Based on this standard design, you can develop your own design. It will consist of the following elements:
- housing (usually made of metal);
- a reducer, which is attached to the cylinder (use a ready-made device);
- nozzles (made independently);
- fuel supply regulator (optional);
- head (the shape is selected based on the tasks being solved).
The burner body is made in the shape of a glass. The material used is ordinary steel. This shape allows for reliable protection against possible blowing out of the working flame. A handle is attached to the body. It can be made of various materials. The most important thing is that it provides convenience when working. Previous experience shows that the most optimal length of such a handle is in the range from 70 to 80 centimeters.
Gas burner device
A wooden holder is attached to the top. A gas supply hose is placed in its body. This allows you to give the structure a certain strength. The flame length can be adjusted in two ways. Using a reducer located on the gas cylinder and a valve installed on the tube. The gas mixture is ignited using a special nozzle.
Waste oil furnace
Considering that petroleum products are expensive, it is beneficial to use a forge using waste oil. To make the forge during mining, parts that have served their useful life are used. After processing the furnaces, a significant drawback emerged - the spent mixture did not ignite well. To eliminate this problem, an additional compartment was built into the mining forge. Here the oil is preheated with coal or wood. To improve combustion, waste fuel passes through filters and diesel fuel or gasoline is added to it.
As a result, the mining forge has the advantages of a yellow flame and stable temperature.
You can make it yourself:
- It is made from fireclay bricks, dimensions: 85×48×40 cm.
- The vault is made in the form of an arch to maintain temperature.
- The body is completely covered with sheets of iron. A thickness of 1.5 mm is used on the sides, and the top and bottom are lined with 2 mm sheets.
- The supports are made from angles based on the weight of the structure.
Air is pumped into the chamber by a fan. A waste tank is installed on a hill. From it, the oil enters the chamber through a pipeline, where it is picked up by air, which moves under a pressure of 2 atm. The waste is broken up and fed into the nozzle.
To reduce the ignition time, a heating element is installed in the forge during testing. Ignition time may take up to 30 minutes. But the hot mixture burns well. Now you need to make sure that the fireclay does not melt.
Scheme of the furnace during development:
Aluminum smelting
Aluminum, which has a high degree of ductility, is a low-melting non-ferrous metal. A forge for melting aluminum is easy to make with your own hands. There are many designs that use furnace smelting. They have no fundamental differences between themselves.
Step-by-step instructions for creating a forge for melting aluminum:
- The body is made of brick. The material is selected without cracks to avoid heat loss.
- By selecting scraps of steel pipes, shelves for grate bars are made from them. Low-melting material cannot be used here.
- Steel strips up to 6 mm thick are selected and used as grates.
- The grate bars are screwed on.
- Both coke and coal can be used as fuel.
- Ignition is carried out using a blowtorch or gas torch.
Such a homemade blacksmith's forge can only be used in open space, due to the absence of a chimney. During operation, a lot of gases are released that should not accumulate in a confined space.
Little tricks
As a cast iron grate, you can use an ordinary old frying pan with fairly thick walls; you need to drill special holes with a diameter of about 10 mm at its bottom.
Next you need to insert it into the tuyere as tightly as possible. To supply air, without which the forge will not properly fulfill its purpose, you can use a regular fan. To do this, you can use a vacuum cleaner, and sometimes a hand-held siren.
https://moyakovka.ru/youtu.be/nPt8g8IOxm4
It is important that it has a speed controller and that it is not very noisy. Otherwise, loud noise may disturb you while working.
Mini horn
A small, portable forge is often useful on the farm. It can be used not only in the forge, but also in the garage or at the dacha.
To make a mini-forge with your own hands, you need to have 2 refractory bricks, a hacksaw, a drill with a diameter of 8 cm and a length of 15 cm. It is advisable to have a pobedite tip at the end. To fasten the structure, 2 pins with a diameter of 8 cm and a length of 21 cm are prepared. During the work, you will need 2 hole saws, 63 and 26 mm in diameter.
The operating procedure is as follows:
- 2 bricks, 250 mm long, are sawn in half.
- Two halves of one brick are laid on top of each other and 2 through holes with a diameter of 63 mm are drilled using a hole saw.
- Placing the third half under them, through holes for the studs are drilled in two corners, diagonally.
- Using pins, a block of three bricks is assembled and pulled together. First, washers are put on the ends of the studs and nuts are screwed on.
- A hole for the burner is drilled between the first two bricks using a 26 mm ring drill. It connects to the main passage, but does not touch the second wall.
The burner is inserted into this hole and ignited. Any metal is fed into the main passage, which falls under the flame and heats up in a few seconds.
Framing the walls
This forge will be small in size, its internal dimensions are only 12 x 18 x 24 cm. But for my work this is quite enough. Due to the small size, only three bricks were needed for the walls, and all I had to do was weld the metal corners at the corners.
Adjusting the burner operation
Attention! Subsequent work is a fire and explosion hazard, because
are carried out with open fire and flammable gas - propane. They must be carried out in strict compliance with Fire Safety standards and the following requirements:
- carry out all work in a well-ventilated area;
- remove (reliably de-energize) all spark-producing equipment;
- the workplace must be prepared for work: everything unnecessary should be removed not only from the workbench, but also from the floor, ensuring clear passageways in case of force majeure;
- prepare: primary fire extinguishing equipment for flammable gas;
- medical first aid kit.
The burner flame is adjusted in the following sequence:
- open the valve on the fuel source, supply gas to the burner and light it;
- Gradually move the nozzle tube towards blocking the four air intake holes and achieve stable combustion. Additionally, the burner flame should be adjusted by changing the gas supply. Having obtained a flame of the desired intensity and shape, the position of the tube and nozzle should be fixed with a clamp screw (4 in the figure).
Such a burner will operate steadily and produce an even flame sufficient to heat small parts to the required temperature.
This is interesting: Opening a blacksmith shop with manual equipment for artistic forging: short and clear
Making a forge from a potbelly stove
Essentially, this is the same potbelly stove, only without the grate. The appearance of blacksmiths can be in the form of a cube, parallelepiped and cylinder. After cleaning the grate, the air does not come from the space below, but is blown through a side channel, which can be adjusted. As a result, the oven heats up better. It retains gases longer, which also increases the heat.
The manufacturing procedure is as follows:
- From a pipe with a diameter of up to 300 mm, a ring 100 mm wide is cut. This part is called a collar.
- A sheet 4 mm thick is taken and a circle equal to the diameter of the collar is cut out of it. This will be the door.
- A piece of pipe for air supply is cut off. It can be from 76 to 102 mm.
- The damper is inserted into it using a handle, a spring and a nut.
- A strip 30 mm wide and length equal to the perimeter of the door is cut out of a 3 mm sheet.
- The strip fits around the door and gets scalded.
- A hole is drilled in the side of the door and a pipe for air supply is welded there.
- Using a locking device, the door is attached to the collar.
- This unit is installed on the firebox with a distance of 100 mm from the bottom.
- In the back part, at the top, a hole is cut and a chimney is installed.
The disadvantages of such a stove include the absence of an ash pan. However, longer combustion results in improved combustion of solid waste. Ash removal can be done less frequently.
Making a forge from a bucket
The bucket forge is also designed for melting aluminum. To do this, you need a bucket with a capacity of 10 to 20 liters. In addition, gypsum and sand. This mixture is placed at the bottom of the bucket.
Step-by-step instructions for a forge made from a bucket with your own hands:
- The selected bucket must not be galvanized. This is due to the fact that zinc, when heated, releases harmful gases. The container is made of ordinary metal.
- A mixture of gypsum and sand, 5 cm thick, is placed on the bottom. The ratio is 1:2. First, such a mixture is formed at the bottom. After drying, the inner walls of the bucket are treated with it. Drying time is 15–20 minutes.
- A water squeegee is installed below, through which air is supplied with a hairdryer.
- A crucible is inserted into the bucket.
- The ignition process begins.
- Aluminum is placed in a crucible and melts under heat.
Small items can be cast in this way.
A hand-made blacksmith's forge is a necessary household device. However, first, you need to read the instructions for its use. Purchase the necessary drawings. The risk of fire must be completely eliminated. The right place has been chosen for it. Working with hot metal will bring not only pleasure, but also benefits.