Everyone who uses headphones has sooner or later encountered the fact that they fail. As a rule, this manifests itself in the form of one non-working speaker. This kind of breakdown is typical for headphones, and it is due to the fact that their wires are constantly bent. Below in the photo, red circles show the areas most at risk of cliffs.
As practice shows, if such a breakdown occurs, in most cases performance can be restored. We'll tell you in detail how to solder your headphones so that they continue to delight you with clear sound.
Problem Definition
A break can occur in the plug, at the speaker, or somewhere in the cable. The latter case is extremely rare and, as a rule, is caused by mechanical stress on the wire due to careless handling. In such a situation, it is recommended to completely change it, since the adhesions will create a problem area.
Places where wire breaks most often occur
Most often, the problem lies in the plug itself, since this is the most critical place. In most cases, by pressing on the base of the connector, or bending the cable near it, you can find a position in which both headphones will start working. As a result of this, we can state that the problem lies precisely in the plug.
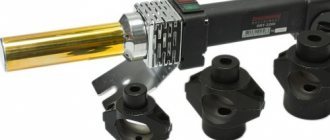
Soldering iron.
A soldering iron with a power of 25 - 40 watts is suitable for soldering connecting audio cables.
The pictures show the process of preparing two tips with diameters of 4 and 6 millimeters for operation.
In some cases, you may need to use a file to correct the shape of the soldering iron tip.
A properly sharpened soldering iron tip is convenient not only for soldering, but also for removing insulation.
The tip of a 40-watt soldering iron with a diameter of 6 mm, for ease of use, can be slightly narrowed with a file.
After the tip has acquired the required shape, it must be burned so that the oxide prevents the solder from spreading beyond the working area. For firing, just turn on the soldering iron for 20 - 30 minutes.
Now you need, with the soldering iron still turned on, to pass the file along the working surface of the tip several times to remove the oxide. Immediately after this, you need to immerse the tip in rosin, rub the solder ball with the tip and immerse it in rosin again.
Your soldering iron is ready to go.
Return to top to table of contents.
Standard plugs
Before we begin the repair, let's look at the most common types of headphone jacks, as well as their connection diagram. This will help us decide how to solder the headphone wires if the cable has 4 wires (headset with microphone) or 3 wires.
Below is a classic diagram for connecting headphones connected to each other by a common ground. In quality devices such as Koss Porta Pro, Philips, Sony, Sennheiser, etc. a separate shielded wire is used for each channel; in more budget implementations, there may be a common shield for two channels.
Connecting headphones to a standard plug
For headphones with a microphone, the plug has an additional contact pad; a diagram of such a connection is shown below.
Diagram for connecting headphones with a microphone to a standard plug
Note that many manufacturers of mobile devices can use non-standard connectors; we will consider this topic at the end of the article.
Tinning.
Tinning is a mandatory procedure if the electrical elements were not prepared for soldering at the production stage.
In order to tin the conductors and plug contacts, you can apply them one by one to a piece of rosin and heat them with a soldering iron. In this case, there should be a drop of solder on the working surface of the soldering iron.
When using liquid rosin-based flux, you need to moisten the conductors and plug contacts one by one with the flux, and then heat it with a soldering iron with a drop of solder on the tip.
The use of active flux is allowed only for tinning, but not for final soldering.
When using active fluxes, rinsing of the solder is required.
The tinned end of the cable should look something like this.
Return to top to table of contents.
Algorithm of actions for repairs
Now that we have everything ready, let's start restoring the headphones:
- we cut off the old connector, approximately at a distance of 0.5-1 cm from its base, so we will get rid of the problematic part of the wire;
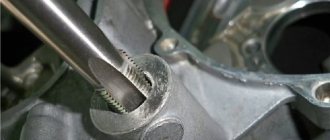
- remove the insulation so as not to damage the conductors. As a result, we will see four wires, two of which will be covered with insulating colored varnish, and two without insulation (an example is shown in the photo);
Stripped end of headphone wire
- in order to tin the wires, it will be necessary to remove the insulating varnish from them; this is done using a stationery knife or fine-grained sandpaper. We twist the screen of the right and left channels together;
- as mentioned above, it can be three wires, two of which are channels, and one is a common screen, in this case we simply remove the insulating varnish from them;
- we disassemble the new connector, do not forget to thread the stereo headphone wires through its base, as shown in the photo (otherwise you will have to redo everything);
Important point: the wire must be threaded into the base of the connector
- Let's start soldering the wires to the connector. It is recommended to start with the general one, after which we solder the left and right channels. The result is shown in the photograph;
Soldered wires
- After letting the wires and connector cool for a few minutes, you can test the result. To do this, connect the plug to the audio output socket and check the operation of the headphones. If everything is fine, we proceed to assembling the connector. What to do if one earphone still does not work will be discussed separately;
- We fix the wire; for this purpose, there is a clamp on the connector (on the contact where the common wire is soldered), an insulated cable is inserted into it and crimped using pliers. In the photo below, the clamp is marked with a red circle on the unsoldered connector;
Cable clamp (marked in red)
- For greater reliability, we insulate the contacts with electrical tape, and at maximum proximity to them we recommend tying a knot on the cable. This will significantly reduce the risk that an accidental jerk will break the solder.
Ready-to-assemble connector
- We assemble the connector and use the headphones for our own pleasure. If you need to solder a plug to 4-wire headphones (that is, with a microphone), the principle of operation is almost the same.
Now consider the option that one of the speakers continues to be inoperative after replacing the plug; there are several reasons for this:
- poor-quality soldering, it is necessary to carefully check it;
- there is a problem with the headphone speaker, there is a very high probability that the wire has broken near it;
- problems with the cable itself, as mentioned above, it is not recommended to extend the cable or connect it at break points.
As you can see, in two out of three cases the problem is solvable. If the reason is poor-quality soldering, you should re-solder the connector more carefully; if there is a break near the speaker, proceed according to the following algorithm:
- cut the wire near the base of the earphone;
- we disassemble the earphone, as a rule, they are made to be self-latching, so there will be no problems with this;
- we remove the insulation from the wire and strip and tinning it;
- if you have a multimeter, then at this stage you can ring the headphone lead to ensure its integrity;
- We solder the wires, test the headphones, and assemble them.
Video: How to solder headphone wires
Headphone wire colors
Typically, manufacturers use the already familiar system for organizing colors on cables. They are located like this:
- red – right channel;
- green – left channel;
- two copper ones - the ground of both channels.
Sometimes blue, white or other colors are used together with green on the left channel. However, red always remains on the right channel cable.
But some manufacturers (for example, Apple) have a two-tone coating. A multimeter or a three-volt battery will help you figure out the channels.
The moment you apply voltage to a device or battery, clicks, rustling sounds and other sounds will be heard in your ears.
Non-standard connectors
We have already mentioned that many manufacturers produce devices where the input on the headset differs from the standard one. For example, some models of Nokia, Samsung, Ericsson, etc. It is also common to find headsets where a USB connector is used instead of a standard plug, for example, WH-205.
As for the technology for repairing such headphones, it is practically no different from the usual one. The only exception may be searching for an original plug for a particular phone model. But, given the increased number of “left” manufacturers of original spare parts, it is not difficult to buy such a connector.
In addition, do not forget that to connect a standard headset to a non-standard connector, you can use an appropriate adapter, for example, such as shown in the photo.
Adapter for Samsung phone, for standard headset
If desired, such an adapter can be soldered independently, but given the low cost of Chinese products, this is not particularly necessary.
As you can see, soldering headphones correctly is not difficult; all that is needed for this is accuracy and skills in working with a soldering iron. Even if you didn’t manage to make the repair the first time, don’t be upset, check everything again.
Cable cutting.
You can prepare a cable in different ways, but the least traumatic method for conductors is to remove the insulation using a soldering iron.
Holding the soldering iron with one hand, rotate the shielded wire around its axis with the other hand, while pressing the insulation against the sharp edge of the soldering iron tip. https://oldoctober.com/
If after this you cannot remove the insulation by hand, you can use side cutters.
It should look something like this.
We also remove insulation from individual wires in the same way.
Now you can give the cable a look suitable for tinning.
Return to top to table of contents.
Looking for the cause of the damage
Admit it, how often have you seen a headphone cable break right in the middle? The cause of the breakdown is almost always the plug, which, with regular use, is subjected to mechanical stress much more often than other elements of the headphones. Simply squeeze and tug the wire around the plug.
If the sound appears after this, it means that there really is a problem. We simply cut off the old plug - we won’t need it anymore. Although, if the distance between the break and the flexible part of the plug is about cm, there is a chance to use it if it is not possible to buy a spare plug.
In addition, to more accurately determine the location of the break, you can use the tester in resistance measurement mode (Ohm). Touch one end of the plug to any of the plug contacts (the left or right headphone output is the two outermost contacts), and attach a simple needle to the other probe with electrical tape and carefully insert it into the wire a little further from the intended break point. If the tester shows a value of 0 or slightly more than zero instead of 1 (a value with hundredths or tenths), then there is a break in this wire.
Types of breakdowns
Headphones come in different designs. However, the most common breakdowns for all types of headphones are similar. Most often, damage to one of the cores inside the cord occurs. This usually occurs due to chafing or constant bending of the wire in one place. This is due to intensive use.
The cord may also break at the plug. This happens when there are strong bending loads on the cable at the base of the plug. The wire there may break if it is pulled sharply.
The wires break not only at the plug, but also in the headphone housing. This can happen due to a strong jerk if the wire gets caught on something.
Causes of headphone malfunction: what is it connected with
Suddenly broken headphones will, of course, ruin the mood of any music lover. The reason may lie both in the device on which the sound is listened to, and in the parts of the playback device. Let's look at common reasons:
- Broken wire at the plug or speaker. In this case, the sound through the headphones is not reproduced at all, or appears partially, or is distorted. In some cases, you may hear a crackling sound in the membrane.
- Plug contacts sticking. This occurs due to frequent use of the device. For example, if moisture or dust accidentally gets on the plug and is not cleaned, it may cause problems with hearing the speakers. Clogged contacts do not allow sound to pass through themselves, so there may be a complete absence of sound from the headphones.
- The connector of the device being reproduced is clogged. If the headphone output of a player or phone is dusty or oxidized, there can be no talk of transmitting sound to the membrane.
- Cable bend. This can happen anywhere in the headphones: both in the middle of the wire and at the sockets. Often this problem occurs due to improper use of electronics. So think about how you treated him before.
- The volume control is broken. If there is such a lever directly on your headphones, switching it frequently can lead to problems with sound reproduction. The fact is that if this unit malfunctions, the contact between the headphones and the sound playback device is broken.
- Malfunction of the membrane (speaker element). This happens rarely and often due to dust, moisture, corrosion or mechanical damage. Therefore, keep the device clean regularly.
HELPFUL INFORMATION! Earwax can get into the headphone speaker, causing it to malfunction, resulting in intermittent or no sound. In most cases, repairing headsets and headphones without a soldering iron is impossible
We isolate the wiring
Since we removed the varnish from the wires, they now have no insulation. If you close the twists together, you will either make yourself a mono or cut off one channel. Therefore, they need to be isolated to prevent short circuits between themselves.
First, we isolate each twist separately. In addition to the insulation itself, this will also strengthen the connections. For some reason I did this with masking tape, it was probably closer
It doesn't matter
Now let's wrap everything together with wide tape, 3 - 4 layers. Or 5 - a matter of taste)
Usually in such cases I prefer to space the twists further apart so that they do not touch each other.
Advice from professionals
- When buying cheap headphones, expect a year of service life. Almost no one has them for longer.
- If you are repairing an expensive pair, you will need a good soldering iron with a thin tip so as not to fill everything around with solder.
- Copper, silver, gold - all this is clearly better than tin. Good sound requires good materials.
- Reinforcement of headphones greatly extends their service life.
- You can tin your contacts not only with aspirin. There are many ways. If the reader is repairing expensive studio headphones, you can clean them with a knife, since the thickness of the copper will allow this to be done.
Repairing a headset without soldering
The headset features volume control and a built-in microphone. Its cord has 4-5 wires twisted instead of three, so only regular headphones can be repaired with an AUX cable.
If you don’t want to give up these functions, you can find a similar cable with a working plug. It can be taken from a device with broken speakers and microcircuits - they still cannot be repaired.
Remove excess rubber and varnish as described above. However, there will be no extra wires left - all of them need to be correctly matched and twisted. Any method will work for re-isolation.
Sometimes finding the right cord is difficult. You can try connecting a new plug by simply wrapping the contacts with the appropriate wires. It is important to isolate them from each other. But this method is unreliable - better find a soldering iron.
One earphone does not work: various reasons and how to fix the device
In addition to broken contacts on the headphones, other problems may arise, for example, the lack of the necessary drivers, a problem in the socket itself, or clogged contacts.
| Cause | Explanation |
| The plug does not fit tightly into the connector | The contacts on the plug and the audio output for headphones and on the plug are arranged in a circle; accordingly, loose pressing or falling of the connector does not create close contact, so the sound in one of the headphones may not be heard. |
| Lack of drivers | If utilities are not installed correctly on the device or are missing altogether, the headphones will conflict with the operating system of the player or phone. In this case, they need to be installed. |
| Contamination and moisture ingress | Over the course of months of continuous use (meaning at work, during sports, or other activities), the speakers may become contaminated with earwax, dust, or beads of sweat. And these factors will definitely affect the performance of the gadget. |
The malfunction of one earphone may also lie in a damaged membrane. You, of course, can try to bend it into place, however, you must understand that this phenomenon is temporary, and soon the device will completely fail without the possibility of repairing it. Fact! Poor hearing is more common with earbuds with silicone tips.
Preparation of components
Assembling new headphones for a computer or smartphone consists of several stages:
- preparation of necessary parts;
- checking the functionality of the cable, connector and speakers with a multimeter;
- connecting the wire to the plug;
- connecting the cable to the unit with a microphone from the input and output sides;
- soldering speakers to wire.
All the necessary parts can be cut from old headphones or a headset for an iPhone, Samsung or a smartphone of another brand. Some of them can be bought, but it is not profitable. In addition, the point of making homemade headphones is lost, since purchasing new parts will cost about the same price as a new gadget.
What is needed for work
To assemble new headphones, you will need to prepare the parts - plug, cable, speakers and microphone. In addition, you need a number of tools - a multimeter to check the functionality of parts, a soldering iron to attach wires to the speakers and plug, rosin, solder. If there is no such device, or the user does not have proper experience working with the device, you can solder the parts to each other without a soldering iron.
Plug
Preparing the plug begins by cutting it off from the old headphones. If the Jack works, it can be cut off along with a few centimeters of wire to facilitate further installation. A faulty plug can be repaired, but to do this you will need to disassemble the part, remove the old wire and attach a new one - this is if the problem is a damaged cable. Otherwise, it is recommended to use another plug and throw this one away.
Cable
The cable should have from three to five cores: 3-4 for headphones, 4-5 for a headset. The length is selected depending on the needs of the user. The shape of the cable does not matter. It is very easy to understand the wires: yellow is grounding, the other two will go to the speakers, and another one or two will go to the microphone.
Speakers
Working speakers need to be cut off from old headphones, after making sure they are working. Most often, old headphones do not function because the wire is broken. The plug fails less often, while the speakers are the part least susceptible to breakdowns.
Microphone
In order not to disassemble the box on the headphones, which contains the microphone, power button and volume control, it is recommended to cut the wire from the top and bottom of this block, stepping back about five centimeters in both directions. The main wires will then be connected to these sections according to the color of the cores.