Author: Miralanim
12 September 2022 20:48
Community: DIY!
Tags: Homemade juice press video juice press photo
30313
8
1
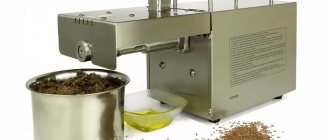
With the onset of the harvest period, the question of preserving it for the winter arises. But not all fruits and vegetables can be stored raw for a long time. A popular way to store harvested crops is to collect juice. Using a juice press can make this process easy and fast. And the ability to make such a device with your own hands according to drawings makes it accessible to every gardener.
0
Source:
See all photos in the gallery
0
Source:
Types of juicers Presses that are created to obtain juice from fruits and berries are divided into several varieties: mechanical (the juice is squeezed out using manual pressure); hydraulic (such models can be equipped with manual or electric drive); pneumatic (can also be supplemented with a manual or electric control mechanism). If a decision is made to build such a device, it is recommended to prepare tools in advance. For simple designs, no complex equipment is required, so every home craftsman can cope with assembling the press.
0
Source:
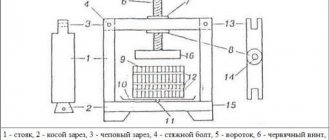
Depending on what type of press you plan to build, a welding machine may be required. Not every summer resident has such equipment, and working with it requires special skills. This problem can be easily solved if you involve your friends in performing such tasks, choose a different type of press, or order welding work from professional craftsmen. In other cases, you will need the following tools and materials: wooden structures (planks of different sizes, bars); steel slats; fastening material (nuts, nails, staples, angles, bolts); tank; saw; hammer; wire cutters; keys; stainless steel sheet; tap; durable fabric with filtering characteristics. When creating a press, you need to pay attention to all its components. The design of the press consists of: base; loading housing into which fruits or berries are placed; filter grids (if you have a high-quality filter, squeezing out juice without pulp is guaranteed); piston; a support on which a special screw is fixed; vessel.
Design options
All juice press models have some common elements:
- Frame. The barrel, drives and all other parts are attached to it. It is usually made of thick, strong metal, since it must support the weight of the entire structure (plus the fruit). Additional beams can be welded at the bottom of the frame to create a cross. This will make the frame more stable.
- Drum-shaped mesh. A lattice just on the bottom will not work, as the fruit will diverge in all directions under pressure. The mesh is installed over the entire internal surface of the structure. At the same time, it must be very durable. Therefore, a drum from a washing machine is often used, and the grate is also made from wooden blocks.
- Barrel with a tap at the bottom. Actually, the juicer body itself, where the mesh should be installed. The barrel must be strong (made of metal). There should be a tap at the bottom, preferably with a handle that can be used to close and open it.
- Pressure mechanism and cover. The drum grid is placed in a barrel, fruits are poured inside (preferably in a bag), and everything is covered with a lid on top, which plays the role of a piston. A mechanism is mounted on the lid that will push it down. In a screw device, this function is performed by a screw.
Devices that create pressure in the tank can be different:
- Mechanical. A hole is made in the top crossbar of the frame with a screw thread inside. A screw piston is inserted into this hole. It is attached to the lid at the bottom, and a handle-bar is mounted on top. A person needs to screw in the piston himself using a handle. The design is extremely simple, but requires physical effort.
- Hydraulic. A system where a device is placed between the cover and the upper frame beam that uses the force of a fluid to create pressure. Such a device in homemade juice presses is often a jack. The latter can have a manual or electric drive.
- Pneumatic. In this case, energy is transferred using air rather than liquid. However, often the same jack, but of a pneumatic design, acts as a mechanism. The drive can also be electrical or mechanical.
You can also distinguish types of presses based on the type of device that transfers pressure from the power plant to the fruit:
- A press with a piston that moves down and up in a cylinder. The fruits are placed in a container, and the piston presses from above. This type of device is the most common and popular due to the simplicity of the design and the low cost of all its components.
- Auger. In this case, the press is more like a meat grinder. Usually this type is not used by summer residents, since it is almost impossible to create it with your own hands. Firstly, you will need a large auger, which is difficult to find. Secondly, such devices require an electric drive, which also complicates and increases the cost of the design.
How to assemble a juicer from a mechanical meat grinder and attachment
How to assemble a juicer in a meat grinder? To do this, you need to install a nozzle, which is designed to receive and collect liquid into a container when grinding products. If your existing meat grinder does not come with such an accessory, you will need to purchase it at the store.
Important! When choosing, you should pay special attention to the material of manufacture. They make products from metal or plastic. The service life depends primarily on the quality of the material used.
Before starting work, you need to install the juice nozzle, for this:
- The metal chopping head is removed.
- A threaded release sleeve and a mesh are inserted into the body.
- A new one is installed in place of the cutting head.
- It is fixed with a special clamping bolt.
A manual meat grinder is an excellent assistant in the kitchen. A simple and reliable device does not have a complex mechanism that needs to be connected to an electrical network. For small volumes, it copes with the task simply and easily. When cleaning after work, it is washed, there are few spare parts, and they are not afraid of water.
Necessary tools and materials to make a juice press
To work you will need the following tools:
- circular saw for metal;
- a regular saw (if the grate is made of wood);
- planks, wooden planks, stainless steel sheets;
- corners;
- hammer;
- bolts;
- nuts;
- spanners;
- welding machine;
- pliers;
- wire cutters;
- polypropylene sugar bag.
You will need the following materials for the press:
- metal beams for the frame;
- wooden blocks or strong steel tubes;
- screws, bolts, nuts;
- metal tank, preferably stainless steel, but iron can also be used;
- faucet with opening handle;
- jack or threaded screw.
Other types of units
You can make other types of juicers yourself.
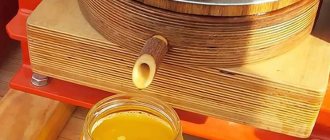
Press juicers are good friends of winemakers. A screw press is best suited for pressing grapes. Depending on the grape variety, different principles of berry processing are applied. White grapes are pressed only after crushing. The red is pressed only after the fermentation process has begun.
The press operates according to the following algorithm. First, the grapes are placed in a basket, then a screw mechanism presses juice out of it, which can be used to make wine, a variety of drinks, and jelly. You can prepare a grape press with your own hands from wood, plastic or stainless steel. The easiest way to implement it is from wood. Made from stainless steel, the device will be of higher quality and more durable.
Manufacturing of main parts
Let's look at the basic elements of the press and how they can be made.
Frame
You need to take metal beams and weld them into a frame in the form of a rectangle. But at the same time, it is necessary to make sure that the tank fits freely inside, and there is also free space between it and the upper beam. At the bottom, small blocks can be welded perpendicular to the frame to make a cross, thanks to which the structure will become stable.
An approximate drawing is shown above, but the actual dimensions must be taken based on the dimensions of the tank and those beams that are available.
It is recommended to make everything from iron to make the structure as durable as possible, but wood can also be used.
Tank
A desirable but optional design element. It is made from stainless steel. If ordinary steel or cast iron is used, then the inside must be coated with an anti-corrosion coating. The tank needs to be round, so the load will be distributed evenly.
Approximate dimensions: half a meter in height and 30-40 cm in diameter. But in general, the tank that is available is taken. Of course, it should not have any chips, holes, rust, or mold. A hole is made at the bottom for the tap.
Pallet
If there is no tank, then you can make an open juice press, without walls. But this will require a tray that will collect the juice. It is usually taken from a simple large flower pot. This choice, although cheap, is not practical, since this material is easily chipped and difficult to process. It is better to make a metal tray from a basin. Or weld it from stainless steel sheets. You need to make a hole at the bottom for the tap.
Tap
It's better to find a tank with a tap at the bottom. But if there is no such container, then it must be welded. First you need to buy the faucet itself. Then find a tube that fits its diameter and make a cut on it, and then weld it to the tank.
The cut screw part is wrapped with double-sided thin adhesive tape. This way the faucet will hold tighter, and the tightness will also be higher.
Then the tap itself is installed. It must have a closing valve so that you can stop the flow of juice so that it does not spill when not needed.
Lattice
The inner drum from a washing machine is best suited as a grille. But if it is not there, then you can make a lattice from wooden blocks. They must be at least 2 cm thick, as they will have to withstand heavy loads.
You cannot use chipboard, as it produces sawdust, resins and other harmful elements.
To create the wall, take two flexible stainless steel strips of the same length as the circumference of the tank. You will also need bars half a meter high, 2 cm thick and wide, as well as self-tapping screws coated against corrosion. The boards are placed in a row so that there is a gap of 1 cm between them. The bars are fastened into a single flexible sheet using two strips of stainless steel and self-tapping screws.
A “raft” is hammered together to create the lid and bottom. Between the bars located on the same plane, the distance should be half a centimeter. First, they knock together a lattice, and then cut out a circle of the required diameter from it.
Filters
It is best to use a polypropylene sugar bag as a filter. You can use linen, lavsan or polyester. But the latter often tear quickly, and the canvas will experience heavy loads.
Power element of the structure
There are several types of juice presses, each of which uses a different power element.
Press with jack
The easiest way to use a press is to use a jack. However, it does not have to be installed there forever. In addition, a device designed for 3-5 tons is sufficient. Hydraulic and pneumatic devices are suitable.
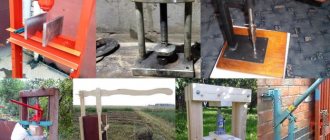
The figure above shows a design using a jack. There are wooden gratings inside the frame. In this case, a scheme is used without using a tank, but with a tray below. The jack is placed on the board and rests against the top beam of the frame. The photo below shows a similar design in real life.
Press with screw
If a person was unable to get a jack, then he can make a screw juice press with his own hands. The screw will require a long iron beam. In addition, it needs to be threaded and a corresponding nut made, which will then need to be welded to the frame. So the service of a turner will be required, so mechanisms with a jack are preferable.
The nut is welded to a hole in the top of the frame. The screw is pushed through it. In its upper part you need to make two identical handles lying in the same plane, opposite each other. This is required so that they balance each other during rotation and do not create vibrations on the screw.
Of course, the screw does not have to be firmly attached to the lid. But you can make a hollow in it, in which the lower end of the screw will stand securely.
Screw press
The difficulty in making a screw juicer lies in the screw itself. This part must have axial symmetry; its blades must also have the same height. In this case, it is desirable that the knives have the same angle of inclination along the entire length of the screw. At the same time, since the auger will have a decent mass, it is difficult to turn it manually. Therefore, an electric motor will also be required.
Above is an example of a screw press for juice. There is an electric motor at the back that drives the propeller. There is a cylinder in the center where the auger is located, and a loading hopper is attached to it on top. There are a lot of holes in the front of the cylinder through which the juice comes out. It falls on a tray, along which it flows into a container. The implementation of the press according to this scheme is shown in the photo below.
Instructions for assembling a juicer from an electric meat grinder and attachment
The electric version has a number of advantages over the manual one.
The most important thing: the volume that it can grind. The power of an electric motor allows much more work to be done than by human hands. How to make a juicer from a meat grinder? To work, you need to install the juice attachment in the meat grinder, for this:
- The central head is removed from the device for preparing minced meat.
- A squeeze sleeve and a filter mesh are inserted into the base.
- The assembled device with the receiving bowl is installed to the engine housing.
- Secure with a twist lock.
The meat grinder has many different accessories. It cuts vegetables, for example, cucumbers, into small slices. Capable of squeezing fruit into purees.
The devices are usually made of high-quality steel and durable non-toxic plastic. Most often, attachments come included with each model of electric meat grinder. But if they are not there, then you can always order the missing set of devices in specialized manufacturers’ stores.
How to make a juice press
Let's consider two design options: mechanical screw and hydraulic with a piston.
Mechanical screw press
First of all, you need to make a lattice. To do this, take a stainless steel sheet 1.2-1.5 meters long, half a meter high and a couple of millimeters thick. Holes with a diameter of 5 mm are made in it in a checkerboard pattern. The distance between holes is 2 cm.
Next, you need to roll the sheet into a short, mundane cylinder. It is necessary to bring one side behind the other, as shown in the photo below, and then weld them together.
Next, using the same scheme, you need to make a tank (without holes), which will be slightly larger in diameter than the grille. The tank does not have to have a bottom. An ordinary metal pallet can perform its task. Then an iron frame is made to fit the dimensions of the tank.
A hole is made in the top of the frame. A suitable nut is welded to it, into which the screw is inserted.
Next, the entire structure is assembled.
At the end you can apply anti-corrosion paint.
Hydraulic juice press
Let's consider a more complex design of a manual juice press with a built-in grinding device. It is useful for processing large and hard fruits (for example, apples).
First you need to find a tank or make a cylinder with a tray.
You need to make a lid and a bottom for it. They are made of wooden beams, about 2 cm thick. They are laid in two planes in a lattice with a gap between the planks of 0.5-1 cm.
Next, the bars are attached to each other using self-tapping screws.
Then a circle of the required diameter is cut out from this blank. The bottom is made flush with the tank so that the drainage wall can be placed on it. But the lid, on the contrary, should fit into the grill freely, so its radius is made smaller by 2.2-2.5 cm. You need to make several of them (2-3 pieces). One covers the entire structure from above, the others must be placed between the bags (they will become intermediate).
A circle is cut out with a circular saw.
The drainage grate is also made from timber. A gap of 0.5-1 cm is needed between the planks. The bars themselves must be thick enough (2 cm), since they will be subject to load. All planks are connected by two stainless steel metal strips.
A wooden grate is placed at the bottom.
Wooden grate at the bottom.
Next, a drainage wall is installed.
The entire structure must be covered with a lid on top.
Next, the metal frame is welded according to the above recommendations.
A cross is welded to the bottom, which will make the structure more stable.
To attach the crusher with the motor, an additional pair of plates is attached to the main frame (perpendicular to each other).
It is better to make the shaft with knives from stainless steel. They are fixed at the bottom of the crusher.
The system is assembled so that both shafts are at the bottom. It's safer and prettier.
An old steering rod is fitted under the belt tensioner. The finished crusher consists of a 220 V motor, a transmission shaft, a working container and blades inside.
The tank is placed inside the frame, and the hole in the crusher is made so that it goes directly into the tank. The photo below shows a fully completed juice press.
We put the bag of fruit inside, cover it with a lid, put a jack on it and gradually increase the pressure. However, wooden blocks will also be required, since the level of the lid will drop significantly.
Wooden juice press
The press will require the following materials:
- for the frame - 3 boards measuring 40*100 mm and 3 meters long;
- to fasten these bars you will need a threaded rod 14 mm wide and 1 meter long;
- also to create the frame you need 8 nuts 14 mm wide;
- for pallets you will need 5 slats with a cross section of 20*40 mm and a length of 3 meters;
- for the table you need a piece of plywood with an area of 30*30 cm;
- You can use a baking tray as a tray, in which you can make a hole for juice;
- To create pressure you need a jack. A weak model for 1-2 tons is enough;
- To extract juice, you will need dense, durable fabric: calico, linen, polypropylene.
To begin with, you can cut all the workpieces to the desired size.
Large boards for the frame should be cut into the following blocks:
- two of them: 950, 650, 650, 650 mm;
- one: 950, 950, 300, 300, 300 and 200 mm.
The pallet will consist of 12 slats, which are stacked crosswise. Therefore, 5 narrow boards are divided into sections 30 cm long. In total, you get 50 slats (12 per pallet, of which there are 4 pieces).
The threaded rod is divided into 4 sections of 25 cm each.
To assemble the frame, you need to carefully drive the slats onto the sections of the threaded rod. To ensure that no traces of blows remain on the boards, you must either use a mallet or place a piece of wood under an ordinary hammer.
In this case, it is extremely important to make all angles of the frame 90° so that the structure does not become loose. Finally, you need to tighten the studs with nuts.
A table on which the pallet will be located is screwed to the bottom of the frame.
We attach a short block to the top of the frame, against which the jack will rest. You can make a round metal heel stop in the center to prevent the jack from leaving marks on the wood.
Next, you need to make an element on which the jack is placed.
The pallets are assembled using stainless steel screws, as they will be constantly in the juice.
Additionally, you can make a frame where apples wrapped in filter cloth will go.
Wooden parts that will be in direct contact with the juice must be made of a material that does not give off odor. Therefore, any coniferous trees are not suitable.
Metal parts must be coated with an anti-corrosion coating. It is better to cover it with silver dust.
Juicer – meat grinder – drawings
The juicer is unprepossessing in appearance and simple in design, but after working with it once, you will no longer be able to bring yourself to use your industrial combine with an electric drive and numerous attachments: after it, you will again have to wash the entire kitchen and clean all the attachments.
In a homemade juicer, there are only three parts to wash, and the seeds and pulp do not get stuck, and the productivity is such that, even if done manually, you get a bucket of tomato juice in 30-40 minutes.
Juicer device
Externally, the juicer resembles a meat grinder: the clamp is also attached to the table, the same bell of the loading window, the same handle. However, this is where the similarity ends, since the principle of operation is completely different: there is no auger or conventional knives inside, although there is its own grate at the outlet. Instead of a screw there is a small drum with scraper knives. With their blades they grab the tomato (or slices, if large) and drag it along with them when you turn the handle, pushing it into the narrowing gap between the body and the drum.
Rice. 1. Juicer-meat grinder and its main parts: 1 – body assembly, 2 – drum, 3 – juice tray, 4 – scraper knives, 5 – handle with shaft.
The mechanism is extremely simple. The parts visible from the outside are a clamp, two plate bracket posts above it, a hopper with a handle and a mesh window for juice and a pulp exit window, with two trays below them. Inside there is one single unit - a drum, and in it there are plates of retractable scraper knives with a spacer spring. The drum, with its thickened bottom with a threaded hole, is screwed onto the shaft shank, which is connected to the drive handle. The shaft bearing and at the same time the oil seal is a fluoroplastic bushing, the body of which is a steel bushing welded to the side of the hopper.
Rice. 2. Main parts of the juicer: 1 – front wall of the hopper. 2 – pulp tray, 3 – pulp exit window, 4 – shaft, 5 – handle. 6 – drum, 7.20 – side walls of the hopper (wall 20 – with a hole), 8 – knife (recessed), 9 – tomato. 10 – juice tray, 11 – stand, 12 – clamp, 13 – handle connecting rod, 14 – axle, 15 – bearing housing, 16 – bearing (fluoroplastic bushing), 17 – mesh (or perforated strip with holes with a diameter of 1.5 mm), 18 – knife (in the extended state), 19 – knife spring.
A mesh (a perforated plate with a hole 1.5 mm in diameter) is welded to the bottom window of the hopper - through it the juice flows onto a long tray, fixed with bent ears in specially sawn grooves in the bracket posts. The pulp tray is welded to the hopper below its top window.
Rice. 3. Drum assembly (assembled): 1 – handle, 2 – shaft, 3 – bearing housing, 4 – bearing (fluoroplastic bushing), 5.9 – hopper walls, 6 – drum, 7 – knives, 8 – spring.
The scraper-knives are connected by a spacer spring. To do this, their plates from below are cut into three “petals”: the two outer ones are bent in opposite directions (stop), the middle one is inserted into the spring. At the top of the plate there is a side protrusion that limits its pressing into the slot of the drum.
The handle and shaft are assembled as a single unit. The second assembly unit will be a drum with knives on a spring. It is inserted on top of the hopper; then a shaft is inserted into the fluoroplastic bushing, which is carefully screwed onto the drum. All that remains is to install the juice tray - and the harvester is ready for use.
Due to the eccentric position of the drum in relation to the walls of the body, the scraper knives sliding along them, the closer to the mesh, are increasingly recessed into the slots of the drum, and the tomatoes they carry are increasingly squeezed and kneaded. On the mesh, they are practically rubbed through its holes, completely releasing the juice under the pressure of the drum. And the almost dry pulp, when released from the mesh, is then pushed through the window onto the outlet tray by the knives.
The mechanism can be disassembled just as easily as it was assembled: the juice tray is removed, the shaft is unscrewed from the drum (by rotating the handle in reverse) and the freed drum with knives is removed from the hopper - that’s it, you can wash it.
It seems that this simple machine would be a great help for amateur gardeners and gardeners - after all, you can pass any soft fruits, berries and vegetables through it. The only exception would be those that do not have seeds, but seeds: they must first be removed, and the rest must be passed through a juicer.
The proposed design option was intended for tomatoes and was designed for a maximum diameter of 50-60 mm. When using the machine for other types of vegetables, berries, fruits, appropriate changes can be made to the dimensions of the hopper, drum and other components and parts.
I am sure that everyone who makes such a device will be satisfied.
How to use the press
Before work, all fruits are washed and cleaned of rotten parts. Before pressing, they are poured into polypropylene or other durable bags. Make sure there are no holes in it first. This filter is needed to retain the pulp so that only the juice is released. The bag itself with fruits or berries is thrown into the tank.
Before work, the inner surface of the tank, tray, grille, lid and other elements are cleaned and washed. It is advisable to treat them with an antiseptic (chlorhexidine, alcohol, something else). The latter is necessary to prevent pathogenic bacteria from getting into the juice.
During the process, you need to monitor the condition of the bag to see if there is a risk of rupture. Watch for a gradual increase in pressure, do not increase it too quickly. At the end there should be dry cake left.
Powerful DIY garden juicer
As the owner of a large garden, during the season you have to think about where to put the harvest. After all, it will not be possible to eat everything in a short time, and if the fruits are ripe, then they will not last long on the tree - they will begin to fall and spoil. However, there is a way out of the situation and it lies in a homemade device. Let's look at how to make an apple press from a washing machine and improvised materials with your own hands. Using such a device, you can squeeze juice out of apples and other fruit crops, which will be much easier to process.
Juicer from an activator washing machine
To make such a juicer you will need an Oka or Sibir machine. You can use other options equipped with a spin device and an activator at the bottom of the tank. Let's look at the step-by-step manufacturing of the device:
- Remove the activator and shaft from the washer.
- We mount another or the same shaft with a threaded thread.
- We cut out three knives from stainless steel, which we secure to the shaft with nuts. The knives must be rotated 60°.
- Insert a plug into the hole for draining water.
- We place a wire mesh 0.25 mm thick with a cell size of 1.5 mm in the centrifuge so that it extends 4-5 cm beyond the sides of the drum.
- We close the hole in the rubber cover with the plug that comes with the kit, and then place it on the bottom of the centrifuge.
- Using a baking soda solution, wash the inside of the machine and all elements that will have direct contact with the juice.
How to squeeze juice
The process of extracting juice is quite simple. To do this, you will need to wash apples or other fruits and load them in a small volume into the washing machine tub. The device is turned on and the product is crushed using knives. The duration of processing depends on the specific apple variety and ripeness. After grinding, we obtain the mixture in the form of a puree and load it into a centrifuge, approximately 3 liters each. Turn on the device and squeeze out the juice. After a few minutes, you can remove the mesh and shake out the cake.
Tips for work
After creating an apple juicer with your own hands, an equally important stage begins - fruit processing. Harvesting and preparing the fruit for it takes time.
For the assembled device to operate effectively, the following sequence of actions must be followed:
- The apples are carefully sorted, washed and dried to remove excess moisture.
- Large fruits are cut into smaller pieces. The core should be removed.
- Rotten parts of the fruit are thrown away. Otherwise, they will spoil the taste of the finished drink.
- The chopped fruits are placed in the working basket of the unit. The smaller the pieces, the easier it will be to squeeze out the juice.
- They put the mechanism into action.
A DIY juicer is a useful invention. With its help, you can bring your engineering ideas to life and save money. The device will last for many years, allowing you to preserve all the beneficial substances contained in apples.
Juicer from front washing machine
Making a juicer from a front washer is somewhat more complicated and will take more time. To construct the device you will need:
- belt-driven, front-loading machine;
- a pair of metal meshes measuring 300*60 mm;
- fasteners made of bolts and nuts with a diameter of 3 mm;
- juice container;
- muffler made of rubber;
- drain pipe;
- set of screwdrivers and socket wrenches;
- metal scissors;
- Bulgarian;
- electric drill;
- hammer and pliers.
Preparatory work
All unnecessary elements are removed from the washing machine (pump, sensors, filter, valve, control device), after which it is placed with its back side on the bars and fixed well. Then perform the following steps:
- Remove the drive belt from the pulley.
- Open the hatch and bend the rubber band, dismantle the clamp and seal.
- Unscrew the fasteners and remove the shock-absorbing elements.
- Remove all parts that prevent the tank from being removed.
- They take out and disassemble the tank, for which they unscrew the bolts and release the latches. If the tank is made of plastic, it is cut in half.
- Clean the tank from various contaminants.
- All holes are plugged with rubber plugs, except for the drain.
- Mount the tank and other elements in the reverse order.
Manufacturing process
After the preparatory activities, all that remains is to do the following:
- The mesh is fixed inside the drum using screws. It can be easily dismantled for cleaning.
- In order for the raw materials to be crushed, the ribs need to be sharpened.
- A pipe is attached to the drain hole.
- Mount the electric motor.
How the juicer works
Before launching the assembled structure, you need to make sure that it is stable, as well as that the drum rotates evenly without jamming. After this, the fruits are washed and loaded inside the machine.
If loading hard apples, the drum should be half full. Soft raw materials can be placed in larger quantities. Place a bucket or pan for juice under the drain pipe. All that remains is to start the motor in spin mode. As the ram rotates, the apples will break and juice will flow out of the resulting mixture. As with the previous design, there is no need to cut the raw material into pieces. The performance of such a juicer is approximately the same as in the version described above.
Advantages of a homemade juicer
If you have an old unused washing machine, automatic or activator, you can turn it into a useful device for extracting juice. The idea is to install a grater inside the machine. The raw material is poured through a large hole, after which it is crushed and the juice is extracted. The advantage of this design is the ability to make juice in large volumes, which most household juicers cannot provide.
In addition, the homemade device has a much larger capacity for loading raw materials. Equipping such a juicer with a powerful motor will allow you to get about 20 liters of juice per hour. This indicator is quite enough to process apples from your own garden and also help your neighbor.