Home craftsmen rarely need to polish large items. For this reason, in garage and country workshops, belt grinding equipment is usually represented by grinders and manual belt sanders. On the other hand, when decorating a country house with wood or building a bathhouse, sanding a large number of flat and volumetric parts is always required. The need for such work appears sporadically, and a stationary factory-made belt grinder (grinder) is quite expensive - from 12,000-15,000 rubles. In this situation, the best solution is to make a collapsible grinding unit yourself with the required size of the working area and processing speeds.
Device and materials
Stationary homemade belt sanding machines, as a rule, have a vertical layout, which is most convenient for grinding large products made of metal, wood and plastic. They use existing power tools or motors from outdated washing and sewing machines as drives. Next, we will consider the process of manufacturing and assembling such a tape machine, which must meet the following requirements:
- height of the working area - 50-60 cm;
- overall dimensions in the horizontal plane - no more than 30x40 cm;
- sanding belt width - 5 cm;
- using one of the common continuous belt sizes;
- drive from an existing grinder;
- the ability to quickly assemble, disassemble and install in a new location.
In such devices, the movement of the sanding belt is ensured by a system of rotating rollers, one of which is the drive roller, and the rest are guides and tension rollers. In home workshops you can find various options for machines, the size and layout of which depend on the needs, capabilities and imagination of a particular master. The kinematic scheme with three rotating rollers is completely reliable and fully functional, so the process of self-manufacturing just such a belt grinding machine will be described below.
Sanding belt selection
For a machine with a working area of 50 cm, continuous belts with a length of 1200 and 1220 mm and a width of 1000 and 1500 mm are quite suitable. In the first case, they will need to be cut lengthwise into two parts, and in the second - into three. The choice of belt grain depends on the type of material being processed, because... The particles cut off during grinding, which clog the space between the abrasive grains, differ in structure and size for different materials. When processing plastic and wood on belt grinders, a grain size of 80-100 R is used, and when grinding metals - 30-40 R and lower.
What is a belt sander
A belt sander, also known as a sander or grinder, is used for the following types of work:
- production, periodic sharpening of knives;
- final sanding of the wooden surface before varnishing or painting;
- rounding of sharp corners of processed wooden blanks;
- sharpening rods with a sharp end.
The belt sanding machine is suitable for working not only with wood, but also with plywood and some types of metals: copper, brass, aluminum, steel. Essentially, the grinder performs all the same tasks as the sharpener.
The structure of the belt sanding machine is as follows:
- It is based on three pulleys. When the engine is turned on, the main pulley begins to rotate, which drives the belt with the abrasive belt.
- A second pulley of similar thickness but smaller radius is mounted on a bearing.
- The third pulley is installed and rotated on the upper arm. The function of this wheel is to hold the abrasive belt in tight tension. On the back of the belt sander, the upper arm is attached to the frame using a spring.
General device
Homemade grinder. Important points.
There are many designs of homemade grinders. Some make them using an engine from an old washing machine, others make them from an old grinder or drill, but all these models share the same technical details. Let's look at them in more detail.
Dimensions and design
There are no specific sizes that are the same for all grinders; they can be purely individual in each specific case. When choosing the overall dimensions and design of a belt grinding machine, you need to be guided by the free space in your workshop and the rule that the longer the belt, the more resistant to abrasion it will be and, accordingly, the less often it will have to be changed. If you are going to purchase ready-made, already glued tapes for the grinder, then the machine needs to be designed taking into account the size of these tapes. If you are going to glue the tapes yourself, then the dimensions of the machine can be arbitrary, but it is best to stick to the standard sizes of the tapes.
Abrasive belts for grinders are available in two widths: 50 and 100 m. The length of such tapes can be 610, 915, 1230, 1600, 1800, 2000 millimeters.
It is best if you have an abrasive belt of the required length, then it will be easier to adjust the size of the grinder to it.
The main components of the grinder are a machine frame with a work table and a tape clamp, an electric motor with a drive roller, a tension roller, a barrel-shaped roller and, if necessary, additional driven rollers. The barrel roller can also be a tension roller.
The most compact grinder can be made with just two rollers, one driven on the electric motor shaft, and the second barrel-shaped tension roller.
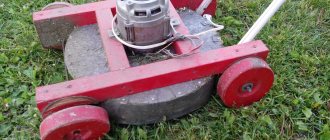
Belt grinding machine with a washing machine motor.
The same machine with an engine from a washing machine. View from a different angle.
Drawing.
The machine is made with a plywood frame.
Grinder.
Grinder with furniture gas shock absorber.
This machine is made using rollers from the car's timing belt.
Another band saw with a plywood frame.
Grinder driven by an angle grinder.
Compact machine with furniture gas shock absorber.
Compact belt sanding machine on two rollers.
Machine with a plywood frame.
If the grinder will work with long abrasive belts, then it will not be possible to do without additional driven rollers.
Why do you need a barrel shaped roller? When assembling the machine, it is almost impossible to maintain perfect parallelism of the axes of all rollers. For this reason, the tape tends to come off the rollers. To eliminate this drawback, a barrel-shaped roller is used. By adjusting the tilt of its axis, you can “force” the abrasive belt to remain in place.
To adjust the axis of the barrel roller, you can use the principle of a regular door hinge. The roller axis is welded to the movable part of the hinge, and adjustment is made using a bolt. Which rests on the movable part of the loop.
The photo shows a barrel-shaped grinder roller.
Note the barrel roller and adjustment bolt.
Barrel roller with adjustment mechanism.
Barrel-shaped grinder roller.
The mechanism for tensioning the abrasive belt can be made in several ways. The most common is using a spring, the second is using a furniture gas shock absorber and the third is using regular rubber, for example from a bicycle inner tube. If you use a furniture gas shock absorber, you need to know that it does not work well at low temperatures.
It is recommended to make the tape support two-layer. Make the base of the stop from a metal sheet and glue smooth porcelain tiles onto it. Thus, the emphasis will practically not heat up during intensive work on the grinder. Also, porcelain tiles wear out much slower than metal. It can be conveniently replaced as it wears out; you just need to heat the connection with a hair dryer, and it will come off. You can glue it to a regular silicone sealant for marble, for example Silirub MA from Soudal.
The stop must be adjustable relative to the tape. It must be moved to the tape tangentially to it or with a slight overhang of up to 0.5 mm. This overhang does not cause excessive wear of the belt, but it allows you to grind long strips longitudinally without touching the convex parts of the rollers.
Porcelain tiles on a grinder.
How to calculate the diameter of the drive roller.
To calculate the diameter of the drive roller, you need to know the belt speed at which the grinder will operate and the number of engine revolutions.
Belt speed should be selected according to the belt manufacturer's recommendations. For example, for a 3M Cubitron tape on steel it should be 22-25 m/s; from the same manufacturer, a speed of 30-35 m/s is recommended for tapes with aluminum zirconate. Belt speed is highly dependent not only on the type of abrasive, but also on the grain size. And so on average it is recommended for carbon steel 32 - 38 m/sec, alloy and stainless steel 18-30 m/sec, Titanium -15 m/sec, non-ferrous metals 35-45 m/sec, plastics 10-30 m/sec, malleable cast iron 38-34 m/sec, gray cast iron 35-45. As for wood, it is recommended not to exceed 20 m/sec, and you also need to know that different wood will burn at different speeds.
Formula for calculating belt speed:
V tape (m/s) = (3.14* D * N) / 60000,
where D is the diameter of the drive wheel in mm, N is the engine revolutions per minute.
Formula for calculating drive roller diameter:
D(mm)=(V*19108) / N,
where V is the belt speed in m/s, N is the engine revolutions per minute.
Calculation example. It is necessary to calculate the diameter of the drive roller for processing steel (22-25 m/s). Electric motor 2800 rpm.
D=25*19108\2800=170.6mm
The speed of rotation of the belt for different materials can be adjusted by changing the diameter of the drive roller or adjusting the engine speed. It should also be understood that as the diameter of the drive roller increases, the load on the engine increases and if it is of low power, for example, from a washing machine, then it will often stop even from a slight load.
Which engine to choose for a grinder.
On the Internet you can find information about machines made using electric motors from old washing machines. Such electric motors are low-power and low-revving. Most often it is 180 watts and 1400 rpm. Such grinders, as a rule, do not have enough belt speed and engine power, so they can be used to perform light work, for example, sharpening knives or processing small pieces of wood. They are not designed for anything more serious.
Below is the formula for calculating engine power for a grinder.
Formula for calculating engine power:
P(W)=(D*N)\570,
where D is the diameter of the drive wheel in mm, N is the engine revolutions per minute.
If a three-phase motor is used, but connected to a single-phase 220V network, then its calculated power when connected in a delta with a working capacitor is approximately 1.5...1.6 times lower than the nominal value. This must be taken into account. For example, according to calculations, an electric motor with a power of 800 watts is required, and the motor will be used three-phase, but on a 220V network. Then the required power of such an engine will be equal to: 800 * 1.6 = 1280 watts.
The optimal choice is a single-phase motor with a speed of at least 2800-3000 and a power of at least 800 watts. With such an electric motor, it will be possible to process hardened steel on a grinder, and not just sharpen “pencils.”
We recommend reading:
How to choose and glue grinder tape.
If an open-type motor is used in the manufacture of a belt grinding machine, as in washing machines, then you should think about protecting it from abrasive and metal dust. Such protection can be made from a 5-liter plastic bottle or any other plastic container.
How to make rollers for a belt sander
If you know a turner, then you should not have a similar question. Well, if there are no such acquaintances, then this information will be useful to you.
There are several ways to make videos.
It is convenient to make the drive roller from a sheet of plywood. First, circles of the required diameter are marked, then they are cut out using a jigsaw. After this, the plywood circles are glued together.
Glue the plywood circles together.
After gluing, the central hole of the roller is drilled to match the diameter of the electric motor shaft. Now you need to make a keyway in the hole. It is easy to do with a file.
Making a keyway in a plywood roller.
Driven plywood roller with keyway.
Then we put the roller on the electric motor and grind it using a chisel, a large file or an angle grinder (grinder) with a grinding wheel.
We grind the plywood roller with a grinder.
To make the drive roller slip less, it can be treated with liquid rosin.
The easiest way to make driven rollers is to simply assemble them from bearings of a suitable diameter on a shaft. Partially threaded bolts can be used as a shaft. Bearings need to be sealed, otherwise they will quickly become clogged with dust and fail.
You can use timing belt rollers from your car as rollers, but don’t buy new ones, ask them at any service station. It is only desirable that the rollers be flat without shoulders. These beads can cut the edges of the tape.
Another way is to cut the rollers with a crown made from a sheet of plywood and glue the resulting washers together. You can additionally secure them with self-tapping screws. Afterwards, inside the roller you need to drill two holes on both sides of the roller for the bearings. The depth of such holes should be equal to the width of the bearings. It is convenient to drill such holes using a wood drill bit. When the holes are ready, we drill a through hole in the center of the roller for the roller axis. The diameter of this hole should be slightly larger than the diameter of the inner race of the bearing, otherwise the bearing will jam inside the roller.
After this, the roller is almost ready, all that remains is to sand it on the outside and give it the desired shape, if it is a barrel-shaped roller.
Plywood roller.
We sharpen the roller using a grinder.
The rollers can be made from round caprolon or another name for this material is polyamide-6. The process of making a video is no different from the previous ones. We cut the workpiece to the required length, drill holes with a feather drill for the bearings and grind it on the outside using a grinder.
Another way to make driven rollers is to use couplings from a polypropylene pipe. Barrel couplings are available for sale. For example, a Czech-made coupling d 32 Wavin Ekoplastik.
Plastic plumbing coupling.
This photo clearly shows that this plastic coupling has the shape of a barrel.
Bearing No. 201 fits well under this coupling. The bearing can be pressed into the coupling using a vice.
If you need to make a straight driven roller or you couldn’t find a barrel-shaped coupling, then you can make a roller from two straight couplings. If necessary, this roller can be ground to a barrel-shaped state.
Diagram of a roller made of two plastic couplings.
Parts for making a grinder roller.
For one roller you will need two plastic couplings with an internal diameter of 32 mm, three bearings No. 201 and washers for the M12 bolt. First, the plastic couplings are cut, on one side, so that the distance from the edge of the coupling to the inner rib is 5 mm. We need the bearing to be able to enter the coupling only half its width, that is, 5mm. The bearing should rest against the internal rib of the coupling.
The photo shows a plastic coupling marked before cutting.
After cutting the couplings, use a vice to press the bearing between the two couplings. It will be inside exactly in the middle of the future video.
Now we put washers and press two bearings along the edges of the roller.
We place washers between the bearings.
All that remains is to sand the outside of the roller.
We grind the roller using a grinder.
I recommend watching a video on this topic.
DIY belt sander from an electric drill
Another way to make a belt-driven grinding machine at home involves using an electric drill as a drive. Battery powered models are not suitable; a corded drill is required.
What tools will you need?
To make your own belt sander you will need the following materials:
- Electric drill;
- wooden railings;
- thick plywood sheet;
- threaded rod;
- steel sheet with a thickness of at least 3 mm;
- bearings, nuts, bolts, washers of different sizes;
- construction corners with holes;
- several wooden blocks for attaching the drill.
The procedure for making a homemade grinder from an electric drill
The step-by-step technology for manufacturing a belt sanding machine will be as follows:
- Two pieces of equal length are cut from the railing for the frame supports.
- Using a wood saw, many circles of the same diameter are cut from a plywood sheet. The circles are then overlapped and glued together to form a drive and driven wheel. In this version of the belt sanding machine there will be not three rollers, as is usually the case, but two.
Circles for wheels
- A rectangle is cut from the same plywood sheet, which will be the base of the belt sander.
- The railing supports are screwed to the base with self-tapping screws.
- A hole with the diameter of the mounting bolt is drilled in the center of the glued rollers. In addition, seats for sealing bearings must be drilled at the top and bottom of each wheel.
- On one side of the railing, recesses are drilled for a threaded rod on which the drive wheel will be mounted.
- On the second piece of wooden railing, two holes are cut for a pin with a driven roller. Then the wheels are installed in the designated places.
Cutting holes in the support
- A composite holding device for a drill is made from wooden beams. A rectangular platform with a length slightly larger than the diameter of the wheel is screwed to the frame of the belt grinder. After this, two identical U-shaped wooden fragments with semicircular recesses are cut out.
Bottom part with a semicircular groove
Together, these grooves should form a circle of such a diameter that the electric drill chuck fits there without interference. Having made sure that this condition is met, the master installs the first U-shaped beam on the edge of the attached platform closest to him, places the second one on top, and then fastens the bars and the support platform together with bolts and nuts.
- An electric drill is installed in the groove, the end of the threaded rod of the drive wheel is brought to the chuck and securely clamped.
Leading the drill
- On the outside of both supports of the future belt sanding machine, a corner with holes is screwed into place. Next, you need to connect the hole in the corner with the edge of the screw on which the driven wheel is attached. To do this, you will need to weld the end of the nut to a long threaded rod. The nut is put on the wheel screw, and the pin goes into the hole in the angle and is fixed on the reverse side. The operation is done to adjust the tension of the abrasive sanding belt.
Connecting the angle with the roller fastener
- Additionally, a platform made of steel sheet is attached to the supports on top. The distance between the edges of the rollers is measured, and a piece of steel of approximately the same length is cut out. The platform is screwed to the supporting railings.
Platform
- Now all that remains is to integrate the sanding belt into the system. The end of the strip is brought under the wheels, brought up on the other side and goes on top of the steel platform.
Applying the sanding belt
This end is held with one hand, and the other brings the continuation of the belt to it. At the point where the retained end ends, the sanding belt is cut and the task is to join the two edges into one belt drive. To do this, take another small piece of abrasive strip, turn it upside down and liberally drip with reliable glue.
Connecting piece with glue
The bottom of both ends of the cut strip is glued to this fragment very carefully, because if the fastening is poor, such a belt will quickly break, and you will have to tighten the sanding belt again.
- An electric drill is inserted into the groove, and the operation of the assembled belt sanding machine is tested by starting the engine.
Testing the finished machine
A homemade belt grinding machine from a drill can be made in both horizontal and vertical form. For the second option, a perpendicular support table is additionally installed.
Required tools and materials
To make a homemade grinding machine, I used the following parts:
- Drill.
- Core drill 60 mm.
- Plywood.
- Wooden beams and railings.
- Sheet metal.
- Threaded rod.
- Wood saw.
- Construction corner.
- Bearings 4 pcs. (internal diameter 8 mm).
To manufacture the machine, you will also need to prepare the required number of various hardware (nuts, screws and washers).
Making a grinder from Chapai
Grinders “Ot Chapaya” enjoy absolute authority among specialists for their thoughtful design, functional versatility and high quality workmanship. The family of these machines was developed by Andrey Chapai, an engineer and entrepreneur from Kovrov, who died at the beginning of 2022.
Today his wife continues to produce and sell them.
Grinder from Chapai.
Chapaev machines are capable of processing wood, metal, plastic, and stone. They are ordered by people who need constant use of this tool and its special settings. Such grinders are an example of homemade devices with high productivity.
Grinder design diagram
The difference between a belt grinder and conventional grinding machines is that it uses a sanding belt rather than a disc for processing. This allows you to select the desired degree of grain size and process large areas.
The abrasive tire installed in the tensioner moves by rotating the drive shaft. Grinding is performed when the surfaces of the part and the moving tire come into contact.
Grinder scheme.
The design of grinders does not differ from the design of stationary disk machines. Essential elements:
- Drum system. Designed for mounting a tire. Consists of drive and several driven shafts.
- Bed . The design of the element depends on the purpose for a specific type of material being processed. For wood, a lightweight frame is used, for metal – a more powerful one.
- Tension system. Used to maintain the tire in a constantly tensioned position.
- Electrical unit consisting of an electric motor and a control unit. As an additional element, a speed increase/reduction unit based on a belt drive is included.
Safety precautions when working on a sanding grinder
Like any other work on any other machines, grinding on a homemade belt sanding machine is subject to fairly strict safety rules that must be strictly adhered to.
The principle of operation of the grinder.
These rules are as follows:
- It is strictly forbidden to touch anything that moves with your hands while the machine and working surface are operating.
- Wear safety glasses while working to protect against hot abrasive particles.
- Carefully check that the connections and fastenings of all moving parts of the grinder are tight.
- Monitor the condition of the braiding of electrical wires.
- A protective casing is a must, even though it slightly narrows the viewing angle.
Working belt
You can always see a spring on a belt grinder, which is necessary to ensure automatic tension of the sanding belt. If you use such a spring, then changing the tape will be very convenient, and its tension will be adjusted automatically. It should be said right away that it will be necessary to change the tape several times even when processing one product. When processing any metal part, you must start with a belt with a larger abrasive, gradually changing it to a finer one.
Very important attention should be paid to gluing the tape. There are options for proper gluing on the Internet, and you can also watch this process on video. To make it, you need to use sandpaper on a fabric basis. The seam on the tape is made only end-to-end and it must be reinforced, for which a strip of dense fabric is used, placed on the back side of the area to be glued. To glue tape sandpaper, you must use only elastic glue, and it must be of very high quality.
To ensure high-quality and reliable gluing of the sanding tape, you will need to properly prepare it. You can glue the tape using a glue stick for a hot-melt gun: this method can be clearly studied in the video above. For heating, you can use a regular technical hair dryer.
If you wish, you can make your homemade grinding machine even more versatile; to do this, it should be equipped with an additional table placed on the side of the largest pulley. This will allow you to process parts on a belt grinder, pressing them against the sanding belt from the side of the largest pulley. If you decide to make such a table, you will need to provide for the possibility of changing the direction of movement of the sanding belt, which should always move towards the work table, and not away from it.
A simpler design of the grinder can be seen in the video below:
Application areas of the machine
The main tasks performed by the belt grinding machine are: final leveling of the surface being processed, bringing the level of surface roughness to the required level, bringing the processed surfaces to the level of smoothness before covering them with varnish and other finishing materials. The belt machine is also used to eliminate minor defects of the processed surface: depressions, elevations and burrs, processing the finishing coating: removing sagging primer and varnish, burr, grinding internal surfaces, processing roundings on the surface of the part.
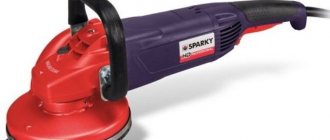
A factory-produced option, the drawings of which can be used to create a similar homemade device.
The tape machine can be used for processing parts made of various materials: wood, plain and alloy steel, non-ferrous metals. What’s convenient is that using a belt machine you can process parts that have different shapes: quadrangular, round and flat. Using such equipment, it is possible to process round and tubular parts with a large cross-sectional diameter.