How to make a rope yourself?
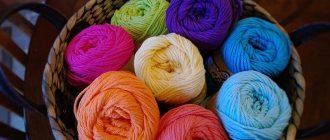
Sometimes you need thick or decorative rope, which is not so easy to find in stores. It can be used for decoration, in construction, for clothing, bags and so on. You can knit this lace yourself. Depending on the length needed, the amount of materials is selected. The choice of yarn for this purpose is also up to you. For example, for decorative rope, yarn made from materials such as:
- mohair;
- wool;
- wool mixture;
- merino;
- acrylic;
- cotton.
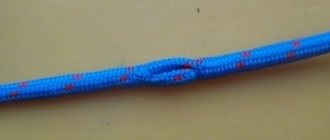
It will take little time to make a clothes rope, because its length usually does not exceed two meters. This accessory is used as a belt or as aran patterns on clothes. Separately, you can tie original knots and then decorate a sweater or cardigan with them. Such creative clothing items will be appreciated by handmade lovers. In addition, the demand for handmade items is very high abroad and you can make it to order, the main thing is to find a sales channel on the Internet.
If you are interested in unusual jewelry, then pay attention to thick knitted yarn. It is from this that non-standard neck jewelry is obtained. They can be made either according to standard patterns, or you can come up with patterns yourself, because this will only benefit the product. Spaghetti knitted yarn resembles a T-shirt cut into ribbons, but looks much neater. The thickness of the knitwear is the same along the entire length, so the accessories made from it have a dense, uniform structure.
Such ropes are easy to make at home. As a rule, they are knitted very quickly and require a minimum of additional fasteners to give the product a finished look. Necklaces are in greatest demand. Despite their massiveness, they look very gentle and original, and fit almost any style. By adding beads to such a necklace, you will get an expensive-looking and stylish decoration.
Types and applications
To correctly select a wicker product, you need to know the approximate weight that it will lift.
Depending on this indicator, ropes are distinguished:
- steel;
- synthetic;
- reed
The most durable is the first type of products, which are used to lift loads weighing several tons and are:
- cargo;
- cargo-human;
- reinforcement
Each of these species has many different subspecies.
Depending on the design, ropes are:
- spiral. Consist of spirally twisted (one or several) layers of wire;
- single lay. Produced by twisting round wire;
- double lay. These consist of several strands.
In order for the wicker product to meet your expectations during operation, when choosing, you must take into account all its functional characteristics.
How to make a rope, watch the video:
There are several simple ways to make rope. These methods can be divided according to the type of material used. As a rule, in order to weave a rope “here and now” it is necessary to use less processed and, accordingly, less durable materials. But in any case, to weave a rope, you need fibers. These fibers can be either wood (birch bark, bast) or simply plant (flax, hemp, nettle). This is not to mention ropes and threads woven from wool. Tapes made from bark or thin twigs are not very flexible and are therefore not suitable for some types of work.
More about materials
Lyko
- this is what is located between the tree and its bark. It has a fibrous structure and is therefore suitable for making ropes. In addition, it does not need to be processed for a long time - just lightly dry it in the sun. After the bast stops oozing (in some tree species the bast is very juicy), you need to knead it, and then start twisting the future rope from two thinner ones. This is the fastest and easiest way to make rope. You can also braid a rope from bast, but such a rope will only be strong if it is thick.
From birch bark
a similar result is achieved only by weaving three or four stripes. The more strips you intertwine, the flatter and wider the ribbon becomes.
However, the strongest ropes are made from the stems of green plants.
, and they take quite a long time to make.
This is due to the fact that the stems must first be soaked and dried. It takes the longest to wash hemp
– it is believed that to fully process it, it needs to be washed for at least two years.
The situation is similar with flax
. The stems of such plants contain a small layer between the inner “woody” part and the green skin, which, in fact, is the fibers. To separate it, the stems need to be dried and then soaked for a long time in running water (to prevent rotting), although in some regions the so-called “soaking in dew” was more common (simply lay flax or hemp on the grass in an even layer and leave it like that). for a long time). When the process is completed, it will be possible to easily separate the fibers from the stem itself; to do this, you need to thresh the flax or hemp (that is, knock on the stems with a wooden stick). When the fibers are separate, they need to be combed out, then spun (again, twist the fibers in two threads), and thinner threads made into thicker ones.
Two methods are commonly used to produce rope: braiding
and
twisting
. The second method is more suitable for the production of thin threads, with the help of which rope or cord is made. Let's take a closer look at several ways to make rope.
Making small twine
To knock down a short twine you do not need any special devices; you can very easily do it yourself, even on a desert island. To begin with, you will need a piece of some dense natural material, from which, if possible, a kind of rectangle is made, on which small holes are made. Fibers of the future rope are then inserted into these holes, with the help of which a piece of leather can be tied to any object, for example, a tree or your knee. Next comes the process of making the heel (the strand from which the rope is twisted). The heels are tied at the ends for convenience. The tied ends should be in the hand, and the free ends should be placed parallel to each other on a piece of leather. The heels are twisted counterclockwise. The process can take place in several stages - it all depends on the size of the twine. When the twine is ready, its free ends are also tied so that they do not unravel during use.
Twisting a rope with your fingers
This method is best suited for making rope from reeds or cattails. Two heels made from these natural materials are tied together, after which they are thrown onto special flyers made of wood and driven into the wall (such a simple device serves as a reel for rope). The heels are transferred from one hand to the other during the twisting process. When a heel comes to an end, it needs to be extended, but under no circumstances should this be done by extending both heels at the same time. Otherwise, in some places the thickness of the rope will be greater, and because of this, the strength of the product is significantly reduced. At the end of the process, the remaining free ends of the heels must be torn off.
Twisting with hooks
First you need to make the hooks themselves, which can be cut from willow or birch. The ends of the hooks should not be the same, one of which should be approximately 2-3 times larger than the other.
The heel is draped over the hook in several reverse layers, somewhat reminiscent of a figure eight. For convenience, it is better to tie the ends of the heels. Twisting on ropes on hooks takes place in several stages:
- Pulling the heels on the stick;
- Rotate clockwise (until you get a strong tourniquet);
- The hooks will be mixed from one hand to the other in the process (in this case, the right hook should always be on top, and the left one on the bottom);
The process of twisting a rope on hooks consists of repeating these actions. To make a three-fiber rope, you need to add another hook. When the ropes are ready, they are dried, twisted and stored in some dry place.
Twisting a rope using improvised objects
Almost always, the available material for weaving a rope can be two pieces of cardboard or wood, and one piece should be slightly smaller than the other. Holes are made in both pieces into which wooden sticks are inserted, which can easily be torn from any tree by clearing them of leaves. After this, the cardboard or board should be fixed, for example, on a tree trunk (plant fibers and flexible rods can also be used for fixation). To twist a rope in this way, you need to make a bobbin, which is very simple to make. Take four sticks, the length of which should be 50 centimeters according to the eye. These sticks are tied in a cross pattern. Then four more sticks are added to them, which serve to connect these crosses. In the middle of the crosses you need to make a small hole and insert an axle into it (the same wooden stick, only a little denser). To twist a rope, plant fibers must be carefully laid out by winding one of them onto the resulting bobbin. Next, you need to rotate the bobbin with your right hand, gradually adding new fibers with the other hand. The strand remains on the bobbin until it is completely filled, after which the strand can be wound or tied for further use. To twist strands into a rope, you can use the above methods.
Menopausal syndrome in women - causes, clinical manifestations, treatment and prevention
2022-02-20 05:40:47
Books for vacation: read in one sitting!
2022-02-09 00:11:17
Milkshake with ice cream and banana
2022-02-03 22:30:07
How to make a rope from plastic bottles with your own hands?
In order to weave a strong thread, it is not at all necessary to choose expensive yarn. Sometimes scrap materials that can be found in every home are quite enough. Even seemingly useless items such as plastic bottles are quite suitable for this purpose. Weaving a rope from a bottle is quite simple. First you need to cut it into thin long strips and gradually weave it together. Plastic weaving is done manually or using ordinary cosmetic tweezers.
To make a rope from plastic bottles, for convenience it is better to make your own machine. This is a simple design that anyone can do.
We will need:
- wooden block of any size;
- blade;
- 2 nails.
Manufacturing of the machine
So, take a wooden block and drive 2 nails into it (5-6 cm from the edge), not too deep. Cut off the heads of the nails and bend the nails to the sides.
After this, carefully saw the block at a distance of 4-5 cm from the edge, but not all the way. We process the cut with sandpaper. Then we make another cut - across the first cut. It should be as deep as the width of the blade.
We insert the blade into the cut and clamp it with nails.
How to use this machine? We insert the bottle into the through cut, do not forget to cut off the bottom first. We rotate the bottle around its axis. As you can see, the bottle is cut into a thin strip.
Once you have cut your plastic bottle tape, you can make it more durable. To do this, you need to hold it over a hairdryer or gas burner, twisting it a little. After this treatment, the tape will become shorter, narrower, but several times stronger!
In childhood, weaving laces and wreaths from grass was common. For this purpose, plants of a special variety were chosen: hard and sharp, they could very easily cut you. Blades of grass woven into flagella also made a fairly strong rope. Typically these are used in the construction of small rafts or boats. This fun is probably familiar to everyone from childhood. In the modern world, grass fibers have been replaced by cotton fibers and are successfully used to make natural products. Particularly strong threads were obtained from nettles. This procedure had to be carried out wearing protective gloves, otherwise the fingers would quickly turn red and begin to itch. However, the result was worth it, and the rope came out strong. After drying it in the sun, it was possible to weave a small string bag. Nettle ropes are widely used in authentic style. They are completely environmentally friendly and even have some healing properties.
Of course, the most common are thread ropes. In terms of strength, nothing can compare with them. It's all about the number of individual threads, because the more there are, the stronger the product will be. Often, for this purpose, floss threads are used, immediately divided into fibers. There are many techniques for creating round or flat ropes from embroidery thread.
As for purely decorative items, paper ropes can be used for this purpose. First, the material is prepared, namely, the creation of paper tubes. Take a regular sheet of newspaper, roll it into a thin tube and carefully seal it so that it does not unfold. The workpieces must dry for some time, after which they are completely ready for work. By making a long rope, you can use it to knit baskets or organizers for small items.
There is a whole manual on how to weave a reliable rope from twine. Three-strand weaving from such a dense material will help make a strong rope. after all, in appearance it resembles an ordinary woman’s braid. To prevent the twine rope from unraveling, it is advisable to singe the ends before starting work. They will be securely fixed, and you can safely get down to business. Weaving a rope is a very exciting process that develops fine motor skills, attention and concentration.
How ropes and climbing ropes are made
The plant operates modern equipment, but in one of the plant’s workshops a unique production facility has been preserved - the “cable car”. This production has been operating since the opening of the plant in 1875 and it still operates on the same equipment, which is already 140 years old! It is quite possible that this is the oldest production equipment in the world that is still in use today. I recommended that the plant submit an application to the Guinness Book of Records. By the way, the plant is 55 years older than the city in which it is located.
The cable car is a huge workshop, half a kilometer long.
At the first stage of production, the strands are twisted.
Bobbins of thread are mounted on a creel - a frame with axes arranged in several tiers. The larger the diameter of the rope, the greater the number of threads required for its manufacture, the more seats the creel must have.
The threads are pulled in bundles through gauges - groups of holes arranged in the form of concentric circles.
The strands come out of the gauges.
The strands are attached to one of the hooks of the loom spindle, which moves along rails.
This machine is 140 years old and works like new!
There is no electricity here - the machine is purely mechanical. It moves and all its mechanisms work due to the rotation of the side wheel, through which a drive rope is threaded, running along the entire workshop.
At first this rope was pulled by a steam engine, now by an electric motor. Just imagine: this equipment was once powered by steam!
This mechanical machine is controlled by three rudders and four levers.
140 years ago there were no telephones or walkie-talkies, but a communication system was necessary. The workshop is long, the equipment is noisy and after 500 meters it is useless to shout. Since those times, a signaling system has been preserved, allowing a worker on a moving machine to transmit signals to a worker at the beginning of the workshop. These are three ropes stretching over the cable car.
The worker pulls the rope and at the end the bell rings. The bell is also 140 years old.
A moving machine pulls the strands along the entire length of the ropeway and twists them.
Up to 12 strands can be twisted in one pass. To ensure that the strands do not sag when pulled, do not get dirty and have the same tension, supports with teeth are placed under them at regular intervals.
After the movable machine has pulled the strands the full length of the ropeway, they are connected to lay the rope, three strands per rope. Four ropes can be woven at the same time. In order for the strands in the rope to lie evenly, they are passed through a cone located on a movable cart.
When twisted, the length of the rope decreases. Strands 300 meters long when twisted form a finished rope 230-250 meters long.
This is one of the last ropeways in the world - they have been supplanted by much more compact rope-weaving machines, but ropeways have many advantages - they can weave rope from any fiber, synthetic or natural, and there is practically no limit to the diameter of the rope. The rope winding machine is designed for only one thickness of rope, but the ropeway can wind rope of any thickness. This kind of rope (and it is almost 10 centimeters in diameter) can only be made on a cable car.
How to make a rope weaving machine with your own hands?
Making ropes is an activity that seems simple at first glance. Often, having started a task, many are faced with the fact that the work is progressing too slowly and the result does not live up to expectations. To make things go faster, you can make your own machine for twisting threads. The creators of Lego sets managed to modernize even such a thing, and now you can already find a real machine that twists ropes.
For twisting, five coils are taken at once. The threads are connected together, secured, and the machine begins its work. Moreover, it is electronic, which helps save a lot of time and effort. The creators note that you can make such a unit yourself from Lego parts that you have at home. It takes up little space and can twist ropes of completely different diameters and densities. The developers offer to modify it according to your wishes and diversify the functionality of the actions. In this case, rope weaving turns into a real exciting process, interesting not only for adults, but also for school-age children.
Second version of the machine
First you need to take hardwood, always dry. For example, you can use birch, hornbeam, oak, etc. You need to select a smooth round log with a diameter of 10 cm. Then it must be cut into five rings, each 2 cm thick. Now they need to be processed with a knife. This is necessary in order to align them in diameter. The next step is to give each ring a gear shape with equal teeth. For marking, it is best to use a ruler and compass. To do this, you need to divide the length of this cut (equal to the diameter multiplied by the number Pi (3.14) by the number of teeth. Make a step between them approximately equal to one centimeter. This is necessary for greater strength.
After cutting out 5 gears, they need to be checked for tooth pitch compatibility. You also need to make shafts (for gears). Use aluminum cylinders 10 cm long and 7-1 mm in diameter. Make a through hole in each of the shafts (at one end). In the center of each of the five gears you also need to make a hole (one, the diameter is 22 mm larger than that of the shaft). Next, you need to take the shafts and drive them into the gears, with the side that does not have holes.
For the body of the machine, take two pieces of boards measuring 20*25 cm and 20*20 cm. The thickness of the pieces is 3 cm exactly. Then take a 20*20 cm board and make a hole in the very center for the previously prepared shaft, then simply insert it there along with the gear. Place the remaining four gears in all corners of the board and mark the same places for the holes for the shafts. After you have made all the holes, insert the gears on the shafts into the middle. In order to reduce friction between the gears and the base board, use regular tin washers (don't forget to lubricate them well).
Then we need to attach a second board (the one that is a little larger in size) to our first base board. We do this with screws or nails. Attach at an angle of 90 ̊. We respectively attach the handle for rotation to the central gear.
How to make a clothesline on rollers?
Weaving rope at home, of course, should have a practical side. Typically, such products are successfully used as clotheslines on the balcony for drying. When you have ready-made rope at hand, it is very easy to replace it in time, so it is better to prepare it in advance. Despite the enormous popularity of metal indoor dryers, most housewives prefer to dry clothes outdoors. This way it dries faster and has a natural, pleasant aroma of freshness.
It is best to dry clothes under a canopy. To make it convenient to remove and move, they came up with clotheslines on rollers. The mechanism is very simple: rollers are installed on the supports, and the rope is pulled over them in a closed ring. Thus, an elongated circle is obtained. The rollers rotate, and at this moment the laundry moves along with the rope. A similar design is installed not only under a canopy, but also on open balconies of multi-story buildings.
A clothesline on rollers is a universal tool that is suitable for drying clothes on a balcony, loggia, street, or under a canopy.
This is especially true for structures installed behind the railing of a balcony or window. This can often be seen in hostels. This is a universal system that makes life much easier for housewives. At the same time, the laundry looks smooth and fresh, and it can be dried in much larger volumes due to the double rope.
How to make a twisted rope?
The strongest strands are those twisted several times and consisting of many thin threads. The more such threads there are, the better. A twisted, strong rope is best made from twine. Only then will it last a long time and perform its function 100%.
For added strength, braid several braids and then join them into a single rope. This rope can be used in construction, repairs or other household issues.