A router, or manual milling machine, is a universal tool suitable for various types of wood processing. It can be used to drill holes, cut grooves, grooves and chamfers, and process the edges and edges of a wooden product. It is very convenient for installing locks on doors, assembling floors and furniture, and other work with this material. Carving on pre-prepared wood using a router can be mastered quickly with your own hands if you immediately choose the type of manual machine for yourself.
There are several types depending on the work performed. So, they distinguish:
- A vertical milling cutter is used both for making through holes and for cutting blind grooves in the rock
- Edging is useful for processing the edges of wood. Has low power, the big advantage is low weight
- The combined one serves both of the above purposes and has two bases for them.
WOOD CARVING WITH A MILLER WITH YOUR OWN HANDS: TIPS FOR BEGINNERS AND TEXT INSTRUCTIONS
A router, or manual milling machine, is a universal tool suitable for various types of wood processing. It can be used to drill holes, cut grooves, grooves and chamfers, and process the edges and edges of a wooden product. It is very convenient for installing locks on doors, assembling floors and furniture, and other work with this material. Carving on pre-prepared wood using a router can be mastered quickly with your own hands if you immediately choose the type of manual machine for yourself.
There are several types depending on the work performed. So, they distinguish:
- A vertical milling cutter is used both for making through holes and for cutting blind grooves in the rock
- Edging is useful for processing the edges of wood. Has low power, the big advantage is low weight
- The combined one serves both of the above purposes and has two bases for them.
Project
The quality of the blank design will depend on how professionally the project was created. There are many online resources that allow you to design the required drawing on software. Their use makes it possible to visualize the design, as well as obtain a three-dimensional image of the future work, before it begins.
The program used on a CNC milling machine is compiled according to the following scheme:
- entering the dimensions of the workpiece that will be used for drawing;
- creation of a virtual drawing applied to the surface;
- setting the ratio of the specified parameters and saving them.
WE UNDERSTAND WOOD CARVING TECHNIQUES WITH A MILLING MILLER WITH YOUR OWN HANDS
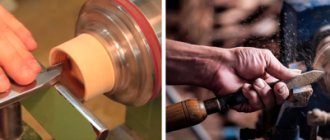
The now popular art of wood carving can also be done using this tool. There are many cutters, that is, working heads, for various purposes. Advanced craftsmen even make cutters or parts themselves. The main task when working with a hand router is to learn how to use it correctly. Once you master this tool, you can perform any type of artistic carving.
How to learn to cut wood with a hand router: tips and ideas for beginners
In order to learn how to carve pre-prepared wood using a router with your own hands, you can enroll in thematic courses. However, not everyone has the time or desire to visit them. For such people, there are many video lessons, which, when viewed, will give you an idea of this skill.
Even before watching the video, it is important for beginners to carefully read the instructions for using their electric assistant. There you can find a lot of practical advice on how to assemble the tool, adjust the depth of the cut, what each cutter is needed for, read about the complete set of your router model, and also find out what additional attachments you can buy to achieve exactly your goals. Don't forget to look at the safety precautions and technical specifications section of the device.
After this, you can begin the first small steps in developing the skill of carving with a wood cutter. These training activities are described below.
Through or slotted wood carving.
To have a general idea of the learning process, suffice it to say that most craftsmen start by cutting out simple patterns using a template.
Please note: Before and After: How to build a terrace with your own hands - photographs.
To do this, you need to take a piece of wood and draw a sketch on it. There is a large selection on the Internet and in art books; in addition, looking at photos of finished works with abstract patterns, it is easy to copy these drawings in pencil.
After the sketch is applied to the log, you should adjust the router so that it makes through cuts. Start working with the outer parts, and when the form is ready, you need to cut holes and give the pattern an openwork pattern. If you are cutting out platbands or other elements of the facade of a house, then you need to take a blade made of hard wood. Conifers and oak are good choices. For smaller interior products, it is better to take softer linden or birch.
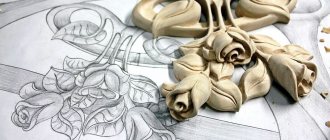
Figured wood carving using a hand router.
After mastering the technique of through threading, you can proceed to more complex elements. For example, after adjusting the depth of the cutout, add a pattern to the finished trim using V-shaped or other cutters. Not just flat figures look beautiful, but those complemented by notched carvings or made using other techniques. Chamfers on flat or rounded surfaces of large diameters will look very useful.
Various types of chamfers.
After training in these techniques, you can take on more complex ones. With the help of a customized router, it will not be difficult to make your first product using the flat-relief technique. Such drawings look amazingly beautiful on wall panels, boxes, and in addition, photographs of furniture with carved elements make you look closely and examine the entire pattern.
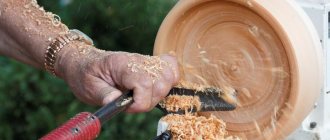
We hone our skills in using a router and wood carving
To achieve mastery in absolutely any task, constant practice is important. Even if the products turn out a little clumsy the first time or nothing comes out at all, you shouldn’t give up. After all, each time the cut will be smoother, the finish will be thinner, and the products will be more beautiful.
Wood carving with a router – photo for inspiration.
More interesting articles here: Interior.
Source of the article: WOOD CARVING WITH A MILLER WITH YOUR OWN HANDS.
- Previous: Garden Design and Exterior Decor
- Next: 11 unusual options for creating a Christmas tree
Working with a device - a router - patterns.
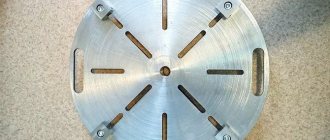
Draw the contours of the design on the working surface of the product and install the frame, loosen the wing nuts on the device, position the slats in position according to the drawing, so that the side guides of the frame lie along the contour. Place the router in the frame on the workpiece and align the router with one of the edges of the design outline. Repeat along the other edges of the frame until all four guides and curved cutting templates are aligned. Tighten the wing nuts and secure the fixture to the workpiece. Lower to a certain depth, usually 2-3 mm and make a cut in a clockwise direction, pressing the base of the router to the edges of the frame or template. To re-rout, simply move the jig and attach the design to the new workpiece (left).
Carved frames for mirrors: an interesting idea
Lovers of Art Nouveau style interiors will appreciate carved frames that frame paintings or mirrors.
Such interior items not only look rich and unique, but also add a special “zest” to the interior of the room. When cutting out mirror frames, experts recommend using a few basic styles to work with.
- The double baroque style contains two contours inside and outside, represented by openwork curls. The craftsmen included a feather profile in this style; it reflects some of the lightness and grace of the rectangular-shaped product.
- For mirrors, the feather profile with a back is ideal, providing a dense back part where the mirror is attached.
- The refined profile also has a dumbbell style, despite the somewhat massive frame. It is these frames that hold a heavy and massive mirror well.
Lovers of Art Nouveau style interiors will appreciate carved frames that frame paintings or mirrors.
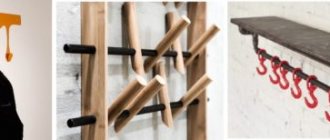
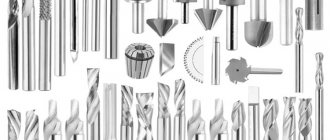
Milling cutters for hand router
Milling cutters are cutting tools that process and shape a surface. They consist of a cylindrical part, which is clamped by collets in the unit holder, and a cutting part. The cylindrical part can be of different diameters. Choose one that has a collet for which your device has. The shape and location of the knives of the cutting part determines the appearance that the wood receives after processing. Some cutters (for edges) have a stop roller. It specifies the distance from the cutting surface to the material being processed.
Working with a hand router on wood requires the presence of a certain number of cutters. This is a small part of what exists
Milling cutters are made from different metals and alloys. For processing soft wood - pine, spruce, etc. - use conventional nozzles (HSS), for hard woods - oak, beech and others - from hard alloys (HM).
Each cutter has a certain resource and maximum speed at which normal operation is ensured with minimal runout. You should not exceed the recommended speed - this may cause damage to the router. There is also no point in sharpening a cutter if it is dull. This is done using special equipment (costing about $1000), where you can set the required sharpening angle. Nothing good will come of it manually. So, dull ones are easier (and cheaper) to replace, since they cost relatively little.
Popular types
There are a number of types of router bits that are used most often.
- Edges. Serve for processing the side surfaces of workpieces. With their help, you can make smooth or shaped edges, you can form recesses and spikes for joining parts. It is this type of cutter that comes with a bearing at the end - it rests on the part, setting the distance from the edge of the workpiece to the cutter.
Some types of edge cutters
Groove cutters - for forming grooves anywhere on the part
There are simple cutters, formed from a single piece of metal, and there are typesetting ones. Stacked ones have a shank - a base, a certain set of different cutting planes, a set of washers of different thicknesses. From these parts you can independently form the required relief.
A set cutter is a set of several cutting surfaces and washers from which you can make a cutter of the required shape
These are the most popular types of cutters, but in fact there are a lot of them. In addition to the different diameters of the shanks, there are different diameters of the cutting surfaces, their height, the location of the knives relative to each other, etc. In general, for do-it-yourself milling, you usually need about five of the most common cutters. They are usually present constantly, and the rest are purchased for specific types of work.
Sketches for patterns: instructions
Beginner carvers are recommended to decide before starting work what technique they plan to use for engraving and choose the right ornament or pattern.
For those craftsmen who have recently picked up tools, experienced craftsmen recommend taking into account the following nuances when preparing for work:
- the engraving template should be as simple and understandable as possible, without complex or ornate elements;
- each type of thread has its own templates for work;
- lines from the existing template to the material for work are transferred as accurately as possible, since this is the only way to achieve accuracy in the work.
You should not start working without first creating a sketch.
When choosing a design for subsequent transfer to the material, it is worth considering a number of subtleties that will help you make the product professionally and skillfully.
- For a large product, you should not choose an openwork pattern or a pattern with small details. Such a design will be lost on the finished item and will not make it unique.
- Small items are not decorated with patterns with large elements and ornamental details, so as not to hide the shape and uniqueness of the product.
- Proportions when transferring details to fragments of the product should be observed to the finest detail so as not to disrupt the integrity of the finished ornament.
You should not start working without first creating a sketch, which you can make yourself or download ready-made photographs from the Internet.
Geometric and flat-relief carving: what is it?
The name of geometric wood carving comes from the main details and elements at the base of the pattern: geometric shapes, figures and their elements. Such ornaments are used to decorate furniture and household utensils.
To create this engraving you will need a simple set of tools:
- a piece of soft wood board;
- special knife-jamb;
- simple soft pencil;
- ruler.
When making the product, you will not need an applied paper blank, since the elements of the geometric pattern can be applied directly to the wooden blank.
Flat-relief carving is made in a similar way, but the design elements are not geometric shapes, but images of animals, elements of nature, and people. This type of carving is also used for making backgammon.
The finished product can be treated with colorless varnish
For such a wooden engraving you will need the following materials:
- set of wood cutters;
- soft wooden blank;
- sandpaper, pencils.
The product is manufactured following a certain sequence of actions.
- The wood is cleaned and prepared for work in advance. The design is applied to carbon paper and transferred to the workpiece.
- Contour carving is made according to the drawing; the relief and frame of the product are pre-selected.
- Upon completion, the work is treated with stain, dye or simply watercolors. Cleaned with sandpaper.
The finished product can be treated with colorless varnish.
Straight edges start in the shop
When purchasing lumber, select the best boards possible, paying particular attention to the grain pattern and how it will look on the finished product. You can purchase unplaned material, either having two planed faces or planed on both faces and on both edges
The latter option, being more expensive, often solves the problem of obtaining a straight edge. However, even such boards can warp. Warped boards, although difficult to work with, can also be a good material. A flat board with curved edges (photo on the right) can easily be processed to straight edges by following the decision diagram.
Video tutorials on working with a hand router
When installing doors, you need to cut in the hinges, how to do this using a router - in the next video (there is also information on how to make a groove, for example, for installing an extension). How to make a homemade milling machine from laminate samples (plywood can be used) and how to make a tenon joint for drawers (a table, for example) - in the next video Working with a manual wood router is shown well in the next video, but it is in English. Even if you don't know English, take the time to watch it. Many operations will become clearer.
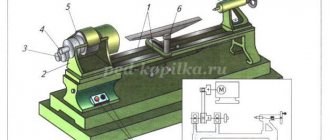
The OF 1010 EB vertical router (see Fig. 1 below) is perfect for artistic processing of wooden surfaces. In this case, the tool is guided freely without any stops. Lines are cut out of a wooden surface either according to your own sketch or using ready-made templates. How accurately you will be able to convey the drawing and not blur it depends mainly on your skill. Your movements when driving the router should not only be very easy and confident, but also extremely accurate. Wood with pronounced rings requires particularly precise guidance of the router, as the cutter tends to follow the ring pattern of late (summer) wood. To obtain a more contrasting pattern, the workpieces were treated with a dark stain before milling.
The following cutters can be used for milling:
Font cutter (Fig. 2)
V-groove cutter (Fig. 3)
Grooving cutter (Fig. 4)
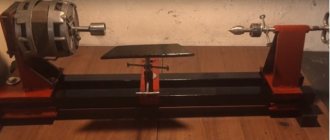
Small diameter slot cutter (Fig. 5)
To remove dust from the work area and ensure a good view, use a dust extractor with a Ø 27 suction hose (Fig. 6). A multifunctional table with clamps is perfect for securing workpieces (Fig. 7)