The weeding trimmer attachment solves two problems at the same time: it speeds up the process of destroying weeds in the garden bed, allowing large areas to be processed, and also makes the gardener’s work easier. You don’t need to bow to every extra blade of grass to remove it.
Place the nozzle, start the trimmer, and walk between the rows, occasionally waving the tool. There are several types of attachments, but cultivator type models are especially popular. They remove weeds and loosen the soil, increasing aeration, which in turn has a beneficial effect on the future harvest. Each attachment is good in its own way, and the choice depends on several parameters, including the characteristics of the cultivated soil.
Advantages and disadvantages of the cultivator attachment
The cultivator attachment for trimmers is becoming increasingly popular among buyers. Here are some advantages of this device:
- Easy to maintain.
- Significantly cheaper compared to equipment for a motor cultivator.
- This cultivator is simply irreplaceable for those people who have a lot of greenhouses. Using this device, you can quickly loosen the soil in a greenhouse and saturate it with oxygen.
- The design is made of very high quality, which makes it possible to use the cultivator for a long time.
- Protective shield. Protects operator from debris.
There are not many disadvantages:
- Each attachment makes the structure heavier; during prolonged use, a person will feel tired.
- It is necessary to select a nozzle and a trimmer with the same connecting nodes.
- Due to vibration, operating the trimmer switch button and holding a heavy unit suspended is often inconvenient.
Important! The model of the cultivator attachment must be manufactured by the same company as the trimmer. If the loosening tool is manufactured by Husqvarna, and the brush cutter is made by Oleo-Mac, then you will not be able to cultivate the soil: you simply cannot attach the attachment
Features of the nozzle
Any cultivator attachment for a trimmer significantly increases the weight of the entire device assembly (by at least 5...6 kg). Therefore, not everyone can work with such a tool for a long time. It is also necessary to include mechanical limitations on the power of the trimmer drive into the calculation. If the engine is designed for a power of no more than 1500 W, then the cultivator can only cultivate regularly loosened soil, or limit itself to hilling breasts, potato bushes, etc.
Since the drive of gasoline trimmers is located behind the operator, and the drive rod is quite long, vibrations constantly occur during the cultivation process. Their size is determined by both the length of the rod and the changing load on the disks or cutters. These vibrations are transmitted through the shoulder strap to the user’s hands, so it is not always convenient to operate the trimmer power button and hold a rather capacious unit. Therefore, long-term soil cultivation using a cultivator attachment is unsafe for health.
But it’s not all bad: the mobility of a gasoline trimmer makes it easy to cultivate the soil between rows, and the absence of wheels on a mounted cultivator does not damage the plants in the beds.
The cultivator attachment “does not like” compacted soil, and when first introduced into such soil, the boom is abruptly thrown back. Therefore, disc cultivators are equipped with a safety guard (toothed cutters are more likely to bend than break, although even in this case a low protective shield on the leg side would be helpful). The presence of a safety screen impairs the visibility of those working with the cultivator.
https://youtube.com/watch?v=lnrCg1_b3t4%3F
Design and mounting options
The cultivator attachment comes in two versions:
- A disk, the cutting elements of which are a pair of cutting disks;
- Gear, which is a series of cutters located sequentially on the shaft.
The fundamental difference lies only in the design of the ripening unit. Disc attachments are more rigid and therefore suitable for processing heavier soils, while toothed attachments have a lower dead weight but are designed for working on lighter soils.
The transmission of torque from the trimmer motor to the cultivator attachment is carried out using a special shaft, which is arranged in a special rod (it will have to be purchased separately). This unit is not interchangeable, and differs in the number of splines on the end of the rod: there can be seven or nine. Therefore, when thinking about purchasing a cultivator attachment, you need to understand that an Oleo-Mac attachment will not fit a Husqvarna trimmer, and vice versa.
The spline method of attaching disks or cutters to the shaft allows free movement of the cutting elements, which is ideal for cultivation, since it allows you to loosen the soil with a fairly wide grip (up to 200...250 mm per pass), without requiring a large amplitude of movement of the rod. Restrictions on the density of beds located on the site are also lifted. As the beds lengthen, the convenience of working with the attachment in question increases, since turns will have to be made much less frequently.
Kinds
Depending on the type, the device may or may not have cutters. Based on this feature, it can be classified into gear or disk. Products of the first type are characterized by the presence of cutters, which are located on both sides of the drive shaft. The second options work using cutting discs. However, the presence or absence of cutters does not affect the functionality - cultivator attachments for a gasoline trimmer are purchased for loosening the soil.
The differences between varieties lie in the type of soil that the cultivator attachments themselves can handle. For example, gear-type varieties are lighter in weight, however, because of this they are not able to process difficult soil. Disc analogues can work not only with light soil. These nozzles are characterized by greater rigidity, they are stronger and more durable.
Features of weeding potatoes with a trimmer
A trimmer, or brushcutter, is a device that runs on electricity or burning gasoline. Its cutting elements are special cutters, fishing line or sharp metal knives. Properly organized weeding significantly saves the gardener’s time and physical strength. At the same time, unlike manual weeding, this method of cleaning the beds makes it possible to immediately mulch them with the help of cut grass. Mulch will retain moisture in the soil, attract worms, loosen the soil and improve the fertile layer, and become an additional fertilizer for potatoes. That is why supporters of organic farming prefer to weed potato plots with a trimmer.
Video with a visual demonstration of weeding potatoes with a trimmer:
Types of construction
The design of such a device is usually equipped with one or two pairs of cutting parts. Instead of a gearbox, they are attached to the trimmer at the bottom of the rod or near the motor. The brush cutter works by burning liquid fuel.
Types of structures:
- Cultivator. It is considered the most popular attachment. Its advantage is that it simultaneously weeds and loosens the soil. The cultivator consists of disk elements that are placed on one axis.
- Three- or two-blade knife. Used for cutting weeds. It is a metal plate with two or three pointed blades along the edges.
- Trimmer head with fishing line. Designed for cutting weeds. Treats row spacing. For work, two types of fishing line are used: circular and faceted.
Choose the right attachment for your device. Too heavy options will overheat the engine.
Pros and cons of weeding potatoes with a trimmer
The advantages of using a technical device are:
- easy weeding that does not require much physical effort, which makes it possible for older people, teenagers, and women to do the work;
- small amount of time spent;
- multifunctionality of the device: simultaneously with weeding, loosening, saturation of the soil with oxygen, and mixing of soil with fertilizers are carried out;
- when using some attachments, weeds grow very slowly afterwards: for example, after treatment with a rounded fishing line in the trimmer head, the vegetation does not sprout for a long time;
- the work is made easier by the fact that there is no need to remove the cut grass from the potato bed - it will become an additional fertilizer and an excellent mulching agent.
Disadvantages of this type of potato weeding:
- the impossibility of carrying it out on heavy, clay soils;
- the need to apply only to small, not yet rooted weeds;
- Weeding of potatoes can be done only after germination, however, by this time the grass may already have taken root;
- Hilling potatoes without a hoe and the usual manual processing method will not work.
Weeding rules
It is necessary to use a trimmer for weeding when the weeds have not yet grown too much and are quite easy to cut off.
It is important to follow the rules:
- when working, you need to use a respirator and safety glasses, because during operation of the brush cutter, dust is generated and small pebbles fly away;
- it is forbidden to work if there are people in front of the scythe;
- It is recommended to bury the trimmer blade into the ground no more than 1.5 centimeters;
- It is possible to start weeding when the seedlings appear, so as not to accidentally weed them;
- with low engine power, you need to take breaks every 15 minutes, allowing the engine to cool;
- At the end of the season, all working surfaces and brush cutter blades must be treated with fungicidal agents; they will help get rid of pathogenic microflora.
Design and mounting options
Modern cultivator attachments can be made in two versions:
Toothed, in which the cutters are located sequentially on the shaft;
Disc, when several cutting discs act as cutting organs.
The torque is transmitted to the cultivator attachment from the engine thanks to a shaft, which is arranged using a special rod. The latter, unfortunately, often has to be purchased separately.
The unit in question cannot be called interchangeable, and the number of slots on the end of the rod can vary from 7 to 9. Based on this, when buying a cultivator attachment, for example, from Oleo-Mac, you should know that it is not suitable for working with a Husqvarna brand trimmer , as well as vice versa.
The spline method of fixing cutters or discs to the shaft provides for the free displacement of the cutting elements, due to which the soil will be loosened over a fairly wide coverage - 200-250 millimeters. This option is excellent for cultivating land on the site, since it eliminates the large amplitude of displacement of the rod during operation. In addition, this method allows you to reduce or completely eliminate restrictions on the density of beds.
The cultivator attachment comes in two versions:
- A disk, the cutting elements of which are a pair of cutting disks;
- Gear, which is a series of cutters located sequentially on the shaft.
The fundamental difference lies only in the design of the ripening unit. Disc attachments are more rigid and therefore suitable for processing heavier soils, while toothed attachments have a lower dead weight but are designed for working on lighter soils.
The spline method of attaching disks or cutters to the shaft allows free movement of the cutting elements, which is ideal for cultivation, since it allows you to loosen the soil with a fairly wide grip (up to 200...250 mm per pass), without requiring a large amplitude of movement of the rod. Restrictions on the density of beds located on the site are also lifted. As the beds lengthen, the convenience of working with the attachment in question increases, since turns will have to be made much less frequently.
Types of construction
The design of such a device is usually equipped with one or two pairs of cutting parts. Instead of a gearbox, they are attached to the trimmer at the bottom of the rod or near the motor. The brush cutter works by burning liquid fuel.
Types of structures:
- Cultivator. It is considered the most popular attachment. Its advantage is that it simultaneously weeds and loosens the soil. The cultivator consists of disk elements that are placed on one axis.
- Three- or two-blade knife. Used for cutting weeds. It is a metal plate with two or three pointed blades along the edges.
- Trimmer head with fishing line. Designed for cutting weeds. Treats row spacing. For work, two types of fishing line are used: circular and faceted.
Choose the right attachment for your device. Too heavy options will overheat the engine.
Mounting options
The following methods are used to secure the working part:
- near the engine instead of a rod;
- instead of a gearbox under the rod;
- a method in which the rod is disconnected in the middle.
The number of slots on the end of the rod is different for each model
Therefore, when choosing a nozzle, pay attention to this
How to weed potatoes with a trimmer
Following the rules for properly weeding potatoes with a trimmer will allow you to avoid mistakes and carry out the work quickly and easily:
- It is better to weed potatoes while wearing a respirator and safety glasses, since when the cutters rotate, dust and weed particles fly up.
- Treatment with a trimmer is carried out at least once every 14 days, since weeds that have not yet taken root are susceptible to it.
- The best time for weeding is early sunny morning.
- Simultaneously with getting rid of weeds, potato beds are loosened if the cutting elements are deepened by more than 1.5 cm.
- The lower the engine power, the more often you should take a break, giving it rest.
- Before work, the cutters are treated with silicone grease, and such weeding is not carried out on heavy soil.
- Trimmer attachments must be periodically treated with a disinfectant that will destroy pathogens.
- There should be no other people nearby when working.
Rules and nuances of work
To make weeding as effective and safe as possible, follow these steps:
- First, wear safety glasses, a respirator, and clothing that will cover exposed areas of the body.
- Prepare the trimmer and check its operation at idle. If there are any malfunctions, then it is unsafe to use such equipment for weeding.
- The cultivator type attachment can be buried no more than 2 cm into the soil.
- Weeding is carried out if the height of the weeds is no more than 20 cm.
- It is better to do weeding after 4 pm in dry, windless weather, and experts recommend using mowed weeds as natural mulch for garden beds.
- Every 20-30 minutes you need to take a break. Both the trimmer must rest (the motor cools down), and the person who controls it.
Expert opinion
Kuznetsov Vasily Stepanovich
Before starting work, it is recommended to treat the trimmer head with an alcohol solution. It is appropriate to perform the same procedure after weeding. This way you can avoid the spread of pathogens throughout the garden, which will eliminate a number of problems.
Weeding should be done every 10-14 days. It is not recommended to leave the garden unattended, since in the presence of heavy rainfall the grass will grow much faster than the crops. And if the weeds reach half a meter, they will have to be removed manually.
Chopper for trimmer
For many summer residents, weeding is problem No. 1. Especially if the plot was purchased recently, and before that it had not been cultivated for a couple of years. And gardeners often dream of a mechanical hoe. It won't be difficult to do if you have a trimmer available. This attachment is attached to the trimmer according to the principle of a trimmer knife.
Making a hoe attachment
Cut a circle out of a thick sheet of iron (preferably stainless steel), there should be a landing hole in the center, and holes should be drilled on the entire surface. Secure the sharpened bolts in them using a washer and nut. The result is a design that resembles a hedgehog. It is with these very thorny bolts that weeding will be done.
Oleo-Mac brush cutter
Rules for weeding with a trimmer
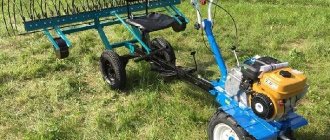
The rules for growing potatoes provide for several operations - continuous cultivation until the potatoes have sprouted, weeding the rows, hilling the bushes.
For simple cultivation, drum cutters are used; for weeding, you can use disk, saber, or drum cutters. But for hilling it is better to make a stacked structure - make the internal cutters of a larger diameter, and the outer cutters of a smaller diameter. This design ensures ease of use of the tool when hilling under a bush.
Weeding rules are quite simple:
- a sunny day is chosen for work, so that the weeds dry out in the sun as quickly as possible;
- For protective equipment, you should wear goggles and a respirator, and for shoes, boots;
- when working, as well as when mowing grass, it is recommended to use a shoulder strap;
- weeding is carried out with a deepening of 1-1.5 cm, this is enough to loosen the top layer and increase gas exchange in the soil;
- It is recommended to weed the entire row spacing until the plants rise to a height of 10-15 cm;
- Weeding is done in a zigzag, the nozzle is first moved to the left, and then at an angle to the right. The next move to the left, taking over the next lane.
- Hilling is done to a depth of 10-12 cm, with the first movement being forward in the center of the row spacing, and after that, turning the nozzle left and right, a mound is formed near the bushes.
- It is recommended to select the operating mode with short breaks so that the trimmer has time to cool down;
- At the end of the work, the nozzle must be cleaned, unscrew the screws of the technological holes and add molybdenum grease to the gearbox.
From a chainsaw
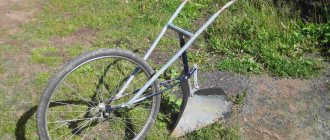
Many different attachments have already been invented for chainsaws that expand the capabilities of this unit, for example, a cultivator, a drill, a boat motor, and also a scythe attachment. You can see what it looks like in this video. If you want to make a trimmer out of a chainsaw, the most you can make is a lawn mower on wheels, since the engine of the unit is quite heavy, and it will not be possible to apply the above-described options for making trimmers (with a bottom drive) to it.
Therefore, the trolley is made first. It can be welded from a 25x25 mm corner. The frame dimensions should be 500x600 mm. The wheels are attached to the corners of the frame.
Next, you need to unscrew the “steering wheel” and tire from the unit. The cart handle can be made from water pipes. The “steering wheel” is screwed to it. It is also necessary to lengthen the fuel hose and throttle cable.
The gasoline engine is installed (screwed through the holes to secure the tire) onto the frame so that the gearbox is rotated 90 degrees and the shaft is at the bottom.
Now all that remains is to attach the cutting tool to the shaft of the unit. This is done as follows.
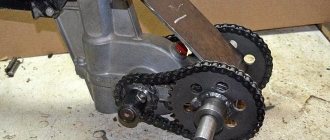
- It is necessary to weld a small piece of pipe, 80 mm long and 50 mm in diameter, to the “star” of the device. It is better to cut the pipe on a lathe so that the ends are perfectly straight.
- Next, find a pipe with a slightly larger diameter - equal to 58 mm. It also needs to be cut to a length of 80 mm. Thus, you will receive a telescopic shaft, which is connected using 2 bolts (m6) located opposite each other. The bolts must have locknuts. Below is a diagram of how the trimmer head is made, which is used to secure the cutting tool.
Several holes need to be made in the telescopic pipes so that the height of the knives above the ground can be adjusted.
It is better to make a knife of such a design as in the following figure.
Due to the fact that movable knives are attached to the disk with rivets, they will simply bounce off when they encounter a stone or a dry branch. This will protect the shaft and gearbox from damage that may occur when the tool jams.
The diameter of the disk (made from 4 mm sheet steel) should be 180 mm. The knives are made from strips 30 mm wide and 120 mm long, cut with a grinder from a hacksaw blade for wood.
Homemade protective casing
If you are making a homemade mower, then you will definitely need a protective cover. It will protect your eyes, body and legs from injury from small pebbles and knife fragments if they break.
The trimmer housing can be made from a sheet of aluminum or thin sheet metal.
- First, in the corner of a metal square, you need to drill a hole of the required diameter (depending on the type of drive of your unit) using a crown.
- Then you will need to make markings for the fasteners. As a base to which the homemade protection will be screwed, you can use a standard casing from an angle grinder if you are making a trimmer from it.
- Clamp the workpiece with a clamp and, using a tape measure and a pencil, draw the first circle with a radius of about 270 mm. The center of the circle will be the corner of the workpiece. It is impossible to give exact recommendations regarding the radius, since it will depend on the diameter of the cutting tool that you will use with the unit. Therefore, first decide which knives you will use and what line reach will be optimal.
- Next, draw a second arc (this will be a bend), slightly retreating from the first. In this case, 5 centimeters. This way you measured the height of the future shield. In general, it is recommended to make the height of the casing such that when you place it flat on the ground, the cutting tool does not reach it by about 2 cm.
- After marking the second line, you need to cut a workpiece along it using a hacksaw or a jigsaw with a metal file.
- In addition, it is necessary to make radial cuts (up to the first arc) and bend the resulting parts with pliers at an angle of 90°.
- Next, the shield is attached to the protective casing of the angle grinder, the cutting tool is installed, and the unit is ready for work.
Read also: Tightening cylinder head bolts without a torque wrench
In this way, you can make and install a protective cover on a trimmer purchased in a store if the shield has cracked for some reason. The shields in factory devices are made of plastic and often break if you unsuccessfully hit the trimmer head on the ground to lengthen the fishing line.
Trimmer attachments for weeding potatoes
Attachments that can be used to weed potatoes with a trimmer:
- A cultivator is the most popular attachment among gardeners, thanks to which you can simultaneously get rid of weeds and loosen the soil. Cultivators with tillers are disc elements with sharp blades that fit onto a common axis. For one nozzle, 4 cutters are used.
- A three-blade knife is used for cutting weeds. For trimmers with a straight bar, a metal blade is used, for devices with a curved bar, a plastic blade is used.
- A trimmer head with fishing line is used to process row spacing. There are 2 types of fishing line - round and faceted.
A brush cutter with a motor located at the top is best suited for weeding potatoes. This device can be used in wet grass. Nozzles are selected based on the power of the trimmer. If you use a nozzle that is too large, the device’s motor will quickly overheat and become unusable.
A video about the cultivator attachment for a brush cutter will allow you to use it correctly, saving yourself from the need to manually weed potato beds:
How to choose?
Before you buy a nozzle, you need to determine two nuances:
- Purpose of weeding: if you need to remove grass in the rows or front garden, then a fishing line head will be enough. When it comes to the beds themselves and the need to pull out weeds by the roots, preference should be given to a cultivator attachment with teeth that capture unwanted vegetation.
- Amount of work: if it is a huge plantation, then the fishing line will not cope with the task, especially if there are dense and tall weeds (it is better to take a disk one). And for working between the beds, a fishing line will be enough, which costs 2-3 times less than a disk attachment, and it will be safer to approach the beds with it.
If the weeds are large, and you only have a head with a fishing line, then you don’t even have to start working. It will be extremely difficult for the attachment to cut through massive weed trunks, which will lead to overheating of the motor. A trimmer that experiences increased load will constantly fail and require expensive repairs.
Have several attachments available, since none of them will be superfluous in the household. A head with a fishing line will help you mow barely grown grass after heavy rains. A disk-type attachment can remove overgrowth from the garden, but only a cultivator-type attachment can most thoroughly clear the area of weeds by removing them by the roots.
Trimmer attachment Boat motor
) with a fuel consumption of about 1 liter. per hour of work under load. The attachment for the trimmer is sold as a separate leg (complete with a propeller drive, control handle, fastening mechanism and everything necessary), which is connected to the trimmer motor through an adapter.
First, you must disconnect the trimmer rod with cables and wires from the trimmer motor. The drive leg for the propeller of the trimmer attachment of the boat motor with its own throttle cable and engine shutdown wiring will be connected to this motor, i.e.
wire to the “jammer” button. More often, such a boat motor from a trimmer is bought by fishermen, hunters and those who live or travel by water. The disadvantages of a boat motor attachment include noise (fishermen and lovers of silence still need oars) and the fact that the propeller blades are plastic.
Trimmer attachments. What is better - buy or do it yourself?
Owners of suburban areas and houses often buy a gasoline trimmer and get at their disposal a fairly powerful autonomous device that can cope with various types of agricultural work. And considering that manufacturers often complete the tool with various useful attachments, for example, blowers, shredders and hedge trimmers, working with such a device becomes a pleasure! In today's material, we will not deal with the operating features of various attachments, but will talk about one specific solution - a cultivator attachment for a trimmer.
Pole saw: features
With its help, a person can get rid of twigs and branches that grow at a height of three meters.
The object’s design features allow it to perform such operations, because the pole-cutter attachment on a brush cutter consists of a one-and-a-half meter bar, supplemented with a chain or tire. In most cases, the chain width does not exceed 1-3 mm, and the comfortable weight of 2.5 kg for long-term work allows a person to actively operate the unit and not feel pain in the back or shoulders.
As for homemade versions of this device, there is no need to create them, because in stores such attachments are very affordable and almost everyone can afford to buy them.
Reviews
Before you start weeding with a trimmer, evaluate your capabilities. Many summer residents share their experiences.
Ivan, Minsk: “I think that with modern technologies it is imperative to use them. But their use must be approached wisely. For example, at the beginning I weed the potatoes exclusively with a trimmer, and then I go through them with a walk-behind tractor and cut the ridges. The potatoes always turn out great.”
Vitaly, Novgorod: “I have a small potato production farm. Recently, I have mechanized potato weeding, which has helped reduce labor. It turned out to be both fast and cost-effective.”
This is interesting:
The nuances of storing potatoes in a vegetable store.
Treating the stomach with potato juice.
What caliber of potatoes are there (table) and what does it mean.
Trimmer attachment Support wheel
Used together with a blower or other attachments as needed. It is especially convenient to use running wheels for a trimmer together with a sweeping brush or roller - you can raise the working body and, accordingly, reduce friction on the surface (easier to work, less wear, better results and pleasure from work). See also: Raiffeisen Bank Aval in Kremenchug.
The new support wheel for the trimmer makes it much easier to work with the trimmer with different attachments. This attachment can be attached to the trimmer shaft in a variety of positions, providing versatility and adaptability.
The support wheel allows you to maintain the same cutting height, as well as the same cutting depth and width when using the edger on flower beds and garden paths. The attachment is equipped with two support wheels for working as an edger or one rotary wheel for working as a trimmer. The support wheel can also be used with a blower or brush.
Additional attachments
In addition to the cultivator attachment, stores have many other devices that are mounted on the trimmer, these include:
- Drill. When installed on a gasoline trimmer, you can work without electricity.
- Lopper. It works on the principle of a hacksaw.
- Gardening scissors. With their help, it is easy to trim bushes, trees and tidy up hedges.
- Aerator. Destroys the crust on the surface of the lawn.
- Height cutter. Using this attachment you can remove branches at a height of up to 4 meters.
- Snow blower. Designed for removing snow from garden paths and areas.
The downside of all these useful attachments is their high price. Also, when equipped with any attachment, the weight of the trimmer will increase by 5-6 kg; not everyone will be able to work with such a tool.
To make your gardening easier, you need to purchase several different trimmer attachments. If your budget is limited, then you can make accessories for brush cutters yourself.
Trimmer belt
For more comfortable work with the trimmer, if you intend to process a large area covered with grass, it is advisable to use a special belt. This device relieves fatigue from the hands and back of the mower operator and greatly facilitates the process when compared with the same work, but without a belt.
There are shoulder straps and backpack straps. The shoulder strap is the simplest device and consists of a loop with two or one latch (carabiner), with which it is attached to the mowing unit. A plastic plate is usually attached to the second carabiner, protecting the operator's side from pressure from the trimmer bar.
The shoulder strap is usually used with lightweight trimmers weighing 3-4 kg. For heavier units it is more convenient to use a backpack belt.
A trimmer belt can be easily ordered online or purchased at a specialized store that sells these devices and their accessories.
If you want to make it yourself, then any housewife, looking at this device, can easily sew it from improvised materials (old belts and belts). You may have to buy buckles and carabiners. But we still recommend buying a ready-made backpack suspension and not wasting time and money on making a device of worse quality than the ready-made one.
For many summer residents, the trimmer has long become a familiar and almost irreplaceable technique. But it is not always possible to purchase a model that can satisfy all needs. It happens that the trimmer easily copes with fresh young vegetation, but there is a desire to clear a place behind a fence or along the driveway, and tall, mature grass turns out to be too tough for the equipment.
DIY trimmer attachment
We offer the option of making your own trimmer attachment from simple, almost improvised, tools. You will need a metal perforated plate (100mm x 240mm), two hacksaw blades for metal, 4 screws and 4 M5 nuts, 4 washers and 4 enlarged washers. From a safety point of view, hacksaw blades should not be completely hardened.
Everything you need to make a nozzle
The most difficult thing in making a nozzle is to symmetrically mark and make holes for the knives and trimmer shaft. That is why a ready-made perforated plate is selected.
First you need to make the base of the nozzle. To do this, use a grinder to cut out a square with a side of 100 mm from a metal plate. You need to mark it in such a way that there is a hole exactly in the center (at the intersection of the diagonals). To do this, measure a distance of 50 mm from the center of the selected hole perpendicular to the short side of the plate and mark the cutting lines.
Marking the base of the nozzle
We cut off the excess and get a square of 100 mm x 100 mm. Now you need to slightly round the corners and drill out the central hole for the trimmer shaft.
Round the corners and drill the central hole for the trimmer shaft
We cut the metal sheets, measuring 8 cm from each end. We get four blanks with ready-made holes.
We cut sheets for metal
These blanks must be shaped into knives. To do this, we mark the cut line by eye (special precision is not required), fasten all four blanks together and grind off the excess.
We cut knives from blanks
As a result, we get knives of the same weight and size; they can be sharpened a little on one side. Now all the parts of the homemade trimmer attachment are prepared, you can start assembling.
Everything is ready for assembly
We put a small washer on the screw and insert it into the corner hole. We put the knife on top, placing the sharpened side in the direction of rotation of the trimmer shaft. Next comes a large washer and a nut, which is not tightened so that the knife rotates freely. We attach the other three knives in the same way.
Fastening the knives
The end of the screw must be riveted so that the nut does not fly off.
The end of the screw needs to be riveted
The nozzle is ready. It is installed with nuts to the ground and secured in the same way as the three-bladed knife that comes with the trimmer. When colliding with a stone, the knives fold and go inward a little.
This idea was proposed by our regular video author Tatyana (Tula region). You can see in more detail the entire process of making such a trimmer attachment and learn some of the nuances by watching the video she prepared.
When working with a trimmer, it is important not to forget about safety precautions when using any attachments, especially homemade ones.
DIY universal cultivator for trimmer
If you have a summer cottage, then the presence of a cultivator attachment will greatly facilitate the work of cultivating the soil (working with a hoe requires a lot of effort and time). Special factory equipment is not cheap, which means you need to assemble the cultivator attachment for the lawn mower yourself.
The following is a simple example of how to make a cultivator based on a trimmer. To do this you will need the following tools and materials:
- grinder with metal discs;
- drill complete with drills;
- welding machine;
- electrodes;
- hacksaw for metal;
- emery machine;
- garden forks;
- steel tube for the trimmer shaft;
- hammer, pliers, tape measure, etc.;
- Metal sheet.
Cultivator attachment for brush cutter (petrol mower)
Manufacturing begins with a loosening element. To do this, you need to bend the rods of the garden forks. Their length should be about 15 cm.
Then a working nozzle is made. To do this, the fork teeth need to be flattened to a width of 1 cm, then the resulting cutters should be sharpened using emery. After this, cut a circle of durable metal with a diameter of about 10 cm and weld cutters to it, preferably 3 pieces.
The next step is to attach the weeding bit to the trimmer. If there is a reverse thread at the end of the trimmer shaft, then the resulting part is simply screwed on. It is enough to weld a tube with a nut to the cutter. That's it, the do-it-yourself trimmer ripper is ready.
How to do it?
A hand cultivator can be quickly and easily made with your own hands. Moreover, you should not be afraid that you will need special skills, materials or tools - in most cases, the unit can be assembled from what is already at hand.
The simplest model of a universal assistant is a model similar to the “Tornado”. Such cultivators operate without fuel or electricity. All work is done with our own efforts and tools. This device is made from a fork, and the teeth are bent with a hammer so that they look like a gimlet. Then a simple shovel handle is attached, a plastic pipe is put on top of it, and all this is secured with electrical tape.
Depending on which cutters are used, cultivators may differ. For example, there are needle models, which are a type of rotary star device. They do an excellent job of loosening and killing weeds. The mounted lancet cultivator allows you to perform even more functions; its cutter resembles “crow’s feet” in appearance. Such a unit can loosen, trim weeds, comb out plant debris, and level the surface layer of the earth.
From the Bulgarian
A burnt grinder can be successfully converted into a cultivator. Of course, such a tool will not be able to process large areas, but it will help to cope with a summer cottage or even a greenhouse. The main advantages are its environmental friendliness, low weight and ease of use. This device runs on electricity.
To assemble the unit, you will need a welding machine, as well as at least minimal skills in working with it. Materials for manufacturing will be:
motor from a washing machine or drill;
gearbox from a grinder;
chain and sprockets from a small bicycle;
cultivator cutters, which are made from car springs;
cable approximately 50 meters long;
tin to protect the motor from earth getting into it.
Lawn aerator attachment for lawn mowers - what is it and what is it used for
Owners of private houses will find a useful device such as a lawn aerator attachment for a trimmer. Its main purpose is to saturate the soil layer with air. This is done to improve the growth of lawn grass. The action of the aerator is absolutely safe for vegetation.
Aerator
Externally, the nozzle resembles a rake, but its main purpose is to restore the breathability of the soil to saturate the root system of plants with air. The device can also be used for uniform distribution of organic fertilizers.
The cost of the aerator is about 10 thousand rubles, which depends on the manufacturer.
Pros and cons of the method
Weeding a garden with a trimmer, and especially the area where potatoes grow, has its own characteristics and specifics.
First of all, you need to pay attention to the fact that you need to choose the right tool for the job. It is preferable to choose powerful four-stroke engines as a working engine. Such brush cutters have lower gas consumption and greater productivity compared to two-stroke ones.
For two-stroke engines, the recommendations boil down to choosing a higher engine power; the more powerful the engine, the more efficient the work.
Such brush cutters have lower gas consumption and greater productivity compared to two-stroke ones. For two-stroke engines, the recommendations boil down to choosing a higher engine power; the more powerful the engine, the more efficient the work.
Weeding potatoes, unlike making hay or mowing the lawn, is a more labor-intensive process, so you need to be prepared for the fact that after work not only your back, but also your arms and legs will hurt. The fact is that during work you will have to keep the nozzle suspended, preventing the lugs from completely burying themselves in the ground. In addition, you will have to move the unit along the surface from right to left, which also requires significant effort.
But from an economic point of view, such potato weeding will be much more effective than manual weeding - in a season, using a cultivator, you can cultivate a much larger area than with your hands. In this case, repeated processing will be required after a longer period of time.
Alas, there is also a minus. This is a lot of gas mileage. In normal mode, gasoline consumption is usually 0.44-0.92 liters of combustible mixture per 1 hour of operation of the unit, depending on the design and type of engine. With the device installed, this figure increases by approximately 35-40%. So you have to choose either saving time and quality of work or saving money.
FAQ
If the trimmer engine heats up quickly and within 5-7 minutes there is literally boiling water, does this mean that the attachment is not doing its job?
Perhaps the reason is that the attachment is not able to remove thick thickets of weeds, which leads to increased workload. But boiling of a gasoline trimmer can also be caused by a lack of oil in gasoline. Check that the correct concentrations and proportions are selected before filling the tank.
Do you need to choose attachments based on the model name or are some of them suitable for trimmers of other brands?
Ask a salesperson who will help you make the right choice. The power of the simplest garden trimmer is not always enough to fully operate the cultivator attachment.
How often should you sharpen the blades on the weeder attachment?
As it becomes dull. If you use it quite often and process more than 10 acres per week, then it is better to sharpen them every 10-12 days using special equipment.
Is it worth making a cultivator attachment yourself?
The technology for caring for vegetation will also change: first, use a knife attachment to walk through the beds, cutting off the grass, and only then use a cultivator attachment.
Having decided to make your own cultivator attachment for the trimmer, you should first evaluate the following:
- The design of the output section of the boom: if it is a flexible shaft, then you will have to forget about the cultivator: it will not withstand the constantly changing amplitude of torques. The cardan transmission is more functional, and the most successful design is considered to be a multi-slotted rod, and a straight one, not a curved one.
- Drive power: If it is less than 1000W, the motor will overheat and the cultivation performance will drop sharply.
- Fuel tank volume: energy consumption will increase significantly, since the cultivator attachment will have to be made from scrap materials. Therefore, the tank must contain at least 1 liter of fuel.
- Handle design. Ergonomics experts believe that the most comfortable is the T-shaped handle, which provides the most accurate and reliable direction. The J-shaped handle common in some models makes it difficult to hold a gasoline trimmer with a cultivator attachment.
If the existing trimmer meets the listed requirements, and its owner has sufficient experience in performing such work, then it is quite possible to make a disk attachment with your own hands. As for gear-type nozzles, making them yourself is very labor-intensive and will not provide the desired quality.
Non-existent attachments
On the Internet you can find several exotic attachments that are physically difficult to use on a lawn mower. Let's figure out where the truth is and where these rumors come from.
Drill attachment
This attachment is confused with a motor drill. In fact, it is an independent tool, the gasoline engine of which is similar to the engine of a lawn mower. This was the reason for the untrue rumors about the super-nozzle. In fact, such an attachment would require complete disassembly of the trimmer, which is ineffective.
A gasoline drill is a useful tool that allows you to work in the absence of electricity. The powerful drive increases the productivity of the drill. The tool is characterized by durability and increased reliability. A distinctive advantage is the colossal torque (due to the presence of a reduction gearbox with a gear ratio of 17:1).
snow blower
Such designs are not commercially available, primarily because removing snow with a brush cutter is inconvenient. The snow auger is heavy and difficult to hold in front of you. A small and light auger will have low productivity. There are homemade models created by folk craftsmen, but their effectiveness can be judged from the video below. An ordinary shovel will cope with this volume faster.
To remove snow, you need to use specialized tools, which are characterized by better performance and ease of operation. A special bell sets the direction of snow ejection, which allows you to clear paths, parking lots or backyards more efficiently and quickly.
The good thing about the listed tools and accessories is that they are suitable for most modern trimmers. They are affordable and easy to use, and, most importantly, they make caring for your garden easy and enjoyable.
Terms of use
When using any equipment, including manual and agricultural equipment, you should follow safety rules. The user must carefully read the instructions for the unit and work without violating them. Accessories on the trimmer can be attached to it in the following ways:
- instead of a reducer at the bottom of the trimmer hose;
- instead of a hose near the engine;
- by disconnecting the hose in the center.
The motor from a brush cutter can operate in various positions, as it is characterized by high power density, reliability and small size.
Owners of gasoline trimmers with attachments claim that they are much cheaper than bulky walk-behind tractors, but are not much inferior to them in efficiency. The purchase of these units is a profitable investment, since they can be used to process the garden, vegetable garden, and clean the area in the warm and cold seasons
When purchasing equipment of this type, you should pay attention to the quality and design features, as this will guarantee long-term use of brush cutters with attachments, as well as efficient work on the territory and a high yield
For information on the features of the brush cutter attachment, see the following video.
Features of operation
Taking into account the capabilities of the trimmer and the attachment itself, work with the attachment is carried out before the period when the weeds have not yet grown and become stronger. Thus, the user’s work will be more efficient, because it is easier to cut short grass than to deal with coarse and thick stems. Timely loosening of the soil using a cultivator attachment will contribute to the accelerated growth and strengthening of planted crops and, as a result, high yields.
It is important to securely attach the attachment itself to the gasoline trimmer. It is important to take into account the fact that not every gardener can work with a brush cutter with a cultivator attachment, the reason for which is the weight of the scythe and attachment
If the engine of the unit is not designed for a power of more than 1500 W, this attachment can only be used as a ripper or a light hiller. It is important to understand that the attachment for cultivating soil using a gas mower in no way replaces the unit for weeding, plowing and hilling. This is a mini device for small purposes.
Knives rotating during operation are quite dangerous, and therefore you must work with a gasoline trimmer with extreme caution. Do not attempt to clear weed blades while the device is on. This can only be done when the engine is completely stopped. Do not grab knives with your hands or try to block them. The device must be inspected in a timely manner, eliminating breakdowns and worn parts.
You need to refuel the unit outside
It is important to ensure that there is no oil or fuel leakage. Do not allow the engine to overheat
During operation, the operator must stay away from rotating elements, since the cutters can damage limbs. Before starting work, you need to inspect the area of future processing and rid it of solid objects. For example, it is advisable to get rid of stones that can cause the cutters to stop or even break.
You can learn more about the cultivator attachment for a gasoline trimmer in the video below.
How to make a manual cultivator for cultivating row spacing
To cultivate narrow spaces between rows, first of all, the cultivator must be compact. A hand-held device called “Hedgehog” is well suited for this type of work. Having all the necessary parts, it is easy to make it yourself. To assemble the “Hedgehog” you will need: a U-shaped bracket with holes, a shaft, a handle and wheels with metal spikes.
- In order for the walk-behind tractor to move easily around the site, you need good wheels. To do this, take medium-sized steel pancakes and weld metal spikes to them. Spikes are easy to make; you just need to sharpen the reinforcement into a cone shape.
- Ready-made cutters are put on the axis.
- The axle is inserted into the bracket and fixed on both sides.
- A fastener is welded to the end of the bracket and the handle is inserted.
The equipment is assembled and ready for cultivation and weeding between the rows.
https://youtube.com/watch?v=B2_Gnt8sK2o
From the trimmer
You can assemble it from available materials: a working gasoline trimmer, an angle grinder or welding tool, a garden fork, a steel pipe
- To make a cutter, teeth from a fork are used, which are bent into the desired shape. Usually the soil is loosened to a depth of 10 to 15 cm, so the length of the teeth should be no more than 15 cm.
- Next, we do the working part. The tines of the fork are flattened to a width of about 1 cm.
- The cutters are sharpened with emery and secured to a round penny.
- A nickel with a diameter of 10 cm should be perfectly even in shape. Three cutters are placed evenly on the heel. If you put more than three pieces, the device will be severely overloaded.
- The final part is connecting the base with the cutters and the trimmer. It is good if the shaft tip has a thread. Then the trimmer is simply screwed to it.
The equipment is designed for loosening soil at shallow depths.
https://tytdacha.ru/sadovaya-tehnika/mini-traktory/nasadka-na-trimmer-dlya-propolki/https://proinstrumentinfo.ru/nasadka-kultivator-dlya-trimmera-tsena-otzyvy/https:// tokar.guru/instrumenty/kultivatory/ruchnoy-samodelnyy-kultivator-iz-trimmera-i-velosipeda.html
Types of cultivators
Tornado
A tornado is the simplest version of a cultivator that you can make yourself. Outwardly, it looks like a corkscrew, which is mounted on a vertical tripod. The design is equipped with a horizontal handle on top. To make it, use a simple pitchfork and a handle attachment. You can buy an attachment at a hardware store. It has the shape of a handle and is used to work with forks and shovels.
The handle of a cultivator should be long. Therefore, the nozzle must be increased. For extension, use a plastic pipe with a slightly larger diameter than the thickness of the plastic nozzle. The pipe length should be about 0.5 m
So that the pipe can be put on the handle handle, it is carefully cut lengthwise and turned inside out. The pipe is wrapped with electrical tape. Fixed, during operation it will not slide or jump out of its place
The finished handle will have protrusions about 25 cm long on both sides. Using a simple hammer, change the teeth of the fork to the shape of a corkscrew. By delivering strong blows to the metal teeth, they will begin to bend in the required direction. An original photo of the cultivator will help you replicate its exact curves.
Bicycle cultivator
The design of this manual cultivator is more complex. It is made from bicycle parts: frame and wheels.
- A cultivator head, made by hand from sharp metal rods, is mounted on a bicycle frame. As a head, you can take a part from an old cultivator. The frame of the device is created from a small plow.
- A handle is made from a metal or aluminum pipe with a diameter of 2 to 2.5 cm.
- All connections are rigidly fixed with bolts. Structural elements should not dangle.
- A medium-sized wheel is mounted on the frame. Wing nuts or simple locknuts are used as fasteners. Wheels that are too large or small are not suitable here.
Types and principle of operation of cultivators
The principle of operation of the cultivator is simple: the element that loosens the soil begins to work after the mechanical part of the device starts. Depending on the external size, engine power and performance, cultivators are divided into three types: light, medium and heavy equipment.
- Light equipment is used in small areas with soft soil (flower beds, greenhouses).
- Medium weight is used on clay soils.
- Heavy equipment refers to universal equipment. It can be used for any soil.
When cultivating a plot of land, everyone chooses the model they need. The good thing about hand cultivators is that you can make them yourself with minimal cash outlay.
Advantages and disadvantages
Each cultivator, regardless of whether it is manual or electric, has its pros and cons.
- Hand cultivator. Easy to use and much more convenient than a shovel, compact. Doesn't put stress on the lower back. It loosens the soil well and does not spread roots throughout the area. But this technique cannot cope with unplowed land, as it has low productivity. It is best used in small areas such as flower beds or greenhouses.
- Electric cultivator. Lightweight and compact equipment, powered by mains. Easy to maintain. The only downside to this technology is the electrical cord. It can interfere during work, and due to its length, there is a limitation in the area to be processed. It has low power and low tillage depth. Not intended for attachments.
- Gasoline cultivator. Thanks to the attachments, it has many functions. It is not connected to electricity, so it can move around the entire site. Suitable for processing small areas. Weighs much more than electrical equipment. It is difficult to maintain and requires fuel to refill.
Why is a trimmer the best choice for your garden?
If you do not have a lawn that is smooth in all respects, and you need to deal with dense thickets, then a wheeled lawn mower is not suitable for you. In a country house where there is a vegetable garden, the surface of the plot is usually far from smooth. In this case, a trimmer is the most ideal option for cutting the lawn. And it's very simple to explain:
- It is very convenient for them to cultivate narrow areas between flower beds and along paths;
- It is perfect for mowing overgrowth along the fence and narrow openings;
- It is agile and easy to control;
- It is easy to carry from place to place.
Of course, if you need to mow large areas or don’t want to waste time, you can buy a robotic lawn mower that will independently control the weed growth. But although such a device is quite convenient, it will not cope with very lumpy surfaces.
A trimmer is the best tool for working in the garden
The trimmer is ideal for hard-to-reach places where a lawn mower cannot reach. In addition, when using a device with a cord, it is not scary to mow directly along a fence or building, as the blade may break. The fishing line will only be used up a little faster when colliding with solid objects.
But which trimmer is better to buy for your dacha, gasoline or electric? And with what engine location, top or bottom? Let's take a look at the details and choose the best trimmer for gardening.
Top 5 best gas trimmer attachments for weeding
Before ordering a trimmer attachment, read the description and characteristics of the top designs. Study their advantages and disadvantages, value for money. Well-known manufacturers: Bosch, Echo, Elitech, Husqvarna, Patriot, Oleo-Mac, Stihl, etc. The best attachments for gasoline trimmers are:
- KAAZ Kat-MC250P for VSP255S;
- ECHO PAS-Tiller Cultivator for PAS-265ES;
- KR400MP MAKITA 195710-3;
- Oleo-Mac CULT;
- for TAC petrol mowers.
KAAZ Kat-MC250P for petrol mowers VSP255S (244G03)
The cultivator attachment for the VSP255S trimmer has a subsoiler, thanks to which you can change the plowing depth. Suitable for processing small gardens. Due to its compact size, the nozzle is suitable for cultivating soil cultivated around flowers in flower beds, loosening the soil around trees and in hard-to-reach places. It effectively fights weeds. More details:
- price: 9990 rub.;
- characteristics: suitable for Caiman VSP255S, knife material – high-strength steel, working width – 240 mm, depth – 360 mm, manufacturer – Kaaz (Japan);
- advantages: wide range of action, ability to adjust plowing depth, strength;
- cons: fits only on one trimmer model.
ECHO PAS-Tiller Cultivator for brush cutters PAS-265ES
This attachment was created specifically for the PAS-265ES brush cutter for the purpose of processing small areas, flower beds and lawns. It is compact, but not effective for weeding large areas. The design is characterized by good strength and durability. It can replace a whole range of working tools for the garden. Weeding will be quick and effective. Options:
- price: 17800 rub.
- characteristics: manufacturer – ECHO (Japan), compatibility – with PAS-265ES, gross weight – 3.36 kg;
- pros: compact, maneuverable, high quality workmanship, easy installation;
- cons: expensive, suitable for one brush cutter.
KR400MP MAKITA 195710-3
The trimmer attachment from the Japanese manufacturer will greatly simplify the care of your summer cottage, small garden or garden. It is also well suited for landscaping lawns and flower beds. Weighs slightly less than other analogues for weeding. The design is generally reliable, made of metal. The cutting element is cutters. Options:
- price: 17160 rub.
- characteristics: tool model – EX2650LH, DUX60Z, width – 16 cm, cutter diameter – 23.2 cm, manufacturer – MAKITA (Japan);
- pros: good efficiency, high reliability, ideal for weeding small areas;
- cons: high cost.
Oleo-Mac CULT
A cultivating addition to the trimmer, designed for processing small vegetable gardens, beds, flower beds and even greenhouses. The tool has the ability to adjust the plowing depth, because it is equipped with a subsoiler. The knives are made of high-strength steel, which can indicate their reliability and durability. Detailed parameters:
- price: 12990 rub.
- characteristics: brand – Oleo-Mac (Italy), knife material – steel, cutter width – 200 mm, weight – 6 kg, suitable for Oleo-Mac 740T, 746T, 753T, 755 Master models;
- pros: you can adjust the plowing depth, durable knives, good efficiency in small areas, wide cutters;
- Cons: heavy, slightly larger than analogues.
Attachment for TAC lawn mowers (shaft – 7 splines, rod 26 mm)
This is a weeding trimmer attachment that thoroughly digs up the soil, facilitating the penetration of moisture and nutrients and saturating it with oxygen. The device is securely attached to the trimmer. In order to quickly and easily loosen the soil in a small area, the cultivator has rotating cutters. A protective shield, like other models, will help prevent debris from entering the operator. Detailed parameters:
- price: 7900 rub.;
- characteristics: manufacturer – Taiwan, power – gasoline engine, cutting element – knife, cutter diameter – 200 mm, passage width – 120–240 mm, rotation speed – up to 180 rpm, internal shaft – 7 splines, outer diameter rods – 28 mm, weight – 5 kg;
- pros: reasonable price, durable design, efficient, wide passage, quickly and easily loosens the soil;
- cons: heavier than analogues.
Is it worth making the nozzle yourself?
The cost factor of the finished product can have a strong influence on the final choice between purchasing a new cultivator attachment in a store or saving money and making it yourself. High-quality trimmer models can cost 11-20 thousand rubles. This cost can only be justified if you expect large amounts of work with the tool! In addition, you should not buy an expensive device if there are heavy soils on the site, for example, loams and black soils, since in this case the cultivator will not lift the soil, but will only throw clods to different places along with the roots of grass and weeds.
When choosing an attachment, you should also understand the technology of care: the first thing you need to do is go through the attachment-knife, cutting off all the vegetation in the garden bed, after which you can proceed directly to loosening the soil!
Before you finally decide to make a cultivator attachment for a trimmer with your own hands, you must first consider the following points:
- Handle design. Many years of practice in using the tool and research have shown that the T-shaped handle was and remains the most convenient to use, providing the most reliable and accurate direction. The handle in the shape of the letter “J” used in some gasoline trimmers significantly complicates the work with the cultivator attachment;
- Fuel tank dimensions. Since the trimmer attachment will be made from scrap materials, the overall level of fuel consumption will increase. Therefore, it makes sense to organize a tank with a capacity of at least one liter of fuel;
- Drive power, which should not be less than 1000 W. Otherwise, the engine will often overheat, which will lead to low performance of the device;
- Barbell design. If it is made in the form of a flexible shaft, then you can forget about the cultivator, because the constantly changing torque will simply disable it. The best solution would be a multi-slotted straight rod paired with a cardan drive . This will make the tool more functional and reliable!
If you already have a trimmer at home that would fully satisfy all of the above points, and your experience allows you to organize this kind of work, then making a disk attachment yourself will not be difficult. As for tine cultivators, making this kind of attachment with your own hands will be difficult and labor-intensive, and the finished result will not be able to provide the required quality.
Necessary tools and materials for manufacturing
Making a cultivator from a trimmer with your own hands is a fairly simple process and does not take much time. However, before starting work, you should still prepare the necessary materials and tools.
Materials:
- iron plate 15x4 cm;
- two M10x45 bolts and nuts;
- metal sheet for making a protective shield;
Tools:
- Bulgarian;
- drill;
- hammer, file, pliers, tape measure, etc.
It is advisable to make homemade products according to the drawings, but those who have some experience working with an angle grinder, a drill and a welding machine can easily do everything without diagrams and the given dimensions.
Step-by-step manufacturing instructions
First manufacturing option:
- We take an iron plate 0.3-0.5 cm thick, 15 cm long and 4 cm wide.
- We find the center of the plate and drill a hole with a diameter corresponding to the groove of the washer, which is placed on the braid shaft. The center must be determined as accurately as possible to avoid strong vibrations during operation. Vibration negatively affects the trimmer components; they will quickly become unusable.
- Along the edges of the plate we make 2 holes for an M10x45 bolt at an equal distance from the center. This design is convenient because if the bolt becomes bent, it can be easily replaced.
- To make a protective shield, we take an iron sheet. From it we cut out a circle with a diameter of 20 cm.
- In the manufactured circle, we drill 3 holes suitable for the holes in the mounting strip for the trimmer protective casing.
- We assemble the entire structure. The protective cover is attached to the trimmer bar. The plate with bolts (cutting tool) is installed on the unit shaft using a locknut.
This homemade cultivator from a trimmer works quite effectively; unwanted vegetation is completely removed, and the top crust of the soil is also loosened.
The second manufacturing option, for which you will need:
- Sheet of metal 3 mm thick;
- bolts M6x60 or M8x60 with nuts and washers – 24 pcs.
Procedure:
- We determine the diameter of the base of the nozzle. The best option is if the nozzle matches the size of a standard trimmer cutting blade. If the motor of the brush cutter is powerful, then the attachment can be made to fit the row spacing. The base must be made in the form of a disk. To do this, take an iron sheet and mark on it the center of the future foundation. Draw a circle and cut out a disk.
- Next, drill the central hole in the disk. The diameter should be the same as the seat washer used to install the mowing blades.
- We drill 24 holes in the prepared disk (we will fasten the bolts in them). It is very important to maintain symmetry to maintain the balance of the disk.
- Insert a bolt into each hole and tighten with a nut.
- The resulting product is attached to a trimmer instead of a conventional cutting knife.
This attachment can loosen the top layer of soil and also remove weeds, while damaging the roots, which makes it difficult for them to reappear.
Be sure to wear high boots and goggles when working, as pieces of earth and stones may fly out from under the rotating blades.
Both versions of a homemade cultivator attachment are installed on a trimmer instead of a cutting knife. In this case, the unit itself does not need to be redone; it can still be used for its main purpose.
An option for making a homemade attachment for cultivating soil using a trimmer is shown in the video below:
Thus, making a cultivator from a trimmer with your own hands is quite simple. Users note that such a device is very useful on the farm, as it allows you to loosen the ground quite well and copes with weeds perfectly. On the other hand, a factory-made cultivator attachment is inexpensive and performs better than a homemade one. Therefore, everyone must decide for themselves what suits them best: quickly and easily make a homemade product or purchase a ready-made nozzle.