About the elements
They are needed when cultivating the soil.
Therefore, the quality of processing and the complexity of the procedure itself depend on the model: load on the motor, ease of control and labor intensity. How to assemble cutters?
As a rule, the cutter is included with the walk-behind tractor. But this may not be enough. Sometimes it is necessary to increase the depth or width of processing, so the device can be supplemented with other products. This solution also makes it possible to improve the process of moving the walk-behind tractor forward. In addition, this will increase the service life of the mechanism.
If the soil is clayey, then it is better to use two pairs of cultivators. And even if the soil is light and has already been cultivated previously, additional elements will not become a hindrance.
Changing the depth is possible due to the adjustable coulter. It is a durable element located vertically in the walk-behind tractor coupling. And the final loosening depth is influenced by the diameter of the cultivator cutter.
If you want to make cutters for a walk-behind tractor with your own hands, you should start by determining their types. Two types of construction can be distinguished:
- "crow's feet";
- with saber knives.
The last option is the most popular and can be called standard. After all, these types of products are time-tested: their effectiveness is quite high. They have the optimal shape and material. The knives are made from high-quality, high-strength steel. Additionally, the material undergoes thermal hardening and high-frequency current treatment.
It should be noted that the cultivator cutters have a collapsible design. This feature is caused by the fact that the material does not accept welding well. As a result, before installing the product on the walk-behind tractor, its preliminary assembly is required.
As for crow's feet products, such products are used for hard soils. They have a solid structure, non-separable. Thanks to this, their strength is high.
Characteristics of crow's feet:
- weight – 16 kg;
- speed – 2-5 km/h;
- height – 38 cm;
- length – 38 cm;
- width – 41 cm.
Such products are effective in controlling weeds and processing virgin soil. However, their drawback is the material of manufacture – carbon steel. This affects the strength of the products: therefore, virgin soil must be processed very carefully so as not to bend the products. However, this allows, firstly, welding, and secondly, repairs.
It should be noted that the cutter is a self-sharpening tool. No additional manipulations in this direction are required.
How to properly assemble knives on a walk-behind tractor with 3 cutting blades?
The main mistake when assembling the cutting tools of a motor cultivator is installing left-sided blades on the left section, and right-sided blades on the right. This knife mounting scheme is functional, but has a number of shortcomings:
- the increased distance between the right and left mounted parts (from 20 to 25 cm) reduces the quality of tillage - after the passage of the equipment, a wide strip of uncultivated land remains;
- the cutting blades do not overlap each other, which reduces the quality of soil loosening;
- wear of cutting parts increases;
- the comfort of using special equipment is reduced - the motorized cultivator will bounce when passing the strip due to the asymmetrical entry of the cutting tools into the ground.
Correct assembly diagram for a 2-section cutter
To correctly assemble the knives on a walk-behind tractor, you must adhere to the principle of diagonals and carry out all installation steps symmetrically. Some models of special equipment are equipped with a left and right cutter with a removable last section. Their number does not affect the installation principle of knives. The main thing when attaching the cutting blades to the next section is to shift them so that, when viewed along the bushing, they “pass” through the formed angle of the already fixed ones.
Installation of the first knife 2 sections
If the diagonal (offset) assembly is observed, the blades of the sections will cut the soil sequentially one after another. The rotation of the left and right cutter will be symmetrical. With correct installation of prefabricated elements, uniform operation and load distribution are guaranteed.
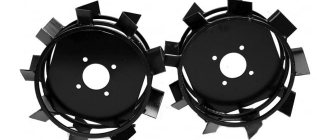
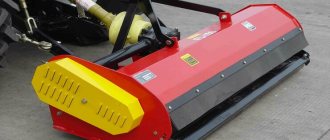
Not so long ago, milling cutters began to be used for walk-behind tractors, which were called “crow’s feet”. They have proven themselves well and are most often used for processing hard and complex soils. These are the cutters that are used when cultivation needs to be carried out in difficult conditions, on rocky soils. The design of the “crow’s feet” is made solid, which ensures the highest levels of equipment strength. The cutters are available in standard sizes:
Crow's feet cutter.
- the width of the knives is 41 cm;
- the length of the knives is 38 cm;
- structure height – 38 cm;
- the weight of the cutter is 16 kg;
- The permissible operating speed of a motor cultivator with such blades is 2-5 km/h.
What are the advantages of a crow's foot cutter? Is it possible to install it yourself? It is convenient for cultivating soil and controlling weeds. Other models will not be able to do the job better. For rocky and hard soils, a crow's foot cutter is simply irreplaceable. Among the advantages, it should be noted that the steel of the cutter in this case can be welded. If necessary, you can carry out repairs at home rather than buying new knives, as this is expensive.
This type of cutter also has its disadvantages. The main disadvantage is that ordinary carbon steel is used for manufacturing. The strength of the structure itself is at a high level, but the material is slightly inferior to other varieties. Such a cutter should be regularly inspected when work is carried out on clay soils or when cultivating virgin soil. The cutter blades may be bent or simply broken. However, the repair is not too complicated; a welding machine is usually used for a broken knife, after which the fracture site is carefully polished.
When assembling the circuit, two people should work together, since the weight of the structure is significant
It is important not to confuse the direction of installation of the knives on the axis. When assembling, the sharpening point should face the direction of the cultivated soil.
To strengthen the cutter, a stopper is used; it is placed on the output axis.
What types of cutters are installed on walk-behind tractors?
With a walk-behind tractor, you can cultivate any type of soil and perform different types of work - aeration, loosening the soil or crushing it into a lump, removing the roots of perennial weeds, mixing soil layers or fertilizers. The functions and capabilities of garden equipment directly depend on the type of installed cutters - spring, hook, flat ripper, etc. Three types of attachments are considered the most versatile, popular and functional:
- Saber-shaped. An active type of cutter for a walk-behind tractor that requires assembly. They are installed on most models of garden equipment. The cutter can consist of 2-5 sections with knives that determine the width of the cultivation. Made of steel, it provides optimal depth of loosening of soft and untrodden soil. Plant roots do not get wrapped up.
Saber-shaped cutter options with 3 and 4 knives
- Crow's feet. Inactive type of cutters with a non-separable design. Designed for processing hard, rocky and trampled soils. The cutting blades are good at breaking up plants remaining in the soil, removing the roots of perennial weeds, and promoting aeration. The blade of the knife can be shaped like a spatula, triangle or trapezoid.
Popular modifications of crow's feet cutters
- Spiral, or “Virgin” Inactive type of all-welded cutter. It is designed for deep soil plowing, virgin soil cultivation, and loosening. The design is reliable, but the processing speed is reduced. Consists of 2-4 sections.
Two sections of a spiral-shaped cutting element
The owner of a new garden equipment will need detailed instructions to assemble the cutters on a saber-type motor cultivator, since 9 out of 10 models are supplied with disassembled attachments. The other two types of cutters only need to be hung.
Rotary mower for motor tractor
This is the most common type of mower, which not only enjoys great success in the market, but is also actively manufactured independently by many craftsmen. The success of such equipment lies in its reliability and simplicity of design, as well as high performance.
The operating principle of such a device is very simple: several disks are mounted on a metal beam (frame). Several knives (2 – 8) made of hardened steel are mounted on disk hinges. When the discs rotate, the blades unfold and cut the grass. Thanks to such a simple mechanism, if a rotary mower breaks down, you can fix it yourself.
Today, such mowers are sold together with a grass catcher. This brings additional convenience when working with such equipment. You can also make a rotary mower with your own hands, but we will talk about this a little later.
Rotary mowers come in single-rotor and double-rotor types. The former align the cut grass relative to the equipment in one direction, and the latter – in the center between the rotors.
Such mowers are designed for motor tractors with a power of 10 - 25 hp. Models of such equipment are distinguished according to mobility, functionality, durability and performance. Among semi-mounted rotary mowers, the AgroService SB-1200 is popular. Among the budget mounted mowers for mini tractors and at the same time high quality is the DM 135.
Trailed rotary mowers are distinguished by their safety and require less power from a mini tractor. Basically all the work comes from the traction of the wheels. Such equipment can be mounted either from the rear or from the front using a PTO.
- Bolt M8-6gх16.58.016
- Washer 8 65G 016
- Right ski
- Transmission housing
- Bolt M8-6gх20.58.016
- Transmission side
- Belt A-950-II
- Cotter pin 2.5x25.005
- Nut M10-7N.5.019
- Pulley
- Stretching device
- Upper transmission
- Pad
- Angular gear housing
- Main transmission
- Washer
- Disc with knives
- Protective washer
- Transmission left
- Left ski
- Gear housing
- Transmission average
- casing
DIY cultivator: assembly instructions
To create a cultivator, you can use a chainsaw, starter, grinder or washing machine.
From a chainsaw
The method of making a cultivator from a Druzhba chainsaw with your own hands has long proven itself. The principle of creation is quite simple. As a result, the equipment is light in weight, compact and reliable, with a very productive engine. The speed is approximately 2.5 km/h and the power is 4 HP. s., which is quite enough for a decent walk-behind tractor.
So, the process of assembling a cultivator from a chainsaw does not differ much from the general collection mechanism, but it has its own nuances:
The main shaft is equipped with a collar-type flange. In the future, this will allow you to attach bridge gearboxes without any problems. Sprockets (usually from a UAZ) and a double-row chain are taken and installed on the future mechanism. Thanks to them, the distance from the gear axle to the ground becomes an order of magnitude greater. Timing sprockets, unlike others, increase the distance to the ground by as much as 15 cm.
Housing-type bearings are attached to the main axle, and then a gearbox is designed or purchased. It requires a standard centrifugal clutch. A steel pipe is taken, and with its help the structure is supplemented with cutters
When assembling the cultivator cutters, it is important that their cutting part faces the direction of movement of the walk-behind tractor. After assembling the cutters, a load sufficient to maintain the center of gravity is attached to the frame. Handles are made that are comfortable to use and durable, so that you can easily guide the device. A cultivator made from a chainsaw must be tested on site to immediately determine whether there are any malfunctions. If there are, they are eliminated, and then the mechanism is put into permanent use.
From the starter
Creating such a cultivator will not be difficult if you have a starter from a car in your home arsenal. If there is such a need, then the shaft is slightly shortened. It is also advisable to replace the front cover, having first made many small holes in it (up to 5 mm in diameter) to allow air to flow in from the attached fan. The prepared starter is combined into a structure with cutters. Then the almost finished device is installed on the most common working platform of a cultivator and tested.
From the Bulgarian
A homemade cultivator made from an angle grinder does not have much power, but nevertheless does a good job of weeding the area. The grinder in such a device acts as an electric drive. Everything else is taken from old non-working cultivators.
Important! An ordinary grinder is capable of making up to 600 revolutions per minute, so when creating a cultivator, a pulley with a groove for a V-belt is used, rather than cutting wheels. It is necessary to weld the angle grinder suspension unit to a frame made or taken from an old cultivator, and in order for the product to be connected to electricity, use an ordinary extension cord on a reel
It is necessary to weld the angle grinder suspension unit to a frame made or taken from an old cultivator, and in order for the product to be connected to electricity, use an ordinary extension cord on a reel.
After the cultivator base is assembled, you can test the machine. The cutters of such an assembled device should produce 300 rpm.
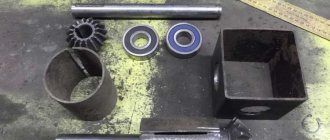
From the washing machine
Many owners have an old and unnecessary washing machine somewhere in the garage or barn, which is still capable of working, but is no longer relevant. Based on its engine, it is possible to make a small electric cultivator. This way the old equipment will come to life and still serve for the economy. To be able to create such a cultivator, you will need, in addition to the electric motor from the machine, the following parts: a two-core wire, a gearbox, an ordinary wheel (diameter - 1.5 m), a metal corner (no more than 3 m in length), a toggle switch, springs from a car as knives, a start button and a drum with a piece of tin.
Cultivator
When everything is found, you can immediately begin collecting. And the first stage is welding work. This is followed by the preparation of knives. For each knife, it is necessary to maintain its own trajectory of movement that does not intersect with any other.
The motor itself requires two windings (starting and working). The starting winding is activated only when the tool is started, but the working winding must be connected to the network for the entire period of operation.
In principle, this is where all the key aspects of collecting a cultivator from a washing machine end. This data is enough to try to assemble the structure yourself.
Kinds
Classification of mowers for mini-tractors is made according to several criteria, the fundamental of which is the type of design. According to this criterion, two categories of devices are distinguished: rotary (disc), segmental (finger) and flail.
Rotary models are the most popular type of equipment and are designed for mini-tractors with power from 12 to 25 hp. With. The unit consists of a steel frame, discs welded to it and a support wheel. Each disc is equipped with several knives secured using hinge joints. Disc mowers easily cope with areas up to 2 hectares, do not require special care and are easy to repair. The principle of operation of the equipment is as follows: the power take-off shaft of a mini-tractor transmits torque to the pulley through an angular gearbox, after which it transmits rotation to the disks through the support wheel. At the same time, the knives begin to rotate, mow the grass and place it in neat windrows.
Rotary models can be single-row or double-row. In the first case, the mown grass is placed to one side of the unit, and in the second - in the middle, between the rotors. Mounting the disc mower can be done both at the front and at the rear, and can be done in three ways: mounted, semi-mounted and trailed. The first two methods are the most common; such models are easy to configure and aggregate. The rotation of the rotors in them occurs due to the power take-off shaft. Trailed mowers are driven by wheel traction and are used with low-power tractors.
The advantage of rotary mowers is their high maneuverability, which allows you to mow grass in close proximity to trees and bushes. Another advantage is the ability to adjust the angle of the discs, which makes it possible to work on hills with a slope of up to 20 degrees and areas with difficult terrain. And also among the advantages they note the high performance of disk equipment, reasonable cost and long service life. The disadvantages include the rapid failure of the knives when stones and solid debris get under them, the impossibility of using them in fields overgrown with thick-trunked bushes, and low operating efficiency at low speeds.
Segment models are designed for mowing lawns and making hay. They are a structure made in the form of a frame with 2 bars fixed on it and sharpened plates located between them. The principle of operation of segmented mowers is fundamentally different from the principle of operation of rotary mowers and consists of the following: the torque of the power take-off shaft is converted into a linear translational motion of the working knives, which begin to move according to the principle of scissors. In this case, one cutter moves from side to side, while the second remains stationary. When the tractor moves, the grass falls between the two blades and is evenly cut off.
The segment mower can be either rear-mounted or located in front of the mini-tractor. Working knives are easily dismantled and in case of breakdown can be easily replaced with new ones. There are special slides installed on the sides of the segment models that allow you to adjust the cutting height of the grass stand.
This is due to the ability of the knives to completely follow the terrain of the site, moving in close proximity to the ground. Another advantage of segment models is the absence of vibration during operation. This greatly facilitates the use of equipment and allows the mini-tractor operator to work in more comfortable conditions. The disadvantage of the models is their inability to fold the mown grass into neat windrows, and, in comparison with rotary devices, rather low functionality.
The flail mower is a front-mounted structure mounted on the rear three-point hitch of a mini-tractor, and is designed for tractors with a power of over 15 hp. With. The model is highly productive and can process up to 6 thousand square meters per hour. m of area. Thanks to the ability to install different types of knives, as well as a floating hinged system, it is possible to mow grass in uneven areas. The cutting height of the grass stand is adjusted by raising or lowering the three-point linkage, through which the mower is attached to the mini-tractor.
How to make a mower using an electric drill
When working in a small area or if it is not possible to make a mower with your own hands from a chainsaw, a regular electric drill is suitable as a source of energy for the device. It is better to use a battery to ensure autonomy. But if you have an industrial extension cord at hand and the area is small, use a regular one.
During operation, the electric drill motor, using an eccentric mechanism and a connecting rod, converts the rotation of the shaft into reciprocating movements. By attaching a moving element - cutting blades - the desired result is achieved.
It is noteworthy that, depending on the needs, a homemade mower can be made mobile on a wheelbase or portable. The second is convenient for processing ornamental shrubs, which are shaped by cutting off the tips of the branches.
What you will need to assemble a portable device (according to the designations in the diagram):
- Bed made of duralumin corner 40x40x3 cm.
- Duralumin cover.
- Sleeve.
- Movable knife.
- Fixed knife.
- An eccentric mechanism that is installed on the drill neck. To do this, remove the standard cartridge and replace it with an eccentric. A bimetallic mechanism is recommended - the central part is machined from duralumin, and bronze is used for the outer part.
- Engine.
The structure is assembled in the reverse order, starting from installing a split flange on the “neck” of the drill, which is fixed with a clamp. Next comes the eccentric and steel connecting rod.
The connecting rod is fixed using a lining attached to the end of the eccentric mechanism. It is necessary to ensure that the cylindrical part of the rod slides freely inside the duralumin block - this way it will serve as a guide.
At the final stage, the eccentric housing and the mower frame are mounted and the ease of movement of all mechanisms is checked.
The photo shows a wheeled mower based on an electric drill. Assembly requires a welded frame and a protective platform for the housing
Recommendations for assembling knives
Manufacturers of cultivators try to simplify the assembly of attachments as much as possible. Therefore, two central technical holes are provided on the flanges on opposite sides of the square. They allow you to accurately place cutting elements on the plate.
Location of technical holes on the plate
The Two Hole Rule is as follows. When placing the very first knife on the plate, it should cover one of the technical holes and be parallel to the edges of the flange. Next, the installation of the following elements is carried out at an angle to the first. It is extremely difficult to make a mistake in this case and get confused.
Solid shafts with mounting plates can have a special design. The flanges on them may already be offset - rotated relative to the adjacent one by several degrees.
Mounting plate locations
To make it easier to install the blades according to the instructions above, it is not recommended to fully tighten the nuts. This procedure should be performed at the final stage after the master is convinced that the cutter is assembled strictly according to the diagram.
How to make it yourself
It is difficult to assemble a mower onto a walk-behind tractor without experience in metalworking. You should not do this work when you do not have the necessary tools and components at hand. But if you understand the design well, prepare the necessary drawings and work strictly according to them, you can save money and make equipment that will not be inferior to the factory one.
Rotary mower
A difficult option, since you need to find a drive that will make the structure work. You can buy it in the same place where they sell finished products; they usually sell spare parts there as well. It is necessary to collect in the following sequence:
- Find a ready-made one or make a new one. Consider the dimensions, features of fastening to the walk-behind tractor, and the power transmission system from the equipment to the mower.
- Buy a disk drive. It must ensure that the axes move towards each other.
- Select metal disks by size. Any options will do, as long as they are made of steel and have the same diameter.
- Weld the frame. Think about how to attach the mechanism to it. Attach the disks; for this you can make axles from a thick-walled pipe or metal rod.
- Attach 3-4 knives at equal distances along the edges of the disks. They are placed on small axles so that when they rotate, they move outward.
- Secure the drive pulley and tension roller. Here you need to take into account the length of the belt, you need to tension it well.
Advice! Secure a frame made of pipe or angle in front of the discs; if there is a stone in the grass, it will prevent damage to the working parts.
Secure all parts firmly. Use high-quality fasteners, tighten the connections with self-locking nuts; they do not unscrew during vibration. Paint to prevent the metal from rusting due to high humidity and plant debris.
Segment mower
It is much easier to assemble it. But at the same time, you need to find an eccentric mechanism that will ensure the movement of the working part; it is difficult to do it yourself. You will need a welding machine, several rectangular pipes and bolts at least 8 mm thick. Do this:
- Find a drawing or make one from a ready-made sample. Apply dimensions accurately.
- Weld the supporting frame. Both the working part and the unit with which the mower will be fixed to the walk-behind tractor will be attached to it.
- Make guides on the frame in which the bar with knives will move. The easiest way is to make them U-shaped.
- Assemble the element with knives and secure them to the bar. Check how it moves in the guides.
- Install two rods that will ensure the movement of the working part. Attach them to the eccentric mechanism. Install a drive through which power will be transmitted.
After assembly, check how the mower is placed on the walk-behind tractor. Install the belt and make sure the roller provides good tension. Carry out a test run at low speed. If the movement is not linear, or there is some kind of play, figure it out and make changes to the design.
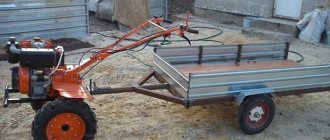
Mower wagon
This option is the easiest to do, since there are no complex components in the design. An adapter can be used as a cart, which is used for plowing and other agricultural work. But it is not difficult to assemble, following simple recommendations:
- Make a drawing. Consider factors such as processing width and cart length. If it is ready, then adapt the parameters to it.
- Place the wheels on the axle, weld the drawbar to connect it to the walk-behind tractor. Place a seat and footrest on top.
- Make the mower body. Weld it from sheet steel with a thickness of 1 mm or more. The size of the box should be 10 cm larger than the diameter of the knife.
- Install an angular gearbox on top to rotate the axle through the pulley. Make the knife out of steel, secure it at the bottom.
- Bolt the housing to the trolley. Provide a height adjustment system.
Tip: Make the mower removable so you can use the cart for other purposes.
Ensure ease of control of the walk-behind tractor. The important part is the belt drive, firstly, the tension must be good, and secondly, it is better to place the casing on top so that the moving part is closed. You don't have to make a seat, but put the wheels in the back for support and work as usual.
Assembling a mower for a walk-behind tractor with your own hands is only possible if you prepare a detailed drawing and have all the necessary parts. It is easier to buy a rotation mechanism ready-made, since it is difficult to manufacture. It is necessary to precisely fit all the elements to each other and connect them with strong fasteners that prevent loosening of the connections due to vibration.
How to make cutters for a walk-behind tractor with your own hands
The cutters are not complicated. Before assembling them, it is worth familiarizing yourself with the existing parts and their design features.
Suitable drawings are contained in thematic publications and on forums on the Internet. After defining the model, it is necessary to prepare materials for assembly. If shaped parts are used, they should be ordered from a craftsman or forged yourself if you have certain skills and access to special equipment.
Materials you will need
Before assembly, you should measure the area you plan to process, and based on the data obtained, begin assembling the mechanism. To get the most correct design you will need:
- welding machine,
- Bulgarian,
- parts that will act as leavening agents;
- long metal tube with a diameter of 42 mm.
The basis for rippers can be automobile springs, which are bent and welded at an angle to the main pipe.
Manufacturing Tips
First of all, pay attention to the correct assembly . Avoid any deviations, no matter how minor. If you are not careful, the axis will be broken. When installing homemade cutters for a walk-behind tractor and cutters for a cultivator, it is important not to confuse the direction of rotation of the teeth.
It is recommended to manufacture elements with a diameter not exceeding 500 mm. This means that the tool will be able to penetrate the soil 260 mm and capture approximately a meter in one go.
Saber knives are less dangerous compared to others. With them, the risk of serious injury is minimal. The alternate arrangement of the knives makes their entry into the ground consistent, there are no blows or jerks.
To maximize the service life of homemade devices, you need to adhere to a few simple rules, in particular, when starting, the friezes must be above the ground , after which the revolutions start, the blades slowly lower into the soil - this is how processing begins.
Build process
As already mentioned, work begins with taking measurements of the site. After all the calculations have been made, you can proceed directly to the assembly. Using a welding machine, connect the knives to the pre-prepared pipe. Before this, you can sharpen the edges of the elements at the desired angle.
The resulting device must be fixed on the hitch unit - and the work can be considered completed. To ensure the system is working properly, perform a test run and make adjustments.
People with experience working with metals can easily assemble cutters for the Neva walk-behind tractor. Pre-compiled diagrams, as well as a set of high-quality tools and materials, make installation easier.
You can assemble a mechanism such as a milling cutter for a walk-behind tractor with your own hands, you just need to read the recommendations and strictly adhere to consistency in your work. Then the device will serve for decades.
Safety precautions
The main thing a master should worry about when assembling homemade equipment for minitratcore is not how well it will work, but, first of all, how safe it will be. Before you start working with a self-assembled mower, check the tightness of all connections. Take care of the safety of not only the tractor driver, but also the animals. When launching, there should be no one within 50 m.
When working with a homemade mower, make sure that there are no people in front. If the grass to be cut is tall, such as reeds. Don't be lazy to go and have a look. Remember safety first.
Assembling a mower for a mini tractor with your own hands is easy only for a person with the skills of a welder, technician, or mathematician. In addition, perseverance and hard work must be present. If you don’t have all these qualities, then just spare your nerves and buy a ready-made model of a rotary mower.
What attachments for a walk-behind tractor can you make yourself?
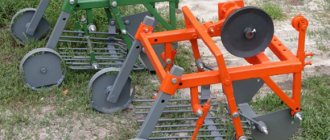
It all depends on the qualifications of the home craftsman and the set of tools he has at his disposal. We advise beginners to start their experiments with the simplest designs - a fan potato digger or hiller.
The design of the device for digging potatoes is shown in the sketch. It consists of a wide bent plate (foot) welded to a vertical bipod and field bar. Teeth made of reinforcement are attached to the rear edges of the paw by welding.
It is easier to make a disk model from hillers. Its main elements - disks - can be cut from the ends of old gas cylinders. They have the right shape, diameter and metal thickness.
Quite a lot of design solutions for the device itself have been invented, you can see this by watching videos of homemade people, as well as various assembly diagrams.
One example of an adjustable disc hiller
In addition to the disc disks you will need:
- two racks made of steel strip;
- two rolling bearings;
- bolts for attaching the racks to the frame and adjusting the rotary sectors;
- cross member made of profile pipe;
- T-shaped leash.
The main condition for the high-quality operation of such a mechanism is the precision of manufacturing of all parts and the symmetry of the installation of disks. Otherwise, it will be pulled away from the furrow while moving.
Assembly elements of saber-shaped cutting tools
The collapsible saber-shaped structure consists of:
- left and right knife (blade);
- shaft (bushings) - metal pipe with a diameter of 50 mm, a wall thickness of 4 mm;
- anther;
- flange, plate (may have different geometries) - steel sheet up to 15 mm thick;
- fastening elements.
Components of a 4-blade cutting device
The cutting blades are connected to the plate using bolts so that the sharp edges enter the ground when the walk-behind tractor moves forward. In this case, the right and left knives on the sections should alternate.
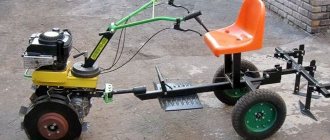
Homemade mowers for walk-behind tractors
Let's look at several types of homemade products.
DIY rotary mower
This type of mower is used for mowing the lawn and for cutting grass for hay.
It is important to remember that the model only trims tall plants, it only chops short grass into small pieces
The mower assembly is shown on the Neva walk-behind tractor and similar structures. To work you will need the following elements:
- chains from a chainsaw (geared);
- 2 discs from a grain-type seeder (in this version, a C3-3.6 seeder is used).
The knives are made from 65g hardened alloy. There are four knives on a separate disc. On each of the disks, slots with a diameter of 6 millimeters are made using a reinforced drill. The knives are attached using a shank; it is fixed to the opener regardless of the main knife mounting structure. There is a small gap between the blade and the shaver, about 2 millimeters greater than the thickness of the blade. Such a design solution is necessary so that when working with the mower on the walk-behind tractor, the centrifugal force spreads the knives and they cut the plants
It is important that the structure can rotate freely in a circle (360 degrees). This is necessary to protect the knife when hitting hard ground, stones
A few words about installing attachments
After assembling the knives, all that remains is to install the assembled cutters on the walk-behind tractor using stoppers. For convenience, it is better to lift the special equipment and fix it in this position. Next you need to remove the wheels. Carefully place the boot on the support shaft, secure the structure on the left and right with a stopper. Check the connection is secure.
The final result of the build
If the cutter design is completely prefabricated, then installation can be performed sequentially section by section.
Installation sequence
It is recommended to put the motor cultivator into operation only after the correct assembly and installation has been checked. There should be no play caused by weak tightening of nuts or distortions when hanging equipment. High-quality work guarantees a long service life of machinery and equipment.
Deep tillage
When developing new areas, it is necessary to develop virgin soil. Usually it is abundantly overgrown with turf, perennial grasses and weeds. It is quite difficult to cope with such areas with conventional tools. More often they resort to cultivation using deep processing with formation turnover. With reverse plowing, part of the layer is cut, lifted and turned around its own axis. As a result, the soil from the lower layer ends up on top. Weeds cannot grow for a certain period of time. Cultivated plants have a head start for advanced development.
Similar work is done in the fall. The rhizomes of nettle, wheatgrass, dandelion and other weeds freeze in November-December, when the air temperature drops below -15...-17 ⁰С (there is no stable snow cover yet). Subsequently, they lose the ability to grow.
In the future, a similar technique is resorted to every autumn. After 2...4 years of autumn fall plowing, the number of weeds on the site is reduced many times over.
Proponents of organic farming disagree with this approach. But the experience of several centuries proves that only such agrotechnical measures can clear the area of weeds. Otherwise, you will have to use chemicals to control weeds.
Deep plowing allows:
- wrap a layer of soil and allow plants to use for nutrition substances that gradually shift to lower horizons during the season. This operation makes it possible to reduce soil salinization using mineral fertilizers, as well as reduce the amount of fertilizer applied;
- aeration of the lower layers of soil contributes to the occurrence of aerobic processes of decay of plant residues. Usually in the lower layers the access to air oxygen is limited. Therefore, conditions are created when the rotting of taproots lasts for several years. Anaerobic processes (without air access) occur with the slow accumulation of humus;
- When the formation is turned over, weed seeds end up in the lower layers of the soil, and they cannot germinate. The roots remaining on the surface freeze. As a result, soil contamination sharply decreases;
- Freezing lumps of earth in winter crumble more easily in spring. A light, loose surface layer is formed in which cultivated plants can receive more abundant nutrition;
- adding organic matter before plowing allows for active rotting of manure or green manure if they were sown after harvesting the main cultivated crops.
Do I need to sharpen cutters for a cultivator?
Having dealt with the cultivator and the types of cutters for it, let’s move on to considering the main issue that this article is devoted to, namely, whether it is possible and necessary to sharpen such a working piece of equipment as a knife. The majority of domestic manufacturers of agricultural machinery use cutters from a plant located in the Smolensk region. For their production, hardened steel is used, the cutting edge of the knives is processed with high frequency currents. The cutters are attached to the flange using bolts, since this material is difficult to weld. This point suggests that the welded cutters of most Chinese companies use metal of not very high quality.
Good hardened steel does not tolerate welded joints, only bolted ones
When creating the working edge of a cutter, it melts and cools quickly, as a result of which it looks uneven and slightly resembles a hacksaw blade, which can be seen with high magnification. During operation, a hardened steel blade does not become dull, but crumbles, which leads to the formation of deeper “saw” teeth. Many people call such cutters self-sharpening, although this definition is not entirely accurate.
Now, regarding whether it is necessary to sharpen the cutters and how to do it at home. If you sharpen using a grinder or on a sharpening machine, the result is overheating of the metal, and consequently, a violation of its structure and loss of strength. As a result, the cutters will become dull faster, and this is in the best case, but in the worst case, the knives may begin to break down and you will have to buy new ones.
Sharpening a cutter using a grinder causes the metal to overheat
Sharpening of cutters can only be done on a high-temperature sharpening machine, and such equipment is unlikely to be available on every farm. And you don’t need to grab a file, which will help remove small chips and make the edge smooth. As a result, this will lead to the formation of an even larger chip or breakage of the knife when it hits a stone during soil cultivation. If a notch appears on the cutter, then simply continue working. You will see that after a while it will disappear on its own.
Elements of milling cutters for walk-behind tractors
A classic reciprocating cutter for a walk-behind tractor consists of three parts:
- supporting power shaft , rectangle or pipe, which transmits rotation from the gearbox and carries the remaining elements;
- flanges , which are tightly fixed to the shaft with holes for bolting replaceable cutting blades;
- knives, replaceable cutting blades.
All other types of cutters consist of the same parts. The difference is that “crow’s feet” and spiral cutters are most often non-separable, all elements are welded.
Assembling cutters for a Bright walk-behind tractor. Milling cutters for walk-behind tractor
Equipment such as a milling cutter is necessary for any walk-behind tractor, since it can be used to carry out most work related to soil cultivation. Basically, the tiller comes complete with the unit, but in cases where you need to change the width and depth of processing, you should purchase the equipment separately.
Additional cutters allow you to increase the functionality of the walk-behind tractor and simplify the work with it. Experts recommend having several pairs of cutters in your arsenal.
Which cutters are best for a walk-behind tractor?
Such “knives” for tillage can be divided into two large groups. Each of them has its own characteristics and is suitable for a certain type of work.
Saber cutter for walk-behind tractor
The most popular and versatile models that are effective when performing various excavation work. These models use the optimal shape of knives, for the manufacture of which manufacturers choose high-quality durable steel.
The models have a collapsible design, so their installation and maintenance are as simple as possible.
Crow's feet
These models appeared on the market relatively recently. With their help, any virgin soil can be processed; they are also effective when cultivating hard and difficult soil.
Features of this type of cutter:
- solid design, which ensures high accuracy of work;
- the equipment fights weeds well;
- ease of use, ability to replace spare parts at home.
Such models, unlike saber-shaped cutters, are made of carbon steel, which is slightly inferior in strength.
Homemade cutters for walk-behind tractor
Manufacturers offer different options for soil cutters for walk-behind tractors. You can use one set of cutters or purchase two different types of devices, changing them depending on soil cultivation conditions.
Some craftsmen prefer to use homemade products, which, if assembled correctly, will be no worse than factory ones.
The main advantage of creating a plow cutter yourself is that it can be tailored to the specific features of the site.
How to properly assemble cutters on a walk-behind tractor?
Assembling the cutter with your own hands should be done as correctly as possible
And here it is especially important to ensure that the active part crashes into the ground during operation. To do this, it is initially recommended to study the drawings and then begin manufacturing the equipment
To create cutters, the following tools are required:
- The rotor axis is of the required length. It can be divided into two parts if you need to assemble a cutter from two blocks.
- Short axis.
- Gearbox with clamps.
- Left and right knives.
- Bolts, washers, nuts.
Assembling the structure does not take more than an hour, but here it is important to install the knives in such a way that they do not interfere with rotation
- The long rotor axis is equipped with knives at an angle of 30 degrees.
- It is necessary to combine four knives on one block, securing them to the gearboxes.
- Next, the correctness of the design is checked and all fasteners are tightened.
This design is very reliable and can withstand fairly high loads.
installing cutters on a walk-behind tractor
Is it necessary to sharpen cutters for a walk-behind tractor?
Any tillers are self-sharpening tools. Sharpening is not necessary for them, as it can only ruin the design. Only in some cases, if you have been using a cutter for a very long time and see that it has begun to work the ground poorly, you can sharpen the knives.
The tiller is an important element of each unit. Homemade, correctly assembled cutters can be used on any modern walk-behind tractor, in particular on Neva MB 1 and MB 2, MTZ and others. Such structures will help in cultivating the land and make agricultural tasks easier.
"Crow's Feet"
The second type of cutter is the “crow’s foot” model, which received its original name due to the triangular shape of the cutting parts. Similarly with the saber-type device, the size and number of cutting components depends on the weight of the main unit. For example, for the MTZ walk-behind tractor it is recommended to install four or more parts, but for other similar models only three. In fact, you can install an unlimited number of knives as you see fit, but you must take into account that the power of a walk-behind tractor with a weak engine will drop significantly.
With the help of crow's feet, complex types of soil and virgin lands are most often cultivated. But it is worth noting that if the soil contains a large number of branched roots, the system may become clogged and malfunction.
Any type of cutter requires initial inspection and further careful handling
This type of cutter was widely used in the eighties during the USSR, when the active development of homemade devices in the economic sector began. Farmers were forced to look for ways to increase productivity on their plots and for this reason learned to create cutters for walk-behind tractors with their own hands. It should be said that the design of the unit has not changed since then, which once again proves its timeless efficiency.
How to assemble crow's feet
The main element of the soil device is the drive sleeve, the parameters of which must be at least five mm of the wall length, and the optimal indicator is considered to be approximately seven mm. Next, you need to machine the inside so that it fits easily onto the shaft, and make a special hole for the axial pipe, thirty or forty mm deep.
As for the axial pipe itself, it is usually made on the basis of the standard model AE25-32, but other similar parts can also be used. There are two types of finished pipe: collapsible and non-dismountable , it all depends on your expectations. But if you believe the reviews of farmers, the collapsible option is still considered the most effective, since it is always possible to add or remove knife installations. It is impossible to predict how the walk-behind tractor will behave in a certain area, and for this reason it is better to have a backup modification option just in case.
Be sure to read: Self-propelled gasoline snow blower
Having chosen the appropriate type of axial pipe, it is necessary to install a special flange on it for further fastening of the knife units. The total length of such a device will depend on the width of the knives and their distance from each other. The optimal width of triangular knives is approximately 60-80 mm, since larger sizes significantly increase the resistance of the unit to the ground and impair its performance. The knife inserts themselves should be made of dense steel and have a thickness of 3-5 mm. Next, you should assemble the cutting element stand, which consists of a curved strip and a sharpened edge.
"Crow's feet" work well on rocky soils and destroy weeds
By connecting the blade unit and the axial tubes, you get the overall design of a modular element. Actually, this is the final stage of creating “crow’s feet” and you can carry out the first “run-in” of a homemade installation. Also, before starting the cutter manufacturing procedure, you should first make a small drawing to reduce the risk of damage to parts. The necessary drawing can be found in many automotive publications or on the Internet; if you have a technical education and understand the design of the cutter, you can make a rough plan yourself.