Potatoes have always been considered one of the main vegetables in the kitchen. It is used for preparing first and second courses, desserts, etc. Growing this vegetable requires a lot of labor, because to get a good harvest you need to hill up the potato bushes several times a season.
Thanks to hilling, oxygen access to the roots improves, channels in the ground are destroyed, as a result of which less moisture evaporates, and the number of tubers increases.
Hilling up bushes is carried out in summer cottages mechanically using a hoe. However, this is a long and difficult process.
To help farmers and gardeners specializing in growing potatoes, a special tool called a hiller has been created.
Operating principle
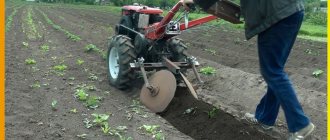
The key part of a manual hiller is the cultivator or plow. It is he who will do what is done manually with a hoe or hoe - plow the soil. This plow, using its sharp end (“nose”), digs slightly into the soil and distributes it on its sides, covering the potato rows with soil.
If the hiller is a homemade model made from a bicycle, then the cultivator will be mounted on its frame. By slightly changing the structure of the unit, grabbing the steering wheel, you can control the device, directing it in the desired direction. The movement of the hiller itself is carried out due to a single wheel in the front part of the frame.
The essence of the work of a manual hiller can be summarized more briefly using the following algorithm:
- the cultivator crashes into the ground;
- the operator of the apparatus, using the steering wheel, directs the hiller in the desired direction and moves it forward;
- movement is carried out due to the existing wheel.
Other tool types:
- To the tractor - process automation. This design can immediately remove all weeds from the treated area. In practice, it has been proven that after working with this type, potato yield increases.
- for a walk-behind tractor - also for automation of work. In principle, this is not a separate type, but the tool can be installed on this vehicle.
Which device is better is up to you to decide. It depends on your goals, the desired speed of operation and the functionality of the devices.
Preliminary actions
To begin with, prepare the bicycle frame: handlebars, saddle, pedals, and remove the rear wheel. The second wheel is disassembled and cleaned - only a metal rim is needed.
The metal rim penetrates the soil better, which is why the hiller will gain much greater stability and maneuverability than with rubber. Operating such a unit will become much easier.
Choice
A correctly made choice will help in maximizing the mechanization of agricultural labor.
For less effort when planting potatoes, cutting furrows will be easier with adjustable wings. To hill up plants, it is better to choose a disk option. To get the job done faster, rather than pulling the tool along each row, you need to consider a two-row classification of hillers. If the walk-behind tractor has sufficient power, you can choose four-row equipment. To choose the right hiller, you also need to compare factors such as:
- soil type;
- type of walk-behind tractor;
- dimensions of the site;
- amount possible to spend.
For example, if you plan to process heavy soils, the quality of the steel will be an important parameter. However, a cultivator with low power is unlikely to pull a heavy tool. If you don’t have enough money to buy a quality tool, and you need to cultivate heavy soils, you can turn to craftsmen for help or make the necessary parts yourself. For homemade products, the characteristics of some popular models will be useful.
For example, a two-row hiller has the following parameters:
- dimensions – 450x130x45 mm;
- working width – 300 mm;
- weight – 4.4 kg.
The disc hiller with adjustable width, height and depth has the following maximum parameters:
- width – 70 cm;
- height – 62 cm;
- disc diameter – 37 cm;
- processing depth – 30 cm.
The process of creating a hiller
The manufacturing process can be divided into 5 stages:
- The mount on the rear wheel is cut so that in the end there is only a “triangle” from the bicycle frame.
- The cultivator will be placed instead of the wheel, and it must be fixed there.
- Screw or weld the cultivator. This should be done efficiently, because this part of the hiller will bear the greatest load.
If the cultivator will be screwed on, then tighten the nuts as tightly as possible, otherwise the manual hiller will not last even a couple of days. This is where both nut and bolt wrenches come in handy. By operating them simultaneously, you will be able to secure the parts firmly and for a long time.
- Next, the offset of the cultivator is adjusted (how far/close it is). This is done for the purpose of convenience during the hilling process, so as not to trip over the cultivator blades.
- The previously removed steering wheel is tightly twisted in place of the saddle.
Self-production
The tool is simple to make yourself. To make a hiller yourself, you need drawings and skills in working with metal. It is advisable to have the following tools:
- welding machine;
- gas-burner;
- angle grinder;
- drill;
- sharpener
An alternative would be homemade hillers, which can be used with any walk-behind tractor and cultivator. To make a part, you need a steel sheet from which the base is made. The pipe will act as a bracket. The entire load will be borne by an element called a rack. For the wings you need two sheets of the same size. If the hiller is adjustable, then hinges are attached to the base of the wings. For better rigidity, the products are bent at a slight angle. A two-row hiller differs from a simple hiller in the increased size of the bracket. It should be sufficient to attach two pairs of plows (wings).
Creation of a cultivator section
If you were unable to find/buy/remove a cultivator, you can make it yourself.
Creating a basic cultivator is quite simple. In fact, this is the same plow. Two plates are attached near the base, which form an angle directed forward (towards the wheel). As the hiller moves, the plates will divide the soil into 2 parts and hill up the potato rows with the raised soil.
However, the following requirements for this part should be adhered to:
- the total width of the blades should be equal to 2/3 of the row spacing of the potato bushes;
- the cultivator should go 10-15 cm underground;
- The angle of the blades should be close to 90 degrees - this way they will perfectly pick up the soil.
After carrying out a full range of work, you should end up with a full-fledged manual hiller that does its job perfectly while growing potatoes.
To familiarize yourself with the device in more detail and understand how to properly make such a homemade hiller, you can watch the following video:
Helpful tips for proper hilling:
- The procedure must be done at a certain time. Ideally - 2 times in 1 season. The first time is when the potatoes grow by about 10 cm. The second time is already about 20 cm. The flowers should not be open.
- Give preference to cloudy weather. If this is a rare occurrence in your area, then choose early morning and late evening. Ideal after rain or watering.
- Forget about the rake and hoe. Trust a modern tool - a potato hiller.
Read also: At what polarity to cook with an inverter
So, without such a procedure you will not see a good result. And without the right device, you won’t be able to make it as easy and effective as possible.
Other types of hillers
There are many schemes for creating hillers. Next we will consider other methods.
From a bicycle wheel and fork
If you have a front bicycle fork and a wheel for it, then you can create a hiller using the following technology:
- 2 pipes need to be welded at an obtuse angle;
- a bicycle handlebar is attached to a long pipe (it would be wiser to weld it so that it does not fall off during operation);
- A cultivator is attached/welded to the junction of both pipes, below.
The final output will look like this:
Creating such a hiller is much simpler than the one mentioned earlier. However, different types of units should be used for different purposes.
From a children's bike
You will need a metal bicycle with 3 wheels:
- the saddle and front wheel are removed and removed;
- cultivator blades are welded on the inside of the frame near the wheels;
- the angle of their placement is selected individually (it affects how the hiller will move: along the rows or between them).
It is recommended to weld the blades so that the angle is directed towards the worker’s feet and opens from the front. Thus, the hiller will move on the ground not between rows, like previous varieties, but along the row itself. The advantage is that each of the cultivator blades will process the row from two sides at once:
But it is important to remember that if the children's bicycle is too low, then the taller the potato plants, the more difficult the hilling process will be (damage to the sprouts will directly affect the health of the tubers).
This completes the creation of a homemade potato hiller, and you can begin the process of hilling the beds. Making this device is not difficult, especially in comparison: work a little with a welding machine and get great efficiency in your work, or hill up each bed yourself.
0
0
Copy link
The best options for manual models
The gardening equipment market offers a lot of options for hillers, from the simplest in the form of a hoe to more advanced ones. Each of them has its own characteristics that need to be taken into account before purchasing.
Tornadica
The latest development, which makes hilling potatoes ten times easier. It consists of long teeth twisted in a whirlwind, a handle that rotates and drives the teeth, and a connecting pipe.
To hill up, you need to place the device between the rows, lightly press the handle, adjusting the depth of cultivation, and turn it 60°. Processing one hundred square meters of potatoes takes about 20 minutes.
| Advantages | Flaws |
| Durable metal that does not corrode or deform | Fixed handle height |
| Easy to use, even an elderly person can handle it | |
| Removes weeds from the soil | |
| Suitable for all types of soil | |
| Not afraid of stones | |
| Used for all types of gardening work |
The average price of a hiller is 1800 rubles. Reviews about it are only positive. Customers note that the tornadika can be used for all types of garden work; it does a good job of uprooting weeds along with the roots.
Miracle hiller
It works on the “push-pull” principle; maximum efficiency is achieved when operated in pairs. It has discs located at an angle, which speeds up the hilling process. Used on all types of soil, including loams and sandstones. It is recommended to carry out work after the soil has been well irrigated.
| Advantages | Flaws |
| High-strength steel, does not deform under strong pressure | Not identified |
| Possibility of adjusting the height of the handles and the angle of inclination of the disks relative to the axis | |
| Productivity up to 10 acres per hour with pair control | |
| Takes up little space when assembled | |
| Does not corrode | |
| Does not require special treatments |
The average cost of such a hiller is about 2800 rubles. In reviews, buyers note that the unit performs well in soils that are particularly overgrown with weeds.
Farmhand
It is a structure consisting of a handle-holder, a support-moving wheel and a direct attachment for hilling. Suitable for single use, it shows excellent performance. Service life is more than 20 years.
| Advantages | Flaws |
| Durable stainless steel, unpretentious to storage conditions | Relatively high price |
| Includes 3 nozzles, used depending on soil type | |
| Easy to operate, no need to involve a second person | |
| In 1 hour you can process about 15 acres without straining | |
| All parameters are adjustable for ease of operation |
The cost of the hiller is about 4,000 rubles, but it is so simple and fast to operate that it pays for itself in the first season. In reviews, buyers indicate its versatility and the possibility of use in wetlands.
Manual hiller
The simplest, most affordable and most primitive to use manual hiller. Presented in the form of a hoe with a long handle. Suitable for working in small areas, since for good hilling you need to apply force.
| Advantages | Flaws |
| Primitive design | Non-adjustable handle |
| Low price | You need to apply force |
| Wooden handle | |
| Good quality metal work element | |
| No requirements for storage conditions |
This option costs about 800 rubles; buyers note its versatility, but often complain about poor fastening of the working element to the handle.
Let's look at the features of each of them.
Lister with fixed and adjustable angle
They have a fixed soil width and are used on very light motor cultivators with a power of up to 4 horsepower. Capable of cultivating beds measuring 25-30 centimeters in width, they are equipped with two side wings and a thin stand. The stand protects the equipment from overloads and mechanical damage. This tool can only be used on dry soils, since adhered soil will interfere with the operation of moving structural elements. There are lister devices with adjustable tillage width. They are installed on motorcycles with higher power – from 4 horsepower. Such units can be safely used on wet soil.
Propeller
The principle of operation is the activity of the propeller parts. Under their influence, the soil is first dug up and weeds are removed, and only then the beds are loosened. These modifications are mainly practiced for motor cultivators with front-wheel drive and two speeds. This is due to the fact that at second speed the power increases to 180 rpm. Once the power level reaches its maximum, this implement can be used not only for hilling soil, but also for throwing soil into furrows from the space between rows of plantings.
Double (2-row)
It cuts two furrows before planting crops, and is also used for hilling and loosening the soil. Includes a frame on which 2 hillers are fixed. When cultivating land, it significantly saves time, since it has two working elements. Mounted on a walk-behind tractor using a hitch. Due to the fact that such a device requires a lot of resistance to operate, it is used in conjunction with lugs.
Rotary active
Instead of wheels, this implement is equipped with rotors with screw-type teeth. Demonstrates high performance when creating, loosening and hilling potatoes. Suitable for use with 3-speed units (two forward and one reverse). In the first gear, the implement hills up the plantings, and in the second gear it also removes the soil from the space between the rows of plantings.
Single row
The most common type. Suitable for use with light soil types. Cutting ditches is carried out after completion of the preparatory loosening of the soil using a cultivator.
Purpose of the operation
Hilling up potatoes is carried out to increase yield by protecting bushes and tubers from bad weather. During the operation, the soil is loosened, which allows the roots to be saturated with oxygen and moisture.
When tubers appear, the fruits are close to the surface, which leads to them baking in the sun or frostbite when the temperature drops at night. Hilling up potatoes helps protect the potatoes.
Hilling effect:
- protecting the plant from bad weather conditions;
- increasing the number of tubers;
- preventing pests;
- the formation of bushes that do not shade the rest;
- strengthening the stems.
Principle of operation
Gardeners know that hilling potatoes should be carried out several times a season. If the soil on the site is well-cultivated and loose, this contributes to a better process of oxygen exchange. The air entering the soil has a positive effect on the development and growth of plants. Timely loosening increases yield by 30–60%. Thanks to the design of the working body of the hiller, furrows with the required depth are obtained. The loosened soil falls off on both sides of the resulting ditch. Tubers are placed in it, and then the grooves are filled with earth. As the potatoes grow, you need to add a thick layer on top. This contributes to the formation of a large number of tubers. This addition is again ensured by loosening with the formation of a groove along the planted seedlings. This is achieved by the fact that the working parts of the hiller, when moving between the rows, cut off the top layer of soil.
In addition to potatoes, other crops that are planted in rows and require hilling, for example, tomatoes, eggplants, and peppers, can be processed with a hiller. Tool designs differ in grip width, manual or mechanized operating principle. The first option is quite primitive, requiring two operators, one of whom takes the front handle, and the other presses on the rear link. As a result of the efforts, the device goes deep into the ground, cuts the soil, and when moving inside the formation, leaves a noticeable trail of earth. The automated version is attached to a tractor or walk-behind tractor and is controlled by one operator.
Manual and automated hillers can be divided into the following types:
disc is a simple tool suitable for one person;
garden plow is a universal plow that requires the presence of two operators.
It is clear that disc options are easier to use; they are also often automated by coupling with motor vehicles. The ridges of the earth after the disc hillers are higher. There is also a negative point in these devices - the price. Compared to a plow hiller, it is four times higher. Externally, the tool looks like a frame with wheels on which disks are suspended. The distance between them can be changed in accordance with the width of the rows. The discs are set at a certain angle, which is not recommended to be adjusted relative to the vertical. Without a constant equal distance between the circles, the tool will pull sideways.
The simplest type of hand plow has a predetermined working width, wings (ploughs) shifted relative to each other, which are motionless. This is convenient if the row spacing has already been determined and the tool fits them. Another advantage of hillers with a fixed working width is the ability to use them with light cultivators weighing up to 30 kg. The advantage lies in its compactness, and the negative side lies in the limited work in wet areas. Here the tool will stick in the soil.
A hiller with variable working width is the most common option. The adjustment mechanism is simple, but it allows you to move or extend the wings, adjusting them to the desired width to the row spacing. The tool can also be automated, but only with heavy walk-behind tractors. The wings of such a hiller push the earth in both directions at once. After the tool passes, the part falls back into the line that it cuts. For a more efficient harrowing process, a more powerful walk-behind tractor is required, otherwise pulling the hiller will seem harder than working with a hoe or hoe.
Execution Rules
Hilling should be done according to the following rules:
- The first operation is carried out when sprouts 8-12 cm high appear. In cold climates, the bushes are completely covered with soil to protect young plants from frost. In warm climates, potatoes are hilled later.
- Hilling is required a second time when tubers form. It is important to do this before flowering. The suitable period begins 14-20 days after the first procedure.
- It is better to hill up the last time when the bushes reach a height of 23-26 cm. The base is sprinkled with earth. Also, soil is spread between the branches so that they grow wider.
The procedure is carried out on damp soil during a cool time of day. The ideal option is morning or evening after rain. This brings additional moisture to the potatoes during hilling. When flowers appear, the procedure is carried out carefully so as not to damage the tubers during the setting period.
The operation is not performed in dry soil: this hinders the development of the plant and makes it vulnerable to pests.
How to make a hiller with your own hands
How to make a potato hiller with your own hands? To do this we need the following tools:
- hollow water pipes: length - 10 cm, diameter 1 inch;
- another similar pipe, but with a diameter of 3/4 inch;
- sheet steel 1-2 mm;
- lanyard or steel plate;
- pipe bender or gas torch;
- welding tools;
- Bulgarians.
This is an approximate list of tools, depending on what type of hiller you want to make, it may change.
The device can be adjusted in several ways:
- By height. Due to the telescopic mechanism in the center. A smaller pipe will be mounted into the central pillar pipe, which will act as a rear linkage. This design is very comfortable to use, because it can adapt to any person’s height.
- We change the angle of attack by tilting the central post relative to the ground. We get this opportunity if we change the angle between the front link and the vertical post. If your design does not have a lanyard, then you can change the angle by changing the position of the plate.
We start making a homemade manual potato hiller with vertical stands
We take a 10 cm pipe and measure about 4 cm from the end. At this distance we should make a slight bend. Approximately - 15 degrees. The most comfortable and easiest way to do this is with a pipe bender - a tool specifically designed for this purpose. Of course, not everyone has such a device, so we’ll tell you about a more affordable way to complete this step.
We fill the pipe tightly with sand or earth - whatever is freely available. We insert plugs so that all the mixture does not spill out. Using a blowtorch or any other heating element, we make the bend we need. Due to the fact that there is a mixture of sand or earth inside the pipe, it will not bend and will maintain its ideal parameters.
Let's move on to making traction
A homemade manual potato hiller has a built-in rear pull. It has the shape of the letter "Pe". In our design it will be of the following dimensions: 5 cm wide and 2 cm long. Note that if you change this value for one engine, you must do the same for the others. We attach a 3 cm long pipe to the center of the fork, vertically. Then we will insert it into the vertical rod
We attach a 3 cm long pipe to the center of the fork, vertically. Then we will insert it into the vertical rod.
We now need to bend a pipe with a diameter of 3/4. This can be done using the method already discussed above. If you have other options, you can use them. In this case, the main thing is one result.
Let's take care of the ability to change the height. We make a hole at the top and in the vertical part of the mechanism. And now, by changing the bolt, we can adjust the height. So, a person of any height will be comfortable working with the tool.
We have made the rear link, now we need to move on to making the front link. It is made in the form of a fork, like the rear link, differing only in size. The handles should be of such length that a person can comfortably stand between the handles.
For ease of use, we will also add an elastic belt that can be worn on the shoulders and chest. This design will reduce the load on the hands and preserve the strength of the person working with the tool.
Dimensions: handles - 6 cm, vertical part - 7 cm. On the vertical part of the fork at its end you need to make a hole with which it can be secured to the rack.
Let's move on to adjusting the angle of attack. The best option is a lanyard.
We count 3 cm from the bottom of the vertical post and mount a 25x25 cm corner in this place. We count 0.3 cm from the position of the fork and then do the same. And we repeat the procedure to the vertical post above our first corner.
The last step is the trimming knife.
It is this mechanism that takes the entire load and reduces resistance in the soil during operation.
For the knife, choose carbon steel. You need to cut the arrows and sharpen them at an angle of 45 degrees. Such parameters allow our mechanism to remain sharp and fully cope with its tasks.
Now you need to start welding the knife to the lower end of the vertical post. Our DIY potato hiller is now ready!
https://youtube.com/watch?v=1WnBUHf8Ds0