In everyday life in your own home, at your dacha or in your garage, there are always many tasks that require the skills of a welder. This skill is especially useful in DIY construction. In nature, there is no more reliable way to connect two metal parts than welding. And it is quite possible to learn this skill on your own and put the acquired skill to good use. Today we’ll figure out how to learn how to cook with electric welding and independently master the basics of this specialty.
Welding Basics
To understand how to properly weld using electric welding, you first need to familiarize yourself with the theory of the welding process.
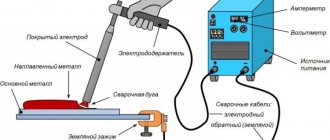
Connecting metal parts into a monolith using welding is by far the most reliable and durable method. This is achieved by obtaining high temperature. The vast majority of welding machines use an electric arc to melt metals: this is the so-called electric arc welding of metals. At the point of impact, it heats the metal to its melting temperature and does this in a limited area.
The appearance of an electric arc occurs due to current - direct or alternating. The first is typical for inverter welding units, the second – for transformers. Let's take a closer look at them.
- The transformer greatly complicates the welding process. Due to alternating current, the welding arc constantly jumps, and the welding process is quite noisy. Another significant disadvantage of such devices is the strong impact on the electrical network, which results in voltage surges;
- The inverter is simpler and quieter to operate, powered by 220V. Because of the constant current, the arc is easier to control and move. If there is a need to learn how to cook with electric welding, then it is better to take lesson No. 1 on an inverter machine.
The formation of an electric arc becomes possible when there are two elements that conduct current and have opposite charges. When welding, it is metal and electrode. It makes sense for a novice welder to use a traditional electrode with a metal central element.
To understand how to properly weld metal, you need to clearly understand the processes taking place:
- An electric arc appears at the moment of contact between a metal part and an electrode;
- At the point where the arc is formed, the metal being welded melts;
- Together with the metal, the electrode itself is melted, its molten particles move into the weld pool;
- The protective coating that covers the electrode rod also burns and forms a gas cloud. It protects the bath from exposure to oxygen. This ensures that the melting temperature of the metal is maintained at the welding site;
- The slag formed during welding also helps maintain the temperature. It is necessary to ensure that the slag encloses the weld pool;
- A seam during welding is formed at the moment of movement of the electrode and movement of the bath;
- When the metal cools after welding, a slag crust remains on it. It is beaten with a hammer.
This is the theory of welding. It is impossible to understand how to weld metal correctly without experience, so let’s turn to practice.
Semi-automatic welding machines in an inert or active gas environment (MIG/MAG).
More complex and expensive devices. But productive and convenient. Widely used in auto repair. The small device is very convenient for personal use.
Used for welding iron, steel, stainless steel, aluminum.
It consists of a transformer with a steeply falling current-voltage characteristic, a rectifier, a wire drive and a hose with a burner. Welding is carried out using wire usually 0.6 - 1.2 mm thick from various metals in a protective gas environment. The output current is usually regulated in steps (4,8,16,32 steps), less often smoothly. With rare exceptions, the wire speed is adjustable. The combination of these two parameters sets the operating modes.
Main characteristics:
- Supply voltage. Power supply can be 220 or 380V, single-phase or three-phase.
- Open circuit voltage. Usually about 35-37V.
- Current adjustment range. The higher the current, the higher the speed of work can be (with a certain skill), the ability to use wire of a larger diameter. With a current greater than 165A, it is possible to carry out spot welding without pre-drilling.
- Diameter of wire used. Typically, wire 0.6 - 0.8 mm is used.
- The wire material is selected based on what metal will be welded.
- The size of the wire spool installed on the device. Typically, bobbins weighing 15, 5, 0.8 kg are used.
Different models of devices can work only with gas, with gas and without gas, only without gas. If it is necessary to work without gas, a special flux-cored wire is used. This is convenient - no balloon is required, the wire is about 5 times higher. For devices operating both with and without gas, it is necessary to switch the polarity of the burner. Different gases are used when welding different metals. Iron – CO2, steel – a mixture of CO2 and argon, aluminum – argon. The cylinder is connected to the device through a reducer with a regulator (preferably with a pressure gauge). You can use industrial cylinders or special branded non-rechargeable ones. Different welding modes require different amounts of shielding gas supplied to the weld pool.
Preparing the tools
Before electric welding, you need to prepare all the tools and uniforms for protection:
- Welding machine and electrodes for it. We recommend stocking up on enough electrodes for practice. The proverb “the first pancake is lumpy” in the field of welding training works without exception;
- Protection: welding mask, protective clothing and gloves made of thick materials. Protection should not be neglected during welding work. It's a matter of health and safety!
- Auxiliary tools - a hammer and a metal brush - to remove weld slag;
- Object for training – metal elements;
- Bucket with water. Literally, just in case of fire.
The choice of electrodes is made in accordance with the thickness of the metal being welded, and the setting of the current depends on the electrode. 1 mm of electrode takes about 30-40 A, it is important not to exceed these values, otherwise the arc will not cook, but cut metal.
Cleaning seams
After completing all work, it is necessary to clean the weld from slag, otherwise there is a chance of corrosion. There are 3 main ways:
- Heat treatment . Removes residual stress from the material that forms during welding. There are two types: local (the seam itself is heated or cooled) and general (the entire seam is processed).
- Mechanical restoration. Removes residual slag from the part. The cleaned seam must then be checked for strength by tapping it with a hammer or pliers.
- Chemical processing . A special anti-corrosion material is applied.
Thermal stripping Source gidpokraske.ru
You can use many tools for stripping, the main thing is to choose them correctly. You can use a metal brush, a special grinder or an angle grinder with an abrasive wheel.
For mechanical processing, the easiest method is manual, since its use only requires a metal brush. But the presence of the special machines indicated above will speed up the process. With this cleaning you can remove burrs, oxides, scale and traces of tarnish. It is also important to remember that for high-quality processing it is necessary to choose the right grinding disc.
Chemical cleaning is considered effective if combined with mechanical cleaning. Can be processed by etching or passivation. For the first option, a special composition is used that forms a homogeneous layer, which after a certain time can be removed mechanically. Corrosion does not form on the material after this.
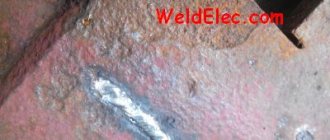
Corrosion on the connection Source otoplenie-gid.ru
Let's start welding
So, let’s figure out step by step how to properly weld metal. Probably, to obtain an acceptable result, you will have to repeat this algorithm more than once. But once you learn, you will quickly get used to the role of a welder and will be able to perform quite complex operations.
First of all, we place the electrode in a special holder. Now you need to light the arc. The electrode should be held at an angle of approximately 70° to the surface; this position is optimal.
Next, we begin to weld the seam:
- Having set the angle between the electrode and the metal, draw a quick line, moving about 10 cm per second. If the position is correct, sparks and crackling sounds will appear - this is a sure sign.
- Having left the optimal angle of inclination of the electrode, you need to touch the metal with it and immediately raise the electrode so that a track of 3-5 mm is formed. If everything is done correctly, the arc will burn and the metal will begin to melt.
- It is not uncommon for the electrode to stick to the base. In this case, you need to slightly swing it and tear it off, and then ignite the arc again. Frequent sticking of the electrode may indicate too low current strength. Try increasing it and compare the results.
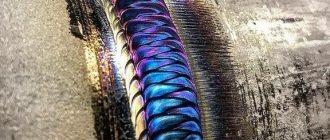
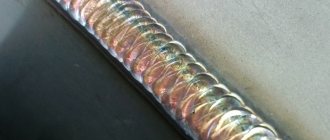
- Once ignition of the arc and its holding in a stable state are mastered, you can begin to deposit the bead. The clamped arc moves smoothly along the weld. At the same time, movements are made that seem to rake in the molten metal. This is achieved by uniform oscillatory movements with an amplitude of about 2-3 mm. The more measured the movement, the more beautiful the welded seam will turn out. By the way, the uniformity of the seam indicates its high quality and strength.
At the first stage, it is best to train on a thick piece of metal and try to draw various paths with an arc - from simple measured movements with a small amplitude to more complex and patterned seams. These skills will be useful in subsequent work and will allow you to get a good feel for how to cook and what angle of the electrode is best to choose.
After finishing welding, you must wait until the metal cools down. The weld will be covered by slag. To make it fly off, just tap the part with a hammer or run a brush over the iron.
Security measures
First, let's start by telling you a little about the culture of this process and its purity. Welding is a dirty process and, while fun, quite dangerous. All dangers relate to three things - the possibility of burns, weakened vision and the lungs, where sediment accumulates over time, which leads to unpleasant diseases. You need to protect yourself from this and take care of yourself in the greatest possible way - that is, follow safety rules , namely:
- Respiratory system. Alas, it is almost impossible to protect your lungs - naturally, you can use a respirator, but this is a certain inconvenience in work, especially for beginners. In general, if we are talking about 5-10 minutes of work, this is not so bad, but if we consider a full work day, then, unfortunately, a respirator will not be the best assistant.
- Eye protection – this phrase must be said very loudly. It must be remembered as two plus two. Without this, the question of how to learn how to weld correctly simply cannot be resolved. Shout (or warning) “Eyes!!!” it is necessary so that people working nearby can have time to protect their organs of vision from the action of a bright arc.
- Overalls - it is clothing that mainly protects against burns that occur from molten metal coming into contact with the skin, as well as from a large dose of ultraviolet radiation. A welder needs to work dressed, so to speak, from head to toe, and this clothing is not at all a light and thin T-shirt or shorts - it is a thick tarpaulin worn over underwear. Naturally, it is clear that in the summer this equipment causes some difficulties - to say that it is hot to work is simply to remain silent. Of course, you slowly get used to it, but at first it is very unpleasant.
And, of course, a head on your shoulders. Thoughtless handling of welding can be fraught with dire consequences, both for work and for you personally.
Some aspects of welding work
Of course, welding does not involve writing intricate patterns on a piece of metal. All of the above is just preparation and training for this rather difficult craft. The main purpose of welding is to reliably fasten metal elements and you should strive for it in your training.
Welding metal elements has many nuances, familiarity and understanding of which will come with experience. But there are some theoretical points that you need to know before practice:
- It is incorrect to connect two parts at once with a continuous and long seam. In most cases, this distorts the metal, as the seam begins to pull the elements together;
- Before making the main seam, you need to tack the parts together. To do this, small spot seams are made at the joints of two parts in increments of 8-25 cm, depending on the size of the elements being fastened.
- It is better to make fastening seams on both sides of the welding surface, this way the possible stress on the metal is minimized.
- After completing the tacks, the main seam is made.
Electrode position
Knowing how to place a weld begins with the ability to choose the desired position of the electrode. Otherwise, a situation may occur in which slagging of the seam occurs, which will not benefit its quality. There are three options for positioning the electrode when welding. The first two assume its inclination in different directions within the same limits, and the third occurs at a right angle.
The “forward angle” method involves moving forward from the welder. It is suitable for welding thin metals in vertical and horizontal positions. With a “backward angle” the movement is towards the welder. Convenient to use over short distances for welding butt and fillet welds. In hard-to-reach places, a 90-degree angle position is used. This is somewhat more complicated, but it solves the issue of welding the ceiling seam.
Let's sum it up
Welding work requires special knowledge, skills and special equipment. Please note that this is a rather complex and dangerous process that requires strict adherence to safety precautions.
Welding skills require some time and practice. There is nothing wrong with training on a piece of unnecessary metal. This allows you to gain experience and understand the essence of the welding process.
Before you start welding parts, you should hone your use of a welding machine and the ability to weld seams on workpieces and then move on to more complex elements.
Pros and cons of inverter equipment
Among all the existing techniques, the inverter welding technique for beginners is considered the most convenient and accessible. If you wish, in just one day you can learn how to cook with an inverter welding machine at home.
The advantages of this type of equipment are undeniable:
- Availability. The cost of the equipment is low and almost every specialized store offers a wide selection of models.
- Mobility. Due to its light weight (only 3-10 kg), the equipment can be moved from one place to another without outside help.
- Versatility. The rules for welding with an inverter allow the use of electrodes for direct and alternating current, which is of great importance in cases of welding non-ferrous metal, cast iron and other alloys.
- Convenience. The device allows you to adjust the current strength over a wide range, due to which argon arc welding with non-consumable tungsten electrodes becomes possible.
- Multifunctionality. In most models, the control circuit makes it possible to perform various functions that facilitate the process of welding parts.
Speaking about the advantages, we cannot also mention the cost-effectiveness of the devices in terms of electricity consumption, as well as the ease of learning, which allows you to learn the secrets of welding with an inverter in a short time.
Along with the advantageous properties of inverters, they are also characterized by some negative aspects that need to be studied before welding with a welding inverter:
- Compared to a conventional transformer, the price of a welding inverter is approximately 2-3 times higher. This is due to the higher complexity and efficiency of the equipment;
- since the device circuit uses semiconductor parts, the equipment is characterized by increased sensitivity to dust and must be cleaned at least 2-3 times during the season;
- Some models are not able to fully operate at sub-zero temperatures, which limits their scope of application.
But if you compare the disadvantages with multiple positive qualities, they seem insignificant and are fully compensated by the ease of learning welding skills, ease of use and the ability to create strong permanent connections.
What is forward and reverse polarity?
The metal melts under the influence of the arc. It is created between the product and the tool under the influence of electric current. It is permissible to perform welding in several ways; they differ from each other in the connection method.
With direct polarity, the rod is connected to the minus, and the product itself to the plus. The melting zone is deep and narrow. With reverse polarity, everything is the other way around, both the connection method and the result. The melting point is shallow but wide.
The element that is connected to the positive is subject to greater heating; this is important to consider when choosing a technique. It is acceptable to use several methods when working with one product.
There is a special table that contains recommendations for choosing one method or another. It all depends on the thickness of the metal.
Classification by purpose
Electrodes are intended for welding:
- Steels: low-carbon, high-carbon, alloyed - including stainless and heat-resistant (austenitic).
- Cast iron - alloys with a high carbon content - 2.14% or more.
- Aluminum and alloys.
- Copper, brass and bronze.
- For welding steels of different grades
- For working with cast iron alloys
- For aluminum welding
- For working with copper and its alloys
To ensure a high-quality connection, you need to try to ensure that the composition of the electrode material matches as closely as possible the alloy of the parts being welded.
Raw electrodes . A common problem. It is associated with moisture that was absorbed by the coating (coating) of the electrode. Even if the electrodes are stored in a dry room, if opened they will absorb all the moisture. To avoid this, the electrodes are supplied in a cellophane-covered package.