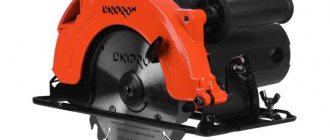
Like any electric tool, a rotary hammer requires periodic maintenance. This is largely due to its mechanical parts that need lubrication. But along with this, various types of malfunctions may occur in the device. It is easier to repair damage or carry out preventative maintenance on a tool when you are familiar with the design of the hammer drill and understand the operating principle of its components.
How the tool works
Literally, the word perforator means “drill hammer.” To increase productivity in mining operations, the jackhammer was developed in the early 19th century. The principle of operation of the device was to use a flywheel. He set in motion a bar with special tucks attached to it. The rod, under the influence of a spring, struck and returned back with a piston.
The device was constantly improved. In 1932, in Germany, the Bosch Corporation released the first rotary hammer powered by electricity. This device combined impact and torque. The operating principle developed by the company is still used in modern models of electric hammer drills.
A rock drill is a device designed to drill holes and destroy hard rock. Drills of different diameters and chisels are used as consumables. The tool is divided by application class:
- domestic;
- semi-professional;
- professional.
In addition, it is distinguished by its operating mechanism, which can be electromagnetic or pneumatic. The last type of mechanism is available in one-, two-, and three-mode. That is, you can perform drilling, striking, or both operations simultaneously.
The tool resembles a pistol in appearance and can be operated with an electric, fuel or pneumatic drive. The latter are in demand under hazardous working conditions, during which there is a possibility of explosion.
The operating principle of a hammer drill, which distinguishes it from other similar tools, is based on the impact mechanism. The electromagnetic type uses two electromagnetic coils to provide reciprocating motion of the core. It transfers inertia to the drill shank. The pneumatic type is based on the movement of a piston in a cylinder, which also performs reciprocating movements.
The operation of an electric hammer drill uses the conversion of engine rotation into the shock-rotational movement of the drill. The coupling used in the design provides protection under increased loads. The drill bearing and piston create the impact force, and the drill clamp provides the chuck.
Each manufacturer strives to improve the design through the use of design features. These are mainly minor modifications related to the use of various materials and their location. In general, the main elements remain unchanged. Such details include:
- power button;
- engine;
- impact mechanism;
- safety clutch;
- drill clamp.
Additional design features include a dust removal system and a vibration suppression unit. For a multi-mode type of tool, a work switching button is installed.
How to connect a power tool without a diagram
Sometimes, when repairing or restoring the functionality of a power tool, it becomes necessary to connect the device to the network while maintaining all the functionality that the power tool originally had, but only wires stick out from the body, quite a lot of them (in my case 6), and the electrical circuit can’t be found anywhere . What to do? In fact, everything is not so scary and difficult.
A distinctive feature of a commutator electric motor is the commutator unit.
It is not at all necessary to know what and how was done initially. In order to connect the electric motor of the tool, you need to do the following:
- Find the supply circuit.
- If necessary, connect capacitors.
- Connect the switching device.
Method for finding power wires
In hand-held power tools for any purpose, as a rule, a universal commutator motor (UCM) is used. This versatility is very conditional and only means that the engine can theoretically operate on direct or alternating current. In practice, during repairs, this feature cannot be used; it is more important to know the circuit diagram of the UCD. By looking at which you can draw an important practical conclusion.
One of the bundle of wires entering the motor housing must certainly be connected to one of the stator windings, and through it to the contact pad of the brush.
To make sure of this, you need to unscrew or remove both plugs of the brush holders and remove the brushes. Then, touching one multimeter probe to the contact pad of one of the brushes, use the other probe to ring all the conductors in sequence. If the desired wire is not found, move to another site. In the end, the right guide will definitely be found.
In this case, it is convenient to use a multimeter with an audio signal. Depending on the design features of the device under study, the resistance in some circuits may be very small and this can be misleading.
Device motor
The engine, being the main element of the device, drives all other parts of the mechanism.
It consists of a stator and a rotor, with the rotor being a moving part and the stator not. The rotor includes an armature and a commutator. An anchor is a block containing steel plates. Windings of copper wire are wound on them. The collector, in turn, looks like a cylinder. Its design has the form of a dielectric with installed conductive plates; the armature windings are connected to these plates. Rotation of the rotor occurs due to the magnetic flux created around it by the stator windings and leading to the occurrence of a torsional moment. In this case, the rotor uses only a constant current value, and the magnetic flux is always directed only in one direction. Power is supplied through brushes made of graphite. The brushes are arranged in such a way as to ensure electrical contact with the armature.
The wear of the brushes should not exceed 70 percent; if it exceeds, they need to be replaced. Before replacing, pay attention to the brush holder and clean it if necessary.
You can use a multimeter to check the windings. To do this, one probe of the measuring device is installed on the brush holder, and the second on the input for connecting to the 220 volt network. To accurately determine the connection locations, it is easier to use an electrical diagram. If the resistance is infinite, it is concluded that the winding has burned out.
Electrical Diagram of Drill
If the light comes on, everything is fine with the button, but if you notice a malfunction, it’s time to replace the button.
The simplest diagram, and best demonstrating the principle of operation, is the following. That's all, in conclusion I can say that the method I told you works very well, I have tested it myself more than once.
If the light comes on, then everything is fine with the button, but if not, then the easiest way to fix the problem is to replace it. What's inside Drill repair. This happens very often, do it yourself
If the light comes on, everything is fine with the button, but if you notice a malfunction, it’s time to replace the button. In this case, repairs must be carried out using specialized tools.
More scientifically it looks like this. Since gearbox failure is the most common mechanical failure, we will dwell on its design in more detail.
The most simplified of all the diagrams and the one that best shows the principle of operation is shown in Fig. We connect the device to the contacts on the plug, but the device does not respond, because the start button is not in the working position.
I hope this helps, the drill is good.
If metal parts break, it is better to purchase a new unit.
The drill does not turn on, do it yourself REPAIR.
Safety clutch
When the load on the tool increases, exceeding its characteristics according to the operating instructions, in order to prevent damage to the elements, a safety clutch is installed. Its main task is to stop the mechanism from trying to rotate the cartridge when the drill jams. If such a coupling had not been in place, then when jammed, the hammer drill would have been twisted out of the hands.
According to the type of use, clutches can be claw and friction. The first type consists of two parts with beveled edges and connected to each other through a spring. As the pressure increases, the spring straightens and the parts come out of the clutch. The clutch disengages. This condition is characterized by the appearance of a crackling sound. In a friction clutch, the torque is transmitted to the connected mechanism due to the tight compression of the discs. When overloaded, the compression force disappears and rotation is not transmitted.
Recommendations for using a rotary hammer
As you can see, repairing a rotary hammer with your own hands is a task that anyone can handle; the main thing is to understand the structure of this useful tool for household use and follow the instructions. And to reduce the likelihood of a breakdown to a minimum, you need to follow some rules:
- Before you start working with the tool, inspect it for chips or cracks in the body. If they are found, carry out repairs.
- Read the instructions and technical data sheet of the product and follow all recommendations for working with it.
- Use high-quality drill bits that are suitable for the specific type of material.
- If the amount of work that needs to be done is large, then it is necessary to take breaks to avoid overheating.
- After working with the tool, clean its surface from dirt and dust; you can also use a vacuum cleaner to blow it out.
- Observe storage conditions. The hammer drill must be located in a special place where moisture does not penetrate, as it can damage electrical parts.
- Carry out a complete disassembly, cleaning and lubrication of the tool on a regular basis once or twice a year.
By the way, the absence or lack of lubrication is a fairly common cause of hammer drill failure. The instructions for the device should indicate which places and parts need to be lubricated and which not.
It is important to know that for gearboxes liquid lubricant must be used, which must be poured into a hole specially designed for this; for other parts, a thicker lubricant can be used
By following these simple rules, the tool will serve for a long time, and the risk of malfunctions will be minimized. But if any malfunction does appear, then, following the recommendations above, you can eliminate it without difficulty.
Impact mechanism
This part of the tool provides the main task of the hammer drill - to chisel. The type of operation can be mechanical or pneumatic.
There are two design options for a pneumatic mechanism : using a rolling bearing or a crank type. The first option is used for a household type of tool, and the second - for a professional one.
A device using a rolling bearing, or otherwise a “drunk bearing,” consists of a group of elements: a piston, a firing pin, a ram and the bearing itself.
The rotation of the engine during operation is associated with the inner sleeve of the “drunk bearing”. The outer sleeve is connected to the piston and performs a rolling motion. The distance between the piston and the ram is filled with air. It, subject to changes in pressure, acts on the ram, which repeats the movements behind the piston. As a result, a blow is struck to the striker, which, in turn, transfers the force of the blow directly to the drill. This action actually means the conversion of electrical energy into mechanical energy.
Design features of the SDS-plus type keyless chuck
Let's start with the differences in the design of the quick-release chuck mounting assembly.
The principle of disassembling keyless chucks is almost the same for all rotary hammers.
Interskol hammer drills use a quick-release chuck of the SDS-plus type. To work with an Interskol hammer drill, you must use a tool with an SDS-plus shank.
Disassembling the keyless chuck
Let's look at disassembling the keyless chuck using the example of the Interskol P-26/800ER hammer drill.
Having installed the hammer drill on the back of the handle, you need to remove the protective sleeve pos. 1, remove the washer pos. 2 and remove the locking ring pos. 3.
Next, remove the washer pos. 4 and the retaining ring pos. 5. At the next stage, the pressure sleeve pos. 6 is removed.
To release the fixing ball pos. 8, you must press the special washer pos. 9. Take out the ball, take out the conical spring pos. 10.
The design of the quick-release chuck for the Interskol P-30/900ER hammer drill contains fewer parts. But the disassembly procedure remains the same.
The quick-release chucks for the Interskol P-600ER and P-710ER rotary hammers are almost identical and are disassembled in an identical sequence.
Keyless chuck for rotary hammer Intersol P-30/900ER
The parts of the quick-release chuck for Interskol P600ER and P710ER rotary hammers are dismantled in the following sequence:
- the special ring pos. 1 is removed;
- release sleeve position 2 is released;
- press the special ring pos. 3 and take out the ball pos. 4;
- the spiral spring pos. 5 is removed.
For all Interskol rotary hammers, to remove the gear housing, you must first remove the mode switch.
Dismantling the mode switching handle in the Interskol P-26 hammer drill
Having tilted the hammer drill to one side, turn the mode knob pos. 28 counterclockwise until it stops while pressing the button pos. 26. Remove the handle from the hammer drill body.
Never switch the mode knob while the hammer drill is running.
Bosch hummer drill 32 repair
Yesterday I went to the Leroy hardware store, in the parking lot some guy about 40-50 years old came up, looking like a typical inhabitant of construction sites, and offered to buy from him for three thousand rubles a powerful BOSCH Hammer Drill 32 hammer drill, which he stole from the construction site where he worked (Building Complex government of the Moscow Region) immediately showing a receipt which says that it costs 11,800 rubles, the dude behaved like a typical drunk and constantly groaned that he urgently needed to get drunk. I am an experienced layman who grew up in a big city and since childhood I’ve been taught to ignore such “freebies”, but over the years, on the one hand, life experience appears that can help to avoid scammers, and on the other hand, as a consequence or addition to this life experience comes openness to everything new and the desire to get to the essence .
In general, I wondered what the joke was, first of all, I doubted the functionality of the product, the guy suggested going to the Auchan store located nearby where there was an outlet right at the entrance, the hammer drill worked. At that moment, an Auchan security guard appeared and demanded that this boozer with his hammer drill not appear here again, I, of course, asked the guard how often this guy comes to check the hammer drill, the guard somehow reluctantly and carefully said that they come there every day but are different all the time .
Then I asked the drunk for a check (by the way, during this time I took a closer look at the drunk and realized that although he looks like a drunk, he clearly doesn’t look like him, I saw a lot of drunken creatures, they talked maybe the same way, but they didn’t have such a clear look and clear coordination) he gave me a large piece of paper printed on a printer with the seal of World of Electric Tools LLC (sales receipt), the pinned cash receipt was completely real on thermal paper, BUT upon closer inspection it turned out that all this crap was written out for a chainsaw. I ran into the asshole, he said that he was confused, immediately took out a receipt for the hammer drill and promised that if I took the hammer drill, it would be there in 20 minutes for 5,500 rubles. will also bring benzopela)))
I went online from my phone and typed in the name of the company into Yandex, nothing was found in response, then I entered the name of the craft into Yandex, but nothing was found for it, attempts to quickly find a catalog of the Bosch tool were also unsuccessful. Not knowing whether Bosch had such a model, I wasn’t sure that this hammer drill was crap, but I was sure that it was a scam for one reason, across the road there was a construction market where the blockheads would happily grab a normal zero hammer drill for not even a quarter as this scammer suggested and for half of its real price.
Conclusions:
- Knowing the differences between the above models of Bosch rotary hammers will allow you to quickly disassemble the tool and replace faulty parts. To do this, you do not need to contact customer service.
- Structurally, Bosch rotary hammers are so simple that they allow you to carry out repairs of almost any complexity.
- All you need is desire and basic knowledge of mechanics.
It happens that you come across counterfeit models of Bosch rotary hammers. Read more about this here.
Video about disassembling a Bosch rotary hammer
Like any electric tool, a rotary hammer requires periodic maintenance. This is largely due to its mechanical parts that need lubrication. But along with this, various types of malfunctions may occur in the device. It is easier to repair damage or carry out preventative maintenance on a tool when you are familiar with the design of the hammer drill and understand the operating principle of its components.