For a long time, tenon joints have been used when assembling drawers, doors, windows and other frame structures. To accurately and quickly obtain such complex elements in wooden structures, a wood tenoning machine is used.
This equipment is used both in business and in large-scale production. It is indispensable in the manufacture of furniture, as well as in house construction and woodworking enterprises.
Types of tenoning machines
A tenon saw is a type of woodworking machine. There are samples of both imported and domestic production on the market. The fixing elements on it can be processed for subsequent connection of products at an angle, as well as for their merging (dovetail folds are used).
Machines for milling tenons are divided into frame machines and box machines according to their intended purpose.
In this case, frame units are:
- unilateral In one pass, the tenons are processed on one side of the workpiece;
- two-way automated. The design of a tenoning machine involves placing supports on two columns and, accordingly, processing the workpiece on both sides.
Naturally, the productivity of double-sided tenoning machines is much higher than their analogues. There are several types of units, which differ in length, and they come in 2, 2.5, and 3 meters.
The cutting tools for them are cross-cut saws and cutters (disc and end) for processing straight tenons, lugs on frames and frames of various wooden structures.
The formation of box and dovetail tenons is done on specialized machines, mainly in large-scale and mass production. At the same time, there are two types of dovetail fixation: with rounded and sharp corners.
The first category is produced on multi-spindle tenoning machines. Such shaped protrusions are processed simultaneously on the mating surfaces using modular cutters. It is this connection that guarantees the durability and reliability of the fixing unit.
When producing the most complex oval dowels (small tenons) and those with a round shape, automatic tenoning machines with numerical control are used.
Manufacturing of equipment for box connection
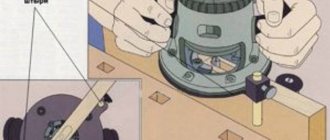
This product allows you to mill box joint grooves one at a time on a milling table. In our case, it is simply an additional board, screwed onto an angle stop and having a key, with which we will determine the exact interval between the grooves.
simple device for making box joints
Install a straight cutter with the diameter of the required groove width; Place the router on the table. Set the routing depth equal to the thickness of the existing board and mill a groove into it. After this, unscrew the board from the miter gauge and move it so that the gap between the groove and the cutter is equal to the width of the cutter.
Mill a groove in the board again, this time the second one (on the right). Cut a key out of the wood so that it fits exactly into the first groove and place it on the glue, so that it will be approximately 25 mm from the groove on the additional board.
Milling grooves in the first workpiece
Place the workpiece with its front surface against the additional miter fence board, pressing one of its edges against the key. Turn on the router and, holding the workpiece firmly against the fence, move it onto the cutter, milling the first groove. U
Specifications
The operator’s functions when working on an automatic machine are reduced to loading and turning workpieces, starting or stopping the cycle. Important indicators of tenoning units are:
- largest peg size;
- the smallest thickness;
- groove height;
- width;
- maximum workpiece size;
- spindle speed;
- engine power.
In addition to the characteristics for classifying the machine, the parameters of the cutting tool are indicated: saw diameter, type and size of cutter.
Often on large production lines such equipment is installed to the ceiling. The machines are additionally fixed with clamping devices, where the workpieces are processed by scoring saws, followed by the formation of tenons on milling supports.
The feed is adjusted smoothly using a variator. To create a high-quality surface of the mating elements, the spindle speed should be about 700 rpm.
Creating tenons on bars and boards
Processing is performed using the following sequence of actions:
- The part to be processed is mounted on a plane from the bottom side.
- The edge of the part where the tenon is formed accommodates the cutouts at the guides at the top. The structure moves inward until it hits the end.
- A movable type element must be fixed while maintaining a certain position.
- We use a wedge tool to connect the guides and the plane located at the top to each other.
- Connection of a hand router with the upper guides.
- Using a router tool on a home router table, wood is removed from one side.
- When the first side of the workpiece is processed, begin the second.
Principle of operation
When forming pegs, a sawing and milling procedure is usually used. An appropriate cutting tool is used to obtain the tenon joint surfaces.
Attention! Whatever the shape of the tenons, the initial operation is to trim the workpiece.
For the most common models that use milling during processing, the machines are equipped with four spindles - three milling and one sawing. One or more workpieces can be loaded onto the carriage table, and they are aligned with their edges along the ruler and their ends along the stop bar.
The tenon is formed as a result of end milling. When the cutting tool comes out, chips may appear on the edges, so to prevent them, a support block is mounted on the ruler, and some machines also provide for the application of glue to the surface being processed.
After turning on the feed mechanism, the product is automatically fixed due to the side and top hydraulic clamps. The carriage with the workpiece begins to move at a certain speed along two guides relative to the cutting tools.
In this case, during the movement of the carriage, a spike of the desired configuration is formed on the structure, then the device, having reached the stop (limit switch), returns to its original position. Here the finished product is replaced with a blank, and the cycle repeats again.
If the machine is double-sided, the process of forming tenons occurs on both sides of the workpiece.
Payment Online.
You can pay an invoice using the details specified in it through your personal account on your bank’s website or through your bank’s mobile application. To pay, go to the website (for example: Sberbank Online .) On the “Payments and Transfers” page, click on the “Organization Transfer” link (note: in the bank’s mobile application this menu item is called “Payment by details”). Fill in the details of the payment recipient (see previous paragraph). Attention:
- The “Account number” field corresponds to the current account;
- In the “Recipient’s Bank” block, select from the directory the name of the bank in which the recipient’s account is opened. To use the directory, click on the “Select from directory” link. In the window that opens, check the box next to the desired bank and click on the “Select” button. As a result, the “BIC” field will be filled in automatically.
- In the “Purpose of payment” field (if required), enter the order number. It is assigned after successful ordering. Check the entered data and confirm the operation with a one-time password. After this, the payment will be sent to Sberbank for processing. The payment is credited to the recipient's account no later than the next business day after the payment is made.
- When filling out the Full Name field - you must enter your Last Name, First Name and Patronymic
- In the address field - you enter your address.
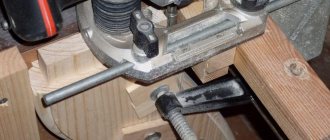
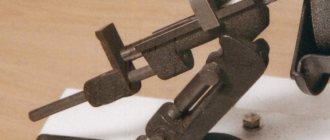
Homemade tenoning machine
Today there are all opportunities for entrepreneurial activity, while many are engaged in the manufacture of furniture, wooden doors and windows, where connecting tenons are indispensable when assembling the product. And since tenon cutting machines are not cheap, at first a homemade unit is quite suitable for obtaining fixing elements.
It is easy to make on your own, which will save a lot of money when organizing production. Moreover, there are different options for the manufacture of such machines, where the basic element can be a stationary engine, an angle grinder, a jigsaw, and even an electric drill.
Let's consider making a do-it-yourself tenoning machine based on a grinder with a disk cutter positioned in a horizontal position.
As in a factory machine, here, in addition to the engine and cutting tool, there are two components:
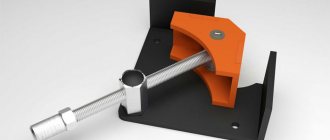
The frame must be strong and stable, since it is the base part of the unit on which the device for fastening the workpiece and the grinder with the cutter are installed. This component of the tenoning machine can vary in design and be manufactured without drawings. For example, it can be made from metal corners, and a sheet of chipboard can be fixed on them.
The size of the tabletop must correspond to the intended workpiece. It also contains clamps and a control ruler.
The bed guides must be strictly perpendicular to the movement of the tabletop when milling connecting elements. The quality of the connection between the studs and lugs depends on this.
How to work with box templates.
Tools and accessories for working with box templates
To mill tenons, the following tools and devices are required (Fig. 1):
Fig.1