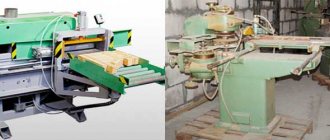
Many woodworkers dream of buying the perfect tenoning device for a router in order to quickly and accurately make straight or dovetail tenons. These factory fixtures can do much more than simple box tenons. One example is semi-blind spines (pictured on the right below). Such a device will perform any semi-blind dovetail connection. So what if
If you are familiar with how a conductor works, then you are on your way to mastering this technique. Using the proposed templates in the set, you can make any semi-blind connection and it works in much the same way as in a typical box - only with slight differences. But today, let's look at how to make a device with your own hands that will help you make simple box tenons.
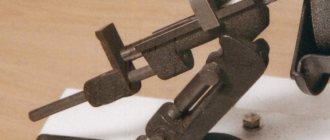
Tenoning attachment for a router with a constant size.
Every carpentry workshop simply needs to have a tenon-cutting device for the router for making tenons of different sizes. When making such a device, you need to understand that it, in this case, is made for one specific size of spikes. It's not difficult to make and it will work like a clock. The necessary parts are guides for making tenons; they are installed on opposite sides of the device body in a checkerboard pattern and at the same distance from each other. A cutter with a thrust bearing is inserted into the hand router, which follows the shape of the guides. If the guides are cut to the same size and evenly mounted into the body of the device, then the tenons will fit together perfectly. These studs measure 7/8″ wide and the stud height is 3/4″. Before making tenons, install the router and cutter on the router table. Note: A situation may arise when a cutter with a thrust bearing is not available, then a guide bushing for the router will correct the situation. Securely secure the device itself with clamps on a 15″ long board.
Tools used
The creation of tenons and grooves, with the help of which the connection of two wooden blanks will be ensured, involves taking a sample of material on the side surface of a beam or board using a hand router. In this case, all geometric parameters of the elements of the future connection must be strictly maintained.
To perform this operation with a hand router, you can use tools with shanks with a diameter of both 8 and 12 mm. The most universal in this case is a groove cutter, the cutting part of which works as follows:
- the lateral surface forms the walls of the groove and the sides of the tenon;
- the end side processes the bottom of the groove and removes a layer of material of the required thickness from the base of the tenon.
Cutting a tenon with a mortise cutter
Thus, using a tool of this type, it is possible to form both a tenon and a groove on the side surface of a beam or board. Moreover, their sizes can be adjusted within a fairly wide range.
In cases where higher demands are placed on the reliability of the connection of wooden parts, the grooves and tenons are made not of a rectangular shape, but of a shape called “dovetail”. Grooves and tenons of this configuration are created using dovetail cutters. It is also possible to perform the procedure for forming grooves and tenons of this shape with a manual milling cutter, but for these purposes you should use devices of a different design.
Dovetail sampling using a template
So that the question of how to make a groove in a board or beam or a tenon on their side surface does not cause any particular difficulties, it is better to use a power tool equipped with comfortable side handles, a wide guide sole and the option of protecting the spindle from turning during the process of replacing the cutter. In addition, it is desirable that such equipment have a side stopper, due to which the overhang of the cutter used with it will always remain constant.
Adjustable tenoning jig for router.
How to make grooves in the body of a device for a hand router at ideally equal distances from each other and the same size? We can say that this is a common operation in woodworking and a router is the ideal tool for the job. The grooves can be located widely, as in the example in the photo, or they can be located very close, like box tenons. It doesn’t matter for what purpose the grooves are located, the main thing is that the grooves are evenly spaced - parallel to each other, at the same distance and with the same width. To do this, you need to make a simple device consisting of a piece of MDF on which the router is attached. Such a jig can be made to fit one size or with the ability to adjust the distance between the grooves, as shown in the photo below.
Shiporezka.ru - tools for carpenters!
Hello! I, Yuri Mikhailovich, also known to many carpenters, professional woodworkers and carpentry enthusiasts under the nickname “ Countryman ,” welcome you to my website. For those who don’t know me, I’ll bring you up to date. I provide services for the manufacture of various products for hand milling machines. These high-quality products allow you to turn a hand router into homemade high-level woodworking machines. With my help, my tools for a router, your work with a hand router will bring you joy and pleasure. For example, using plates for installation, attaching a hand router to a table, guides, and a convenient protractor, you can make a homemade milling table for a hand router. And by purchasing an additional tabletop for the milling table, made from high-quality multi-layer CNC-laminated plywood, you will receive a practically complete set of a professional milling table! Moreover, the quality of the plates, protractor, table tops and other accessories of such a milling table will be much higher than many similar “branded” router tables, and the cost is much lower. Such miracles! Here, for example, is one of the many customer reviews: “ I bought it. Well done. I haven't seen the original device, but I assume this one is better. Respect to Yuri (Zemlyak) and many thanks! And if you want, you will find many such reviews! This is not surprising, considering that many unique parts are made on high-tech, state-of-the-art equipment by professionals with a capital P. Here on the website, you can order both individual devices for a manual router and finished products, for example, a tenon cutter - a tenon cutter . This device will allow you to make high-quality tenon joints using a hand router in the manufacture of various products. Starting from the manufacture of simple frames, box joints, the manufacture of beehives and chairs, country and garden furniture, as well as good quality furniture for the home. What is very important is that you can do it yourself. Well, if you are professionally engaged in the manufacture of custom-made furniture, according to individual orders and projects, or make home furniture for the kitchen or living room, offices or shops, you will also find on the site many useful tools for wood processing. With the help of these devices, your carpentry workshop will allow you to produce high-quality furniture for any purpose at a much higher, professional level. All products are made using high-tech equipment for various types of routers and circular saws. Plates for the milling table, bushings for the router, box templates for making tenon joints, tenon cutters and other parts are cut out by laser cutting in precise compliance with all the required dimensions, for each type of router or circular saw. In addition to the products listed on the website, you can order other devices for carpentry. To buy the necessary product, you can use the site’s online store or simply send me an order by email.
How to do it yourself?
From the very beginning, it’s worth making a reservation that you shouldn’t make a universal carriage for a hand router yourself. This is an almost precision product, and it is almost impossible to make such a model at home. If you need to carry out important work at a professional level (for example, produce and install doors on a large scale), then you can get by with simpler solutions (which will be discussed now). We are talking about sets of templates that are made from:
- become;
- plexiglass;
- textolite.
But it follows precisely from this that it is stupid to limit yourself only to the offers of official suppliers. They mainly sell carriages for the most popular hinges and other parts, and the range of such types of fittings is not even covered by a third.
When making a template (carriage), you should ensure that the dimensions are set as accurately as possible from the very beginning. The simplest design, designed to work with workpieces from 50 cm and larger, is made from:
- metal corner 30x30;
- studs category M10 (complete with suitable washers and nuts);
- plywood sheet 60x20 cm with a thickness of 0.8 cm.
The studs should be secured to the tabletop. To fix them, use holes for bench stops. The nuts are tightened from below. The work takes approximately 2-2.5 hours. Since the carriage is movable, it is easy to adjust it to a certain height.
You just have to move the nuts on each of the studs. In the same way, it is possible to set a slight tilt of the router. To work with workpieces that require fastening under the carriage, the edges are clamped with clamps on the workbench. An alternative solution is to pull the edges to the studs. The choice depends on your own taste and technical feasibility.
It is imperative to use drawings of milling carriages. The photo shows one schematic version - without indicating the dimensions, but everything should be clear. Alas, you will either have to draw diagrams with dimensions yourself, or search long and hard - it is quite difficult to find ready-made samples in open sources. Another manufacturing option is possible - obtaining a carriage with a slide. It will be able to level the surface over fairly large areas.
For completely independent work you will need a circular saw. If you don’t have it, you can always order a complete set of parts from the nearest furniture manufacturer. In addition to the circular saw, you will need to prepare:
- MDF in sheets;
- wood screws;
- a router for which the carriage is prepared (as a sample, for precise fitting);
- miter saw;
- set of clamps;
- drills and a screwdriver for tightening them;
- Swenson's square;
- construction tape;
- pencil or marker;
- ruler.
The width of the strips is determined by what height of the sides is considered optimal by the craftsmen themselves. The next step is to measure the width of the router base. A wide strip should be made with some margin to guarantee freedom of maneuver during work. The preparation of the milling carriage is completed by sawing out the sides. What remains next is:
- mount the base, tightening the sidewalls with clamps;
- check the exact fit of the corners;
- punch pilot holes for screws;
- attach the sides using 5 cm self-tapping screws;
- cut the panel to length;
- cut the sides;
- If desired, trim the walls along the edges (if this is aesthetically necessary).
Assembling the turning fixture
Scheme of a simple lathe.
The assembly method will be like this:
- The basis of the unit will be a 3-phase electric motor. Therefore, its power supply must be three-phase, otherwise the automatic fuse in the house will constantly blow out.
- Engine speed is no more than 1500/min.
- Place a faceplate on the motor shaft for large parts and a removable analogue for small ones. Secure the other side of the knot with a corner. There are special peaks on the faceplates; the workpieces are pressed onto them with a hammer.
- Next, center the workpiece and secure it with counter washers. The homemade woodworking machine is ready.
Working on the machine
The photo shows the production part.
Operating rules:
- Turn on the machine and insert the first cutter (ordinary chisel). It will remove the initial layer (1-3 mm).
- After rough processing, the workpiece will be 1 mm thicker than necessary. Remove the remaining layer with a finishing cutter, which will give the product its final shape.
The dimensions of the workpieces can be controlled with a micrometer or a template. Contours and cuts can be made with the sharp side of a chisel, and grinding can be done with a finishing cutter.
You can also smooth the parts with sandpaper. Polish with wood shavings, holding them in your fist and bringing them to the workpiece.
Making complex corner joints
A comb-like metal plate with two clamps and a special routing device for cutting grooves is all the equipment needed to make corner joints on a straight open tenon or dovetail. Working with such a device is extremely simple: the cutter enters the part with such precision that even beginners can make tenons flawlessly.
Both types of tenons are cut out on the two parts to be joined in one step. The parts are secured with offset metal clamps on both sides.
The lateral edges of the parts are shifted by the width of one tenon to the left or right. If a corner connection is made on a straight open tenon, then both boards are installed vertically. To make a dovetail joint, one board is installed vertically, the other below. at right angles to the first board.
The cutter is guided along the metal template from left to right. It is necessary to ensure that the cutter teeth do not touch the template itself.
Using a milling device and a template, you can process two boards up to 28 cm wide in one go. The thickness of the board for making a corner connection to a straight open tenon should be from 16 to 20 mm.
dovetail cutter
The metal plate serves as a template for processing parts with a milling cutter. Two side clamps securely secure the parts and template to the workbench.
The thickness of the tenons when connected to a straight open tenon is 10 mm. The spikes are distributed depending on the width of the board.
Both parts are secured offset along the side edge. Spikes are performed within one minute.