A bench vise is a necessary piece of equipment in any man’s workshop, and it is difficult to do without in any type of work.
It is not at all necessary to place them in the garage; you can set up a corner for a vice at home, for example, using a table or an ordinary stool.
Why do you need a bench vise?
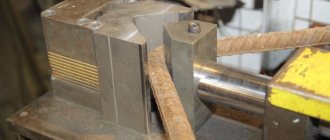
When processing or sharpening any part, it is necessary to fix it firmly and reliably, that is, to hold it in a certain position. The photo of the vice shows the operating principle of this equipment.
The parameters and dimensions of the vice are determined depending on what type of tool needs to be firmly held.
The design of a carpenter's vice includes:
- chassis screw;
- handle;
- movable and fixed sponge;
- base plate.
Main types of bench vices
- Before making a vice with your own hands, you need to decide on the choice of work associated with it.
- All types of vices are divided into two types:
- non-rotating ones have a simpler design and are easiest to make yourself. The part is fixed strictly in one position.
- Rotary vices are most often adapted for drilling on a machine. During operation, it is possible to rotate the workpiece without unclenching it.
The material of the vice body is most often made of durable cast iron.
It is important to know that cast iron is not intended to be exposed to high temperatures; steel metal is suitable for these purposes.
- If the work will be carried out with small-sized parts, you should not increase financial costs and make compact small vices.
A small vice with a ball joint base is useful on the farm for processing very small parts that can be secured individually. These are mini-vises with suction cups, mounted on a glass or well-polished surface. But they are suitable for rare non-serious work.
Please note that it is wise to install soft attachments on the fastening part for working with soft parts, so as not to cause damage to them. A vice with the least amount of play when the jaws are fully extended is the ideal option.
- A vice without a rotating mechanism will save a lot of money, unless, of course, it is needed in the work.
Work on making a bench vice at home
Carpenter's vices, made independently at home, will save the family budget significantly more than their store-bought ready-made “brothers”. And a huge plus is that the product can be made according to personal preferences and for certain individual types of work.
It is absolutely not difficult to find material for the structure; it could be: a piece of technical pipe, a used jack, old lathes, presses, etc.
- And if you go to a metal collection point, there will undoubtedly be a suitable part for a vice that will cost you a penny.
Classic homemade vice
There are many types of vices, but the most popular and traditional is the type with steel material. Such a vice will be much more reliable than a factory-made one.
The structure consists of:
- a steel plate of at least 3 mm, but it can be much thicker;
- external and internal channel (120 and 100 mm);
- steel lugs;
- turning cutters 2 pieces;
- a small piece of reinforcement (rod for a gate);
- a nut (2 pieces), a pin or a screw of a certain diameter that corresponds to the rod;
- washer (2 pieces) of the same diameter with the lead screw;
- screw pair 335 mm;
- To secure the propeller chassis, a thick plate is needed.
It is necessary to separate the lead screw with washers on both sides of the plate. One of the two washers must be secured with a cotter pin or a locking ring, so that the part is completely removable; you must first weld the screw thread to it.
The handle should also be collapsible on one side, and welded on the other side using a nut. It is necessary to weld a nut with a channel from the screws flush to the plate. To make the channel inside with the screw move easier while moving, it is recommended to lightly process it with a file.
Sponges are welded to the so-called ears, made from turning cutters. They are placed in the right place when the lead screw is screwed in, so the ears stand at the ideal distance from each other.
But you can also connect them with wire for greater convenience, so in the future it will be more convenient to fix uneven parts, the shape of which is expanded towards the bottom.
- These homemade vices allow you to process larger parts.
- To perform work in a home workshop, it is recommended to choose the simplest fixed vice for the machine.
- It’s not at all difficult to make them yourself, you just have to watch the videos and recommendations, which can be found without much difficulty on the Internet and first draw up the drawings correctly.
DIY vise photo
Source: https://sdelajrukami.ru/tiski-svoimi-rukami/
Step-by-step instruction
The job requires a relatively small number of tools. The entire manufacturing process can be divided into several main stages:
- To begin with, the profile pipe is cut into the required pieces. For this, various tools can be used: a grinder, a hacksaw. The cutting of the required elements is carried out in accordance with the drawing. It is worth considering that some elements will be connected with bolts, for which you need to create the appropriate holes. After preparing the required elements, all burrs are removed with a grinding wheel.
- The next step involves creating the running nut. It will be used to transfer force to the workpiece. It can be made from a regular nut of the appropriate diameter, but from hardened steel.
- The running nut is attached to the base of the future vice by welding. It is the welding seam that has the required strength. When creating a homemade structure, you can use a small welding machine. Electrodes and voltage are selected in accordance with the thickness of the metal and its composition.
- Next, the lead screw is screwed in. You can make it yourself only if you have a lathe with a thread cutting function. After this, the two halves with jaws are installed. It is possible to make two elements that will be compressed using the same profile pipe.
DIY vice
The most important tool for a mechanic is a vice. Without them, it is impossible to perform most locksmith operations. Therefore, any novice locksmith first wants to purchase this necessary tool. A situation may also arise when the old factory vice is simply broken and cannot be repaired.
In such cases, buying a new similar tool is not always profitable, since they are far from cheap. Therefore, many mechanics decide to make a vice with their own hands, which in turn can be a good experience for beginners, and experienced specialists will be able to make high-quality and comfortable vices for themselves.
You can make such a tool in one day from scrap materials, or you can collect the necessary components within a month and make a vice that is not much different from a factory one. In fact, the truth is somewhere in the middle. This article will describe in detail instructions on how to make a vice with your own hands within a few days without much expense.
Vice drawings
Such work can only be performed in a small locksmith workshop with the obligatory presence of a welding machine, electric drill, grinder and other hand tools.
In addition, it is necessary to purchase materials such as a piece of steel channel No. 6, 0.5 m long, 0.3 m2 of sheet steel 4-5 mm thick and 30 cm of steel angle 50x50 mm, 18 M6 bolts with nuts and a piece of thick sheet metal for making jaws.
In this case, you cannot do without the services of a turner, since it will be necessary to make a screw with a diameter of 16 mm, mill two plates for the clamping jaws and turn two nuts in which the screw itself will rotate.
Stages of making a homemade vice
An approximate step-by-step instruction on how to make a vice with your own hands at home may look like this:
A piece of channel 30 cm long is cut with a grinder. It will serve as a moving part of the vice. On one side, a 4 mm thick plate with a recess is welded to the base of this workpiece, into which a clamping screw with a groove is inserted. In order for the screw itself to be securely fastened in this recess, a locking plate of the same thickness is attached to this plate from the inside with two bolts.
Using a grinder, a plate measuring 25x6.2 cm is cut out of a sheet, to which two 50x50 corners 25 cm long are welded. This design is the stationary part of the vice. 6 holes with a diameter of 6 mm are drilled in the shelves of this workpiece.
From the same sheet, another blank measuring 30x20 mm with a side protrusion measuring 10x8 mm is cut out with a grinder. 12 holes with a diameter of 6 mm are drilled into it along the edges. It will serve as the base for the vice on which the entire structure is attached. Two locking plates for the fixed nut are welded to it on the protruding part.
Two blanks are cut from angle steel, holes are drilled in them, and threads are cut for attaching the clamping jaws. Then one of these blanks is welded to the stationary part of the vice, and the second to the one that will move inside the frame.
First, the frame itself is attached to the metalwork table using bolts. Holes are also drilled in the jaws, through which they are attached to the clamping plates with bolts. A knob is inserted into the screw and the reliability of the fastening is checked again.
Additionally, you can strengthen the design of the vice by welding gussets and locking plates, as shown in the video and photo. These bench vices are easy to disassemble, so it is advisable to paint them with anti-corrosion metal paint and install them in a permanent place.
In the same way, you can make a vice for a drilling machine, only in this case the attachment to the machine bed will be slightly different depending on its design.
As can be seen from the above description, making a homemade vice is not at all difficult. You just need to have the desire and basic skills to work with metal. Below we recommend watching a video on how to make a machine vice.
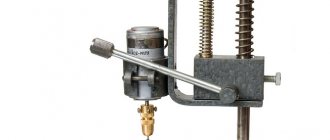
Placing position numbers on an assembly drawing in SolidWorks.
Position numbers are set using the “Position” tool. Read more about setting positions in the lesson: Assembly drawing of a crank-rocker mechanism in SolidWorks.
I put all the positions on the main view, on the top view and on the section A-A.
Position numbers on the assembly drawing of a mini vice in SolidWorks
As you can see, the position numbers of the nut and washer M12 (positions No. 11 and No. 10), and the bolt, washer, nut M8 (positions No. 6, No. 7, No. 8) are indicated using group positions.
How to add a group position to a drawing in SolidWorks is shown in the lesson: “Group positions on an assembly drawing in SolidWorks.”
That’s all with the position numbers in the drawing, let’s move on to adding a specification according to GOST in SolidWorks.
Homemade bench vise: video, photo, drawings
It’s not difficult to make reliable and easy-to-use vices with your own hands. The need for this may be caused not only by the desire to save on the purchase of a serial model, but also by the need to use a clamping device that will allow it to more effectively solve the tasks assigned to it.
Simple homemade vice from corners
Serial models of vices, although they are universal, are not always able to provide high precision in fixing parts; they are quite bulky and have a significant weight.
Homemade vices, used primarily in a home workshop, can be made more suitable for performing certain technological operations, and therefore more efficient and convenient.
Homemade bench vices may differ little from factory ones in both appearance and reliability.
Any person who spends a lot of time in his home workshop will confirm that it is quite difficult to do without such a device as a vice. Without a clamping device, it is difficult to perform various operations with parts made of metal, wood and plastic.
The use of a vice guarantees not only high accuracy and efficiency of drilling, milling, etc. operations, but also the safety of the machine operator.
If there is no desire or opportunity to purchase a serial model of such a device, then it is quite possible to make a vice with your own hands, spending very little time and effort on it.
Homemade bench vise: option No. 1
You can make excellent strong bench vices yourself from profile pipes. Below are detailed instructions in photo selection format, supplemented by a detailed video. Unfortunately. The video is in English, but this is unlikely to prevent a competent master from understanding the essence of the process.
Homemade vice from profile pipes
Vise parts from the profile Running nuts Attaching the running nuts to the base of the vice Screwing in the lead screw Maximum opening of the vice The vice is assembled, it remains to be painted Painting the moving part Painting the fixed part The vice is ready for work
Instructions for making a vice: option No. 2
Homemade vices do not require complex design developments and calculations. You can use numerous photos and drawings of such devices, which are easy to find on the Internet. A fairly simple, but at the same time very effective design is created on the basis of metal pipes.
As is known, pipes used for the installation of water and gas pipelines are manufactured in such a way that a product of a certain diameter fits tightly into a pipe of a subsequent standard size.
It is this feature of the pipes that allows them to be used for such a device as a homemade bench vise.
A visual drawing, photo and description of the manufacturing process will help you make this vise yourself.
Drawing of a homemade vice. Below are two photos of the finished product.
The structural elements that will make up a homemade vice are:
- a piece of metal pipe that will act as the internal moving part of the device;
- a piece of metal pipe of the following standard size, which will serve as an external fixed part;
- running nut with thread diameter M16;
- lead screw with thread diameter M16;
- a knob through which rotation will be imparted to the lead screw;
- front and rear supports, due to which the stationary pipe will be fixed to the base;
- pieces of rectangular pipe (future clamping jaws of a vice);
- two lock nuts with thread diameters M16 and M18.
Two main parts of the vice (movable and fixed)
To make such a vice with your own hands, you begin by welding a flange to the end of a section of a larger diameter pipe, which will act as a stationary element. A nut with an M16 thread must be welded into the central hole of the flange. A flange with a central hole into which the lead screw will be passed is also welded to the end of a section of a movable pipe of a smaller diameter.
At some distance from the edge of the lead screw, an M18 nut is welded to it (it will become a fixing element). After this, the end of the lead screw, to which the nut is welded, must be passed through the inside of the movable pipe and inserted into the hole in the flange. In this case, the nut should press against the flange from its inside.
Vise assembly (in the photo there is a hammer clamped in it)
A washer is put on the end of the lead screw protruding from the outside of the flange and an M16 nut is screwed on, which is then welded to the screw. A washer must also be installed between the inner nut and the flange surface, which is necessary to reduce the friction force. To correctly perform this stage of making a homemade vice, it is better to focus on the corresponding video.
After the movable vice assembly is assembled, you should insert it into a fixed pipe of a larger diameter and screw the second end of the lead screw into the nut of the second flange. To connect the lead screw with the knob, a nut or washer can be welded to its end protruding from the side of the movable pipe, into the holes of which the knob will be inserted.
The clamping jaws of such a vice can be made from sections of rectangular pipes, which are welded to the moving and fixed parts. To give the structure stability, two supports are welded to the bottom of the fixed pipe, for which corners or rectangular pipes can be used.
The inner tube can also rotate during the rotation of the lead screw, which makes the use of such a vice very inconvenient. To prevent this from happening, a longitudinal slot can be made in the upper part of the stationary pipe, and a locking screw can be screwed into the movable pipe, which will move along this slot and prevent rotation of the movable part.
Many photos of homemade vices of a similar design show devices whose moving and fixed parts are made of square or rectangular pipes. The use of such pipes also avoids rotation of the moving part of the vice.
The vise of the described design, authored by V. Legostaev, is a reliable and effective clamping device, easy to maintain and repair, which makes it very popular among home craftsmen.
If you do not plan to heavily load the vice, then it is quite possible to make it from wood according to a simple scheme
How to make your own carpenter's vice
Almost any home craftsman has to deal with the processing of wooden products. The need for such processing may be associated both with the manufacture of various wooden structures, and with the repair of existing ones.
Carrying out this work using improvised devices with metal clamping elements is not only inconvenient, but also fraught with damage to the surface of the wooden part, the appearance of dents and cracks on it.
This is why it is best to use a carpenter's vice for wooden products. Making them yourself is also easy.
Homemade vice with wooden guides
As in the case of a bench vice, finding drawings, photos and even videos of the manufacture of such devices on the Internet is not difficult.
The simplest design of a homemade carpentry vice consists of the following elements:
- bodies made of solid wood, which also serves as a fixed clamping jaw;
- a movable sponge made of a wooden block;
- cylindrical metal guides along which the movable jaw will move;
- a lead screw that ensures movement of the movable jaw;
- a crank through which rotation is imparted to the lead screw.
The device of a carpenter's vice
The body of such a vice, on which the metal guides are fixed, is attached to the surface of the workbench using long screws or bolts.
It is necessary to make three holes in both the body and the movable jaw of the clamping device - for the guides and the lead screw.
It is best to drill such holes simultaneously in both bars so that they are positioned exactly relative to each other.
Attaching the vise to the bottom of the workbench
After the guides are fixed in the body, a movable clamping jaw is put on them. Then a screw is inserted into the central hole of both bars, onto which a nut is screwed from the back of the body.
Purpose
Movement in machines equipped with a rotary device is carried out by the tools, not the workpiece. This principle helps reduce the cost of the rotary mechanism. However, doing work on the reverse side of a part from a master is theoretically possible. In practice, this is unlikely to be accomplished; the craftsman has almost no visibility of the workpiece when performing the work.
The following situation is a good example. It is necessary to process a metal part, the shape of which is a block. On each side there should be a recess, the shape of which is a half-cylinder. The master does not see the cutter and does not know whether it reaches the end of processing - the height of the workpiece does not allow this. Corrections can be made to the part if the cutter has not completed its job. But there are complex recesses in which this is not possible.
When using a 160-250 mm rotary machine vice, the situation is different. The master will have to stop work to walk around the machine in order to continue it later. The cutter must be retracted in advance.
Milling machine vices are used when working on devices where machine control is carried out for a number of reasons.
- The machine can be programmed so that the workpiece to be processed is rotated from the side where it is visible. The master will be able to control the processing process. This will be useful to him especially when introducing a new program into operation. The error can be seen immediately, and not after the part is manufactured.
- There are situations in which it is necessary to rotate the workpiece, but the cutter must remain in place. This could be making a perfect circle.
- A large number of workpieces are convenient to process when fixed in a machine vice rotated 90°. After which the working position is established.
Making homemade bench vise
The vice seems to be an important tool that helps in organizing plumbing work. They allow you to correctly organize any operation related to precise adherence to dimensions that require concentration and composure of the master. Any part can be firmly fixed in the desired position, thereby allowing its owner to concentrate on work.
A bench vise is designed to clamp a product during work.
Vices are used especially actively in any workshop, because it is impossible to imagine processing wood or electrical devices without the use of holding devices.
You can make homemade bench vise yourself.
How to do this correctly? To answer this question, you should study the varieties of this clamping mechanism, the components and elements of the device.
Types of vices: A – metalworking; B – machine tools; C – manual.
Machine vices are used for rough fastening of parts, the processing of which involves the following activities:
- drilling recesses;
- sanding the base;
- finishing the coating with a file;
- gluing elements;
- milling the outer layer.
Machine vices allow you to strengthen the workpiece with the support of the listed elements:
- screw with holder;
- wedge constipation;
- diaphragm;
- pneumatic mechanism;
- eccentric.
An example of elementary devices would be the first point, which allows you to create one of the primitive structures.
- A chisel is what you need and what it’s for.
- How to make a knife yourself.
- How to work with a chisel - read here.
Vise design elements
Design elements of a vice.
To strengthen the part in the desired position, it is attached to the workplace. In the house, an ordinary table serves as such a covering. Traditionally, machine vices are represented by such elements as:
- supporting body;
- main lead screw;
- handle and nuts;
- a device that allows you to attach the vice to the desired point;
- a set of heads including flattened jaws that secure rounded parts.
Such homemade products most often have two slats, one of which has a movable base. Its movement is associated with the operation of the main lead screw. The second part is motionless; it allows you to fix the base of the device on the table. The holder helps move the clamping structure.
Source: https://moiinstrumenty.ru/standartnye/samodelnye-slesarnye-tiski.html
Creating an Assembly Drawing in SolidWorks
And click “File, create drawing from assembly”, the “New SOLIDWORKS Document” window opens, select “GOST drawing template” and click OK.
I would like to note that all the drawing settings in SolidWorks according to GOST ESKD are included in this template.
New document window in SolidWorks, selecting a drawing template according to GOST.
Next, the “Sheet Format/Size” window opens. Select the sheet format “A3 – GOST-L1-G” and click “OK”.
Selecting sheet format in SolidWorks according to GOST.
The View Palette automatically opens in the panel on the right.
View Palette in Right Panel in SolidWorks