I am a person who loves to work in the garage, doing a variety of things. Therefore, the need to give mobility to the welding machine became the reason for me to learn more about the design of the cart and the method of its manufacture.
Building a cart for a welding machine with your own hands is quite simple. To do this, you will need to get several tools and materials from which the future project will be made. All that remains is to figure out how to assemble it, based on drawings from the Internet.
Source tdrimspb.ru
Welding trolley for semi-automatic machine - characteristics and requirements
A mobile welding trolley must have a certain load capacity, sufficient capacity, reliable stability, be maneuverable and pass through narrow places up to 700 mm wide. The standard factory design weighs no more than 15 kg, has a platform for a welding machine of 300x400 mm and overall dimensions of about 1250x350x700 mm.
The cart should not fall when the welder pulls hard on the hose. It provides enough space for the necessary tools, while there is no point in overloading the structure and moving excess weight on the wheels. Depending on the design, the product may have 2, 3 or 4 wheels.
The two-wheeled trolley has a simple design and occupies the smallest area. However, it is not characterized by the best stability, and the space for additional tools is limited.
The four-wheeled version allows you to take everything you need with you, including a multifunctional table. Such a cart is no wider than a two-wheeled one and fits in narrow places. The three-wheel design provides the greatest maneuverability, but its stability is a concern.
We make a cart with our own hands according to the drawings
Practice has shown that the optimal material for making a do-it-yourself welding trolley is a profile pipe with a cross-section of 20x40 mm and 20x20 mm. When used indoors on a flat floor, cast wheels are suitable; for outdoor use when moving on the ground, it is better to use pneumatic ones. The design can have certain variations, and we will look at two examples that can be modified in your own way.
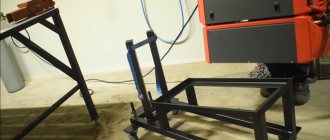
The cart shown in the photo has two pairs of wheels of different diameters, two shelves for tools and a welding machine, and two places for 10-12 liter cylinders. The bases of the shelves are made of thick plywood.
The drawing does not show all dimensions in centimeters, but those indicated are quite sufficient for a homemade design. The large diameter rear wheels are mounted on M16 bolts welded to the frame. The front wheels are rotating furniture supports. Let's look at assembling the cart step by step:
Probably for safety reasons, it is more correct to install the front supports with clamps. They are a little more expensive than usual, but the cart will not roll away on uneven surfaces. You can learn more about the assembly process using the following video.
Technological components
For the manufacture of trolleys, a metal profile of round or rectangular cross-section is used. For the platform, steel sheets, expanded metal mesh or a transverse set of corners are used. The blanks are welded together, then cleaned and painted with powder paints to protect the structural elements from corrosion.
If the device is used in enclosed spaces with a flat floor, cast wheels of small diameter are usually used. If you plan to go outside, choose pneumatic rollers with a larger diameter that can handle potholes and other obstacles.
The trolley must be equipped with a device that prevents its independent movement. For two-wheelers, this is a heel support; for three- or four-wheelers, wheels with a built-in pressure brake are used.
Mobile cart for welding machine and large cylinder
The second version of the semi-automatic trolley is designed for a cylinder with a volume of 40-50 liters. The design includes a retractable metal box for small tools and a high table that is convenient to use without bending. The entire set of equipment weighs noticeably more than in the previous case, and the stability is somewhat worse.
The base of the frame is made of a 20x40 mm profile, the rest of the part is welded from pipes with a cross-section of 20x20 mm. The “ears” on the top platform are designed for a hose and cable (almost for noodles...). On the frame of the trolley there is a conductor for longitudinal fixation of the cylinder, which is cut along the radius of the container from a 20x40 profile.
The cylinder is attached to the trolley with a chain and two eye bolts with wing nuts. The shelves in this case are made of a sheet of metal 1.5 mm thick. The platform for the cylinder is a grid of tubes with a cross-section of 20x20 mm. The base for the welding machine is made in the form of jumpers from a 20x40 mm profile, as a result, air flows freely from below, which improves the cooling of the device. The sequence of assembling the product is approximately the same as in the previous case.
Source
What in the end...
For myself, I chose a small cart without stoppers. It allows me to fully satisfy my requirements. The advantages of DIY construction are savings and convenience. Instead of purchasing, you can design a cart that will be convenient for you. Therefore, it is not only possible, but also necessary to take existing schemes as a basis, which should be modified to suit your requirements. For example, make a comfortable handle or upgrade the fasteners. Here everyone chooses the scale of improvements for themselves.
Question
Write in the comments what you think - should you make a cart for a welding machine yourself so that it exactly matches the dimensions, or is it easier to buy a ready-made one?
Communities › Do It Yourself › Blog › Trolley for semi-automatic welding machine.
Hi all! Not long ago I became the owner of an Avrora Overman 180. Gorgeous thing! I decided that I needed a cart to move the device, the cylinder was heavy, I couldn’t handle it, even though the hose was 15 meters long, but still. Somewhere in the vastness of the drive I saw several options, so I decided not to invent anything, I’m not very creative -) I used a metal profile 20x40 and 20x20. Start of production:
To ensure that the cylinder stood tightly in its place, I made a rowlock for it.
The cylinder is held on with a chain, which is sold at any hardware store. I used two eye nuts and two hooks. One eye nut is tightly screwed to the trolley stand, and the second is on a long pin and has movement.
The chain is put on the eyelets and tightened like a lamb, thereby tightly fixing the cylinder. Next, I welded a couple of holders for cables and hoses.
Technological components
For the manufacture of trolleys, a metal profile of round or rectangular cross-section is used. For the platform, steel sheets, expanded metal mesh or a transverse set of corners are used. The blanks are welded together, then cleaned and painted with powder paints to protect the structural elements from corrosion.
If the device is used in enclosed spaces with a flat floor, cast wheels of small diameter are usually used. If you plan to go outside, choose pneumatic rollers with a larger diameter that can handle potholes and other obstacles.
The trolley must be equipped with a device that prevents its independent movement. For two-wheelers, this is a heel support; for three- or four-wheelers, wheels with a built-in pressure brake are used.
Tags: semi-automatic, welding, trolley, aurora
Comments 119
wow, what a bourgeois))) You’ll find 20 liter horseradish cylinders, and if you find them, they refuse to fill them up - they say just overfill them. I also want a small one like this, but apparently it’s not fate. Tomorrow I’ll start making a cart for 40 liters, but 20 should also fit
I literally changed this cylinder to a 40 liter one a month ago. This one was 25 liters, besides, I turned off the valve on it) They took it away, and with an additional payment I took a 40 liter cylinder for myself. Now
I just wanted a small size. but there are only 10 and 40.
10 seems to me to be about nothing at all.
Well, if you go on trips, then nothing. In the meantime, I’ll be training, I’ll blow away this ten in a month
It depends on how much you cook on the road, if you sneeze and puff and that’s it, then it’s easier to take flux-cored wire. And if from the pick-up until dinner, then 10 km is not enough.
argon-arc. And so as not to carry a semi-automatic device, you can use piece electrodes. they are cheaper too
Greetings! Tell me about the cylinder. How many liters and how long does it last for heavy work?
Hello. The volume seems to be 30 liters, I have never refilled it yet.
Another question...what should be the pressure on the gearbox for a quality weld? At the moment I’m just working with flux-cored wire. It’s expensive. I want to buy a carbon dioxide cylinder
Yes, I somehow feel it, it should hiss slightly when you bring it to your cheek))
Thank you. One fine day the gearbox simply stopped letting carbon dioxide pass through -) I haven’t taken it apart yet, so I installed another one.
Yes, it seems not, you can open the lid and change it.
Honestly, since I bought a large reel, I haven’t changed it even once, though it seems to be on the way. I don’t cook on an industrial scale...
Before this there was none)))
Good execution, the main thing is that it is convenient and comfortable for you to work with. I also welded a cart for my Overman 200, maybe I’ll post it here later.
Hello, Now I’m also making a cart, and also for an overman. There were questions about the wheels. What kind of wheels did you get from Leroy? Does the cart ride on the ground (grass) with front swivel wheels? How did you attach the wheels themselves, what was used as an axle?
Hello. I took inflatable wheels from Leroy. It rides fine on hard ground, I haven’t driven it on grass, but I think it won’t be very good. I wrote that it would be nice if all 4 wheels were inflatable, but I didn’t want to mess with the turning mechanism.
How did you attach the wheels to the axle?
I welded a long bolt from the bottom of the cart, welded a washer onto it, put on the wheel, a second washer and a cotter pin.
Hello. I took inflatable wheels from Leroy. It rides fine on hard ground, I haven’t driven it on grass, but I think it won’t be very good. I wrote that it would be nice if all 4 wheels were inflatable, but I didn’t want to mess with the turning mechanism.
Heh, another question about the wheels, what size are your front wheels? I found 200 mm in the store - rotary. Will there be a forward tilt? Thank you.
Yes, also in this size, I think. You need to look at the slope locally. The swivel wheel also has a turning mechanism, which also adds height.
Hello, Now I’m also making a cart, and also for an overman. There were questions about the wheels. What kind of wheels did you get from Leroy? Does the cart ride on the ground (grass) with front swivel wheels? How did you attach the wheels themselves, what was used as an axle?
If it's not too much trouble, can you tell me the dimensions in a personal message?
I have the same machine, I’m just learning how to cook p/a, I wanted to make a cart. Can you give me a drawing or dimensions? I want to calculate how much metal I need to buy.
Of course, there are no drawings. I did everything locally. I can measure it when I’m in the garage, I don’t plan to in the next few days. I'll be there, try it on and write then.
It turned out great. I will also do the same for my Aurora)) How to change the wire, does the lid open up?
You don’t have to change the wire every day, at least for me, in extreme cases you can pull out the device, but you can safely open and replace it anyway.
Greetings. A little off-topic question. Please tell me, how do you like the Overman 180 welder? Can I get one for my home and my crafts?
I love it! I read a lot of reviews, but I haven’t heard anything bad about this device!
I also read the reviews, but I decided to ask a real person who uses it)) Thank you.
segedakot › Blog › Do-it-yourself cart for semi-automatic Aurora with a cylinder
The first product that I wanted to make with the help of the new welder was the cart itself for the welder itself, and put the cylinder on it. This is how it turned out in the end, all that remains is to paint it.
And here's how it began. To begin with, I looked on the Internet, studied the experiences of other people, who does what. I chose the options I liked and printed them out.
I started with the chassis, taking measurements, trying on wheels, etc.
Next is the place for the cylinder
Then I thought whether the device would be “on the floor” or a little higher. In the end, I put it on the “second shelf”, with the idea that there would be more dust on the floor. The higher, the safer.
I made the shelf for installing the welder mesh; if I don’t like it in use, I’ll convert it into a solid metal sheet.
Wheels on improvised “wings”, rear fixed wheels with a diameter of 125 mm, front swivel wheels with a diameter of 100 mm. Installed with M8 bolts.
The functionality is not spoiled - the housing cover opens without problems for replacing the coil and servicing.
High-quality equipment to everyone in the garage!
Comments 14
does this machine weld aluminum?
Great) Can I have a drawing?
Thank you. Somehow I never got around to sketching out a drawing... I’m all busy, I don’t even remember about it in the garage. I need to put a reminder on my phone
