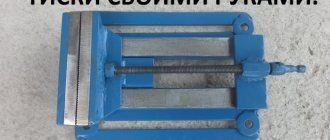
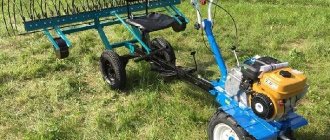
A bench vise should be in every home workshop. And today we will share with you an idea on how to make a vice with your own hands.
With their help, you can not only fix parts, but also perform other technological operations: leveling pieces of metal, pressing bearings into a cage, etc.
The design of a bench vice is very simple:
- base (fixed part);
- moving part;
- pressing jaws;
- lead screw with knob.
To make a vice we will use sheet metal, a construction angle and round pipes. The tools you will need are an electric drill, a grinder and a welding machine.
The author of the YouTube channel KEVGEN MASTER shared with us his personal experience in making bench vices.
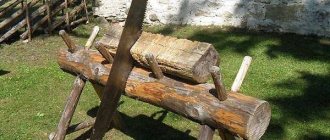
How to make a carpenter's vice yourself
A bench vice is used to work with metal parts and workpieces.
If there is a need for processing wooden workpieces, then a bench vice is least suitable for such purposes, as they have some disadvantages. The parts being fixed may become deformed, so it is recommended to use a bench vice when working with woodworking materials. There is no need to buy them specifically for working with wood. For such cases, you can make a carpenter's vice with your own hands. Let's look at the manufacturing instructions in detail. Carpenter's vices are made of wood, which is an advantage in their manufacture. When working with wood, the need to use a welding machine is eliminated. A drill is used to drill holes, and to cut off parts of the future tool, a hand saw, jigsaw or grinder with a wood disc is used.
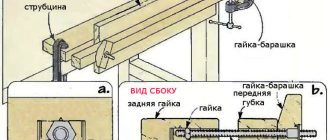
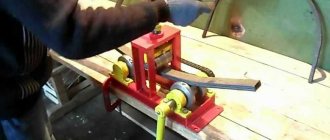
First of all, let's prepare the screw. To do this, cut off the required length of the stud. A nut is screwed onto the stud on one side. Using a plumbing tee, you should put it with the central hole on the stud.
Moreover, it is important to ensure that the pin does not protrude beyond the edges of the two parallel holes of the tee. Drill a hole in the center of the tee to install a key bolt at “10”
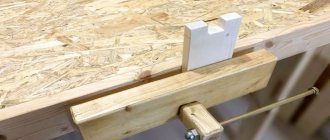
It is necessary to drill the tee together with the stud. Install a key bolt at “10” into the resulting hole. In this way, a handle for the future tool is made. Next, we move on to the manufacture of vice jaws. To do this, from a board at least 6 cm thick, you should cut the required length - 20-30 cm. Two boards should be the same size in length. It is these boards that will act as fixing jaws. In the center of both boards, you need to drill central holes through which the pin will pass. We drill additional holes on the sides of both boards, which are needed for guides. In one board, a groove needs to be made in the central hole to accommodate the nut. Now the nut is screwed in and a washer is placed on the stud on the side where there is a through hole. We install the stud in the central hole of the board with the groove. On the other side of the stud, a washer is installed and a tee is installed, secured with a bolt. The nut on the back side of the board should be tightened, drowning it in the groove. To prevent future rotation of this nut, it must be connected to the stud. You can use welding to do this, but an alternative method is to use a drill. Using a drill, a hole is drilled in the nut mounted on a stud, through which rigid fixation of the two parts is ensured. Using a bolt of the appropriate diameter, it is necessary to drive it into the hole made in the previous paragraph. Assemble the structure, resulting in a movable vise jaw. We use two metal rods that are necessary install in the side holes of the board. A second board is attached to the table or workbench, which will play the role of a stationary jaw of a carpenter's vice. To do this, we fix the board to the table with a clamp, after which we drill holes in the table structure. We begin assembling the structure. To do this, you need to connect the two parts using a wide nut. After screwing the nut onto the stud, you need to trace its edges around the perimeter. Using the resulting marking, you need to cut out a groove using a chisel. This is necessary in order to fix the nut in the jaws of the vice. We recess the nut into the structure of the jaw. You get an almost ready-made carpentry vice, which only lacks a handle. It can be made from a wooden tube of the appropriate diameter. After that we assemble the tool
In order for the guides to move freely in the fixed jaw, steel bushings should be made and installed inside the holes. The fixed jaw is fixed to the table surface using self-tapping screws. Moreover, this matter must be approached responsibly. You should first drill holes and also make grooves for the screw heads. After all, the surface of the board is the working part of the carpentry vice, so any protrusions on it and other defects will negatively affect the quality of the workpieces being processed.
In this simple way you can make a carpenter's vice at home. Moreover, you don’t need to buy materials to make them, since every home craftsman probably has everything he needs.
Do-it-yourself bench vise - part 1
If you go to a store and look at the cost of a bench vise with a jaw width of 120mm or more, it becomes kind of sad... After looking at the metal that I have in stock at the dacha, I decided to spend a day making my own bench vice.
The material I looked for for making a vice:
- iron sheet for the base of the vice 4mm thick - profiled square pipe 50mm with a wall thickness of 4mm - angle 60mm with a wall thickness 5mm - angle 75mm with a wall thickness 8mm - strip 10mm thick - threaded rod 20mm - long nut 20mm
The plate for the base of the vice was 200x160mm in size. I decided to cut the same one and, having drilled evenly 8mm holes in one of the plates with spot welds, I fastened these two plates together.
Cleaned up the welding areas:
I drew a central line in the center of the plate and along the edges of it I also drew a pair of lines 20mm wide - the thickness of the pin.
I installed the long nut into which the stud will be screwed onto a spacer - a piece of 10mm thick strip to which I welded this nut.
I installed the nut on the spacer in the center of the drawn line and screwed the pin into it and aligned it in the center.
After that, I welded the pad with the nut to the base plate and cleaned it.
A 60mm corner with a wall thickness of 5mm and a length of 200mm will be used as sidewalls. I installed them to see what it would look like:
Here is a general view of the parts for a bench vice:
In a 50x50mm profile pipe, I used a grinder to make a longitudinal groove slightly wider than the welded stand with a nut. At the edge of this pipe I left an unsawed part equal to the width of the future jaws.
The corners surrounding the profile pipe were tacked to the base sheet. Between these corners I placed a plate 50mm wide and 10mm thick. In order for the profile pipe to move normally, I made a spacer between this plate on top and the profile pipe itself. As a spacer I used a couple of hacksaw blades for metal.
After that, I welded the plate along its entire length. The result was a kind of box:
Since the gap between the plate and the corners turned out to be quite large, after welding the plate on top, I cut off the tacks and welded the same plate from the inside. Since the profile pipe has semicircular edges, the welding seam from the inside does not interfere with the movement of the profile pipe.
After that, the resulting box was cleaned:
As a base for the jaws of the vice, I used a thicker corner of 75mm and a wall thickness of 8mm. The width of future sponges will be 150mm. Having installed the corners at the future fastening points, I cut them slightly at a bevel.
A piece of strip 10mm thick will be used as the sponges themselves. The sponges will have a size of: 150x50x10mm.
Having attached these future jaws to my corners, I secured them with “dog” pliers and drilled 4.2 mm holes through them. Then I cut 5mm threads in the corners, and drilled holes in the jaws with a 5.1mm drill and made a countersink for countersunk.
I screwed bolts into the cut threads and screwed two nuts on the back side, which I then scalded by welding. The result was some kind of elongated 5mm thread.
I made holes for attaching the jaws to the corners in the center of the jaws - 25mm from the vertical line and 30mm from the edges.
At the end of the profile pipe, where in the future the knob will be attached to the stud, I initially planned to weld a square pad. Then I decided to weld a piece of corner along the edges of the pipe, in which I would then cut a thread and not weld this area, but fasten it with screws. This will allow me to disassemble the vice later if necessary.
Having placed the corner with the future jaws on this part, I made bevels of the corner relative to the protruding welded corners.
In the future, to strengthen the jaws, braces will be welded on the inside of the corners and the whole thing will be welded with a 4mm thick plate.
To strengthen the upper part of the vice, where there is room for the anvil, I put another plate 8mm thick (like the corner of the jaws) and a width equal to the total width of the box. Thus, if in the future you have to use the anvil for its intended purpose, then the entire load will be placed on the vertical ribs of the side corners.
Having welded the reinforcing braces, I covered the corners of the jaws with a 4mm thick plate and cleaned everything with a grinder and then with a 40-grit emery wheel.
Yes, for welding... I welded with the Forsazh-161 Electrode - MR-3S 3mm Welding current - about 110A.
When scalding the corners with a 4mm plate, I used the same electrodes, only at a current of about 80A.
Then I degreased the whole thing and coated it with a primer and paint from a can:
Assembled at the moment it looks like this:
In the second part on making a bench vice yourself: - installing jaws with threads to prevent slipping - installing an end cap with a screw and a collar - mounting holes in the base of the vice
How to make a bench vice with your own hands
After an approximate selection of the type of product, we decide on a drawing (sketch, diagram).
Important: the final dimensions of a do-it-yourself carpentry vice may differ from those planned. This is due to what materials will be chosen for the design and how much the master knows how to take into account the size of the gaps, welds and other elements.
So, you need to select the material (finished product) for:
- sponges – movable and stationary. Usually this is a corner, channel, less often a rail or strip;
- bases - strip, rectangular pipe, channel, solid part (cast or stamped);
- guide movable jaw. Most often it follows the shape and material of the sponge itself and is mounted on the edge of the base;
- lead screw. Rods with metric, rectangular or trapezoidal threads are used. The running nuts are selected accordingly;
- fastening to the table. A screw clamp or plate with holes for direct screwing to the table/workbench will work.
Important: in order to accurately center a carpenter's vice for a workbench with your own hands, it is better to select a guide and moving part of the product in the form of coaxial parts - for example, two pipes that fit into each other with a small gap.
If you can find drawings with dimensions for making a vice with your own hands, it is better to use an already developed option. If not, you will have to personally combine the actual details of pipe/channel/angle/plate scraps with the desired dimensions.
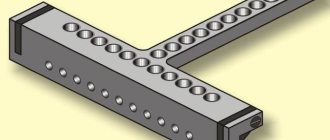
A diagram of a machine vice, made with your own hands from pipes and a corner, is shown below.
If there are no suitable pipes, you can make a homemade vice from a channel. The U-shaped part will be movable, hiding the lead screw and nuts, and it will be pressed against the base plate either by a larger channel (if you can select two profiles with a relatively loose fit) or by a welded structure made from corners.
Types of vices: which devices to choose for different jobs
There are several types of vices, which are classified according to various parameters. One of the main identifying elements is the type of clamping mechanism. Based on this factor, the following types of vices are distinguished:
- screw;
- wedge-shaped;
- with installed diaphragm;
- eccentric;
- with pneumatic device.
Depending on their purpose, vices are divided into the following types:
- carpentry;
- metalwork;
- machine tools;
- manual.
Taking into account the material used, these devices are also divided into types. Carpenter's vices for a workbench are most often made of wood, and metalworking vices are made of metal.
Vices come in wedge-shaped, screw, eccentric and with a pneumatic device
A bench vise is the most common type of tool in question. These devices have their own subtypes; they differ in size, or more precisely, in the width of the jaws. This figure can vary from 63 to 200 mm. Small vices are used mainly for household purposes. They are fastened using a lower screw-clamp on a small machine, but more often - on a table or an ordinary stool. Larger vices are installed in industrial workshops and large workshops for the purpose of processing large parts.
Bench vices: price, features and varieties
A vice for metalwork is a necessary part in any industrial workshop. Such equipment is necessarily present in the workshop of an experienced, self-respecting master. Moreover, depending on the shape, type of fastening and the material being processed, they are divided into several types.
Pipe vices are used for fastening pipes or cylindrical parts.
The main advantage of a rotary vice is the ability to fix a part in the required plane and at the desired angle to organize the work process. With their help, you can process the most difficult to reach parts and their areas. At the same time, it is almost impossible to do this with a conventional vice. Like all installations of this type, rotary products can be stationary - these are benchtop carpentry vices that are mounted on workbenches. Another subtype is a vice with a built-in clamp for attaching to a table.
Vices for metalwork are a necessary tool not only in the industrial workshop, but also in the home workshop
Hydraulic vices are designed to provide more reliable fixation of particularly large parts. They are clamped under compressed air pressure. Basically, such tools are installed at large industrial enterprises. The price of this type of carpentry vice is high, and the device is quite complex, so the tool is not intended for home workshops.
Self-centering vices are necessary in high-precision production, that is, where precise fixation of a part in a certain position is required. Typically, the structure of this type of vice requires the presence of a bearing base.
Features and types of carpentry vices
Carpenter's vices are used for processing wood parts. This type of work is specific, and therefore requires a special design of the tool itself, different from the design of a bench vice. Most often, carpenter's vices are made of solid wood, and parts are secured using wooden jaws for a vice. In this regard, they must be wider than a bench vice, and in addition, they require a significantly larger clamping area.
Carpenter's vices most often have one base, but with two guides. With their help, the movable sponge is held in place, which helps prevent distortions. In this case, the guides can be an integral part of the workbench or can be removed if necessary.
Carpenter's vice is designed for processing wooden and plastic workpieces
Carpenter's vices are also classified based on the technology used in the process of activating the screw. According to this feature, they can be manual or pneumatic. If the classification takes into account design features, then the vice is divided into rotary and non-rotary.
As mentioned above, carpentry models are used for processing wooden and plastic blanks. Therefore, wooden parts are mounted on the jaws, which helps to avoid clamping marks. When the device is mounted at the front, there is a chance to work vertically with fixed parts.
Features of the vice
Almost any master who spends a lot of time in his own workshop or garage knows that it is almost impossible to do without the device in question. During machining, a lot of force is applied to the workpiece. They decide to create locksmith tools with their own hands to achieve the following goals:
- Increased processing accuracy. Due to vibration and displacement of the workpiece, the accuracy of the operation can be significantly reduced. On various machines, fastening is carried out using a special design. However, some homemade or household machines do not have a device designed to fix the workpiece. Bench vices have a wide range of applications and can be used when performing drilling or other operations.
- Significantly improving the quality of the performed operation associated with drilling, milling or edge processing. During machining, part of the vibration is transferred to the unit, which is used to secure the workpiece. Due to this, you can increase the cutting speed or increase the feed. When drilling, you can create a through hole without fear that the drill will enter the machine plate.
- To protect the craftsman, since during work there is no need to fix the workpiece with your hands. If you hold a part with your hands while working, there is a high probability that the applied force will lead to its displacement. In some cases, your hands may be affected. Work when using a special fixing device is safer. For example, when drilling and milling, you can install a part and cover the cutting area with a special screen.
- Increase comfort during workpiece processing. For manual machining, using a vice allows you to free your hands.
You can make a strong vice with your own hands at home from a profile pipe. The resulting structure will have compact dimensions and can be rigidly attached to the base. Such a vice is used to work with various workpieces, since the device can exert different pressure on the jaws.
Step-by-step instruction
The job requires a relatively small number of tools. The entire manufacturing process can be divided into several main stages:
To begin with, the profile pipe is cut into the required pieces. For this, various tools can be used: a grinder, a hacksaw. The cutting of the required elements is carried out in accordance with the drawing. It is worth considering that some elements will be connected with bolts, for which you need to create the appropriate holes. After preparing the required elements, all burrs are removed with a grinding wheel.- The next step involves creating the running nut. It will be used to transfer force to the workpiece. It can be made from a regular nut of the appropriate diameter, but from hardened steel.
- The running nut is attached to the base of the future vice by welding. It is the welding seam that has the required strength. When creating a homemade structure, you can use a small welding machine. Electrodes and voltage are selected in accordance with the thickness of the metal and its composition.
- Next, the lead screw is screwed in. You can make it yourself only if you have a lathe with a thread cutting function. After this, the two halves with jaws are installed. It is possible to make two elements that will be compressed using the same profile pipe.
After the structure has been assembled, it is painted. As a rule, the corner used is made using ordinary steel, which becomes corroded during long-term use. The created vice can be attached to the base using bolts.
Instructions for making a vice: option No. 2
Homemade vices do not require complex design developments and calculations. You can use numerous photos and drawings of such devices, which are easy to find on the Internet. A fairly simple, but at the same time very effective design is created on the basis of metal pipes.
As is known, pipes used for the installation of water and gas pipelines are manufactured in such a way that a product of a certain diameter fits tightly into a pipe of a subsequent standard size. It is this feature of the pipes that allows them to be used for such a device as a homemade bench vise. A visual drawing, photo and description of the manufacturing process will help you make this vise yourself.
Drawing of a homemade vice. Below are two photos of the finished product.
The structural elements that will make up a homemade vice are:
- a piece of metal pipe that will act as the internal moving part of the device;
- a piece of metal pipe of the following standard size, which will serve as an external fixed part;
- running nut with thread diameter M16;
- lead screw with thread diameter M16;
- a knob through which rotation will be imparted to the lead screw;
- front and rear supports, due to which the stationary pipe will be fixed to the base;
- pieces of rectangular pipe (future clamping jaws of a vice);
- two lock nuts with thread diameters M16 and M18.
Two main parts of the vice (movable and fixed)
To make such a vice with your own hands, you begin by welding a flange to the end of a section of a larger diameter pipe, which will act as a stationary element. A nut with an M16 thread must be welded into the central hole of the flange. A flange with a central hole into which the lead screw will be passed is also welded to the end of a section of a movable pipe of a smaller diameter.
At some distance from the edge of the lead screw, an M18 nut is welded to it (it will become a fixing element). After this, the end of the lead screw, to which the nut is welded, must be passed through the inside of the movable pipe and inserted into the hole in the flange. In this case, the nut should press against the flange from its inside.
Vise assembly (in the photo there is a hammer clamped in it)
A washer is put on the end of the lead screw protruding from the outside of the flange and an M16 nut is screwed on, which is then welded to the screw. A washer must also be installed between the inner nut and the flange surface, which is necessary to reduce the friction force. To correctly perform this stage of making a homemade vice, it is better to focus on the corresponding video.
After the movable vice assembly is assembled, you should insert it into a fixed pipe of a larger diameter and screw the second end of the lead screw into the nut of the second flange. To connect the lead screw with the knob, a nut or washer can be welded to its end protruding from the side of the movable pipe, into the holes of which the knob will be inserted.
The clamping jaws of such a vice can be made from sections of rectangular pipes, which are welded to the moving and fixed parts. To give the structure stability, two supports are welded to the bottom of the fixed pipe, for which corners or rectangular pipes can be used.
The inner tube can also rotate during the rotation of the lead screw, which makes the use of such a vice very inconvenient. To prevent this from happening, a longitudinal slot can be made in the upper part of the stationary pipe, and a locking screw can be screwed into the movable pipe, which will move along this slot and prevent rotation of the movable part.
Many photos of homemade vices of a similar design show devices whose moving and fixed parts are made of square or rectangular pipes. The use of such pipes also avoids rotation of the moving part of the vice.
If you do not plan to heavily load the vice, then it is quite possible to make it from wood according to a simple scheme
Main stages of work
We begin the “construction” of a table vise by making the stationary part. We cut off the sheet metal base and weld two corners at the edges.
Between the corners we install a guide made of a round pipe. We weld strips of metal to the corners.
We weld a guide nut for the lead screw between the strips at the front. We weld a second guide from a round pipe on top.
Then we weld two more corners to the strips and the second guide, and a strip of metal on top. As a result, we will get a beautiful and neat design. We clean the welds with a grinder.
Manufacturing of the moving part
Cut two pieces of round pipe and insert them into the guides. We screw the lead screw into the nut.
We install a metal plate with a hole, as shown in the photo below, and weld it to the ends of the pipes. We weld a piece of angle to the opposite ends of the round pipes.
Manufacturing of pressure jaws
Cut two pieces of metal corner of the same length. Using a grinder, we give the blanks the required shape.
Drill out the mounting holes. After this, we cut off two plates of thick metal and drill coaxial holes in it.
Using a tap, cut threads for fasteners in the holes.
When assembling the vice, the plates will need to be screwed to the corners using bolts. The protruding parts of the bolts can be trimmed with a grinder.
Fly tying tool
Most anglers prefer homemade fly tying vices to commercial ones. The device itself has a fairly simple design, which allows you to make them in a short time and without special tools at home. The most difficult step in making a vice is the jaws themselves. They are made from rectangular steel bars. Two holes are drilled in the finished jaws for fastening to the yew and one for the adjusting screw. The holes need to be threaded (M6) with a tap.
Next, you need to tighten both jaws with a screw. After tightening, disassemble the jaws and install the clamping screw, and adjust the opening angle to suit you. You need to make a small groove on the jaws for the hook.
The yew support can be made from a T-shaped or L-shaped steel rod. Sponges are welded to the end of one of the workpieces. The rod must be welded to the support, and if you need to make the support adjustable, then a piece of edged pipe is welded to the workpiece, the diameter of which is equal to the diameter of the workpiece. It is recommended to make the length of the support about 20-50 cm high for more comfortable work.
If the vice has become unusable and there is no way to repair it, then you should not immediately buy new ones, but try to make it yourself. Such a tool will serve for quite a long time and will cost several times less.
Originally posted 2018-07-04 07:41:07.
Design Features
Starting the difficult process of making metal yews at home yourself makes practical sense because of the achievement of great advantages. This essential tool:
- will be useful to everyone who is interested in metal arts - carpentry, plumbing;
- will be needed in an apartment, in a country house, in your home;
- allows you to perform various types of work with high precision - surface treatment, deburring, drilling, chamfering, etc.
An additional motivation for making a bench vice with your own hands is saving money. Finished products sold in stores are expensive.
Mechanic's vices installed in various factory workshops consist of structural cast iron (frame) and tool steel (thrust screw, handle, clamping jaws, bolts, nuts and other fasteners). Due to technological and objective difficulties, it is not possible to manufacture the necessary tools for the home from the alloys listed above. Therefore, home craftsmen have to look for an alternative, choosing a design where the use of cast iron is not necessary.
To understand how to make powerful metalworking yews without outside help for your own needs, a person must know the structure of standard samples installed in factories, as well as the specifics of the operation of such devices. Structurally, a bench vice consists of several main parts:
- base;
- movable and fixed jaws;
- parallel replaceable plates;
- thrust and clamping screws;
- inner nut;
- pen.
Popular models of factory vises have a rotation mechanism for a certain number of degrees. It is not of great interest for home modifications, so craftsmen who make vices for their own needs do without such a common improvement.
Before starting the required actions, the master, using a long handle, pulls back the movable mechanism with a replaceable metal plate. Next, he inserts a part or a workpiece into the gap formed and begins to tighten the mobile part of the vice until it stops, with the clamp, applying characteristic forces.
Adjustment of the bench vice forward/backward using a movable jaw is carried out by a long screw with an inch or trapezoidal thread, with a large pitch, which moves sequentially inside a fixed nut installed in the body. The rotation of the mechanical device is carried out after loosening the clamping screw and is carried out by the master using the necessary forces.
Some men, in order to save money and personal time, make miniature bench vices from improvised tools. The most famous version of a simple device used at home is the improvement of pliers. A through hole is drilled in the clamping jaws and a thread is cut. A bolt is screwed into the prepared hole on one side, and a nut is screwed on the other. During operation, the part is inserted between the jaws and clamped with a bolt/nut pair. It is difficult to prove all the advantages of a mobile design, because to achieve comfort and safety it is still better to use a stationary vice.
Video on the topic
You can watch the step-by-step process of manufacturing and assembling a homemade bench vise in the author's video below.
Round Tube Vice. How to make a Vice from Round Pipes with your own hands. Original Vise made from Pipe.
Andrey Vasiliev
Ask a Question
What to paint with?
Products for painting bench vices can be like this.
- Hammer enamel. This type of painting leaves behind an attractive appearance of the instrument. But it is worth considering that the paint easily chips under mechanical stress.
- Epoxy paint. Reliable type of painting. It has no cons. A minor drawback is the small color palette of the presented assortment.
- Sadolin paint. Car paint. Before work, the surface should be well primed.
- Set for painting bathtubs. White epoxy two-component paint is suitable for bench vices.
Those parts that are not planned to be painted can be sealed with tape. Some craftsmen advise using soapy newspaper. It also adheres well to the surface. There is no need to paint the threads and those places where some parts move or are inserted. With further use, turning the handle will be quite problematic.
As you can see, it is quite possible to restore a mechanic’s tool at home. Of course, you should not bring the device to a deplorable state. But some recommendations will help restore even those instruments that have not been used for a long time and are covered with a coating of rust.
It is also necessary to observe safety precautions when performing work. It is worth remembering that you should wear a mask and safety glasses when working with paints and sanding tools.
Restoration of a bench vice is presented in the video below.