Even simple welding work requires a professional attitude. To obtain connections of the highest possible quality, in most cases it is necessary to use special devices. These include corner clamps for welding, which you can assemble from metal with your own hands. The use of a clamp allows you to reliably fix the workpieces being joined, which speeds up and facilitates the process of obtaining a welding seam. For manufacturing you will need a simple set of tools, available materials and ready-made drawings of clamps, in accordance with which the work will be carried out.
Wood clamps
This option is the first thing that comes to mind, because it is simple to implement and not expensive. The only question is how exactly to make the clamp.
This clamp can be made in a matter of minutes and is easy to use. Usually pine or aspen is used to make it. The fixing rod is made of metal with a small number of nuts.
Almost any wood that is not damaged or defective is useful for making a handle. The parts that will need to pass over the fixing rod must be dry and movable.
The mechanism of operation is that there should be nuts on the sides of the fixing rod that do not allow the restraining mechanism to come apart. The choice of nuts is up to you: choose based on your preferences and budget.
For additional protection on the side, you need to screw in more nuts and washers; they should stop the nuts. To achieve maximum quality of a hand-made clamp, we recommend looking at the drawings.
Benefits of the tool
The tool in question has a fairly large number of advantages. The main ones are the following:
- Long service life. As practice shows, an angle clamp can last for several years, the main thing is not to apply critical force. Otherwise, there is a possibility of deformation of the main elements.
- The device is reliable. When the device is used correctly, the possibility of workpiece displacement is eliminated.
- At the time of work, reliable fixation of the workpieces relative to each other is ensured. This ensures the most favorable conditions for processing the workpiece.
- Wide range of applications. In some cases gluing is carried out, in others processing.
- Relatively low cost. Even industrial mechanisms are inexpensive. At the same time, there are simply a huge number of different versions on sale.
- Possibility of assembling the structure with your own hands. Due to this, you can save a lot, since improvised materials are used during the work. A homemade mechanism is practically not inferior to an industrial one, and is also characterized by a wide range of applications.
In general, we can say that there are simply a huge number of different advantages that determine the spread of corner clamps.
Steel clamp
A more difficult option is homemade metal clamps. Most often they also look like the English letter “F”. What distinguishes it from wood is clear from the name - its devices include metal parts.
It is important to consider that the durability of the product itself depends on the properties of the metal. The plates are the most difficult parts in this device; several holes must be made in them.
After you finish making the clamp part, you will need to clean its surface with sandpaper or something else, because this part must be smooth, without external defects and burrs.
Terms of use
There are several different rules regarding the use of the device. Among the features we note the following:
Care must be taken to ensure that the surface is completely adjacent to the working part of the tool. When clamping, pay attention to the force applied. Too high an indicator causes damage to the surface layer. Do not forget that the corner clamp itself must also be securely fastened when machining the workpiece.
Otherwise, the processing becomes significantly more complicated.
The simplicity of the mechanism means that it is quite easy to use. You don't need to have any special skills.
Clamp in the shape of the letter F
These options can be either metal or wood, and in their shape they are similar to calipers. It’s still not difficult to make such a clamp. It is recommended to use durable wood or metal as the material.
It is necessary to make small cuts in the rail so that moving parts can be fixed. Your workpieces are secured using a holder that is adjustable thanks to nuts. If the holder is loosened, the workpiece can be easily removed from the clamp.
Note!
- Do-it-yourself compressor: selection of materials and tools for assembly at home + step-by-step instructions for making and assembling yourself
- Homemade products for the garage with your own hands: options for products for arranging a garage, detailed diagrams and drawings for creating with your own hands
Do-it-yourself press - design features, choice of manufacturing materials. Step-by-step instructions for making it yourself + simple diagrams and drawings
F-shape
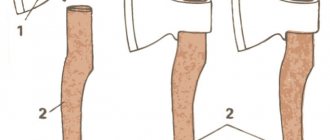
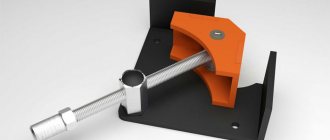
To make the work easier, you will need to prepare a few simple clamps. You need to prepare in advance small pieces of any profile, a nut with a screw and mounting bolts. Angle clamps for welding are manufactured in 2 stages.
Base
You will need three pieces of profile pipe. You can use any profile that is at hand, but it is better to take one with different shelf sizes. For example, a 25/60 pipe can serve as an excellent base blank.
Parts are cut to lengths of 300, 200, 100 mm. Distribute the smaller piece in the middle of the long one and grab them. The result was a base 180 mm wide.
From the larger edge, the corners are marked and cut at 450. A section of the profile about 150 mm long is welded in the middle of the long part of the base. A nut with a clamping screw will be attached to this part.
Cut a corner or profile along the length of the bevel on the base and grab the pieces to the end of the base. These parts of the structure serve as guides for the workpiece and as stops for fixation.
Boil all the joints and clean them well with a grinder and a cleaning stone . The base of the corner clamp for welding is ready, you can proceed to the final part of the assembly.
The principle of operation of the clamp
Mechanics, carpenters, mechanics and others encounter clamps while still studying at school - during technology lessons. Clamps are easy to make with your own hands and are needed to secure various parts made of wood or metal. They are secured in a vice and then processed or cut.
In the past, this device could not completely free the master's hands, and he had to hold an ancient clamp. Nowadays, everything is much simpler: clamps are not only quick and easy to use, but also the principle of their operation is clear and easy to repeat. There are even quick-release clamps that you can easily make with your own hands.
The basis of a modern clamp is both a screw mechanism and a lever mechanism.
Thanks to the latter type, it is possible to quickly and easily fix the workpiece in a certain position without tedious, repetitive movements, because everything works thanks to simple physical laws and levers. They are called "quick clamps". They are simple and straightforward to make, and can be easily made right at home.
It is worth noting that thanks to such devices you can calculate how strong the pressure exerted on the workpiece will be. This is important if you do not want to damage the wood texture or leave dents on the part.
Note!
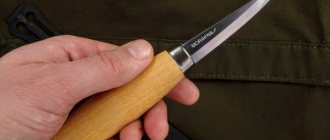
Do-it-yourself winch: classification, manufacturing materials, description of work stages + instructions for DIY construction- DIY knife | A step-by-step description of how and from what materials to make a homemade knife
DIY vices: simple and reliable homemade vices from A to Z (190 photos)
Other varieties differ only in that the blanks are secured in them differently.
Devices for secondary protection during argon arc welding
Factory-produced welding clamps are quite expensive, so it makes sense to make a corner clamp with your own hands. Such a task cannot be called difficult, since for assembly you can use metal elements that have been stored in a garage or shed for years, which would be a pity to throw away. Due to the simplicity of the design, the use of complex tools is not required to make an angle clamp.
Regardless of the design, the main purpose of the devices is to rigidly clamp workpieces for their subsequent welding or surfacing. Corner clamps made of plywood allow you to connect both metal parts and wood blanks.
To make your own clamp you will need the following materials:
- a pair of hardwood blocks 25 mm thick;
- a sheet of plywood with a thickness of at least 12 mm;
- fastening elements: studs, self-tapping screws;
- hacksaw or jigsaw;
- drill.
A square with sides measuring 250 or 300 mm is cut out of a plywood sheet, to which bars are attached at right angles.
The angle should be set as accurately as possible, since the correct fastening of the workpieces relative to each other will depend on it in the future.
First, the bars should be glued, wait until the glue sets, and countersink with a drill. Self-tapping screws or other fasteners are screwed into the resulting holes. From the center of the pads it is necessary to draw perpendicular lines along which the screw studs will move.
At a distance of 20 mm from the corners, thrust bars are fixed, leaving a small gap between them. Its size should slightly exceed the maximum width of the workpieces to be fixed. It is more convenient to screw in the studs immediately, before attaching the thrust pads.
It is also necessary to prepare movable bars that connect to the pin. When screwed in, its part will move towards the corner block.
When making a corner clamp from a massive material, such as chipboard, a thicker material should be selected for the bars.
First of all, you need to make a drawing or sketch of the corner clamp and decide on the main dimensions.
To make the base you will need sheet material 8–10 mm thick. For fastening, you can use a corner of the appropriate size. It is convenient to connect the elements using electric welding.
- For a screw clamping mechanism, two nuts are welded together. The bracket with a threaded hole in the central part is made with a height of 30–40 mm. For fastening, it is recommended to use a bolted connection, which can be easily replaced if the thread breaks.
- The mutual placement of the pressing jaws requires special attention. It is necessary to ideally set the right angle, since when performing welding work it will be impossible to achieve acceptable quality. First, one corner is welded to the clamp, and another is placed on it. The resulting structure is tightly compressed and welded to the bracket.
- Guides are attached to the side planes of the clamp to ensure movement of the base. A groove measuring 8–10 mm is cut along the bisector line of the clamping device.
- A bolt is screwed into the upper base of the clamp. Its thread should not reach the head, which will ensure free movement of the bases relative to each other.
Do you use a clamp at home or at work? Did you make it yourself or buy it ready-made at a hardware store? What difficulties and features of welding did you encounter when using the device? Please share your experience in the comments.
To obtain a high-quality seam, product parts must be correctly positioned in space relative to each other. To perform this action, special devices of various types are used for assembly and welding.
The first ones are used for installing and securing parts of a structure using tacks, welding pliers, welding clamps, and other simple mechanical devices.
Welding fixtures are used to connect pre-assembled products fixed in a certain position. These also include mass clamping. The third option allows you to combine the two operations listed above.
It is worth noting that the assembly mechanisms must allow free movement of parts of the structure. They will heat up during operation and their size may change.
If the parts are placed close to each other without the possibility of movement, then deformations may occur due to thermal effects.
READ MORE: Conifers in the landscape design of a summer cottage: options and rules for composing compositions
When working with large parts with low rigidity, tools should provide the ability to connect only the edges of the parts, and not the entire structure.
When planning welding work, it is necessary to provide in advance the possibility of access to the joints. If parts are located at right angles, corner clamps should be used. If possible, you can spot weld parts of the structure.
Then it is enough to throw the ground terminals of the welding machine over the product and you can start working. Sometimes you can use a lot of the details themselves. Under their own weight, they can be quite reliably positioned in the required configuration.
However, this option is not always applicable, so it is always better to have welding pliers on hand.
Magnetic clamps are classified as installation and fastening mechanisms. This means that they allow you to correctly position the parts and secure them. This operation is carried out using strong magnetic elements.
What advantages does this welding device provide? Let's figure it out.
The main advantages include:
- the ability to quickly connect parts;
- installation of parts at different angles using a magnetic angle for welding;
- significant reduction in time for preparatory work;
- small dimensions;
- the presence of a magnetic field activator in some models;
- possibility of quick and easy cleaning of magnets.
The main disadvantage of such devices is the limitation of their use depending on the material. Non-magnetic metals, wood, etc. do not allow the use of magnets.
On the other hand, magnetic welding fixtures allow you to fasten parts at any angle to each other, and they are more versatile than, for example, clamps.
In addition, on the Internet you can find a large number of reviews devoted to the manufacture of homemade devices for welding work. For example, you can make your own magnetic square for welding with your own hands or a magnetic mass for welding.
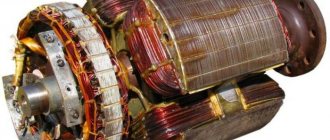
If you find everything you need and study the drawing in detail, you can make a good tool at home. A do-it-yourself metal clamp is a unit that is reliable. In this regard, it will be significantly inferior to a wooden unit. For manufacturing, you will need not only material, but also welding equipment, as well as some tools used in plumbing.
Many craftsmen prefer to make a clamp from a channel, reinforcement, from a corner or from a hairpin. All these metal elements are perfect for this.
Made of metal
It is best to use a metal pipe. The result is a tubular structure. You can make a different type of tool.
Additionally, you will need three metal rings. Their internal diameter must coincide with the external diameter of the pipe. It is allowed to use a metal rod instead of a pipe in the design. A welding machine is used to create the tool.
The work algorithm is as follows.
- The support platforms are welded to two rings. They are made from a metal corner. It's better if it's steel.
- A nut is placed on the remaining ring, and it is welded to the end of a rod or pipe, depending on what is being used.
- A handle is installed on the head of the pancake bolt being used, and the bolt is screwed into the ring.
- A hole is made in the free end where the fixing pins will be installed.
If you have reinforcement on hand, you can use it to assemble the clamp. The process looks like this:
- at the first stage, the reinforcement will need to be cut;
- then the sliding part is made, a nut is installed, which is attached to the lever;
- at the third stage, prepare the screw and stand that will rotate;
- you will need to cut a thread in the rod, then make a shoulder;
- at the last stage they make a handle and a panel for the jaw.
Made of wood
You can also make your own clamp from wood. This tool is most convenient for working with wooden workpieces. This can be plywood, fiberboard or chipboard sheets, timber or boards, but they must be of small thickness. When making wooden tools using this technology, you should adhere to the following sequence.
- First, a template is created on cardboard for future wooden blanks.
- Templates are transferred to wood in accordance with the selected scale.
- It is better not to use boards made from pine. The wood must be hard, then the unit will last a long time.
- Each part of the future clamp is cut out using a jigsaw.
- To ensure a clear shape, the edges are corrected with a file.
- The surface must be sanded.
- A hole for the bolt is first marked in the jaws, and then drilled. For an axial bolt, its length must be at least 1.5 times the diameter of the bolt.
- In the part that will play the role of a handle, a hole for the nut is also drilled.
- The nut is installed with glue. It can be epoxy or cyanoacrylic.
- Now you can assemble the tool. The axial bolt is fixed with adhesive. The rear hinge is installed with screws.
- The upper jaw is installed, then a washer is placed and the handle is placed.
A quick-release clamp can also be made from wood. The only drawback of this technology is that it takes more time, but it saves time when the work is completed. The process looks like this.
- First, the layout of the future parts is transferred to lumber, then the elements of the future clamp are cut out of the boards.
- A jigsaw is used to make slots for the axle plate. They are necessary in the movable sponge.
- The next step is to use a chisel. A groove is made for the cam lever.
- Holes are drilled to install the pins.
- The outer and inner surfaces must be treated first with a file to remove rough protrusions, and then with sandpaper.
- The axial plate is cut out of metal. It will also need to be properly sanded, and then drill holes where the pins need to be installed.
- At the last stage, the tool is assembled.
From the jack
Carpenter's clamp for home workshop
The next type is carpentry clamps; we also recommend making them yourself. Usually carpenters work with this type, because it is intended for wood. This clamp will come in handy if you need to fasten wooden parts.
In the store you can find a large number of varieties of this product. Most of them may not suit your needs because they have different characteristics. There are no particular problems in the manufacture of this device, because it is simple and understandable.
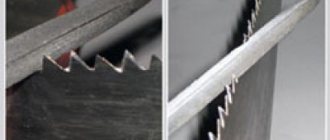
It is easy to make this option from an old metal hacksaw, and an ordinary bolt is used as fasteners. You can choose the rest of the details for a do-it-yourself carpentry clamp at your discretion
The clamping width of the clamp is adjustable, so you can work with parts of different shapes and sizes without any problems, however, carpentry clamps are rarely used for any labor-intensive, heavy work.
Note!
- Do-it-yourself vibrating table - selection of materials, components and assemblies for a vibrating table with a step-by-step manufacturing description
- Do-it-yourself grain crusher - operating principle, types and features of creating a device for processing grain crops
DIY concrete mixer | A visual aid on how and what to make a concrete mixer yourself
But like a vice, it’s unlikely to be attached to a workbench, but you can probably find a modified version on the Internet that will allow you to do this, so we advise you to look at the drawings for a carpentry clamp.
Design
There are a huge number of clamps that differ from each other in shape, size, and the task they face. For example, a clamp for working with pipes is designed for welding the latter at various angles, for example, 90 degrees. Without the use of clamps, maintaining the exact angle when working will be difficult. Angle clamps are produced in different types, based on the width of the pipes being fastened and the angle at which these pipes will be welded.
Angle clamps differ in the following characteristics:
- thickness of sponges. The thicker the clamping jaws, the more securely the pipes are clamped and the welding seam does not bend or break.
- material for making clamping screws. During welding, molten metal can be thrown in all directions, and clamping screws are no exception. If molten metal gets on the screw threads, soldering may occur, which will render the thread unusable. To avoid this, copper-plated screws are made. Copper does not allow splashes to harden on the surface of the screw, thereby maintaining its performance.
- working surface. A clamp can increase the working area when working with the electrode at a certain angle.
The angle vise for pipe welding consists of a moving part and a main part. To regulate the degree of compression, the moving part is equipped with a screw. With its help you can adjust the distance between the clamping jaws and the part. The mobility of the structure ensures work with parts of various shapes and cross-sections.
When choosing a clamp, you should pay attention to the type of work being performed. For example, G - clamps are used when working with steel parts of small thickness. To work with parts of large thickness, F - clamps should be used.
Locksmith's clamp, manufacturing instructions
It often happens that a mechanic has to work in an unprepared room where there is absolutely no equipment. In this case, it is impossible to work adequately, because the part is not secured. In this case, it would be reasonable to make a clamp for a mechanic, for example, even from a profile pipe.
This product does not require serious skills from you, because it is very simple in its design. Wood scraps, metal and pipe can be used as the main material for production.
It would be great if you also had a welding machine, the main thing is to follow the instructions and observe safety precautions. Fortunately, these instructions are easy to remember, and the question “how to make a metal clamp?” will not cause you negative emotions.
Next, we will study a manufacturing option in which the main material is wood. All sizes depend on your wishes.
- To begin with, transfer the image to the workpiece from the drawings.
- The image is then superimposed onto the base material.
- Cut out the marked parts with any convenient tool and clean the edges from chips and protruding fibers.
- In the center, mark the place where you will drill holes for the fixing screw.
- Prepare the handle on which the bolt will be attached. Its size should be such that it is convenient for you to adjust it using keys. Treat the bolt and attach it using any convenient adhesive or mixture.
- The details are put together into the final version. Additionally, treat the wooden parts of the clamp with sandpaper and, if desired, cover it with stain to better preserve the wood.
It is worth noting that you can choose many different options for creating a clamp; an example is any used, old but still usable metal tool with a fairly small thickness.
The clamp itself may differ. So, for example, you can make a corner clamp with your own hands.
Corner option
Regardless of the type of clamp, it must firmly clamp the parts for joining or processing. A corner joiner helps to fasten wood pieces at a certain angle (most often 90°, but there are others). You cannot do without this when assembling furniture and frames.
In order to make such a clamp from wood with your own hands, you will need the following materials:
- two wooden blocks 25 mm thick made of hardwood;
- plywood 12 mm thick or more;
- screws, studs;
- jigsaw or hacksaw;
- drill.
A square board with a side of 25 or 30 cm is cut out of plywood. Two bars are fixed on it at an angle of 90 °.
First, the bars are glued, then countersunk, holes are drilled and screws or other fasteners are tightened. Perpendiculars are drawn from the center of the bars - screw studs will pass here.
At a distance of 20 mm from the corners, thrust bars are attached, maintaining a gap between them. It should be slightly larger than the width of the parts that are to be clamped with a homemade clamp. It is better to screw in the studs immediately, before fixing the stops. You will also need to cut out the movable blocks that will be connected to the pin (when it is unscrewed, the workpiece will be pressed against the corner bar).
In the same way, a clamp is made from plywood or chipboard sheets. In it, instead of wooden blocks, a thick plywood sheet is taken. There are other options for making clamps yourself, but the principle of their assembly is generally similar.
Clamp in the form of a clothespin
This option is considered quite common and probably the simplest; making one is not at all difficult. The operating mechanism of this type is identical to the clothespins that everyone knows and uses on the balcony to hang laundry, but they will, of course, differ in size.
First, cut out ten blanks from scraps of wood. Half of them should have a depression in the middle.
Remember that the more complex the device or projects in which you will use it, the thicker and stronger the material should be. Next, glue the existing blanks together.
Upon completion of the work, if, of course, you followed the instructions, the device will work exactly the same as a clothespin. The only thing that remains is to pull the elastic band onto the product.
Homemade and factory clamps for welding work
Even simple welding work requires a professional attitude. To obtain connections of the highest possible quality, in most cases it is necessary to use special devices. These include corner clamps for welding, which you can assemble from metal with your own hands.
Industrial samples of clamps of various shapes are produced, but at home it is quite possible to make a reliable and convenient clamp for welding work yourself.