Wood carving has centuries-old roots, reflects national traditions and is currently popular. Figurines, panels, and other carved decorations fit perfectly into any interior. To create amazing masterpieces, professionals do not use super-devices; all the main work is done by ordinary wood carving knives, which, although they have the same shape, differ from each other in size. A cutter, a Geismus, a cranberry, or maybe a graver – let’s try to figure out which of these tools is suitable for a novice craftsman.
Features and purpose
A product intended for wood carving is an indispensable component of the arsenal of a craftsman who makes decorative objects from natural wood. The tool differs from a regular kitchen knife in that it has a shortened blade. When working with wood, a significant load is placed on this part of the tool, so the shorter the metal element is, the lower the likelihood of it breaking under pressure from the cutter.
In addition to the carving itself, there are other options for influencing the wood surface, including sawing, drilling, and gouging. All these operations are performed with other tools and are auxiliary, allowing the carver to fully realize his plan, adding significant elements to the overall picture. The nature of the work determines the choice of the necessary tool.
Features of material selection
In addition to the device for work, you will need a base on which you will cut out the pattern. Wood for this purpose can be different: soft, hard and very hard. The first type includes linden, aspen and alder. These materials are suitable for your first steps in mastering artistic carving. The fact is that they are very easy to work with and you don’t need to use a lot of force to hollow out this or that element. That is, such blanks are usually given to beginners.
Hardwoods - pear, birch, oak, maple, beech - are used by experienced craftsmen who have good skills. The remaining breeds are used quite rarely. At first, fake blanks are enough for you.
In addition to the hardness of the rock, the shade of its surface is of great importance. Naturally, after completing the work, you will open the product with colorless varnish. However, there is nothing better than the original shade. It will highlight all the natural beauty of your masterpiece.
Kinds
In the arsenal of masters of artistic carving there are a variety of tools - each of these products is intended for a specific type of operation, and may differ in shape, specific sharpening, and functional features. All of them are divided into 3 main types - hand-held, power tools, and devices for machining. Each of them has its own characteristics and advantages.
Manual
Hand tools include numerous knives that differ in design, as well as chisels and auxiliary tools. Tools must be made conscientiously, from high quality steel, in which case they will not crumble or crush the wood. A prerequisite is excellent sharpening, which makes the work of the master easier.
Cutter
The cutter is a universal knife for cutting wood, which is used by all beginners and professional craftsmen. It is used when forming the main part of the product, and then for more delicate work. Its blade is elongated, straight or curved, and the butt is curved.
The main distinguishing feature of the cutter is the sharpening angle of 35˚. A type of product is a European carving knife, one of the most popular and simple models. It has a smooth cutting edge, a curved butt, and an elongated handle. This knife for wood carving allows you to perform various operations - from roughing to the most delicate finishing operations.
A more modern tool is a knife with interchangeable blades of different shapes, which allows you to perform almost any operation on wood. These elements are easily changed using a collet clamp.
Jamb
A jamb knife is the second basic tool of any carver. It is characterized by a cutting angle of 60˚ and a beveled blade shape, which allows significant effort to be applied in the work without the threat of breaking the tip. Knives for wood carving are convenient for making geometric patterns, roughing and finishing products. Dimensions can vary significantly, depending on the types of wood used and the specifics of the work performed.
Bogorodsky knife
This tool is shaped like a European carving knife, but its blade is longer and the handle is shorter. It is designed for roughing and fine finishing work. The cutting edge is smooth, the sharpening is partial, the blade size can vary from 3 to 9 cm. The knife got its name from the Bogorodsk carving, its shape is ideal for performing this technique.
Auxiliary Tools
In addition to the tools listed above, craftsmen use a wide variety of devices listed in the table.
| Name | Purpose | Peculiarity |
| Chisels straight and curved | For making recesses, cleaning grooves, chamfering. For contour or relief carving. | The tip can be straight or curved. |
| Klukarzy | For complex ornamentation, creating deep volume. | A flat, semicircular or angular chisel has a short or long curved blade and a neck. |
| Spoon cutters | For making recesses in spoons and other products. | Chisels that have a sharp bend that creates part of a circle. |
| Studs and the like | Used when cleaning the background in hard-to-reach places of flat-relief and three-dimensional carvings. | A knife with a sharpened blade in the shape of a leaf, sword or marigold. |
The auxiliary tools may also include sandpaper of various sizes, rasps, scrapers, and metal brushes. All this will be required for the initial, rough processing of workpieces.
Chisels
Klukarzy
Spoon cutters
Klepiki
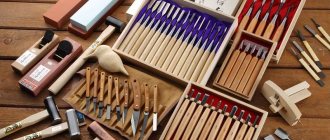
Tool sets
For ease of work, especially for novice carvers, you can purchase a complete set of tools. Products from the same manufacturer include products of the same strength with identical handles. The choice of the composition of the set depends on the specifics of the carving that the master is going to do:
- for garden sculptures you will need chisels, mainly impact ones, hacksaws, large cutters;
- when working on relief paintings, you cannot do without straight and curved chisels and rivets;
- power tools, especially an engraver, are suitable for operations with three-dimensional figures.
When purchasing, you should pay attention to the material of the tool and the manufacturer.
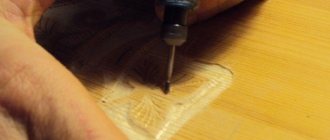
Power tools
This is energy-dependent equipment: engravers - manual and laser, flexible shaft. The first power tool is essentially a lightweight electric drill with a set of 2-6 mm attachments and a chuck for them. Most models are equipped with a flexible shaft with a collet clamp at the end - this is an analogue of the drill that every dentist's office is equipped with. The engraver is indispensable for volumetric, relief, and flat-relief cutting.
The flexible shaft can be purchased separately to complement a conventional electric drill, which will allow you to perform carvings of any complexity. The product is equipped with a 1-6 mm cartridge and weighs no more than 1 kg. For example, from TM Bosch you can find 1.25-meter flexible shafts with 3500 rpm.
Modern laser engravers are capable of creating exact copies of finished works or new figures based on the designer’s drawings. The devices read the shape of the structure, converting it into a digital code, and the actuators already translate it into a finished three-dimensional product. Engravers can process not only wood, but also plywood, plastic, even marble. The advantages of the device include high productivity, minimal labor costs, and ease of maintenance.
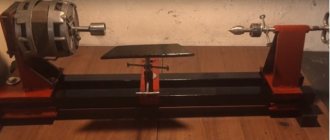
Machining
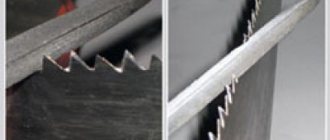
Planing, jointing and milling machines are used for mechanical processing of wood. Their cutting tools are special knives:
- planing or jointing are metal strips with a sharpened edge and soldered hard alloys;
- milling - metal teeth installed in special holders.
The former are used when processing elongated linear parts, the latter - for creating various recesses, for example, in the manufacture of doors.
Other tools
- A wooden or rubber mallet is used to remove wood with a chisel across the grain. Blanks can be large in size, made of hard wood. The mallet has a rounded head that allows you to hit the cutting tool at any angle. The standard diameter of the mallet striker is 75-150 mm.
- Tesla is used when it is necessary to quickly remove wood during rough work with the product. Has a round or flat cutting edge.
- Embossing is convenient for pressing out small depressions in the workpiece, creating speckled patterns and applying ripples to the surface of the product.
Mallet, chasing and adze
Cutting tools
- A cutter is a sharp blade fixed in a handle.
- Hand or electric saw, jointer, one-handed plane, etc.
- All types of cutters, including tools for applying patterns.
Patterning tools
- A jamb knife is a universal tool.
- Chisel – for cutting out notches.
- Klukarza is a chisel with a curved blade for relief carvings with a recess.
- A spoon cutter is a special tool for making spoons. Equipped with a blade in the shape of a ring or half ring.
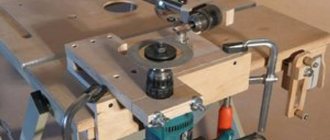
- Disc, face, manual or electric milling cutters.
- Engravers.
Engraver
Grinding tool
| Treatment | Removal depth | Grain |
| Rough (by hand or with a grinder) | 0,08-0,12 | 36–60 |
| Primary (manual or using a grinder) | 0,05-0,07 | 80-100 |
| Removing irregularities | 0,02-0,05 | 120,0 |
| Initial and final grinding of soft rocks (manual or using a grinder) | 0,010-0,045 | 150-180 |
| Initial and final grinding of hard rocks (manual or using a grinder) | 0,005-0,009 | 240,0 |
| Sanding between layers manually | 0,002-0,004 | 280–320 |
| Polishing (manual or using a grinder) | 0,001-0,002 | 400,0 |
Workpiece fastening tool
- Swivel clamp.
- Bench vice.
- Carpenter's quick-release clamp.
- Bench stops.
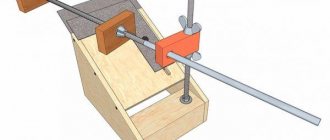
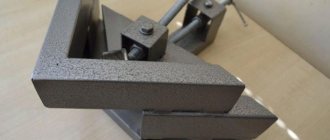
- Wood carving vice.
- Model (copying) vice.
- Bench screw for wood carving.
- Stand for wood carving.
- Bench mounting screw.
Finishing materials for carved products
- Varnishing the finished product for an even shine. Paints and varnishes: shellac, polish, oil, copal, amber varnishes, rosin and its derivatives.
- Polishing with pre-grinding. Polish the product with a cotton swab in polish, there should be 2-3 repetitions.
- Oil and enamel decorative protective coating with preliminary priming of the surface. Primer composition – drying oil or glue, primer varnishes.
- Puttying with preliminary primer. Material for putty: chalk, glue and drying oil in a ratio of 3:1:5;
- Gesso-plating, silvering, bronzed or gilded.
Decorative impregnations
Sharpening methods
One of the main criteria for a quality tool is sharpening. If it is done with high quality, working with wood will bring joy to the craftsman, all cuts will go strictly according to the plan.
A knife for wood carving is sharpened like this:
- First, you need to level the working surface of the product using coarse sandpaper or a circle, maintaining the geometric shape of the blade and the sharpening angle.
- After coarse sanding, touch up the coating on the fine-grained surface. When using emery, avoid overheating the metal.
- Proceed to sanding with fine-grained abrasive materials, from more to less grainy, for example, fabric sandpapers 400, 600, 1200.
The final finishing is carried out on felt or leather with a grinding mixture such as GOI paste.
When the cutter begins to chip or crush the wood instead of cutting it in even layers, this is a signal that the tool needs to be sharpened. Using dull knives will require a lot of effort during the work process and can completely ruin the final result.
Position of the chisel when sharpening: 1 – straight chisel; 2 – semicircular and flat; 3 – chisel – corner
Position and movement of the tool: a – on straight chisels; b – on semicircular and sloping chisels: 1 – external chamfer; 2 – internal chamfer; c – on corner chisels: 1 – internal chamfer; 2 – external chamfer
Correct sharpening
Now, to get started, we just need to sharpen our knife.
The sharpening instructions are as follows:
- Place the blade on an abrasive block with coarse grain (pre-wet it with water) at an angle from 15 to 240. Using movements away from us, we shape the cutting edge until the sharpness can be felt under the finger.
- We switch to a medium-abrasive stone and repeat the operations, leaving a ground metal chamfer (burr) on the cutting edge.
Procedure for sharpening
- On a small (diamond) block, generously moistened with water, we finally remove the burr, forming a blade.
- We perform editing either on a leather belt or on a special block. For straightening we use GOI paste or a similar material, which allows us to get a perfectly sharp knife with mirror-like surfaces of the cutting parts.
These operations must be repeated regularly to maintain the sharpness of the knife, since only with the help of a perfectly sharpened tool can clean and high-quality wood carving be performed.
Editing on the belt
Criterias of choice
Currently, we offer the widest range of knives for wood carving, which is represented by products of domestic and foreign production of very different prices. To select the appropriate tools, you need to decide on future tasks - what type of thread will be used, what material will be used.
To begin with, you can purchase a minimal set - several knives with straight and semicircular cutting edges, then, as you progress, specific tasks will arise, and you can select a tool for them.
Before purchasing, you also need to consider the main manufacturers, select the size of the knife for wood carving, the grade of steel, the material of the handle, which should be ergonomic, comfortable, and not slip in the hand.
Among the manufacturers on the market are the following:
- “Tatyanka” is a domestic supplier of high-quality knives with a comfortable beech handle and a blade made of 65G tool steel;
- Flexcut – produces sets of cutters and chisels;
- Frost – produces knives and spoon cutters;
- Dem-Bart – manufactures tools for finishing stocks;
- Narex is a manufacturer of quality kits;
- “Petrov and Son” – produces several types of knives;
- Pfeil - a variety of knives made of the highest quality steel.
Among the variety of products, the final choice can be made by comparing the purpose, quality and cost of the tool.
Flexcut
Frost
Dem-Bart
Narex
Petrov and Son
Main types of thread
In order to make a craft, you need to master some types of work:
- marking;
- sawing;
- cutting;
- drilling;
- planing;
- pruning;
- chiselling;
- scraping;
- grinding.
In addition, there are several types of carving itself:
- Through. This type involves cutting holes at specified locations.
- Embossed. In this case, the main elements are at different levels in relation to the background.
- Sculptural. This type of carving is quite complex and is used only by experienced craftsmen. The fact is that this work is very delicate and requires compliance with all the necessary proportions.
- Flat-skinned. It is from this type that beginners begin to accumulate their experience. All that is necessary is to apply the design to the workpiece and hollow it out. In this case, all elements are on the same level with the background.
How to make it yourself
Craftsmen who have worked with ready-made cutting tools see their shortcomings in relation to the technology used. It could be the length of the blade or its shape, someone doesn't trust the hardening of finished products, or they don't like the configuration and material of the handle. In such cases, you can make a wood carving cutter with your own hands. To do this, you will need a little experience in handling metal and a fairly simple set of tools:
- blade from a hacksaw or circular saw (2.0 mm thick);
- a piece of wood;
- electric sharpener.
Work algorithm:
- A diagram of a knife for wood carving is drawn on the workpiece, then the excess metal is removed with a sharpener.
- The handle is cut out; the parameters can be determined by squeezing a piece of plasticine in your hand.
- After shaping, the wood must be carefully sanded.
- A hole is drilled in the handle where the knife sits, then it is placed on the blade. To increase service life, the wood is impregnated with linseed oil and then varnished.
- Now you need to properly sharpen the cutter, maintaining the recommended angle. After this, the tool is ready for use.
During processing, the workpiece must be periodically immersed in water, avoiding overheating and, accordingly, tempering of the hardened metal.
Making a template
We create rough blanks
Finishing the edges on a sharpening machine
Using a grinding disc we form a rough cutting edge
Processed on a grinding machine
Preparing the bars for the handle
We insert the blades into the future handle
Cut out the desired shape
We clean and varnish the handle. Ready
Making a knife
Making a blade
When choosing a cutting knife, you should give preference to simple and reliable models made of high-quality steel. However, the price of such products is quite high, so beginners most often purchase cheaper models, and therefore are inevitably disappointed in the quality of the cutters.
Simple Bogorodsk knife made of tool steel
The solution in such a situation may be to make a knife with your own hands. This task is solved quite simply, so even a beginner in plumbing can quickly acquire his own tool.
First of all, we need to find a suitable material. This is not difficult since we need a fairly small piece of good steel.
The following can be used as a blank for a future knife:
- A strip of good steel about 8 - 12 cm long, up to 2.5 cm wide and 1.5 - 2.2 mm thick. The brand does not play a special role, as long as the material is strong enough and holds an edge well - R6 / R6M5, and R9, and even R3AM3F2 will do.
Saw blades with markings
- Mechanical saw blade made of hardened metal. It is better to choose the same dimensions as in the previous case - this way we will save energy on roughing.
Note! Despite the fact that, compared to a saw, the knife will be subjected to significantly less stress, you should not use rusty blades or parts with cracks (even shallow ones).
- Part of a saw for metal or wood (it is convenient to use a fragment of a split disk with one or more teeth).
Drawing of the jamb with main dimensions
The work process itself looks like this:
- First, we make a drawing of a jamb knife for wood carving, determining the shape of the shank, the length of the blade and the bevel of the cutting part.
Note! For cutters, the bevel ranges from 15 to 450, for jambs - up to 60 -700.
- Next, we cut the workpiece to the required size, making the blade from 30 to 90 mm long and leaving a shank sufficient to secure it in the handle.
- We form the blade by cutting the front edge of the workpiece at the desired angle.
- We perform rough sharpening, making the cutting edge.
- Several holes can be drilled in the shank, which will be used for fixing in the handle.
Photos of blanks
After this, we wrap the cutting part with electrical tape so as not to cut ourselves during further operations, and proceed to making the handle.
Making a handle
The knife handle is made from linden, birch or similar wood.
The main thing is that the material absorbs moisture well - then the knife will not slip out of a hand that is sweaty from exertion.
- We take a block with a diameter of about 40 mm and a length of 200-250 mm.
- We cut out the handle of the shape we need from the workpiece, thinning the rear edge of the part.
Note! We can limit ourselves to rough processing, since then we will still be “finishing” the surface of the wood.
- Carefully split the workpiece along the fibers.
- We place the shank of the knife on one of the resulting planes, and then trace it along the contour.
Making a handle for a cutter
- We select a recess in the workpiece that corresponds to the shape and thickness of the tail plate. At the same time, we make sure that the shank laid in it does not protrude above the plane.
- We remove the workpiece from the wooden plank, and then apply wood glue to all surfaces.
- We install the blade in place, press both parts of the handle tightly, and then clamp all the parts with clamps.
The product is ready for gluing
After the glue has dried, we perform the finishing treatment:
- If necessary, we drive rivets into the pre-drilled holes, with which we finally fix the shank in the wood of the handle.
- We put a metal ring on the front of the handle.
- We carefully sand the wood, removing all irregularities. We pay special attention to the junction of the halves.
How to make knives for wood carving, Bogorodsky knife, jamb knife
How to make knives for wood carving?
On one of the forums I came across quite clear material on the manufacture of carving knives, which is given below without any changes. I hope that the author of the note Serjant and the administration of this forum will not complain. “Hello guys, it’s me, Serjant, I’m writing from Flyslayer’s computer, because the bastard admin cut off my Internet.
So:. Let's begin.
It's called 'Bogorodsk knife' (Fig. 1). Designed for both rough and fine woodworking. For rough work it means to give the workpiece the desired shape. Approximately trim so that the silhouette can be guessed. For example, whittling a spoon. For a thin one, for example, cut out fingers on a small wooden toy, cut out the face of an animal, etc. Speaking of toys. This knife got its name from the village of Bogorodskoye, Moscow region, where they cut the world-famous wooden toy for several centuries. As can be seen from the figure (Fig. 1), the knife is simple in shape and also simple in manufacture.
You will need: 1. A piece of steel. The ideal option for wood carvers is a mechanical saw blade (they cut rails with this saw and similar pieces of iron). The grade of steel does not play a special role. It doesn’t really matter whether it’s P6, P9, P6M5 or the really tricky P3AM3F2. This is all wonderful material. The thickness of these canvases is usually 1.8:2.3 mm. We are looking for the right size piece of canvas. You can buy canvas at any construction market. 2. Tree. Or rather, a couple of linden or birch plates. Evenly planed and dry. Why linden or birch? This wood is very good at absorbing the hand sweat that comes with the wood carving process. But still, linden is preferable, although it is inferior to birch in terms of fur. properties. 3. PVA glue or any other hardening wood glue. You can also use epoxy resin. Glue 'Moment' and the like are not suitable; they do not hold the glued seam. Sharpening the blade. We choose the dimensions of the blade and shank based on what we will do with this knife. If you roughly plan wood, then we make the blade larger, 70-90 mm, more is possible, but not necessary. If delicate work, then smaller, 30-60 mm. Shank:. We leave as much as we don’t mind. On the shank, using a sharpener or grinder, we make a bunch of “teeth”, notches or whatever else you call them. This will serve as a good fastener in the tree. We sharpen the blade; razor sharpening of the blade will make the cut softer, and the blade will not get stuck in the wood. (see Fig. 1). We sharpen the blade and straighten it to the point of shaving hair (we use our own carcass). After sharpening, we wrap the blade with paper and electrical tape so as not to cut ourselves when installing and processing the handle. We attach a shank to one of the wooden plates and trace the outline of the shank with a pencil. We hollow out a groove in the plate with a depth equal to the thickness of the blade. The blade, after being inserted into a wooden plate, should not protrude; it may even be necessary for it to be slightly below the plane of the wood by 0.1..0.2 mm. There is no need to worry, the glue will fill this gap. In principle, you should get what is shown in Fig. 2. On the wood planes to be glued, using the sharp tip of a knife, apply a mesh for better penetration of the glue. Apply glue liberally, insert the blade into the groove, and press the second plate. We tighten this entire structure with clamps or clamp it in a vice until the glue dries completely. For PVA this is usually a day. When the glue dries, shape the handle into an oval shape. I deliberately do not give any cross-sectional dimensions; everyone can choose what suits their hand, how it will be comfortable to hold and how it will be correct. We carefully grind the handle, but without fanaticism; there is no need to grind it to a “cat-like” state. There is also no need to soak it in oil or any other nasty thing like cyanoacrylate, let the wood nourish the sweat from your hand.
Sometimes it is useful (but not necessary) on the handle, closer to the blade (step back 5 mm from the edge of the handle), to sharpen a narrow groove with a file, and wrap it with wire or thick cotton thread and soak it with glue.
Make the winding not wide, 10:15 mm wide, so that the winding and the handle are flush.
Such strengthening of the structure is necessary for power work or when repairing a knife, when you are lazy to make a new handle.
It is useful to have several Bogorodsk knives, of different sizes and with different sharpening angles. Personally, I have 5 of them.
The name comes from the fact that the knife has a beveled blade.
Well, that's not the point:
The knife is used for cutting through material, cutting veneer, trimming contours, various types of carvings, such as flat-relief geometric carvings, Kudrinskaya, etc.
This knife is also called a shoe knife, but, as far as I could find out, a shoe knife is distinguished by a one-sided (chisel) sharpening of the blade. Although not always. General view and dimensions are shown in Fig. 3
The knife manufacturing technology is exactly the same as the Bogorodsky knife. The only difference is that the handle of the knife is adjusted in such a way that it is convenient to hold the knife with a reverse grip, with the blade facing you. This is the basic position of the knife in the hand.
The number of jamb knives a carver has is also not regulated by any rules or traditions. I have about 10 of them, all different. "
You can enlarge the images by clicking on them or open the following links:
Bogorodskiy knife https://cam.narod.ru/oborudovanie/instrument/pict/knive-bogorodskij-big.jpg
knife - jamb https://cam.narod.ru/oborudovanie/instrument/pict/knive-kosiak-big.jpg Source https://talks.guns.ru/forummessage/5/61314.html Additional links on the topic: How make a knife for wood carving like Carpenter https://www.finka.ru/howdo/50.htm Folk crafts. Tools for wood carving https://www.kefa.ru/article/xple/te/ Classification of tools for carving. Carver A. Senkevich https://rezbaderevo.ru/topic.php?topic_id=350
About chisels - for beginners. V. Kuznetsov https://cam.narod.ru/oborudovanie/instrument/knives.html Catalog of resources about wood carving https://cam.narod.ru/techno/rezba.html
Compiled by Alexander Viktorovich Abushenko, May 2006
The world of wooden toys - information system
Source: https://www.cam.narod.ru/oborudovanie/instrument/knives.html