When processing a workpiece in a metalworking workshop, the part is secured to the workbench so that it does not move. A quick-release clamp will be a useful tool for a carpenter or carpenter if a vice is not installed on his workbench.
Do-it-yourself quick-release clamp
You can make this mechanism with your own hands, so that you can then easily connect the parts at the right points with self-tapping screws and bolts.
With clamps, the elements stick together well while the master is busy with other things.
Where are homemade clamps used?
In the garage, the carpentry room, the master collects a set of tools that will be needed for various crafts. It is often necessary to securely secure workpieces to a table or workbench in order to finish the material.
A clamp will be needed to maintain a stable position of the parts in the following cases:
- when assembling furniture, when gluing boards and panels, you need to hold parts of the elements;
- when installing echo sounders on the ends of boats, fishermen use them to secure bait;
- a table lamp is easier to hang on the wall, various household items that need to be held with one hand;
- installation of the saw blade on the grinder occurs with an additional holder;
- the wood floor screed is made with a holding device;
- repair car wings using the device;
- Clerks use self-made clamps to bind large ledgers;
- repairmen close the covers on watches using miniature, supporting installations;
- Shoemakers use homemade jigs in their workshops.
Welders also often require a stable, reliable holder with a metal body to allow them to work freely with both hands.
DIY quick-release clamp
Sometimes when working with wood, clamps are required, with which you can fix or hold a part to a work table or place within just a few seconds.
In order to make a quick clamp, you will need wooden boards or plywood 16-18 mm thick. Initially, the tracing paper of the parts is transferred to wood and cut out using a jigsaw. In the driven parts, you will need to make cuts to fit the mating part.
At the marked points of the axes you need to make holes with a diameter of 20 mm.
Hinge axles are cut out of a round blank, ground and pressed into the holes. The result is a clamp design that is somewhat reminiscent of scissors. The drive uses a standard lead screw with a diameter of 6 mm.
Clamp for holding and securing small parts
In a similar way, you can make a clamp for fixing particularly small parts. You will first need to mark and cut out two halves of a device similar to tweezers or a medical clamp from OSB or plywood.
The crescent-shaped blanks are connected to each other using a wooden axis, so a hole of the appropriate diameter must be made in each of the parts of the clamp. For the clamp body, you can use ash or spruce; the axis must be made of a harder material - oak or beech.
Clamp made from rebar and wood
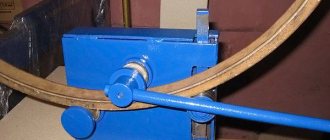
Using a reinforcing rod 50-60 cm long and 8 mm in diameter, you can make a very strong and at the same time lightweight frame for universal use.
The structure is based on a wooden support block made from hardwood. Block dimensions 150x50x30mm. Dimensions may vary depending on the thickness and bending radius of the reinforcing bar. A hook from a piece of reinforcement can be bent with a heavy hammer on a steel pipe. The bend must be done so that the bent reinforcement is flat.
Next, a 7.5 mm through hole is drilled in the block, and the finished reinforcing hook is hammered in; a hole must be made along the line for the lead screw and the clamp must be assembled.
Main types
At home, you can make a simple hand-held device for carpentry.
The design of the tool will include the main parts:
- frame;
- clamping couplings;
- moving part;
- screws or levers.
Homemade metal clamp
The clamp prevents the clamped workpiece from moving; for this, the compression level is adjusted. Based on the form of capture of processed materials, the installations are named:
- corner;
- installation;
- screw;
- manual;
- quick-clamping.
For practicality, the tool is made with maximum extension and smooth working stroke. Depending on the fastening method, the clamp can be:
- G-shaped - the most popular among craftsmen due to its ease of design and operation. The metal bracket has a stop pad on one side and an adjusting screw screwed into the thread on the other. There is a working sponge inside and a handle is welded on top. The mechanism is convenient for processing heavy, large, but simple-shaped workpieces.
- F-shaped, universal with a supporting surface attached to a long rod and a block with a coupling sliding along it. The clamp is secured with an auxiliary screw.
- Pipe for fastening large parts. The grip level is adjusted along the length of the rod on the support platform with sliding jaws. Pipe clamps allow you to work with bulky objects.
- Corner elements connect. To create a right angle when joining, there is an installation of 2 supporting and working surfaces. These can be 2 perpendicular screws or a corner block is installed on one. Sometimes devices are created to position parts at different angles.
- Tape with a clamp made of durable synthetic material with a tension block. Adjust the corners with additional plastic fixtures. This device is used for processing workpieces rounded with a large diameter, when it is necessary to fix polygonal joints.
A do-it-yourself clamp can be made from wood and metal raw materials. The following devices are more suitable for a home workshop:
- screw;
- quick-clamping;
- pipe
Often you have to process workpieces using an angle or tong model.
These types do not require complex material characteristics and simple manufacturing procedures.
Homemade Clamp
Self-clamping option
For gluing parts, it is better to choose the simplest clamp model, which has an F-shape. The stores sell various models that consist not only of wood, but also of metal. The cost of such instruments is high. Therefore, many craftsmen prefer to make them with their own hands.
For small jobs, a cam-type clamp is ideal. For example, if you need to glue small parts or fix workpieces. This model works in the same way as the f-shaped element. The tool includes 2 jaws and guide bars. Sponges: movable and fixed. For reliable clamping, it is necessary to fix the workpiece well and rotate the cam 90 degrees.
You can make such a tool yourself with a minimum set of tools and materials. Before you begin, you should draw a drawing of the product. You can use any material for manufacturing, and also change the standard sizes as you wish.
The tire is made of wood or metal. Small bolts and rivets can be used instead of metal pins. It is recommended to make movable and fixed jaws at the same time, since they mirror each other. Their width and length can be changed to increase the grip of the product.
What's special about homemade devices?
It's good to have factory tools in the workshop. But everything breaks, and there are so many improvised materials that will help avoid problems and reduce the time to produce the necessary things. In homemade devices, it is necessary to take into account the design features:
- couplings that firmly hold the material being processed must be thick, where the objects being connected will be in a rigid state and the seam will not bend during welding;
- it is necessary to use copper screws, their threads are not damaged by soldering when molten alloy gets in, the service life is increased;
- welding clamps provide free space for action, increase working areas, the welder installs parts at the desired angle, adjusts their position.
Housing design with mobile unit and clamping bolt
The design of the housing with a mobile unit and a clamping bolt allows you to control the work process, increasing productivity, reducing production time.
Racks for a set of clamps
Working tools and clamps should first of all be stored in a specially designated place. Instead of a pile of tools, from which it is difficult to find and select the necessary device, it is best to make several split racks or shelves. In this case, it will take only a couple of minutes, and not half a day, as before, to quickly select several clamps that are most suitable in size and design.
Workflow algorithm
Basically, the clamp clamps parts at right angles. But you can install a slope in the design if necessary.
Metal devices
Metal devices hold the workpiece tightly, they are stable and more reliable.
The following procedure must be followed:
- The body part is created, and alloys with a thickness of 10 mm are used to produce the base. Clamps are made from angles that are welded or bolted.
- A metal rod, console, or several nuts fastened together are suitable for the clamping device. Holes are drilled on the bracket and threads are screwed on. Fixed to the base with bolts.
- When forming an angle, pay attention to the clamping brackets. Only connect corners of the same size. A reliable design would be a fixed coupling with an angle, installation of 2 of the same element, pressed to the brackets and fastened by welding.
- Correct installation of the mobile device. The guides are attached to the sides; the internal base will move along them. A groove is cut in the direction of the beam dividing the structure from the corner into 2 equal parts.
- Use a drill to make holes, and use a screwdriver to tighten the bolts with nuts and washers.
- The hardware is chosen with a thread on the rod, which is not screwed to the head.
You can try these recommendations in practice:
- cut 3 strips of 45 mm wide and 110, 260 and 510 (mm) long from a metal sheet;
- prepare rectangular iron plates;
- weld 1 sheet onto the base;
- 2 steel sheet is welded to the smaller side;
- connected by welding the washer;
- apply the nuts to the moving part.
- the leg of the rod is installed in a parallel position;
- welding of the first steel rectangle is performed to the outside;
- the mobile part is fixed inside the device at the ends;
- The washers are welded to the rod.
The conventional device creates problems with some types of work. Due to the limited installation location that can perform operations at right angles. The limitation is eliminated by a detachable bolted connection and an adjustable clamping bolt. Using hardware, select an angle, then attach the workpieces.
DIY wooden universal clamp
The easiest way is to make a clamp from a wooden plank and timber. Wood is a fairly affordable material, so if you mark the parts correctly and use the proper tools, you can make a clamp of any level of complexity without much effort.
To make a wooden clamp, you will need the following tools and accessories:
- Tabletop drilling machine with a power of 400-500 W for drills from 1-15 mm. The vertical stroke of the drill chuck must be at least 120 mm;
- Electric grinding wheel. You can do it yourself; to do this, instead of an abrasive stone, use an electric sharpener to install a circle of plywood, 10 mm thick and 350 mm in diameter, on which sandpaper sheets are glued on both sides;
- Hand-held circular saw for wood with a blade diameter of at least 150 mm. You can use a grinder or a band saw.
All other operations can be done using hand tools. Of course, you can also drill holes and cut grooves with a hand drill and hacksaw, but achieving the required quality and manufacturing accuracy using hand tools will be very difficult.
Classic F-shaped clamp
The design of the simplest wooden clamp looks like the Latin letter F. The vertical and upper horizontal strips are one whole - a fixed guide connected by a stop of one of the jaws. The central bridge of the letter F is the movable or mating part of the jaws, which is driven by the lead screw. The third part of the clamp with the drive screw is manufactured in a removable version. The clamp can be rearranged along the length of the guide bar; the distance between the jaws can be made smaller or larger, as long as the length of the base rail allows.
The general view of the clamp is shown in the photo.
First you need to make a guide rail. Larch or spruce board is suitable for these purposes. All other parts of the clamp can be made from any wood, except soft varieties - poplar, linden, birch.
Important! For the manufacture of any fixtures and auxiliary equipment, only defect-free wood is used. If there is none, then it is best to make a clamp from ordinary plywood with a thickness of 15-20 mm.
The base strip is cut to the length of the future fixture. The supporting stationary part of the clamp jaws bears the lion's share of the load, so it is best to make the guide from the strongest wood or use a little trick.
A semicircular groove is cut out along the side end of the slats, into which a steel rod with a diameter of 8-10 mm is placed. On one side, the end is bent around the end; on the other end, the rod is connected to a fixed jaw with a nut screwed onto a pre-cut thread.
The fixed part of the jaws is glued to the guide bar with wood glue; after the glue has dried, the supporting surface is carefully cut at an angle of 90° to the guide bar. This part can be made glued, or the mounting groove can be cut using a hand-held circular saw.
The mating or movable part of the jaws is cut out together with the support for the screw from one block. Next, you need to make U-shaped cuts in both blanks, allowing you to fit the parts onto the guide bar. After removing the burr, the workpiece is placed in a package in a drilling machine and a hole is drilled for the lead screw.
If you plan to use the clamp quite intensively, then you need to press a brass tube into the hole for the screw and make a sliding bearing. Otherwise, the lead screw will quickly break the hole by 2-5 mm, which will make the tool unsuitable for work.
Clamp assembled from wood and steel
A wooden clamp is convenient to use if you need to apply a little pressure to secure a package of several planks or glue two parts. If you plan to process timber or boards with carpentry tools, a plane or a grinder, then it is best to make a clamp for fixing the material with a metal guide.
The process of making a clamp from wood and steel is as follows:
- Initially, you need to select a steel rail, preferably a tire with a thickness of at least 5 mm and a width of 25-30 mm. Along the length of the tire on a drilling machine, you need to make a series of grooves or holes to fix the rearranged part of the jaws;
- The clamp and the corresponding fixed part of the jaws are cut from one block of wood; it is best to make it from oak or larch. In both workpieces, mounting grooves are cut and steel plates are fastened;
- Next, holes are drilled in the adjustable support for installing the lead screw; this must be done on a machine or guide;
- The fixed part of the jaws is installed on a steel rail and fixed with a clamp to maintain an angle of 90°, after which it is necessary to make two holes and secure the part with rivets or screws;
- The moving part of the jaws is made of maple or ash to make precise alignment; the workpiece is joined to an adjustable support and drilled with a drill with a diameter equal to the size of the lead screw.
All that remains is to assemble the clamp, the rearranged part is drilled under the fixing bolt, the bolt or pin is installed and tightened with a nut. At the end of the assembly, you need to make two or three idle runs to settle the walls and facilitate the rotation of the screw.
Wooden clamp for fixing and tightening sets
In 40% of cases, work in a carpentry or furniture workshop requires the use of long clamps to tighten entire sets or packages of planks, form furniture panels, table tops and door leaves. The process of making clamps for screeding needs is practically no different from a conventional wooden F-shaped device.
Unlike other device designs, the clamp for the screed is made of solid timber, with a cross-section of 50x50 mm and a length of at least 100 cm. A series of holes are drilled in the guide bar from the timber on a machine to rearrange the mating part of the jaws.
In addition, you will need three blocks of oak or beech to make a fixed support with a lead screw and two parts of the jaws - rearrangeable and movable.
An installation groove is cut on the reciprocal adjustable support and a hole is drilled into which a nut is pressed under the mounting bolt. The distance between the supports can be made larger or smaller if the sponge is moved to the next hole and secured with a bolt.
Wooden clip from hanger parts
A small device, very reminiscent of a tightening type of clamp, can easily be made from ordinary suit hangers. The wooden base of the hanger is made of two identical halves of a trapezoidal shape.
The first step to making a clip from a hanger is to fold the two halves of the hanger into one bag and clamp it in the vise of a drilling machine.
Without opening the machine vice, you will need to make four holes with a diameter of 8 mm. You get two blanks, each of which has a pair of through holes. All that remains is to make a clamp; to do this, you need to cut off two studs with M8 threads, each 25 cm long. The studs can be glued into one of the halves or a symmetrical version can be made, as in the photo.
The clamp can be used to make a fixing device for gluing boards, holding pipes, or tightening a package of several planks.
Quick C clamp for wood
In addition to the classic options for carpentry clamps and clamps, when working with furniture and wood materials it is necessary to use small-sized clamps. One such device is a C-shaped clamp made of wood, photo.
Before making a clamp, you need to find a suitable piece of wood. C-shaped clamps require very strong wood, so acacia, elm or steppe oak are used for their manufacture. The U-shaped body is cut out with a grinder. With a total case size of 100x100 mm, the width of the sides should be at least 2.5 cm.
In one of the sidewalls you need to make a through hole with a diameter of 12 mm, into which two steel nuts, M8 or M6, are pressed. The easiest way is to screw the nuts onto the threaded rod, coat them with glue and insert them into the hole. You need to make a few gentle blows with a mallet so that the nuts fit into the through hole with a slight tension. All that remains is to make the handle, and the C-shaped clamp is ready.
Simple models
A self-made metal clamp, simple in design, will allow you to glue the parts together. You can clamp them and leave them until the glue completely hardens. To do this you need to prepare:
- 2 thick metal strips;
- in each plate there are bright holes that completely coincide with each other;
- Threads are cut on the studs.
Working with the clamping device:
- parts lubricated with adhesive are inserted between the iron sheets;
- use a wrench to tighten the nut on the stud;
- remove for a while until the elements stick together.
Monolithic hacksaw
The next model requires a monolithic hacksaw.
Or rather, you will need saw frames for cutting metal fragments. In addition, prepare:
- hairpins;
- steel plates;
- screws with nuts.
A support platform is welded to one end of the frame, and a nut is installed on the other to install an adjusting screw with a coupling and a handle.
Clamp in the form of a caliper
Devices that are shaped like calipers are used to firmly hold small parts. For a homemade clamp, you will need, as before, plywood and small thickness bars.
For screws, it is best to take studs with rectangular or trapezoidal threads. The thread pitch is 2 turns per cm. It is very good if the stud has a rear sight on one side of a slightly smaller diameter than the thread. It can be used to seat the handle. On the other hand, a rear sight with a slightly larger diameter to accommodate the bearing is desirable.
So, in the simplest clamp, one end will be stationary, and the second will move through a worm gear.
To release the workpiece, you need to move the bracket to the required distance and turn the knob a few turns. This will fix the element. After this, you can release the mechanism and the workpiece will be released.
The simplest version of this model is equipped with a rail structure. The guides, which are arranged in parallel, have cut grooves at equal distances. Fixed stops are secured using rods made of metal. They can move exactly along the width of the workpieces. At the end of the beams, fixed stops should be installed, which have a worm mechanism. The usual method is to clamp it with a hairpin and a furniture nut.
The procedure for making a clamp from a pipe
For ease of production, you need to make a drawing.
Drawing
Prepare in advance:
- pipe;
- metal rings - 3 pcs., with an internal diameter equal to the external pipe dimensions;
- welding machine.
Perform the work in the following order:
- 2 rings are welded to steel corners that act as a support platform;
- the free ring is welded to the pipe with the nut installed;
- a long bolt is screwed in, a metal rod is welded onto the head, which will serve as a handle;
- a ring is put on the free end of the pipe, the upper coupling is located on it, the lower jaw is drilled to install the pins;
- install the lower ring.
Such homemade holders are used when assembling furniture sets and any construction or installation work.
Operating principle
The principle of operation of the clamp is very simple. It is necessary to separate the jaws so that they are separated from each other at a distance of 3 cm greater than the width of the shield that will be installed. Next you need to fix them on the pipe. To do this, tighten the nuts that are located at the edges. The blanks must be placed on the tubes and sealed with glue. Then they need to be pulled together by rotating the “lamb”.
If you know how to use a grinder and a welding machine, you can make the same clamp for gluing wood from metal.
To maintain the plane of the plot with tubes, it is recommended to arrange the clamps in a checkerboard pattern. The main advantage of such a tool is its ease of manufacture and operation.
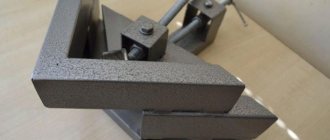
What you need for corner clamps
Welding is often carried out by joining metal sheets at an angle. They need to be held motionless, as a welder can do if his hands are occupied with an electrode and a mask.
Fixing device
A simple fixing device will help out.
Pre-collected:
- 10 mm. thickness of metal strips;
- corners 40x40 or 50x50 (mm.);
- nuts – 4 pcs.;
- bracket.
The corner is fastened with bolts or welding with a rigid connection. The clamping device will be nuts welded to each other or a cantilever support with threads screwed into the holes. The clamping mechanism will move on the installed guides. Holes are drilled with a drill, bolts are inserted, and nuts are tightened.
The next model is also not complicated, but it is attached to a workbench - it’s more convenient to work. You need to prepare:
- 2 corners measuring 70 x 70;
- 2 sheets of iron;
- 2 steel studs;
- nuts – 6 pcs.
Production order:
- The corners are welded at right angles.
- For rigidity, metal strips are installed.
- In the middle of the corners, 1 console is welded.
- A thread is cut into the drilled hole.
- A pin is screwed into the welded nut; it will fix the workpiece.
The nuts connected by welding are installed on the end of the stud and also welded.
Cam quick clamps
Often, a part or workpiece in a clamp needs to be fixed quickly, and the clamp must be made without unnecessary movements. For example, when drying or painting a batch of panels or frames. For these purposes, it is best to make a specialized device with cam clamps, photo.
The difference between this device is that instead of a traditional lead screw, plywood eccentrics are installed on the vertical jaws of the clamp.
To do this, you must first make a cut along the thickness of the eccentric on wooden racks.
Next, the eccentrics are installed, the axles are drilled, aligned so that the clamp can be pressed with your finger, and the device is assembled.
Universal device
Pipe welding device
This device is useful for welding pipes.
Components needed:
- corners – 2 pcs. 70 x70 (mm.);
- metal up to 10 mm. thickness – 2 strips;
- bolts – 3 pcs.;
- nuts – 5 pcs.
Perform the work in order of priority:
- steel strips are cut at the ends at an angle of 45 degrees;
- drill holes for bolts and fasten the plates with them;
- weld corners 7 cm wide to the iron;
- Hollow recesses are drilled on the body base;
- Nuts are installed by welding on each side.
In such an installation, you can work with pipes at the desired angles. For this:
- unscrew the nuts on the steel support;
- set at the desired angle;
- screwed with top bolts for secure fastening.
If there is a vice, the clamp is fixed to adjust the desired angle.
Materials and assembly steps
In order to make tree clamps, you will need the following elements:
- beech or birch block;
- feather drill;
- pipe 2.5 cm;
- mortise nuts of suitable diameter;
- a nut that has a rounded knob (used for decoration);
- a cutter with a diameter of 2.5 cm and a long pin.
- The basis of the material is a pipe, from which a piece of the required length is cut. Depending on the size of the jaws, it is necessary to cut the block. The pieces should be from 15 to 20 cm. For free movement of the timber along the pipe, a hole with a diameter of 2.5 cm should be made at a distance of 2.5 cm from the edge. Parallel to the hole, a cut should be made from the same end. To fix the sponge on the pipe, connect the hole to the end.
- For the driving nut, you need to drill an additional hole on the side of the cut. You need to drive a nut into it and tighten it with a bolt on the back side. To fix the sponge, clamp the pipe in the hole. To move the pipe, you need to unscrew the bolt, then move the element and repeat all the steps again.
- The lower clamping part has 2 jaws; it is slightly larger than the upper one and has an additional nut. The structure of both parts is identical. An additional driving nut is located at the opposite end of the pipe into which a stud with a wing nut is installed.
- In the second collapsible moving part there are no clamping parts such as cuts and nuts. The dimensions of such an element are also rather large. In this part it is necessary to make a recess for the stud device.
What's the result?
Clamps
There are no standards or serious requirements for the manufacture of clamps.
The device must fulfill its purpose and meet the characteristics of:
- Reliability and quality. A hand vice or any metal fastening device is durable and lasts a long time. Parts with different elasticity coefficients can be tightly tightened.
- Light weight. Such units are usually made mobile, they will have to be moved, so the weight of materials is one of the important parameters.
- Strong grip. Steel couplings allow you to firmly hold raw materials for processing. They should not turn, slide or fall out of the groove.
- Versatility. It is better to assemble a tool to perform different functions. There is no need to accumulate many mechanisms with one direction. The device will be able to hold both metal alloy and plastic with wood with maximum stability.
Homemade holders are used for processing various materials; they can have a smooth, tubular shape. It is important to choose the right clamping tool. To do this, you need to clearly know for what purposes the mechanism will be used.
Summary
Article Name
How to make a metal clamp with your own hands
Description
Homemade metal clamp. How to make a metal clamp yourself - drawing and video.
Author
Sarychev Alexander Viktorovich - forensic construction and technical expert, candidate of technical sciences
Publisher Name
Wikipedia of construction tools
Publisher Logo
- Related Posts
- Hand jigsaw for wood - review, instructions for use
- Grinding machine - how to choose
- How to choose a spray gun
« Previous entry
Varieties
The purpose of this publication is not to build something like an encyclopedia of mounting clamps - there are many types of them, and there are even more patents for new, “super-super” ones. Our task is to show which clamps are most needed in a home workshop, and how best to make a clamp without wasting a lot of material and time.
The most common types of clamps in handicraft production are shown in Fig:
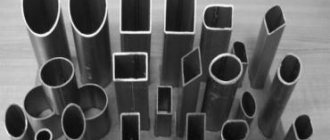
- G-shaped (G-cramp; G-clamp) - the simplest, most reliable and cheapest of general-purpose clamps. Disadvantages: it takes a long time to tighten and can turn the parts being glued if the stop hinge is of poor quality or not maintained. The latter is quite important: an adhesive layer that has not set is a good lubricant, but it is undesirable to separate and recompress the surfaces being glued together, as the strength of the dried joint decreases sharply. In addition, a regular G-clamp does not hold round parts well, so a special pipe clamp is used to secure pipes or a round profile for welding or butt soldering (see next figure). Assembled from ordinary structural steel s=(2.5-4) mm, such a welded clamp provides reliable fixation of pipes up to d(120-150)x(1.5-4) mm.
- F-shaped (F-cramp). Quick-clamping, operates on the principle of jamming the sliding stop in the dead center position. Pressure until it is firmly secured is most often provided by a screw clamp, as in a G-shaped clamp. An even “softer” and faster clamping, but less reliable, is provided by a trigger-eccentric clamping mechanism, see below. The most versatile and widespread of the clamps. The main disadvantage is that due to vibrations and shocks during operation, it can self-unclip and release. Or, on the contrary, it jams tightly, and when wedged with a hammer blow (see below), either the clamp or the part “shoots out”. It is not suitable for adaptation to butt welding of pipes: the jaws are driven by indirect heating and the pipe joint moves apart.
- C-shaped (C-clamp, fixing tongs). A fairly narrowly specialized tool. The main purpose is to compress the parts to be glued. Simple C-clamps are made with a spring clamp. The trigger-lever clamp allows you to precisely set the clamping force.
- Angle clamps for welding linear parts (pipes, profiles) at a given angle. There is no completely established special Anglo-American term. The most commonly used are welding clamp and dead-lock clamp.
- Joiner's bench - a carpentry clamp for joining panels from boards, slats and beams, assembling units from shaped parts (for example, railings with balusters). On the trail. rice. a rail clamp is shown; There are also rack and pipe ones, see below. Please note that pipe clamps are sold under the name “pipe clamp”, and clamps for end-to-end welding/soldering of round timber should be searched for under the query “welded clamp”.
- E-shaped (E-clamp). A highly specialized tool for edging carpentry with glue. If you need to carefully glue an edge on existing valuable furniture/interior design, it is difficult to do without an E-clamp.
- O-shaped or tape, or crimp grip (loop stay, loop brace). Band clamps are most often used by virtuoso carpenters and furniture makers-restorers. If you can fetch up to $1000 or more for a well-restored antique Viennese chair, then for a slightly skewed or wobbly chair they will fetch, at best, 15-20 of the same ones. Making a frame for a large painting or photograph without a tape clamp is also not so easy.
- Lever-plunger (precision clamp). When the trigger is pressed, the plunger (pusher) with the clamping stop moves smoothly forward. The trigger is released - the plunger is fixed by a spring-loaded slide, which becomes in the dead center position. Pressing again releases the slide and further advances the plunger. A good lever-plunger clamp can securely clamp a chicken egg without damaging its shell. In a home workshop, such precision clamping is unlikely to be needed, but suddenly a good precision clamp can be obtained from a mounting gun for tubes with silicone, etc. viscous compounds. A fixed jaw can be easily installed into the opening (window) for the neck of the tube, and a movable one is mounted on the rod instead of the standard pusher. If necessary, both can be removed and the tool can be used for its intended purpose.
Useful tips
The clamp, like any other tool, must lie in the designated place. You can use a shelf in your garage or a toolbox for this. If you don’t have time to make a tool, then you can use your own ingenuity. It is easy to fix the round workpiece on the rings that are pre-stuffed onto the frame. The simplest clamp looks like a pair of bars wrapped in tape. In such a tool you can clamp a pipe or metal rod.
Special clamp designs
Having mastered the skills of making simple-shaped clamps, you can improve them and make devices for connecting complex parts.
There are homemade clamps made from a wooden hanger, which is sawn into pieces. They combine wood and steel and make more comfortable handles that allow you to quickly tighten the screw. This is especially important if you need to frequently change position or use several clamps at the same time. In the case of complex pieces, you can first cut them out of paper and then transfer them to plywood.
Made of wood and steel
This model involves the use of special steel, which is indispensable for working with important parts.
Here both durability and strength of the metal are essential. The goal is to provide a lightweight clamp that isn't too bulky but is quite durable and easy to adjust. The most difficult part is making the plate where the strip is inserted. It is best to make several holes and then cut out the material. It remains in the shape of a small round file. When the main part is cut out, use a grinder to clean the work area. The result may not be so perfect, but the bar will be easy to pass.
A hole must be drilled at the opposite end of the plate. It should correspond to the helix. The final metal part is the locking plate. Its end should be oblique and match the neckline.
This can be done on a belt sander. Wooden parts are easy to make. To do this you do not need to have any specific experience.
Why are glued wood panels made?
Even if the thickness makes it possible to create products with a large width, their subsequent operation raises serious doubts. Those who often deal with wood know very well that solid wood products are quite capricious in terms of use.
To ensure that a wooden product does not lose its original shape, the wood itself must be dried very well in advance. It is advisable to keep the material for at least four weeks in the conditions of the room where the product will be located subsequently. However, this condition is very difficult to comply with when it comes to a window sill or door. Changes in temperature and humidity, one way or another, will lead to deformation.
Gluing helps get rid of this drawback. To do this, wooden blocks are folded into a complete panel and then glued. In order for the workpiece to truly turn into a single whole, a special mechanism is used - a clamp. It can be created quite simply at home, saving a lot on factory models.