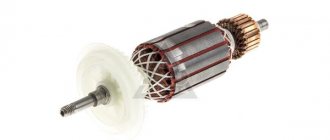
Any tool is subject to overload and various damages. You can drop a power tool or spill liquid on it, causing rust to appear on the windings, which will render the engine unusable. Rewinding an electric motor with your own hands is quite simple, but you will need a minimum set of tools.
The most important thing is that you need skill and experience in repairs. If the power tool is used incorrectly, it is the rotor winding that takes the full impact. The wire from which it is made may break or burn. But if you replace the winding, the tool life will increase significantly.
Tools and accessories
In order to independently rewind the armature of an electric motor with your own hands, you will need the following tools and devices.
- A multimeter or voltage indicator, as well as a 12 V lamp (power no more than 40 W), a megger.
- Winding wire, its diameter must be exactly the same as on the failed electric motor.
- Dielectric cardboard 0.3 mm thick.
- Electric soldering iron.
- Thick cotton threads.
- Epoxy resin or varnish.
- Sandpaper.
Before starting work, it is necessary to accurately determine the damage. To do this, you need to visually inspect the electric motor and check whether there is voltage going to the collector. Carry out diagnostics of the start button, ring it using a multimeter. Only if the power circuit is fully operational, it is necessary to disassemble the electric motor and repair it.
How to call
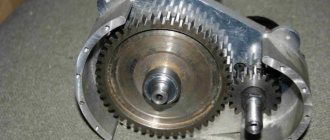
For high-quality diagnostics of the angle grinder stator, you should completely disassemble the power tool in order to remove all other structural elements, including the rotor, to ensure free access to all its parts. At the initial stage, it is necessary to perform a visual inspection. For a more complete picture, you should definitely check for defects using electrical instruments. What devices and how to ring the stator of an angle grinder are described in detail at the link “How to ring the stator of an angle grinder.”
Preparing to Rewind
Before starting work, you need to study the instructions for rewinding electric motors. If you do this yourself, it will take at least 4 hours, and that’s just to rewind the armature. Before starting repairs, you must complete the following steps.
- Count the number of grooves on the anchor.
- Recalculate the number of lamellas on the collector.
- Determine the pitch with which the winding is made. Most often, the coils are placed in the initial groove, then in the seventh, and attached to the first.
Left or right reset is also sometimes used. If winding occurs with a reset to the right, the coil goes to the right of the beginning of the winding. For example, if there are 12 grooves in the armature, the winding step is 1-6 and the reset is made to the right, the winding is laid in the first, then in the eighth and fastening is carried out in the second grooves. All these points must be taken into account, otherwise after repair it will turn out that the electric motor rotates in the other direction.
Prices for electric motor stator repairs
| Power, kWt) | Rotation speed, rpm | |||
| 3000 | 1500 | 1000 | 750 | |
| Up to 1.5 | 2740 | 2806 | 3417 | 4057 |
| 2.2 | 3090 | 3245 | 4154 | 4897 |
| 3 | 3642 | 3901 | 4973 | 5179 |
| 4 | 5012 | 4652 | 5413 | 6804 |
| 5.5 | 5296 | 5301 | 5978 | 7511 |
| 7.5 | 6630 | 6919 | 7312 | 11021 |
| 11 | 8139 | 8147 | 9937 | 13182 |
| 15 | 12088 | 12049 | 11737 | 14803 |
| 18,5 | 13001 | 13345 | 15217 | 24450 |
| 22 | 15057 | 15805 | 23408 | 25522 |
| 30 | 17648 | 18202 | 25857 | 29275 |
| 37 | 23803 | 25949 | 30677 | 40080 |
| 45 | 29055 | 28737 | 38389 | 48070 |
| 55 | 34546 | 32811 | 41481 | 60759 |
| 75 | 44670 | 48812 | 64472 | 82899 |
| 90 | 47893 | 51078 | 78166 | 99898 |
| 110 | 67202 | 73052 | 95759 | 122517 |
| 132 | 80848 | 87962 | 114110 | 147423 |
| 160 | 98012 | 106439 | 138740 | 179116 |
| 200 | 123101 | 132548 | 173924 | ———- |
| 250 | 154120 | 167435 | ———- | ——— |
| 320 | 237156 | ————— | ———- | ———— |
| kW | 3000 rpm | 1500 rpm | 1000 rpm | 750 rpm |
Winding direction and starting groove
In order to rewind email. engines in everyday conditions, it is necessary to remember, write down, or photograph each stage of the work. This will greatly facilitate repairs and avoid inaccuracies during assembly. To determine the winding direction and the initial groove, you need to find a coil that is not covered by others. She is the last one.
If the winding is laid to the right, then the initial groove is located to the right of the outer coil. This is where you need to start laying the wire. Only in this way can you achieve the most accurate winding, very close to the factory one. If the initial winding is symmetrical, and coils are placed in pairs, then there will be two initial slots. You can find them in exactly the same way as in the previous case.
Peculiarities
The master must find out how many turns of wire are laid in one groove and in the entire coil. To do this, you need to separate the coil located on top and count how many turns there are in it. If necessary, disassemble using a gas torch. The number of turns in the groove directly depends on:
- number of lamellas on the collector;
- number of slots on the anchor.
After calculation, it is necessary to prepare the collector; dismantling it is not required. To do this, you simply need to measure the resistance value between the housing and the lamellas.
The resistance should be in the range of 200-250 kOhm. After this, you need to completely dismantle the old conductor; to do this, remove the winding. Carefully protect all grooves and the armature body. Carbon deposits and burrs must be sanded with sandpaper. After this, it is necessary to cut rectangular sections from cardboard corresponding to the size of the grooves in the anchor.
Rewinding motors of drills and grinders
To begin with, the device should be disassembled and the engine inspected. The winding should not be removed immediately: first of all, you need to find out the number of its turns. This is not difficult to do: just separate the top of the coils and cut it off. After this, you need to burn it with a burner. Now you can count the number of its turns.
If you decide to rewind the rotor yourself, then you do not need to remove the collector. It is worth examining it and measuring the value of its resistance in relation to the body (this value should not be less than 0.2 Mohm). The collector should be cleaned of what remains of the previous winding and grooves should be cut in its contact part. This is necessary in order to then insert the ends of the coils into these places and seal them.
After cleaning, the anchor must be sleeved. The sleeves are made of electrical type cardboard, 0.2 millimeters thick, after which they are inserted into the anchor grooves. Only after completing these procedures can you begin to rewind the motor coils.
If it is decided to use circular winding, then the coil should be laid in a sequential manner until all the slots are filled. The laying direction should be chosen in the direction opposite to the clock hand (if the anchor lies with the shaft towards the winder). This type of installation is called “right-hand installation”.
In the collector area, the winding is fastened with a bandage. This should be done using a thick thread of cotton fabric, laid in several tight turns and tied tightly. There is no need to use nylon threads, since nylon can easily melt during operation of the device.
After this, you need to check the product for the absence of interturn short circuits and breaks in the winding. This is best done before the product goes into impregnation, because before impregnation it is much easier to change the winding on the armature.
To secure the resulting winding, you need to impregnate it. This can be done using regular epoxy, designed to be hot cured with the addition of a plasticizer. If this procedure is performed at home, then any varnish can be used. When the impregnation is completed and dried, it is necessary to perform a grooving. How you do this will determine how much the armature will spark. The amount of beating should not be more than 5 hundredths of a millimeter, and the cutter must be properly sharpened to work with copper. After completing all these procedures, you need to re-check the product for short circuits.
Winding a new wire
After this, you can begin winding new conductors. The circuit must be the same as the factory one. Start laying from the initial groove, observing the reset and winding pitch. Fastening is done using cotton threads directly at the collector. Synthetic threads are not recommended for use as they are susceptible to burning.
After completing all work, it is necessary to check the windings for interturn short circuits and breaks. If there are no breakdowns, then it is necessary to apply epoxy resin or varnish to the winding. To speed up the process, you need to place the anchor in the oven, setting the temperature to 80 degrees. Drying must be carried out for at least 20 hours.
How to repair asynchronous motors
If there are problems in the engine, then these are problems of either a mechanical or electrical nature. In the first case, a breakdown may be accompanied by strong vibration and characteristic noise. This usually indicates a bearing problem - usually in the end cap. Failure to repair the breakdown in time can result in the shaft jamming, and as a result, the stator windings will fail. At the same time, the thermal protection function of the circuit breaker may not have time to operate.
Practice shows that in approximately 90% of malfunctions of asynchronous motors, problems appear in the stator winding - in the form of a break, an interturn short circuit, or a short circuit to the frame. At this time, the short-circuited armature most often continues to function properly. Thus, if engine damage has a mechanical cause, the electrical part must be checked.
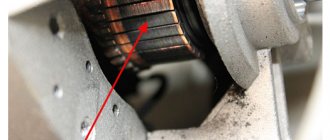
Most often, the problem can be identified by external signs and a characteristic odor (Fig. 1). If the breakdown could not be detected empirically, then we resort to diagnostics and make a continuity test for a break. If we find it, we disassemble the motor (we will talk about this in more detail later) and carefully inspect the connections. When no defects are found, we can say that we have a break in some coil. Therefore, you need to rewind.
If after testing the break is not detected, then we measure the resistance of the windings, taking into account the following nuances:
• it is necessary that the insulation resistance of the coils on the housing tends to infinity; • it is necessary that the windings of a three-phase drive show the same resistance; • it is required that for single-phase models the resistance of the starting coils exceeds these parameters of the operating windings.
You also need to remember that stator coils have very low resistance. Therefore, to measure it, there is no point in using devices that have a low accuracy class - this is the majority of multimeters. The issue can be solved if you assemble a simple circuit using a potentiometer, adding an additional power source - for example, a car battery.
How to take measurements:
• connect the drive coil to the circuit presented above; • use a potentiometer to set the current to 1 A; • calculate the coil resistance using the following formula: where R K and U PIT are described in Fig. 2. R – resistance of the potentiometer, – voltage drop across the measurement coil (shown in the diagram by a voltmeter).
Rotor balancing
In order for the power tool to work as efficiently as possible after repair, you will need to do balancing. Since all work is performed at home, certain recommendations must be followed. Rewinding an electric motor with your own hands is quite simple; balancing it will be much more difficult.
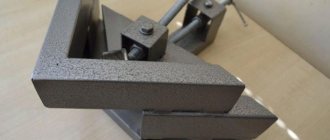
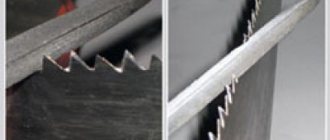
- Pick up two steel blades. They should be even and smooth.
- These blades must be installed parallel and attached to a rigid base.
- It is necessary to maintain a distance between them that is equal to the size of the rotor.
- You place a rotor on these steel blades and watch how it moves.
- The anchor will definitely start to rotate, the heaviest part will be at the bottom.
- It is necessary to shift the center of gravity to the axis of the rotor, securing loads on it.
After balancing, the anchor should be motionless.
In order to equalize the sides of the rotor, it is necessary to hang small weights made of plasticine on it. Only after you achieve balance, you need to remove the plasticine weights, weigh them, and solder the metal. After this, be sure to recheck the balancing.
Features of testing asynchronous motors
Asynchronous motors can be single-phase or three-phase. There are specifics to checking these machines.
- In single-phase asynchronous machines, the starting winding has a higher resistance than the working winding. You can check this using any multimeter.
- There should be a large resistance between the windings and the motor housing.
- In three-phase motors, all windings have the same resistance.
To find out more accurate engine parameters, you need to read the information located on its body. It contains a plate with all operating parameters, and sometimes even with winding connection diagrams.
About the developer
It is very good if the motor markings are preserved on the stator casing. Then you can obtain the necessary data for a specific model and the repair will be of the highest quality.
The number of outputs, as with conventional asynchronous motors, is three.
It can be noted that an electric motor for a bicycle wheel was built on the basis of the RPED. It has a “Slavyanka” winding and has absolutely no magnets. A motor without magnets is, of course, a revolution in the field of electrical engineering, the main thing is that work on this innovation does not stall at the very beginning.
AVE engine
In the case of single-phase ave-071-4s, the winding characteristics are somewhat different. You need to find the starting and operating windings, their outputs, and know their connection circuit. It is also necessary to know the resistance of the coils: this will allow you to check the correctness of their winding and connection, although, of course, the inductance depends on many other parameters.
Useful tips Connection diagrams Principles of operation of devices Main concepts Meters from Energomer Precautions Incandescent lamps Video instructions for the master Testing with a multimeter
Disassembling an asynchronous motor
Before rewinding the stator of an asynchronous electric motor, it is necessary to completely disassemble it. To do this, you will need to use a puller, since the covers are mounted on the bearings very tightly. Try to carry out all work as carefully as possible to prevent destruction of the cover and damage to the winding.
Squirrel-cage rotors very rarely break, so there is no need to touch it during repairs. Only the windings on the stator need to be changed. If there is blackening on the wires, this indicates a breakdown in the engine. All connections in asynchronous motors are practically invisible, since they are very well insulated, because they are fastened with a bandage.
Causes of breakdowns
408-105 Stator for Hitachi G18SE3 and HAMMER angle grinders. Photo 220Volt
The most common cause of failure of the stator of an angle grinder is a violation of operating conditions . Asynchronous motors have the ability to maintain speed regardless of the magnitude of the current load. This is both an advantage and a disadvantage.
The ability to perform work under heavy loads is accompanied by overheating of the tool , which during long-term operation contributes to the occurrence of malfunctions in the rotor and stator windings . Under the influence of high temperatures, the protective layer of the insulating coating burns out, which leads to failure of electrical components.
Removing the winding
After disassembly, be sure to remove the old winding. To do this, you will need to use a sharp knife to cut off all the ropes and get rid of the glue. The wires are cleaned as much as possible from dirt, without damaging the electrical connections. It is advisable to take photographs of all connections so that everything is done correctly during assembly. Be sure to draw up a diagram of the connection of all windings; you can use reference books for this.
Then you need to knock out the stakes made of PCB or wood, which are located inside the stator grooves. After this, remove the gaskets, freeing the wires. Find the outermost wire, take it to the middle of the stator, it should completely peel off from the winding. After this, unwind the next turn until the groove is completely free.
Wire winding
There are several ways to rewind the stator of an asynchronous electric motor, but when choosing any of them, be sure to remember each step during disassembly. This will make the repair easier, and significantly. For winding, you will need a copper wire in varnish insulation; its cross-section should be the same as on the electric motor being repaired.
Make sure that there is no damage to the housing and magnetic circuit of the electric motor. After this, it is necessary to make sleeves and install them in the grooves on the stator. In order not to count the number of turns, or to determine the thickness, strength and heat resistance of materials for the manufacture of sleeves, you can use reference literature. To do this, you need to know the type and model of the asynchronous motor.
All work in specialized workshops is carried out on machines. The machine even calculates the number of turns. But how can you rewind an electric motor at home if there are no such conditions? You will have to calculate everything yourself, or take all the data from the service book for the electric motor.
Step-by-step instructions for rewinding an electric motor with your own hands
It is necessary to immediately warn that without special equipment and operating skills, rewinding reels will most likely be a useless task. On the other hand, negative experience is also experience. Understanding the complexity of a process is the best explanation of its cost.
The first stage is dismantling
We present an algorithm of actions for asynchronous machines, it is as follows:
- Disconnect the drive from the network (380 or 220 V).
- We remove the electric motor from the structure where it was installed.
- Remove the rear cooling fan shroud.
- We dismantle the impeller.
- We unscrew the fastening of the end covers, and then remove them. It is advisable to start from the front part; after dismantling it, the rotor will easily “come out” from the rear cover.
- We take out the rotor.
This process can be greatly simplified if you use a special device - a puller. With its help, it is easy to free the motor shaft from a pulley or gear, and also remove the end covers.
Puller for dismantling
We will not provide instructions for disassembling a commutator motor, since it is not particularly different. The structure of an electric machine of this type can be found on our website.
Stage two - removing the winding
The sequence of actions is as follows:
- Using a knife, remove the bandage fasteners and insulating coating from the wire connections. Some instructions recommend recording the wiring diagram, for example, by taking a photograph. There is no particular point in doing this, since this is reference information and finding it out by engine brand is not a problem.
- Using a chisel, knock off the tops of the wires from each end of the stator.
- We release the grooves using a punch of the appropriate diameter.
- We clean the stator from dirt, soot, and impregnation varnish.
Stator freed from the winding
At this stage, we recommend stopping, picking up the housing and taking it to specialists. Independent dismantling will reduce the cost of restoration work. As mentioned above, without special equipment it is quite difficult to rewind reels efficiently. To understand the complexity of the process, we will describe its technology, which will make the choice easier.
Stator rewinding (final phase)
The process consists of the following steps:
- Installation of insulators in each groove (sleeving).
- The thickness of the material and its characteristics are selected from the reference book.
- Winding data is determined by motor brand.
- A special machine is used to wind the required number of turns of loose coils. You can find photos and parameters of homemade manual machines on the Internet, but the quality of their work is quite questionable.
Bulk Winding Machine - The coil groups are placed in the grooves, after which they are tied and connected. These processes are quite complex and are performed manually.
- Impregnation is carried out. To do this, the body is heated to a temperature of 45°C - 55°C and completely immersed in a container with impregnating varnish. It makes no sense to varnish the wires, since in this case there will still be voids.
- After impregnation, the body is placed in a special chamber, where drying is carried out at a temperature of 130-135°C.
- Final testing of the coils with an ohmmeter.
- Assembly and test run (if only the body, but also other parts and fasteners were transferred for repair).
If only the body was submitted for restoration, we recommend checking the coils before turning on the motor.
Completion of winding
After placing all the windings in the grooves, you need to insert insulators between the coils. The bandage must be carried out on the back side of the stator. Pass the thread through all the loops, while trying to tighten all the insulators and wires. Make sure that the insulating plates do not slip out of place.
Upon completion, be sure to carry out diagnostics of the entire winding, then warm up the stator and apply a special varnish. The stator must be completely immersed in varnish. This is how you can achieve maximum mechanical strength of the windings, because fill the voids and grooves. At this point, the rewinding of the electric motor with your own hands is completed, you can begin operation.
Rewinding the stator of an asynchronous electric motor. Photo and video
- Resistance to temperature changes.
- Simple and cheap assembly.
- No magnets.
- Resistant to dirt and corrosion.
- Duyunov's self-made motor-wheel has a complete replacement for imported components.
- The speed limit on the wheel is 100 km/h.
- The production cost is reduced by 30 percent compared to foreign analogues.
- The equipment has a reduced noise level and light weight.
- The model is durable and has a long service life.
- Maintenance does not require high costs.
- The modification has an increased range.