A screwdriver is considered one of the most popular tools used not only by builders, but also by home craftsmen. When working with hand-held power tools, it is important not only to follow safety recommendations, but also to learn how to insert and remove drills yourself. Below you can find a step-by-step process for installing drill bits and effective methods for magnetizing/hardening bits.
Care and storage
- regularly disassemble and clean the internal elements of the screwdriver from carbon deposits, dust and dirt;
- If unstable operation occurs, carry out diagnostics. Check the wear of the brushes so that you do not have to change the motor armature;
- Do not leave the instrument in areas with high humidity or under the sun. The same goes for the battery;
- Do not keep the battery near keys, coins or other short metal objects. In case of accidental contact with the poles, the battery will short circuit. As a result, a fire may occur;
- At the end of the working day, take a clean rag and wipe the instrument. The cloth can be slightly moistened with water without using detergents;
- The screwdriver should be stored in a dry environment with positive temperatures. Use a case or other packaging to prevent the instrument from becoming covered in dust.
Operate a screwdriver, observing safety precautions and the rules described in the instructions.
Choose the right equipment. And then the tool will serve you for a long time. How to insert a drill
into
a drill
and hammer drill
- 1 Varieties
- 5 How to insert a drill
- 3 What to do if the drill gets stuck
- 4 Videos
There are often problems that arise when working with a rotary hammer or another drill. Basically, the problem may lie in the inability to work correctly with drills. First, let's look at some differences between the cartridges and the drills.
Safety precautions
Before using a screwdriver, be sure to read the safety instructions in the instruction manual included with the tool. This tool is often used in production. As a rule, the instructions “How to use a screwdriver” must be included in labor safety regulations. To prevent accidents when working with a screwdriver, you must follow all safety rules. Do not trust the tool to people who do not know how to use a screwdriver and cannot follow safety precautions. For example, children, the elderly, sick people and people under the influence of alcohol.
Use this tool after wearing overalls and glasses. Remember that any tool, no matter what it is, is a source of danger.
Device and purpose
A screwdriver is used for various construction and repair work, but its main function is to quickly screw in and tighten fasteners: self-tapping screws, screws, bolts, screws.
It helps to cope with a large volume of tasks in significantly less time than using a screwdriver.
Budget screwdrivers of low and medium power are used in the assembly, installation and dismantling of furniture, equipment, construction of frame structures (partitions, walls, suspended ceilings) and other objects. A powerful tool with an impact mechanism copes with drilling holes.
In addition to the standard operations listed in the instructions for the screwdriver, it can also be used for other tasks. Use a mixer attachment to mix thin solutions. Using a special adapter, the device is connected to an ice auger to quickly make holes.
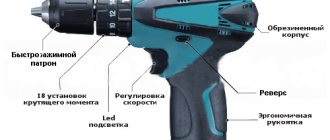
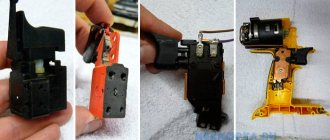
The body of most screwdrivers is made of plastic, which reduces the overall weight of the tool. Inside the case are located:
- engine. Depending on the type of device, it can be electric or pneumatic. The former operate from a network or battery, the latter from a compressed air tank or compressor.
- Gearbox. A gear mechanism that transmits rotational motion from the motor to the spindle.
- Clutch-regulator. Connected to the gearbox, it is used to adjust the screwing depth and torque.
- Start capacitor. He starts the engine.
- Chuck. Bits, drills, and socket heads are inserted into it. The most common are quick-clamping three- or four-jaw ones.
- Power source (battery) and/or power cord.
The body houses a control panel with a power button and a speed switch. To operate in unscrewing mode, reverse is used. Additionally, the screwdriver can have a backlight and a fuse.
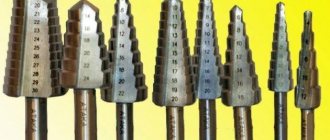
Bits - attachments
The screwdriver comes with several types of bits with different working edge shapes.
Straight edge bits are designed to work with fasteners that have a single slot (spline). Depending on its length and depth, a suitable bit is selected.
The shape of the cross-shaped bit is selected in the same way - the width of the slot and the dimensions of the fastener head itself are taken into account here. For reliable operation, the edge of the bit must fit tightly into the splines, otherwise there is a risk of “licking off” the edges of the splines.
To attach the bat to the chuck, a special attachment with a magnetized holder is used, which prevents the structure from falling apart and reliably holds the bat in a variety of positions.
To secure the bit attachment, you need to unscrew the moving part of the chuck.
Insert the nozzle and screw the cartridge in until it stops.
There are also very convenient double-sided bits that can be fixed in a chuck without an attachment.
For newbies
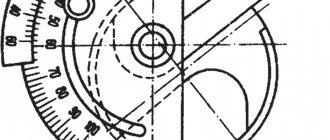
So, let's start with the simplest case - with inexperienced users. Screwdrivers have something called a torque regulator. It looks like a scale around the front of the screwdriver, which is right behind the chuck. There are numbers on it from 1 to 10, 15, 20 or even more - different for different models - and the last position on it is indicated in the form of a drill. If you rotate this regulator and set it opposite the special mark so that one of the numbers is next to it, then when a certain torque is reached, the cartridge will no longer rotate, but will begin to click. If you put it on a “drill”, then the screwdriver will try to twist with all its might, as much as the engine power allows it.
However, it is worth noting that with two-speed screwdrivers, at the second speed, even in the “drill” position, if the torque reaches a certain value, then a protective system is triggered, which simply turns off the current supply. At the very first speed, the screwdriver will also try to turn “to the last.”
And a beginner can start drilling or screwing screws, for example, when the torque regulator is set to one of the numbers, or the screwdriver is set to the second speed (and it is recommended to drill at it).
The drill can be clamped quite tightly, and as a result, when you start to release the drill or bit in the standard way (by turning on the reverse, holding the chuck and pressing the start button), either the torque limiter or the protective system may work.
Therefore, in such a situation, you just need to set the screwdriver to first speed and set the torque regulator to the “drill” position. On single-speed models, you only need to set the torque regulator to the “drill” position. Well, then again we unscrew it in the standard way.
Hard case
Well, it happens that the cartridge does not want to turn away, which means the drill cannot be pulled out of it. This should not happen on working cartridges, so if under any circumstances the cartridge does not spin up, this may indicate a malfunction.
Usually this does not happen abruptly - the cartridge begins to jam before it is clamped so that it does not turn around.
In such a situation, you can resort to two methods. I would like to immediately make a reservation that the cartridge will need to be changed after this. In this case, the drill needs to be removed in order to save the drill itself, and also to make it possible to remove the faulty chuck from the screwdriver. This cannot be done with a stuck drill.
- The first method is quite humane. You need to hold the drill in a vice and try to turn the entire screwdriver around it. You can spray WD-40 into the cartridge to make the task easier. It will be possible to turn the entire screwdriver with the chuck only if its design is such that the chuck is rigidly coupled to the screwdriver and cannot be turned except by pressing the start button. However, not all models provide this; therefore, you can rotate the cartridge using a gas wrench - the plastic part of it will deteriorate. If the drill gives in, then you need to rotate the chuck back and forth and gradually pull it off the drill.
- If the drill does not give in, then you will have to resort to the “vandal” method. We take a grinder and simply cut the cartridge. You just need to cut so as not to damage the screwdriver spindle and the drill itself, if you need it intact. Not a single drill can resist such a technique.
These are the ways to remove a drill from a screwdriver. If this is your second case, then I’m sorry, but I don’t know a more humane way and I don’t think there is one. At least that's how I got the drills out. And this is where I end this article - see you next time!
How to replace the chuck in a drill with your own hands?
To attach the chuck to the drive shaft of the drill, a threaded connection or Morse taper is used. A visual inspection of an electric drill will not always help indicate how to secure the drill chuck. This can be indicated by the marking on the cartridge: it is stamped on its surface.
Replacing the conical type of part
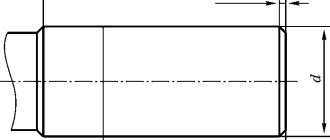
The standard size of the Morse cone (according to GOST 9953–82) consists of 9 values: from B7 to B45. The larger the number after the letter B, the larger the diameter of the cone.
The marking on the cartridge indicates the type of fastening
Thus, having found the marking “B” on the surface of the cartridge, we can conclude that this is a device with a conical mounting base. With this method of attachment, the cartridge can be easily removed. It is enough to use a drift and a plumber's hammer.
Video: how to remove a chuck with a cone from an electric drill?
Replacing the reversible threaded chuck
To secure the drill clamp to an electric household drill using a threaded joint, two types of threads are used:
- inch (for foreign models);
- metric (from Russian manufacturers).
On an electric household drill, two types of threads are used using a threaded joint.
The following type of marking is applied to the surface of the body of the threaded clamping chuck: 1.5–13 1/2 – 20UNF or 1.5–13 M12x1.25.
The reversible threaded cartridge for fixation has a screw with a left-hand thread. You need to know this nuance when removing a broken cartridge. In order to get to the screw head, it is necessary to recess the cams into the collet completely. As soon as the head of the screw is visible, use a hardened Phillips screwdriver to unscrew it to the right clockwise. Then hold the hex key in your fists and hit it sharply in a counterclockwise direction. After the cartridge is torn from its place, it can be easily unscrewed.
Video: how to remove a chuck from a reverse drill or screwdriver?
On other models there are other options for mounting the cartridge on the thread. In some cases, the cartridge is twisted entirely from the threaded end of the shaft. In other cases, the screw can be fixed with a special thin key using a narrow groove. The main difficulty is to move the cartridge from its place when unscrewing.
Sometimes this is very difficult to do. In any case, to remove the cartridge you need: a mechanic's tool, the necessary skill and patience.
Fastening device – non-combat cartridge
The chuck is the fastener in which the drill is fixed. The fastener itself is screwed onto the tool spindle. Most often, drills are equipped with a jaw chuck. This design is a hollow cylinder with metal “fingers” inside. When you turn the adjusting ring, which is located outside the assembly, the “fingers” converge or diverge along the inner cone-shaped surface. In such a “fist” you can clamp both a drill with a cylindrical shank and a hexagonal one.
Convenience and ease of use have made the cam mechanism popular. However, it is not without its drawbacks. One of them is the difficulty of working with small drills. A short product may simply fall inside. You can still secure it by placing the drill in a horizontal position, but you can’t put too much pressure on it while working. If another drill was inserted into the drill, you can remove it by turning the adjusting ring in the appropriate direction. It is not always possible to do this manually; for this purpose there is a special key that acts like a lever, increasing the force. By the way, it is also not recommended to tighten the drill without a key - the larger the diameter of the drill, the more reliable the fastening should be.
When purchasing fasteners, make sure that they are rubberized - this way you will be less likely to injure your hands when securing the tool.
The quick-release fastener, the second most popular, can be operated without a key. Simply insert the drill and turn the lever; this can often be done with one hand. The drill fixation that this type of chuck provides is quite sufficient for most jobs, however, compared to the classic fastening option, it is inferior in reliability and is more expensive. The main advantage of a quick-release fastener is the speed of drill replacement and the safety of the process, since such a chuck is devoid of teeth that can injure your hands. The absence of a specialized key is also a significant advantage! Experienced builders know how easily it gets lost, so very often you can see a key taped to a wire with tape or tape.
True, this does not add convenience, but there is at least some confidence that you won’t have to look for the key throughout the construction site. How to change the drill bit in a screwdriver? The scheme is absolutely identical - the chucks of most drills are similar to the fasteners on screwdrivers. Of course, the latter tool cannot be a full-fledged replacement for a high-quality drill, if only because the fasteners are not provided for drills with a large diameter, and the speed of a screwdriver is usually lower.
Types of instruments: characteristic features
Screwdrivers can be classified into the following types:
- Drill/driver
- Impact wrench
- Cordless screwdriver
- Standard screwdriver
The operating principle of the tools is similar to each other, but there are still differences in functionality.
A drill-driver can not only tighten a screw, but also drill a hole. The impact wrench specializes in bolts and nuts. The third representative is a cordless screwdriver, designed exclusively for screwing/unscrewing fastening elements with a cross-shaped head. The latter type is characterized by low power, unlike the above.
Features of the screwdriver
A screwdriver means the same drill, but it has a lower rotation speed of the chuck and the ability to adjust the twisting force. No one has ever enjoyed twisting and unwinding with their own hands for many hours. A screwdriver will help you quickly and efficiently tighten and unscrew fasteners. Also, using this device, you can make holes in materials of various densities - metal, wood and stone. The screwdriver is powered from the mains or battery.
Construction equipment is divided into the following types:
- standard;
- cordless screwdriver;
- drill-driver;
- impact wrench
All types of tools differ only in purpose: a screwdriver (regular) is used only when working with fasteners, a drill will help you drill the required hole, a screwdriver is intended for tightening and unscrewing fastener elements with a cross-shaped “hat”, a device with a self-explanatory name, a wrench, does an excellent job with bolts and nuts .
How to replace the chuck - updating the drill
Most often, the cartridge is the first to become unusable in a drill. Dismantling it at home is not easy, but it is possible! The fastener is screwed onto the spindle itself, but in addition it is also secured with a bolt with a left-hand thread. In order to get it, you need to completely open the cartridge - it is inside. The whole difficulty of unscrewing it lies in the fact that many do not know about the left-hand thread, and when trying to unscrew it, they twist it even more, tear off the cap and eventually take it to the service center.
By unscrewing the bolt, you can also unscrew the cartridge itself, although this is not so easy to do. Some models have recesses at the base of the thread for a wrench - in this case, you can fix the spindle and unscrew the fasteners using a lot of force. The real difficulty comes when there are no wrench cuts. You will have to remove the housing cover to secure the spindle inside the drill. Difficult, but doable.
Removing a cartridge is one thing. Finding a new one is a completely different matter. In addition to the methods for clamping the drill, which are described above, different chucks also have different threads! The surest way not to confuse anything is to take an old cartridge with you and demonstrate it to the seller, or choose the right one based on the layout. When you have completed this task, all that remains for you is to screw the chuck onto the spindle and screw in the bolt, which in our case is screwed counterclockwise.
An indispensable power tool with a self-explanatory name, the screwdriver is actively used in construction work. The most common procedure with such a device is replacing the drill. Sometimes it seems that this process is very complicated and almost impossible.
However, in reality, replacing a drill in a screwdriver will not be difficult, the main thing is to follow the instructions step by step and pay attention to the details
How to change a drill bit in a drill - we can do it ourselves!
It is not always possible to remove a drill from the chuck in the usual way - as a result of heavy load or improper fixation, it can jam the chuck. How to get a drill out of a drill without damaging the fastener and the tool itself? First of all, try to cool the cartridge thoroughly. Sometimes this is enough for the cams to release the drill a little and you can pull it out.
Instrument care rules
The screwdriver requires minimal maintenance. In order for the tool to work properly, you must adhere to the recommendations specified by the manufacturer, do not use it for tasks that are not specified in the technical data sheet, and do not overload it too often. Periodically, the inside of the chuck and rotating parts must be lubricated with machine oil.
The instrument should be stored in a dry place, away from sources of heat, dampness and sunlight. After each use, wipe the housing with a clean, dry cloth to remove construction dust. If drops of mortar get on the screwdriver, you can clean it with a well-wrung out soapy cloth.
If you follow the operating rules and do not use the tool for tasks exceeding its capabilities, you can significantly simplify repair and construction work. In order for a screwdriver to work for a long time and not break down at the wrong time, you need to take care of it promptly, monitor the condition of the parts and recharge it before use.
Using a screwdriver
Those models of screwdrivers that are sold in stores today allow you to match the bit to the screw so that they fit tightly together. And adjusting the screwdriver so that the tightening of each screw is perfect has become very simple.
Do not think that a screwdriver can only be used to drill, tighten and unscrew screws. When repairing a car, you can unscrew and tighten nuts and bolts, and grind surfaces with a variety of attachments. Assembling furniture without using a screwdriver will take a lot of time. Hanging curtain rods or bookshelves with a screwdriver is much easier than running around with a screwdriver and putting in a lot of effort. So today the screwdriver has taken its place of honor among the most necessary tools in the household.
Video: How to Insert a Drill Bit into a Bosch Drill
Pulling out and installing drill bits is much easier and faster when using a quick release chuck. In it, the sleeve is rotated manually. To limit cam force, they are often equipped with locking elements.
Before inserting the planter, first make sure the planter is in working order and disconnect it from the power source. Only then can you start training.
Types of Eyeless Cartridges
Installation of working tools on a hammer drill
As stated above, the hammer should be checked before installing the drill bit. To perform such a test, the perforation mode is set for non-combat drilling. If you hear and feel that the motor runs smoothly and without shock when you press the start button on the device, this means that the hammer can be used for its intended purpose after drilling or drilling.
To attach a straight shank drill bit to a hammer drill, use a jaw adapter
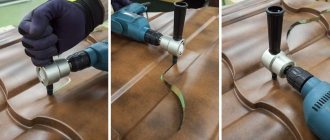
Before inserting a drill into a hammer drill, the shank of the working tool must be treated with a special lubricant that will protect it from corrosion. The procedure for installing drill bits in a drill is as follows.
- The hammer drill is installed on the back of the floor or other hard surface.
- The moving part of the clamping device is retracted.
- The tool is inserted into the punch until it stops. In this case, the drill bit or insertion bit should be held vertically. If you do not comply with this requirement, you may experience breakage or even breakage of the tool, which can also cause the drill bit to malfunction.
Press until it clicks, then pull the drill out if it doesn't work. Everything is fine
Due to the fact that the chucks on modern hammer drills have a fairly simple operating principle, questions about how to get a drill from a hammer drill, as a rule, do not arise.
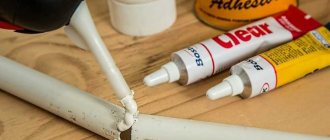
After removing a used tool from a hammer drill to replace it with another, it is recommended to immediately clean the shank of grease and construction dust. The drill bit you are going to insert should also be cleaned and pre-lubricated. The tool replaced in this way will not damage the impact mechanism and will last much longer.
Lubrication extends the life of both drill bit and bit
With a hammer drill, you can not only get a drilled structural element, but also perform processing using a special chisel. You can also set the device's mixer as an operating element.
Home workers also often have questions about how to insert a drill into a screwdriver or how to replace the cartridge on an impact drill. The first question is easy to solve, since the design of the screwdriver uses chucks of the same design as for drills and rotary hammers. But the question of how to correctly replace a cartridge with a hammer drill must be approached with skill: carrying out such a procedure without certain knowledge and skills is not easy.
Some tips for using drilling tools
To avoid the risk of injury to your health from flying tools or concrete chips, drilling operations must be carried out with all precautions. To ensure this safety, you should use safety glasses, gloves, earplugs or earplugs
Naturally, all work must be carried out in special clothing, which should not contain hanging elements that could be wound around the drill.
To prevent the power tool used for drilling from overheating, it should be rested regularly.
It is very important to insert the drill correctly (this must be done until the tool stops)
Two ways to compress a thin cartridge if the jaws extend just short of the shank
If a drill bit gets stuck in the wall while drilling, it should be removed without removing the tool from its surface. To do this, remove the drill bit from the hammer drill and insert another one with which you want to start breaking the wall around the drilled hole in it.
If the drill bit cannot be removed from the drill or hammer drill, it should be clamped in a vice and then pressed down with a hammer using a wooden spacer to press the jaws of the clamping mechanism. This can be helped by oil, a few drops of which are poured into the key cartridge.
Makita. Cordless screwdriver 6281DWPE
Subscribe to our VKontakte group. , not Facebook.
It is much easier not to quickly pull out or install drills using a quick-release chuck. In a personal computer, the sleeve is activated by turning it manually. To limit the clamping force of the jaws, they are often equipped with locking elements.
Before installing the drill, first make sure that the drill is in good condition and do not disconnect it. Only then can you begin installing the drill without any problems.
Types of keyless chucks