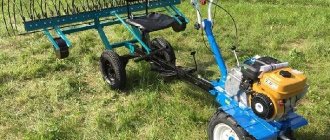
Engine selection and installation
The gasoline engine makes it possible to perform work regardless of the presence of a nearby energy source. This vibrating plate is in demand among small construction teams performing contract work on private development sites.
To carry out work within the personal territory, it is better to use a tamping machine with a 220V electric motor. It operates much quieter, does not require refueling, and the power supply can be easily provided through an extension cord that can be extended to any location on the site.
The electric motor is fixed to a welded channel using bolts and connected to the vibration mechanism using a belt drive. If the vibrator eccentric is connected to the motor with a rigid connection or mounted on a shaft, then the motor bearings will constantly fail due to vibration effects.
The center of gravity of the engine must be on the central axis of the vibration platform. If this is not done, then during operation the vibrating plate made by yourself will constantly move to the side and you will have to make additional efforts to keep it in the desired direction. Vibration-damping pads made of thick rubber must be placed under the motor feet.
Torque transmission
It is recommended to use a soft V-belt drive as a transmission to transmit torque from the engine to the vibration mechanism. It will ensure reliable rotation of the eccentric and protect the motor bearings from the effects of vibration.
It is recommended to use double-belt pulleys. This will give greater grip to the belts and ensure trouble-free operation in the event of a break in one of the belts.
To protect against possible injuries, the belt drive must be covered with a protective cover, and if this cannot be done, then a bumper guard must be installed.
Peculiarities
Compaction of soil, backfill layer or concrete casting during construction work requires the participation of special equipment. In private construction, problems often arise related to deformation or subsidence of the foundation.
- The cause of these events is poor compaction of the sand backfill layer. According to the technology, the density should correspond to the condition of a long-used country road. Checking the quality of the compaction is usually done by walking along the compacted area - if there are no traces of shoes left, the job has been done to the proper standard.
- Soil compaction is required not only in critical areas. Conventional tiling of garden paths requires the creation of a layer of sand cushion, which also requires the maximum degree of compaction, otherwise the coating will begin to fail and move apart. It is impossible to achieve high quality work manually, and a vibrating plate comes to the rescue.
- For home use, not everyone can purchase a ready-made device, since the cheapest sample will cost 20 thousand rubles. People who are able to operate metalworking tools and a welding inverter prefer to make their own vibrating plates, which saves money and brings the desired result.
Operating principle
The operation of a vibrating plate is based on the use of a rotating shaft with an eccentric, which generates strong vibration. The shaft is mounted on a massive metal base, which with its weight acts on the soil, compacting it due to its weight.
On the same base, a motor is installed, which is necessary to drive the eccentric shaft into rotation. To control the structure and give the installation the desired direction, a long handle is installed.
There are several types of vibrating plates:
- electrical;
- diesel;
- gasoline.
By weight they are divided into:
- light (up to 75 kg);
- universal (from 75 to 90 kg);
- medium-heavy (from 90 to 140 kg);
- heavy (140-200 kg or more).
There are also different ways to move the vibrating plate:
- upright, capable of moving only forward and requiring a platform of sufficient size to turn around;
- reversible, capable of moving both forward and backward, which makes them more convenient in conditions of limited space.
Lightweight and versatile vibrating plates are used for compacting paths, paving slabs, and landscaping work. During construction and foundation work, medium-heavy and heavy-duty installations are required that provide maximum compaction combined with high productivity.
Important! The weight of a vibrating plate created at home should not be too large, otherwise it will be difficult to move it and there will be a danger for the worker servicing the installation.
The role of the control knob in the vibrator plate device
In a device such as a vibrating plate, when the market is replete with various models, often differing only in design, it is important to think about the safety of workers. Honestly, it would be better if the model had no handle at all. But such devices will have a significant impact on your wallet and will weigh from 700 kg, but they are controlled remotely. If the handle is present, then it is necessary to ensure that it is equipped with a vibration-proof pad.
The device of the vibrating plate does not involve complex schemes and mechanisms of action. But since this equipment is often actively used in difficult conditions, it is necessary to pay attention to proper care of it. Replacement of vibrating plate filters, spark plugs, oil, timely maintenance - and your vibrating plate will serve faithfully for many years.
Bomag vibrating plate device
A vibrating plate is a construction equipment that is used to compact various bulk materials, for example, loose soil, sand, gravel-crushed stone mixture. It is used when laying paving slabs, building roads, compacting the soil on a built-up site and to perform a number of other works. Equipment operated in relatively harsh conditions may fail at the most inopportune moment. This happens for a variety of reasons. At the same time, many breakdowns can be repaired independently, without resorting to the help of service center specialists. To carry out repairs yourself, you need to understand the design of the working unit, as well as become familiar with the most common breakdowns and their causes.
Mechanism design
The main element of the vibrating plate, from which the creation of the installation begins, is the metal base.
- There are steel and cast iron samples, however, the use of cast iron at home is not advisable.
- It is capable of cracking, cannot be welded, and is fragile.
- Typically, steel sheets with a thickness of 8 mm or more are used. Additional elements are installed on the surface of the base to increase the mass.
- They also serve as the basis for installing the engine and vibration mechanism. In most cases, this is a regular shaft mounted on two bearings, on which a load is attached in the longitudinal direction. The rotation of the shaft creates a driving force, which, due to its own weight and inertial force, forms frequent short-term loads on the ground.
The operating efficiency of a vibrating plate depends on the weight, base area and rotation mode of the eccentric shaft. A slab that is too spacious is not capable of generating high pressure, since the weight of the installation is distributed over the area and reduces the specific pressure.
A small base gives greater efficiency, but it acts too selectively, pointwise.
This mode does not allow uniform compaction of the soil over the entire area of the site. The rotation of the eccentric shaft creates a significant load on all structural elements. Too intense vibration can destroy the vibrating plate, have a negative impact on the operation of the engine, and negatively affect the well-being of the worker.
An example of a drawing of a gasoline vibrating plate:
Making a tamping plate
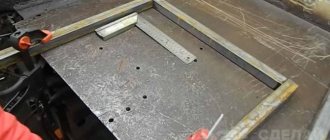
The plate for the vibrating tamper can be manufactured at the factory or made by hand from a metal sheet with a thickness of at least 8 mm. A homemade vibrating plate should provide such a weight to the device that it will give a tight fit to the surface being treated.
Its dimensions should not exceed 800 x 500 mm, excluding the curved edge, which will ensure convenient operation and the ability to use the device without additional assistants.
A flat steel plate, when moving over soil or concrete mixture, will constantly cling to an uneven surface. To avoid this, the front and rear edges of the slab are slightly bent upward, resulting in a structure reminiscent of a sled. To do this, stepping back a little from the edge, you need to make a cut in the metal to a depth of 5-6 mm using a grinder and bend the strip. Repeat this operation on the other edge of the sheet. The contact line after the bend must be welded using electric welding.
Making a tamping plate.
To install the motor and vibration mechanism on the platform, you need to secure the support frame. It can be made from two installed pieces of metal channel. They must be installed parallel to each other transverse to the axis of the tamping platform. Drill mounting holes for the motor and vibrator in them and weld them with electric welding.
Purpose of vibrating plates
A similar mechanism is used for compacting crumbly areas of earth and building materials, as well as uncured surfaces of asphalt and concrete. It is especially effective in small areas and sidewalks, as well as where heavy equipment cannot enter.
The use of this device will greatly facilitate manual labor in homestead or country landscape construction. The easiest way to compact the soil on a garden path or a small parking lot near a house is by mechanized method.
The tamping vibrodynamics will also help out during excavation work on laying underground communications, when you need to compact the soil at the bottom of the trench.
This device operates due to vibrations that occur during the rotation of a flywheel mounted on eccentrics:
- By displacing the ballast through the drive, the vibration created is transmitted to the iron base - the sole.
- The heavier it is, the stronger the oscillatory process and the denser the compaction.
- A similar device is used in vibrating platforms at factories for the production of reinforced concrete products and vibrating tumblers for cleaning various objects from burrs, scale and other defects.
Providing water irrigation
If the soil or bulk materials are moistened with water during compaction, the compaction will be better, and the platform itself will not stick to the surface. This can be especially effective when rolling asphalt concrete pavements.
In order to ensure such wetting, a container with water is installed on the platform, and on the front curved part there is a perforated tube connected to the container through a hose.
How to assemble a vibrating plate yourself
Materials
- Sheet of steel measuring 50x80cm and thickness 8 mm;
- An area vibrator and an electric motor for it, for example IV-98E. Some craftsmen build vibrating plates with a washing machine motor
- Two pieces of channel up to 45cm long;
- M10 and M12 bolts with nuts and washers;
- Metal pipes 1.5 m long and 20-25 mm in diameter;
- Shock absorbers.
Tool
- Welding machine,
- hammer,
- grinder with cutting wheels,
- drill and a set of metal drills for it,
- set of wrenches,
- tape measure and marker.
Step-by-step instructions for assembling a vibrating plate
- On the steel sheet, cuts are made on both sides approximately 5 mm deep, this is enough to bend the sheet. Moreover, the incision should be 10 cm from the front, and 5 cm from the back.
- Bend the edges of the sheet at an angle of 20-30 degrees, and weld the bend points.
- The prepared channels are welded parallel to the bent edges. The distance from the center line of the sheet to the channels is about 5-10 cm.
- A vibrator is mounted in the center of the channels, securing its legs using an electric drill and bolts with nuts and washers;
- Shock-absorbing cushions are attached to the slab;
- A U-shaped handle is formed from the pipe, at the edges of which holes for bolts are drilled;
- Using metal corners, the handle is secured to the sole through shock absorbers;
- Connect the power cable and provide start-up protection.
- A vibrating plate made in this way will have a mass of about 60 kg. For ease of transportation, you can add an axle with wheels to it.
Advice! If you want to increase the weight of the vibrating plate, you can weld several metal sheets or reinforcing rods to it.
Before starting the structure for the first time, check all its components for secure fastening or absence. damage and chips. Keep it clean and your homemade vibrating plate will last a very long time.
If you have chosen a gasoline engine for the mechanism, you will have to clean the spark plugs more often, check the oil level, and change filters.
The first time the oil should be changed after 25 hours of operation, after which it can be done after 80-100 hours. It is better to fill the oil with the engine warm but turned off.
By making a vibrating plate with your own hands, you can save up to 10,000 rubles.
Plate and frame
The plate is a sheet of metal, the thickness of which can provide sufficient rigidity.
- Typically, steel sheets of 8 mm and thicker are used.
- The average size of the working surface of the stove is 60*40 cm, although there are other options.
- The front and rear edges of the slab are raised for unhindered movement along the surface of the site.
The frame consists of a stand for the engine and eccentric shaft. It also serves as an additional load, which gives the vibrating plate greater efficiency and increases the amount of forcing force.
Another task that the frame solves along the way is strengthening the rigidity and strength of the base, compensating for mechanical loads from the rotating rotor.
The design of the homemade frame can be anything. The main task is to strengthen and weigh the slab, so they use pieces of channel bars, rails and other massive and durable elements. The only thing to remember is that the vibrating plate must sooner or later be placed in storage, which may require carrying it manually. Excessive weight will create difficulties.
Vibration mechanism
The vibration mechanism of a vibrating plate, or vibration exciter, can have two design options:
- unbalanced, which is a rotor unbalanced relative to the axis of rotation;
- planetary, using the energy of moving elements that move along special closed paths.
Making a planetary mechanism at home is impractical, since it is difficult both to create and to maintain. It is difficult to make an unbalanced vibrator, and the magnitude of the driving force is the same in both cases, so the choice is obvious.
The eccentric rotor is mechanically connected to the engine via a drive belt. To do this, pulleys located in the same vertical plane are installed on both elements. With their help, you can adjust the gear ratio and change the vibration frequency of the installation.
Additional items
Additional elements are:
- handle (carrier) used to guide the vibrating plate during operation;
- a trolley on which the device is installed when moving from one place to another;
- tension mechanism, which ensures tight contact of the drive belt with the pulleys of the engine and vibration mechanism.
The handle is a long U-shaped bracket made of a tube. It is attached to the plate through a swivel joint, which partially compensates for vibration and protects the worker from its effects.
The trolley is a separate element, although rigid mounting options are available. It is brought under the stove, the unit tilted towards itself by the handle, supported on a trolley and transported to the desired location. When rigidly mounted, the legs with wheels are installed on the base in an inverted position.
If it is necessary to move the vibrating plate, the installation is turned over and transported to another location.
The tensioning mechanism ensures tight contact between the drive belt and pulleys. It is important that the roller has a groove that matches the groove of the pulleys. This will help extend the life of the belt. If the vibrating plate roller is installed on the outside, the groove size must match the back of the belt. For tensioning, an adjusting screw is used, which allows you to loosen the belt for replacement or tighten it to working condition.
Proper care
Most walk-behind tractors are equipped with gasoline or diesel engines, therefore, having made a vibrating plate with such a drive, it will be necessary to provide appropriate care for the manufactured equipment. You can extend the life of a unit with a gasoline or diesel engine by observing the following rules:
- Before starting work, check the tightness of all fasteners.
- Regularly inspect the engine, check the fuel and oil levels.
- The spark plugs in the engine are inspected and, if necessary, cleaned of carbon deposits.
- For the durability of the equipment, you can use a rubberized mat, which is placed on the workpiece blade, preventing it from cracking when working with large crushed stone.
- Before each use of the equipment, the air filter is inspected and cleaned.
- Filling the gas tank is carried out exclusively with the engine turned off.
- It is not recommended to use a self-made vibrating plate on concrete, hardened asphalt and other hard and durable surfaces.
By making your own vibrating plate with an electric motor, you can significantly save on the purchase of professional equipment. This equipment has a reliable and simple design, and the use of a drive and base from a walk-behind tractor will significantly simplify its manufacture, so every homeowner can handle this work.
Source
Frequency and cycle of vibration motor use
First of all, you need to determine the vibration frequency of the engine. It can vary from 750 to 3000 rpm. A high frequency with a small amplitude, or a low frequency vibration with a large amplitude may also be needed. In construction, as a rule, vibration motors with a high vibration frequency of 2 to 3 thousand revolutions per minute are used. However, a lot depends on the size and weight of the installation.
The higher the frequency, the more the installation structure is exposed to fatigue stresses, therefore, the steel of the load-bearing frame must be stronger and thicker. If the permissible frequency limit is exceeded, the structure will quickly deform. In this case, it is also necessary to take into account the operating cycle of the installation.
Under heavy loads and frequent use of the vibration unit, it is not recommended to use a motor with a speed of more than 1500 rpm.
Recommendations
Before starting tamping, you need to familiarize yourself with the weight of the vibrating plate, as this affects the type of work and its volume. To compact the soil, you should opt for a vibrating rammer. And for sand, crushed stone or a sub-concrete base, a slab is used. Large fields for football, golf and other sports are compacted with professional machines weighing from 50 to 100 kg.
Weighting agents are added to homemade structures. The weight material can be water, cement or sand.
Before starting work, all gasoline engine structures are constantly tested for reliability. It is important to regularly remove carbon deposits from candles, which will increase their service life. The first time the oil is changed after a day of work, then the period is extended to 3-4 days. For cases where work is being done at a depth of a meter or more, it is worth using the help of another person.
Homemade vibration motor for concrete
To compact the concrete mass in foundations and other reinforced concrete structures, surface-type or submersible vibration motors are used. For a surface vibrator, a vibration motor with a power of 1 to 1.5 kW, operating on a 220 V network, is suitable.
Its diagram is shown below, and it consists of:
- Handles for holding, guiding and carrying the device.
- Electric motor of sufficient power.
- Power cable.
- Eccentric unbalance.
- Bases of the required size.
Professional models of vibration motors have an adjustable eccentric, which allows you to adjust the amplitude of vibrations and the force with which compaction is performed. The eccentric is fixed on the output shaft of the electric motor. To do this, a bracket is rigidly fixed to the shaft, and the unbalance in turn is attached to it with a threaded connection. By loosening the thread, you can adjust the position of the eccentric in relation to the motor shaft, thus changing the amplitude of the device.
Vibrating screed assembly algorithm
To implement the simplest options, drawings are not needed. Suitable drive units:
electric drill or screwdriver.
You will also need the following working tools and materials:
- a flat, polished board 0.5 m long, about 3 cm thick, 25 cm wide;
- self-tapping screws;
- punched paper tape;
- timber 5 by 5 cm long 1-1.5 (2 pcs) to make a handle.
A vibrating screed made from an electric drill in the form of a mop is assembled in the following sequence:
- the surface of the board (if it is not sanded) is made smooth using a plane and sandpaper;
- to it from above exactly in the center, using punched tape and self-tapping screws, fix an electric drill laid lengthwise;
- on both sides of the drill, stepping back a few centimeters, attach the handles at an angle, having previously cut off the ends of the bars obliquely;
- fix in the power tool chuck an attachment whose center of gravity is shifted, for example, a clamping wrench, a curved drill or a piece of reinforcement;
- connect the unit to the network and check its performance.
The drill chuck should rotate around an axis that coincides with the central longitudinal line of the board. Vibration occurs due to the use of a nozzle with a displaced center of gravity.
A vibrating lathe from a grinder, grinder or screwdriver is made in a similar way. Only after compacting and leveling the concrete will the power tool need to be thoroughly cleaned of the mortar so that it can be used in the future.
If you need to compact and level concrete with a layer of up to 10 cm, then a vibrating screed made from an in-depth vibrator is suitable. It is made as follows:
- cut out a rectangular sheet from plywood (with a side length of approximately 70x50 cm);
- The mace is attached to it using punched tape or using clamps, while the deep vibrator itself serves as a kind of handle.
To ensure that the rail moves freely, it is better to cover the working surface of the plywood rectangle with tin, bent at the edges.
Useful features
All vibration installations have additional devices that make work easier or provide additional protection. In order to move the device to a new place of work, the presence of wheels and a folding handle will make this task performed without unnecessary effort.
Various covers will protect the machine from particles from the compacted surface. The slab wetting system is effective when rolling hot asphalt. Without it, it will stick to the top layer.
Work to strengthen the bottom of trenches or compact soil in narrow places is practically impossible without ensuring reverse movement.
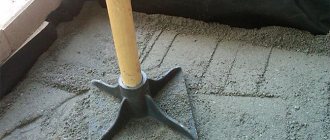
Do-it-yourself manual rammer for soil compaction
Materials used
A suitable material for homemade manual tamping is a square beam with a side of 100 or 150 mm. It will be difficult to work with a round log in the corners and will have to be compacted with a significant overlap of the previous impact point.
It is not at all necessary to take new lumber; a used lumber will do. The main thing is that the wood is free from rot and splits. Choose a piece of timber that you can lift. The height of the manual tamper can be waist-high or chest-high, depending on ease of use.
If you have no experience working with this tool, take a longer block, try it out and shorten it if necessary.
You will also need:
- A piece of 2mm steel plate.
- A round birch stick 450 mm long (an old shovel handle will do).
- Wood screws.
- Carpenter's glue.
Prepare the timber
Saw off the ends of the workpiece according to the dimensions exactly at right angles. Using a plane, adjust the plane of the lower end of the beam to a square. Remove 5 mm wide chamfers from sharp edges.
Make a shoe
Transfer the dimensions of the workpiece from the drawing to the steel sheet.
- You can simply align the timber vertically installed on the metal and trace the outline with a pencil.
- Depending on the thickness of the plate, cut the workpiece with metal scissors or cut out the excess with a grinder. Remove burrs with a file, holding the part in a vice.
- Mark and drill holes for the screws, make recesses for the caps with a countersink or a drill of a larger diameter.
- Sand the surfaces with sandpaper.
Bend the wings of the workpiece in a vice, which will be easy to do with the first two opposite sides. When bending the two remaining sides, the vise jaws may turn out to be wider than the shoe, then use a timber prepared for tamping.
Secure the shoe
- Check the fit of the steel plate on the beam, if necessary, tap the metal or sharpen the wood. The shoe should fit snugly against the end on all planes.
- Drill holes for screws in one wing, pointing the drill at a slight angle into the wood, and tighten the screws.
- Turn the beam over to the opposite side and fasten the other wing in the same way. Make sure that the shoe does not move away from the end.
- When drilling subsequent holes, guide them past the already screwed in screws.
Set the handle
Mark the drilling center at a distance of 100 mm from the top end. Select a drill bit with a diameter 2 mm smaller than the cross-section of the handle. Make a through hole perpendicular to the surface of the beam.
- Even with careful drilling, the outer parts of the hole will be slightly larger than the inner diameter. Sharpen the wood with a file, periodically trying to insert the handle into place.
- At the same time, correct any possible misalignment of the hole relative to the plane of the beam. Achieve a tight (but without significant force) fit of the handle, and if necessary, lightly trim the stick. Do not try to hammer into the handle - the wood may split. Place the stick in the beam and make marks.
- Apply glue to the sides of the hole.
- Place a pen on the marks and wipe off any excess glue. Drill a pilot hole and secure the handle with a long screw.
- After the glue has hardened (according to the manufacturer’s recommendations), the manual tamper is ready for use.
After use, clean the device from dust and store it in a place protected from rain and snow. Over time, the bottom of the tamper wears out; monitor the condition of the metal lining and change it in a timely manner.
Advantages of homemade products
The cost of a device made independently is much lower than that of ready-made equipment. In appearance, it resembles a walk-behind tractor with a vibration motor. Quality and durability are ensured by the simplicity of the design. The efficiency of such a vibrator is no lower than that of a purchased one, and sometimes even higher.
Advantages of a homemade vibrating plate:
- Full compliance with the operating conditions for which it is manufactured allows you to perform the assigned functions with high quality.
- The owner chooses which vibrating plate to make: with an electric motor or an internal combustion engine.
- Everyone also worries about their own safety. Therefore, all the necessary protection systems will be provided and installed.
- Having your own device will allow you to choose the time and place of work according to your circumstances.
Proper care
Most walk-behind tractors are equipped with gasoline or diesel engines, therefore, having made a vibrating plate with such a drive, it will be necessary to provide appropriate care for the manufactured equipment. You can extend the life of a unit with a gasoline or diesel engine by observing the following rules:
- Before starting work, check the tightness of all fasteners.
- Regularly inspect the engine, check the fuel and oil levels.
- The spark plugs in the engine are inspected and, if necessary, cleaned of carbon deposits.
- For the durability of the equipment, you can use a rubberized mat, which is placed on the workpiece blade, preventing it from cracking when working with large crushed stone.
- Before each use of the equipment, the air filter is inspected and cleaned.
- Filling the gas tank is carried out exclusively with the engine turned off.
- It is not recommended to use a self-made vibrating plate on concrete, hardened asphalt and other hard and durable surfaces.
By making your own vibrating plate with an electric motor, you can significantly save on the purchase of professional equipment. This equipment has a reliable and simple design, and the use of a drive and base from a walk-behind tractor will significantly simplify its manufacture, so every homeowner can handle this work.
Source
Operating rules
Any person wants his equipment to work as long as possible and not break down. In the case of a vibration device, for this you need to follow the rules that apply to both a homemade device and a branded one:
- Each time before starting work, it is necessary to meticulously inspect the device. If you find cracks or loose connections, do not start using the equipment until the defects are eliminated.
- The gasoline engine requires maintenance more than other components. Inspection and cleaning of spark plugs and checking the oil level must be carried out regularly.
- The vibration unit also requires attention. If there is no oil, eccentrics and bearings fail.
- The device itself must be cleaned of dirt.
- Do not transport the vibrator while it is running.
- It is prohibited to use the equipment on hardened asphalt or concrete.
Possibility of reverse movement
Movements of a homemade vibrating plate made as described above are only possible in one direction. Therefore, after walking a certain distance, you have to turn it around and only then move in the opposite direction. This reduces the speed of work and requires additional physical effort on the part of the operator.
Another drawing of a variant with a gasoline engine.
In order to provide the vibration machine with the ability to reverse movement, it is necessary to install a device that changes the direction of rotation of the motor. After its installation and connection, the vibrating plate will be able to move in two directions.
When the edge of the treated area is reached, the operator turns off the engine and starts rotating it in the opposite direction. The vibrator eccentric will also become reversible and provide the machine with a return movement.
Purchasing a unit
If you still decide to purchase a unit, you need to take into account both the main criteria and minor nuances that will make the work easier or increase its service life. However, we cannot fail to mention the manufacturers of vibratory ramming devices.
- Equipment from European manufacturers is especially important. German technology is distinguished by its reliability and long service life. Even rental samples show good quality and speed of work. All equipment has a double safety margin. Wacker, Weber, Ammann, Bomag produce professional equipment.
- Israeli Shatal and Czech NTC have fewer resources than the Germans, but they also turn out to be good workers at construction sites and on private property.
- South Korean equipment from Jeonil Minery is not inferior to products from the Czech Republic or Israel. In the Asian market, this is the best offer among all vibration units.
- Russian products from, Motoprom and SZPO are inferior to average European models in terms of convenience and functionality. However, modernization continues, and new, more advanced models appear on sale.
- The Chinese, as usual, charge a price. Their products are only suitable for occasional, light-duty work. Among the mass of unknown manufacturers, the companies TEKPACK, MASALTA, DYNAMIC, CIMAR stand out.
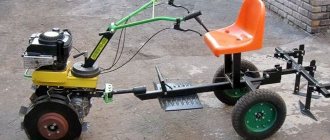
How to make a homemade vibrating plate with a washing machine motor
A simple option for making a vibrating plate with your own hands is to use a motor from a washing machine. The method is convenient because such a motor is easy to obtain by simply removing it from old equipment. In addition, the device can be connected to a 220 V household outlet, which will significantly simplify its use.
Instructions on how to make a vibrating plate with your own hands show the standard assembly diagram:
- the metal sheet is cut along the edges with a grinder and bent upward, and then the seams are welded using a welding machine;
- Using channels located at a distance of about 10 cm from each other, a vibrator with a motor installed on it is connected to the plate, while you need to ensure the strength of the fasteners and their even position;
- the motor from the washing machine is fixed with bolts, usually M10 or M12 are used;
- After installing the engine, they begin to make the handle; it can be made from any piece of steel pipe of a suitable diameter and secured to the base with silent blocks or elastic pads.
Attention! When installing the handle, it is necessary to use not only rigid bolts, but also shock absorption, otherwise the device will simply be pulled out of your hands.
A do-it-yourself vibrating plate with a washing machine motor is already ready at this stage. However, it is recommended to modify it and equip it with wheels for more convenient movement. To do this, a piece of pipe is welded to the base of the structure. Along its edges, using a welding machine, rings are mounted, the diameter corresponding to the selected wheels. The latter are fixed inside with the possibility of subsequent dismantling.
The motor power of about 1.5 kW ensures quick and easy leveling of a layer of concrete or sand up to 200 mm thick. A do-it-yourself electric vibrating plate with a washing machine motor is suitable for most repair and country work.
The concrete vibrator consists of an electric motor, a vibrating device and a flexible shaft. A replacement for the first element is constructed from a jackhammer, hammer drill, drill and other devices that transmit vibrations. There is no need to neglect the design of a flexible shaft for the vibrator, because thanks to it the tip is safely lowered into the solution and transmits the desired vibration. This product can operate from a 220 V home electrical network.
The vibratory ramming machine, constructed from a hammer drill, operates on the basis of impact force. A metal peak is created for the nozzle. This design helps to penetrate the thickness of the concrete, which is extremely necessary after pouring the pile base.
It is important to determine the required length of the nozzle. To process a large area, choose a large sheet to which the puncher itself is attached
It is necessary to firmly strengthen the structure, because the vibration force can be destructive for the product. In cases where the equipment elements are horizontal, the nozzle should be positioned at a slight angle. And this can be achieved by attaching the washer as a support. Then a vibration unit of the hammer drill is installed in it.
Final work
After assembling the slab, all metal parts must be primed and painted to protect against corrosion. Securely fasten the supply cable to the control handle to prevent the possibility of running over it. The engine switch must be located on the structure itself to provide an emergency stop during operation.
After this, the vibrating plate made by yourself must be tested. Freshly dug soil is best suited for this. Testing on bulk material will not allow you to test operation at full load.
As you can see, it is quite possible to make a vibration machine yourself. But for this you need to have basic knowledge and experience in plumbing and welding.