When building foundations for houses, garages, country paths and much more, great attention is paid to the substrate, consisting of gravel and sand. To ensure that the concrete monolith is laid evenly and does not begin to move over time, it is important to carefully level the underlying layer. For these purposes, you can use specialized vibratory tamping machines or rolling equipment, but manual tamping will be much cheaper.
The principle of do-it-yourself processing is that with the help of a homemade tool, blows are applied to the surface, due to which the sand and crushed stone are compacted. In this case, compaction is performed after laying each of these layers.
How to make your own hand tamper
When building foundations for houses, garages, country paths and much more, great attention is paid to the substrate, consisting of gravel and sand. To ensure that the concrete monolith is laid evenly and does not begin to move over time, it is important to carefully level the underlying layer. For these purposes, you can use specialized vibratory tamping machines or rolling equipment, but manual tamping will be much cheaper.
The principle of do-it-yourself processing is that with the help of a homemade tool, blows are applied to the surface, due to which the sand and crushed stone are compacted. In this case, compaction is performed after laying each of these layers.
How to work with it correctly?
To start using a vibrating plate, no special skills are required.
Anyone can cope with this task if they remember the safety rules and act extremely carefully:
- Before starting work, the vibrating plate should be inspected very carefully to see if there are any problems with it. Particular attention should be paid to the protective cover for the transmission belt, as it protects the engine from dust. If the vibrating plate runs on diesel or gasoline, then it is necessary to check the presence of oil and fuel in the engine.
The area you plan to treat with the vibrating plate should be well leveled and clear of debris. Do not work on a dry or very wet surface immediately after heavy rain.- The mechanism should be started. In 80% of models, all you need to do is press the “START” button. Some vibrating plates also have a manual starter, so to use such models you should gently start pulling the cord and wait until the equipment warms up well. Start the engine only on a level surface.
- The operator of the device must be behind the vibrating plate during work. He should not bend too much over the device or try to speed up the progress of work using artificial methods. the tool will operate in a precise mode that will be selected according to the surface.
- A special handle must be used to control the vibrating plate to tamp and compact the soil. It allows the device to rotate in all directions. After turning, you should quickly move behind the slab so as not to accidentally injure yourself.
Do not forget that you should change the consumables of the device in a timely manner. The oil should be changed at least once a month, or every 100 hours of operation. You should only use gasoline and oil of the approved brand, as otherwise this will lead to the vibrating plate quickly failing. The grades of gasoline and oil must correspond to those specified by the manufacturer in the technical manual for the device. Before compacting any bulk materials, the surface to be processed should be cleaned. To do this, you should remove various debris from it - fragments of bricks, pieces of boards, cobblestones.
Sand
Compaction of the sand mixture is carried out using a different technology.
Operating principle for vibrating plate tamping:
- An even layer of sand should be poured onto the prepared surface. Its thickness must be at least 60 cm. Specific indicators will depend on how much your device weighs.
- The entire surface should be moistened evenly with water.
- After this, the vibrating plate should be passed over the entire area at least 4 times.
- If the sand has acquired the required density, then you can add a second layer, and if it is loose enough, then go through the device a couple more times.
- On the second poured layer, repeat everything again.
When compaction is completed, the surface compaction coefficient should be at least 0.95. If you plan to install columns in the selected area, then the use of additional equipment may be required for compaction.
Just as when compacting the soil with a manual tamper, the sand should also be moistened; this is a mandatory item in the plan. If this is not done, then during operation the vibration plates will begin to create a lot of dust, and this, in turn, will cause the air cleaning filters to quickly become clogged (this is especially true for vibration plates on a gasoline engine). But keep in mind that you cannot use too much water, as otherwise it will begin to clog between the material and interfere with its effective bonding. To achieve the required cementing effect, water should be poured, but in moderation.
Priming
Sandy soil is best suited for creating small buildings. The fact is that it is the one that does not retain moisture well, and because of this it will not be susceptible to frost heaving. Such soils can push out the foundation in winter and are therefore not suitable for construction. During the installation of buildings, they (or weak soil) should be removed and replaced with sand. To compact using a vibrating plate, go through the entire area 3 times. If after this it is not possible to achieve the required result, then the layer of material should be smaller. Wet the soil until it begins to crumble when squeezed in your palm.
Please note that vibrating plates cannot be used to compact clay soil and loam, and vibratory rollers are better suited for this purpose.
Crushed stone
The difficulty in working with a material such as crushed stone is that it does not have the same fraction. For this reason, it is possible to select the maximum possible thickness in each specific case only on site and immediately before starting work. After pouring one layer of material and four passes over it, the compaction coefficient should be determined, which should be at least 0.95. If the crushed stone remains loose after compaction, then further manipulations will not yield results. You will have to remove some of the material to make the layer thinner and repeat the procedure.
For effective work, professionals recommend starting the process with the thinnest layer. After this, as you progress, you should increase the thickness to the required quality-performance ratio. This way it will be easiest to determine the sufficient thickness of the layer. If crushed limestone is compacted, then most often the result is a clinking effect. This happens because the stones stick together in the upper layer due to vibrations due to the fact that there is no compaction of the lower stones. To avoid this situation, you should use heavy vibrating plates weighing 150 kg or more. If only those units are available that weigh 100 kg, then it will be possible to lay only 1-2 cm of stones with them.
Laying paving slabs
The only feature of laying paving slabs is a rubber or polyurethane mat. It should be secured to the work plate so that the fragile material is not damaged. For tamping, you should choose mats made from polyurethane, as they will not leave dark marks on the polyurethane and will last much longer. The power of the vibrating plate must be medium.
Please note that you cannot tamp device tiles that weigh more than 90 kg. Heavy models sometimes cause cracks to form on the surface.
Laying asphalt
To compact asphalt crumbs after laying, vibrating plates should be used, all of which weigh from 60 to 90 kg. If the unit is heavier, it sometimes causes cracks, bumps and chips in the asphalt surface. The device should be walked about 2-3 times. The height of the layer will be determined by the characteristics of the coating.
Floor underlayment
For houses that were installed on the ground, a soft underlying layer should be created. It should be made of two layers, which must be poured on top of crushed stone or gravel. After laying each layer, it should be moistened and compacted using a vibrating plate. The material for work should be washed quarry or river sand, and to make the coating even, you should first install and then remove the pegs.
Features of crushed stone compaction
Any novice builder is sincerely perplexed as to why compact an already strong stone. However, there are several important nuances to consider:
- Since crushed stone is obtained by crushing, its particles are obtained of different sizes with free-shaped edges. Because of this, when laying the underlying layer, the particles of the material are not completely adjacent to each other, forming a large number of air voids, the appearance of which ultimately leads to a decrease in the level of load resistance. If fragments of crushed stone fit tightly together, the volume of material will be reduced, but a stronger base will be formed.
- If crushed stone is laid on rocky soil, then compaction can be dispensed with. In this case, you only need to level the gravel.
- After compacting the gravel, the thickness of the layer can be from 50 to 250 mm, depending on the loads that will be exerted on the base.
In addition, when processing crushed stone, it is recommended to declinch the base. To do this, you need to divide the gravel into fractions. The larger material is laid first and compacted by hand. Then smaller material is backfilled, which is also compacted. The final top layer should consist of the finest material, which must be carefully leveled and re-compacted.
Types of crushed stone
Crushed stone is produced using a crushing machine by crushing boulders. A stone of fraction from 0-5 to 40-70 mm is formed. In everyday life, crushed stone with dimensions of 5-20 and 20-40 mm is most often used.
By type it is divided into:
- granite – characterized by high strength and frost resistance, you can purchase it on the Nastroyke net website;
- limestone - cheaper than granite and an excellent option for housing construction;
- slag – formed from waste from metallurgy. The price is higher than limestone and granite crushed stone. The composition contains harmful impurities;;
- secondary - obtained by processing broken bricks or concrete;
When purchasing this material, you need to pay attention to the flakiness. With a high content of flaky grains, the strength of the final base decreases during the construction of various objects.
Features of sand compaction
Tamping sand with your own hands has some nuances that should be taken into account when creating a solid foundation for a concrete slab.
First of all, you should decide on the type of sand that is best suited for these purposes. It is better to use gravelly material, but it is not recommended to use fine sand for compaction. The larger the grains, the greater the compression resistance of the base, which will help avoid shrinkage of the future house or parking area.
If you are planning to build a monolithic structure, then it is best to give preference to river or quarry sand of the middle fraction. However, even in this case, the underlying layer will be influenced by groundwater. Therefore, in order to prevent the process of erosion of the base, it is necessary to lay geotextiles at the bottom of the trench, and only after that add sand.
In addition, before adding sand, it must be sifted, since the presence of foreign impurities (especially clay) can affect its properties. Monitor the moisture level of the material; the ideal consistency will be if you can roll the sand into a small ball that will not crumble immediately. Accordingly, the sand moisture level should be in the range of 8-14%.
Accordingly, 50% of the successful laying of a gravel-sand cushion depends on the material itself, the remaining 50% comes from the equipment. As mentioned earlier, specialized machines can be used for these purposes, but it is much cheaper to make a manual rammer yourself.
How to compact soil with your own hands
You look with slight envy at the neat lawns of your neighbors or TV series characters and think: “I wish I had such beauty.”
Why not? Let's see how you can create an even carpet of emerald grass in your yard yourself.
And in this article we will devote a special place to the process of preparing a site for sowing a lawn.
Preparing the soil for a lawn is a specific set of work that should be started a month before sowing the seeds.
Preparing the foundation for a lawn is similar to preparing the foundation for a building - it has the same importance and the work process is somewhat similar.
Of course, if you are the happy owner of a suburban area with fertile soil, then work on preparing the area for the lawn comes down to only removing debris and leveling the surface.
But if you are as “lucky” as most summer residents/owners of private houses, then you will need to work a little more.
Soil preparation
We remove garbage
To get a beautiful and well-groomed lawn, it is important that the soil for the lawn is initially completely cleared of all debris. It could be small debris - leaves, paper, small stones; and large - stumps, trees.
It is important to pick out all the garbage from the site, but under no circumstances bury it, because over time it will begin to interfere with the growing root system, and inconvenience may arise when using lawn equipment.
You will, of course, have more work if the selected area has not been cultivated before, but regardless of whether you plan to sow or lay rolls of lawn, the work on preparing the soil for the lawn will be the same.
Remove debris and level the area
Also, a special place in cleaning the area for the future lawn should be given to the destruction of weeds.
This can be done by removing the layer of soil with a shovel (this, by the way, is the most environmentally friendly way), or you can take advantage of the achievements of the modern chemical industry and treat the soil with herbicides, which, penetrating directly to the root system, will destroy all the weed. And although the newest chemicals do not accumulate in the soil, we would advise sowing the area with seeds only after 1.5 months.
Digging
As we wrote at the beginning of the article, there are lucky people who do not need to worry about the quality of the soil on the site. But this does not mean that you can avoid digging up the soil before planting.
You can call for help with heavy equipment (a cultivator), or you can get by with a shovel (which will be even better). By the way, digging is another opportunity to remove weeds from the soil that were not killed by chemicals.
Dig dry soil 25 cm deep. This is the so-called single-tier digging.
Is there a two-tier dig? Yes. This digging is used for areas of land that have not been cultivated for a long time.
A furrow is dug across the lawn area to a depth of 25 cm (the bayonet of a shovel), and the layer of soil is loosened with a pick.
In the next furrow you need to select loosened soil and cover it with soil from the previous furrow.
By digging up the ground, you solve several problems at once: remove the remaining weeds and fertilize the soil
There is an option to replace the existing soil with fertile one. This is a complex process. You need to remove 20 cm of soil and fill another one.
You ask: “where can I get the right soil for a lawn?” This is done like this: mix part of the manure + 2 parts of peat + part of loam.
Here is the answer to the question of how to prepare fertile soil for a lawn.
The second option is not so labor-intensive, because it only involves enriching infertile soil.
To do this, add peat, manure, sand and loam to the existing soil and dig up everything with the old soil.
What soil is best for lawn grasses? Experts say that this is loam with a neutral pH level.
As a rule, digging is accompanied by laying a drainage system. Before sowing seeds, you need to install communications and drainage. If the groundwater is deep, then construct surface drainage.
Surface drainage serves only to remove excess moisture after precipitation. In other words, it prevents puddles from accumulating. If groundwater comes close to the ground, then deep drainage is needed.
Please note that creating deep drainage even requires consultation with a specialist.
Alignment
Preparing an area for a lawn involves carefully leveling this area, so that later, when mowing, it does not turn out that on the hills you cut it bald, but in the pits, on the contrary, you left it too long. Uneven surfaces can also damage the sharp blades of your lawnmower.
To level the ground, we select a rake as a tool and walk it lengthwise and crosswise along the dug up ground.
Always level the area, looking at it from the side. Transfer the soil where there is more of it into the holes for uniformity.
After leveling, watering is needed to allow the soil to settle.
When it dries, the unevenness will appear again, and you will need to repeat everything.
Scope of application and operating principle
Vibrating plates are actively used during construction and repair work of varying complexity, for example, when laying roads or sidewalks, etc. The unit has small dimensions, which allows it to be used in hard-to-reach places, including trenches. The design of the tool consists of four main elements:
- A work plate made of steel or cast iron.
- Vibrator.
- Frames.
- Power plant.
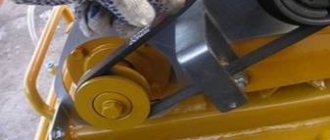
The basis of the unit is a massive plate, in the center of which there is a vibrator. It is connected to the power plant using a V-belt drive or clutch. A vibrator is necessary to convert rotational motion into oscillatory motion. Internal combustion engines or electric motors can be used as the power plant of the unit.
Main technical characteristics
The most important characteristic of the unit is the weight of the working plate. It determines about 70% of the total productivity of a homemade vibrating plate, as well as the suitability of the tool for the work performed. Depending on this indicator, it is customary to distinguish four categories of units:
- Lightweight - weight does not exceed 75 kg.
- Universal - the stove weighs 75-140 kg.
- Medium-heavy - weight ranges from 90-140 kg.
- Heavy - the weight of the slab exceeds 140 kg.
For home use, it is enough to make a vibratory rammer of the first category with your own hands. The power of the power plant also has a great influence on the productivity and quality of work performed. The optimal weight-to-power ratio is 5 liters. With. for every 100 kg of weight.
Among the additional characteristics of the unit, three should be highlighted:
- Vibration force - shows the power of vibration of the base.
- Dimensions of the working plate - determines the base pressure per unit of surface being processed and this indicator should not be less than 0.3.
- Type of power unit - electric, gasoline and diesel engines can be installed on vibrating plates.
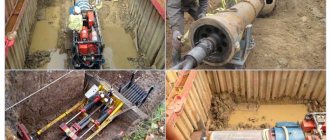
Compacting crushed stone with a vibrating plate
- For large volumes, it is important to use a vibrating plate. This is mobile and compact equipment. Work is completed as quickly as possible. Slabs weighing 60-120 kg are suitable for household use.
- Due to the vibration of the plate, compaction occurs. Shock absorbers dampen mechanical vibrations that are observed in the upper part of the equipment. The stove has a speed change lever.
- There are reversible and single-pass. Reversible ones are characterized by high functionality and efficiency.
- The device runs on electricity or diesel fuel. Unit weight up to 100 kg.
- You can buy a stove either in a store or used, or you can rent it.
- The operating conditions must be followed.
- To maintain technical performance, it is necessary to regularly lubricate some elements and clean the air filter.
Manufacturing instructions
A self-made vibrating plate with an electric motor will allow you to save a lot of money, since industrial units are quite expensive. The design of the tool is not very complicated, and you can make it yourself quite quickly. Among the necessary materials and spare parts it should be noted:
- Power plant - selected depending on personal preference. Many owners of personal plots decide to make their own 220 V electric vibrating plate based on an IV-98E model or any other site vibrator.
- Channel — 2 pcs.
- The basis for the work plate is sheet iron with a thickness of at least 8 mm.
- Soft cushions are installed on the handles of the tool and are necessary to dampen vibration.
- Fastening elements for the motor.
- Wheels - 2 pcs.
- Pipe.
From this entire list, wheels can be considered optional, but thanks to them, transporting the tool will become easier. You can also make your own tamper for soil compaction with reverse, which will make it easier to work on narrow or small areas of land.
On a steel sheet, use a grinder to make 2 cuts on both sides with a depth of 5 mm. They should be located approximately 10 mm from the edge symmetrically. Then the edges of the sheet should be bent, giving it the shape of skis, to avoid burying the slab during work. The places of the cuts must be welded, thereby fixing their position.
The vibrator is mounted on channels, which should not protrude beyond the level of the working plate. It is necessary to weld the channels securely, and therefore it is advisable to place the welding lines across. The distance between them is selected in accordance with the location of the mounting holes on the power plant.
The pipe will be needed to make handles, to which soft pillows must then be attached. Without them, working with the tool will be extremely inconvenient, because strong vibration will make it difficult to hold the plate. If the unit uses an electric power plant, then no special care is required.
The same cannot be said about a gasoline internal combustion engine. Before starting work, you should always check the reliability of all connections. It is extremely important to periodically clean spark plugs from carbon deposits to increase their service life. No more than 25 working hours should pass between the first and second oil change. Subsequent replacement can be carried out after 80 or even 100 hours.
Main components of the vibrating plate design
Before you make a vibrating plate on your own in a garage, you will need to prepare a diagram or even draw up drawings to scale to simplify further assembly. The main components in the design are the following parts:
- frame frame;
- base metal platform;
- electric motor;
- transmission system;
- suspension;
- management block.
The base plate is selected from a thick-walled steel sheet or ductile cast iron so that there is no destruction of the material during operation. This is facilitated by the relative viscosity of the metal and minimal fragility. It is strictly forbidden to assemble cast iron of questionable quality with a large number of cracks or casting cavities. When working with sand and gravel mixtures, it will be destroyed by external influences.
The thickest sheet metal will be needed to make the base and weight for the eccentric
It is important to initially have the correct geometric dimensions of the base, since if you make a vibrating plate with your own hands in accordance with this rule, the site will self-clean from soil adhesion. The area is also selected optimally, without unreasonable increase. A small working surface contributes to high-quality compaction of the site.
Popular drawings demonstrate a fairly simple design of a homemade vibrating plate with an electric motor. According to the kinematic diagram, a vibrator is based on the platform, and an electric motor is mounted above it. To connect these elements together, a V-belt drive or coupling is provided. In fact, the motor provides rotation, transmitted to the vibrator, and it further forms the oscillatory process.
Scheme of the simplest vibrating plate design
The resulting energy is transferred to the slab, and from it passes to the compacted soil. During compaction for laying paving slabs or for other purposes, particles of material fill the voids in the embankment. The result is a dense, even coating.
Types of vibrating plates used
Homemade designs require the presence of a power plant that provides the main work. Three types of motors are often used:
Diesel engines are appropriate when a lot of effort is constantly required. In everyday conditions they are hardly justified. Although it is not uncommon to find a vibrating plate made from a walk-behind tractor with an installed two-stroke engine.
Devices with a gasoline engine, like previous designs, are autonomous, but extremely noisy in operation. An economical engine with a power of several watts is selected for them.
Recommended engine power is 1.5-2 kW at 4000-5000 rpm. Less power will not provide the required shaft rotation speed, and accordingly, the vibration force will be insufficient
The optimal solution for many is a self-assembled electric vibrating plate. It is enough to connect electricity to the place of work on the site and you can start compacting the soil. A positive factor is the absence of exhaust gases during the process.
According to classification, it is customary to divide products into several groups:
- light – weight less than 70 kg;
- universal – up to 90 kg;
- medium weight – 90-140 kg;
- heavy group – more than 140 kg.
The first group is appropriate for processing the local area, where a layer of no more than 15 cm is expected to be pressed. The universal one is relevant for processing 25 cm. Heavier devices are designed for 50-60 cm.
The larger the compacted layer, the heavier the machine should be
It is important to correctly select the electric motor for the vibrating plate. After all, a too weak model on a massive slab will sink into the layers of soil. The optimal ratio is considered to be 5 hp per 100 kg of mass. or 3.7 kW.
Preparing the necessary kit
To make a vibrating plate at home or in a garage, you do not need to look for any rare or expensive parts. In the process, the following tools will be in demand:
- welding machine and a pack of electrodes 3 mm in diameter;
- half a kilo hammer;
- angle grinder with metal discs;
- set of wrenches and screwdrivers.
The components for the device will include the following set:
- An area motor with the ability to be connected to a 220 V household power supply. A new vibrator for a vibrating plate will be quite expensive, so it is recommended to purchase Soviet devices at disassembly sites or radio markets. Sometimes craftsmen even install motors from old washing machines, but the disadvantage of this method is the lack of vibration control.
- Sheet metal 8-10 mm thick. The area is selected taking into account the fact that the edges will bend. The optimal parameter for domestic conditions is 50x80 cm plus allowance for bending. You can find the sheet on metal plates.
- A pair of 80 mm channels or pieces of a building profile that will be welded across the structure. They are needed to mount and hold the electric motor.
- Metal pipe with a diameter of 20 mm. Its length is calculated based on the user's height. The optimal handle for average height is 120 cm, so you will need about 3 m of workpiece.
- A set of hardware for mounting the motor, including M10-M12 bolts, nuts for them, and always locking washers to minimize the influence of vibration.
The degree of influence of vibration on the operator can be reduced with the help of built-in additional devices. Often, automotive suspension elements are used for this. Without them, everything will also work, but the operator will get tired faster.
VIDEO: Making a vibrating plate with your own hands, step by step, with errors and their solutions
Step-by-step algorithm for assembling a vibrating plate with your own hands
At the initial stage, a base platform is prepared from a metal sheet using a grinder and a welding machine. We measure 10 cm from the front and back edges and cut the angle grinder to half the sheet thickness of 4-5 mm. Using a hammer or mallet, we bend the workpiece along this line by about 30-40 degrees. Such a slide will reduce the likelihood of the platform burying in the ground, and will also allow you to move the installation in the desired direction.
The cuts should be strengthened by welding. Using electrodes, we form an internal stiffening rib that fixes the bend in the desired position. We position the channels across the stroke so that their approximate axis corresponds to the distance of the engine mounts. We weld the strips to the inner surface.
There are two ways to mount the motor. In the first case, drilled holes are used in the channel to thread bolts through them. In the second case, the bolts are welded to the channels and the engine is placed on top. This method is considered more reliable, however, it requires very strict adherence to center distances.
When installing the electric motor on the site, it is worth knowing that the Soviet IV-98 models have an internal eccentric for the vibrating plate. It can be adjusted to the optimal vibration strength parameters. We tighten the nuts, having first placed the bushings under them.
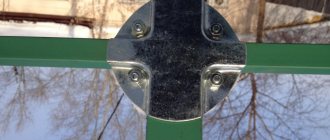
The crucial step is attaching the handle. To dampen vibration on it, silent blocks from domestic or foreign cars are useful. We weld the L-shaped elements to the bent part of the platform. We put rubber elements on them, through which the handle will be connected.
At home, it is possible to assemble a model weighing 40-50 kg. This is enough to compact 10-12 cm of soil.
When operating a homemade machine for a long time, individual parts of the electrical circuit may overheat, so it is necessary to use an RCD.
VIDEO: How the Germans prepare a site for laying paving slabs and paving stones
Safety precautions for work
When compacting soil with a pneumatic primer and using it for other materials, you should first go through the safety regulations.
Of the recommendations that already exist, remember the following:
- For safe operation, the operator must cover his body and face with personal protective equipment, namely headphones, glasses, hard hats, durable clothing and shoes.
- If work will be carried out on a small hill, then the operator and other workers must be above the device. The work should be done from top to bottom.
If for some reason the vibrating plate encounters an obstacle, you should immediately turn it off. After this, remove the obstacle, and the tool should be inspected to ensure that it does not have any malfunctions.
- Do not leave the device while it is running unattended. When working, the master must be behind the device and constantly monitor it, moving nearby.
- It is prohibited to operate the vibrating plate in rooms or areas where there are fire hazards or flammable objects nearby.
If work is carried out on the edge of a trench, ravine or pit, then a person can be at the minimum permissible distance from the cliff, but not closer.- To further speed up the device, do not apply force; this is strictly prohibited.
- To rotate the device, you should use only one hand.
- Before work begins, all equipment should be inspected in advance and ensure that there is no damage to it. If there are any external defects, they must be removed in advance.
- To prevent injury, keep your feet and hands a short distance from the working surface of the device.
- If for some reason the device falls on the block, then first turn it off. Only after this can you begin to lift it and put it into working condition.
- It is strictly prohibited to perform work under the influence of drugs, alcohol or psychotropic intoxication.
- You cannot work without rest for a long time. After you have been tamping for 40 minutes, you should take a 10-minute break to relieve the equipment and workers.
Please note that the higher the center of gravity of the device, the easier it is to tip over. In addition, the master should be careful when working with equipment that has a small support area.
Work especially carefully with a vibrating plate that has a soft start button, since if the work is done in a confined space, then it will be much safer for a person to use remote-controlled models. Naturally, such devices are more expensive, but they fully justify their cost. Compaction with a vibrating plate helps to cope with any tasks that involve compacting bulk materials. To get a high-quality result, you should take into account the characteristics of specific surfaces, and also calculate the appropriate thickness for the layer. The main attention should be paid to safety precautions. Failure to follow these basic rules can result in serious injury and tool failure.
Materials used
A suitable material for homemade manual tamping is a square beam with a side of 100 or 150 mm. It will be difficult to work with a round log in the corners and will have to be compacted with a significant overlap of the previous impact point.
It is not at all necessary to take new lumber; a used lumber will do. The main thing is that the wood is free from rot and splits. Choose a piece of timber that you can lift. The height of the manual tamper can be waist-high or chest-high, depending on ease of use. If you have no experience working with this tool, take a longer block, try it out and shorten it if necessary.
Drawing of a manual tamper for soil compaction.
- A piece of 2mm steel plate.
- A round birch stick 450 mm long (an old shovel handle will do).
- Wood screws.
- Carpenter's glue.
Materials for the manufacture of manual soil compaction.
Prepare the timber
Saw off the ends of the workpiece according to the dimensions exactly at right angles. Using a plane, adjust the plane of the lower end of the beam to a square. Remove 5 mm wide chamfers from sharp edges.
Preparing timber for tamping.
Decide how high-quality a finish you want. Before painting, the block will have to be sharpened and sanded. When a beautiful look is not needed, it is enough to clean the surface a little so that there are no splinters.
Make a shoe
Transfer the dimensions of the workpiece from the drawing to the steel sheet.
Cut out the plates for the shoe.
You can simply align the timber vertically installed on the metal and trace the outline with a pencil.
We make a soil compactor shoe.
Depending on the thickness of the plate, cut the workpiece with metal scissors or cut out the excess with a grinder. Remove burrs with a file, holding the part in a vice.
Mark and drill holes for the screws, make recesses for the caps with a countersink or a drill of a larger diameter.
Sand the surfaces with sandpaper.
Tamping shoe.
Bend the wings of the workpiece in a vice, which will be easy to do with the first two opposite sides. When bending the two remaining sides, the vise jaws may turn out to be wider than the shoe, then use a timber prepared for tamping.
Secure the shoe
Check the fit of the steel plate on the beam, if necessary, tap the metal or sharpen the wood. The shoe should fit snugly against the end on all planes. Drill holes for screws in one wing, pointing the drill at a slight angle into the wood, and tighten the screws.
We attach the shoe to the prepared timber.
Turn the beam over to the opposite side and fasten the other wing in the same way. Make sure that the shoe does not move away from the end.
When drilling subsequent holes, guide them past the already screwed in screws.
A shoe attached to a manual tamper.
Do-it-yourself vibrating plate: making products from a walk-behind tractor and others, operating principle, video and photo
Concrete is the most commonly used building material. Due to its performance properties, concrete is used in almost all stages of house construction: the foundation, blind area, floor surface, walls and partitions.
To achieve strength and durability, concrete must be made from a quality mixture and the right tools.
If the concrete solution is properly compacted, the finished surface will be free of cracks.
The most important tool when working with concrete is a vibrating screed.
Technical characteristics and operating principle
The tool has a very simple design, and making it yourself will not be difficult. A vibrator for the vibrating plate is placed on a heavy base, which is connected to the motor using a belt drive. The rotational motion from the power plant of the tool is transmitted to the vibrator, which converts it into oscillatory motion, which leads to compaction of the soil.
Using a homemade vibrating plate you can get an even, dense coating. More sophisticated tools have a reverse function, allowing them to be used in trenches.
Cast iron or steel is used as the material for the work plate. Among the main technical characteristics of the unit it is worth noting:
- Weight of the structure (ranges from 50−200 kg).
- Surface compaction depth. In garden plots, lightweight and versatile units are most often used, capable of compacting soil to a depth of 10 to 25 cm.
- Dimensions are determined by the width of the working platform and have a direct impact on work productivity.
- The disturbing force shows the force exerted on a surface and is measured in newtons.
- The vibration frequency affects the speed of passes and the smoothness of the compacted soil. The more often the blows are applied, the better the top layer of the surface is smoothed, but the speed of work decreases.
All units can be divided into groups in accordance with the power plant used. The most popular are gasoline tools, but for your personal plot you can make a vibrating plate with an electric motor with your own hands.
There are no significant differences between these types of tools in terms of productivity and quality of work. The only drawback of electric vibrating plates is the need for power supply .
There are also diesel units, but they have a high noise level.
Surface
Before making a homemade vibrating plate, it is necessary to analyze the intended surface of the tamper. If the device will work on colored surfaces, an increased vibration frequency will be required.
Sand, gravel and crushed stone are most effectively compacted with just such a slab.
If the working surface consists mainly of soil deposits, then a plate with a high vibration amplitude will help make the operator’s work easier.
The higher the amplitude, the better and easier the soil compaction occurs. But this homemade stove has a significant drawback - the need to install a shock-absorbing system.
Advantages of a homemade tool
Owners of personal plots often doubt the advisability of creating a vibrating plate with their own hands. It is worth remembering that a homemade device will work no worse than its purchased counterparts. Among the main advantages of a unit assembled on its own, the following can be noted:
- There is no need to purchase expensive materials and spare parts.
- The simplicity of the design allows you not to worry about the ergonomics of the tool.
- The manufacturing process is simple; you do not need to strictly monitor the dimensions.
- You can use any type of power plant, and you don’t have to buy it specially; any engine from decommissioned equipment will do.
- The tool is created taking into account the specific tasks and characteristics of the owner. It is often difficult to select a branded unit with the necessary technical characteristics.
Secure the shoe
Check the fit of the steel plate on the beam, if necessary, tap the metal or sharpen the wood. The shoe should fit snugly against the end on all planes. Drill holes for screws in one wing, pointing the drill at a slight angle into the wood, and tighten the screws.
Turn the beam over to the opposite side and fasten the other wing in the same way. Make sure that the shoe does not move away from the end.
When drilling subsequent holes, guide them past the already screwed in screws.
Manufacturing recommendations
All branded units of this type are quite expensive, and making it yourself can save a lot of money. The quality of work performed using a homemade tool will be high. To make a vibrating plate you will need the following materials:
- Sheet metal 8 mm thick for making the base of the working platform.
- Two channels.
- Soft cushions made of elastic material (2 pcs.) for installation on tool handles.
- Bolts for fastening the power unit.
- Metal pipe.
First you have to decide whether the tool will be portable, or whether it is better to make a wheeled version. In the second case, it is worth adding 2 wheels to the number of necessary materials. The portable unit is as simple as possible to manufacture and consists of 4 main elements: a power unit, an eccentric, a platform and a handle.
https://www.youtube.com/watch?v=ANorNWiTR0Q
As an example, it is worth considering just this version of the tool, because it is perfect for use on a personal plot.
Procedure
The tool is assembled in the following sequence:
- In a steel sheet, using a grinder, it is necessary to make blind cuts at a distance of 10-15 cm from each edge. As a result, the design can be shaped into skis. Otherwise, the tool will not be able to move along the ground and will constantly bury itself in it. The edges of the sheet are folded, and the joints are thoroughly boiled.
- In the middle of the slab, a platform for the power plant will be installed, and it is best to use channels as the material.
- After installing the engine, you need to balance it. When the center of gravity shifts during operation, the tool will constantly move towards the maximum weight, and considerable physical effort will have to be made to hold it.
- The power plant is selected based on personal preference. If possible, you can use an electric motor from decommissioned equipment, which will significantly save on the cost of the tool.
Read also: Wheel for polishing a car using an angle grinder
Set the handle
Mark the drilling center at a distance of 100 mm from the top end. Select a drill bit with a diameter 2 mm smaller than the cross-section of the handle. Make a through hole perpendicular to the surface of the beam.
We make a hole for the handle of the tamper.
Even with careful drilling, the outer parts of the hole will be slightly larger than the inner diameter. Sharpen the wood with a file, periodically trying to insert the handle into place.
At the same time, correct any possible misalignment of the hole relative to the plane of the beam. Achieve a tight (but without significant force) fit of the handle, and if necessary, lightly trim the stick. Do not try to hammer into the handle - the wood may split. Place the stick in the beam and make marks.
Installing the handle on the soil tamper.
Apply glue to the sides of the hole.
Place a pen on the marks and wipe off any excess glue. Drill a pilot hole and secure the handle with a long screw.
Fixing the handle on the tamper.
After the glue has hardened (according to the manufacturer’s recommendations), the manual tamper is ready for use.
Photo of a homemade manual soil tamper.
After use, clean the device from dust and store it in a place protected from rain and snow. Over time, the bottom of the tamper wears out; monitor the condition of the metal lining and change it in a timely manner.
Related articles:
Let's discuss how to work with a hammer drill without dust. And also: disadvantages when using a vacuum cleaner, how to avoid dust when drilling a wall and drilling a ceiling.
The article examines the process of making simple holders, stands and shelves for hand tools in a home workshop.
Options for homemade side stops for a carpentry workbench are considered. A drawing is presented and the manufacturing procedure for one of them is shown in detail.
Master class on replacing a failed nickel-cadmium screwdriver battery with a modern lithium-polymer battery.
Step-by-step instructions with photos examine the process of making a simple tap driver with your own hands.