In this article you will learn how to make a vibration motor with your own hands! Necessary drawings for arranging a vibrating table with an electric motor + Video of how we do it and connection diagram, study in detail!
During the period of arrangement of a country house or a courtyard of a summer cottage, the need for molded concrete products arises. Nowadays, you can buy everything without exception and even more. But you can also save your family budget by making paving slabs, curbs and drainage with your own hands. For this purpose, it is necessary to acquire a concrete mixer and special equipment to compact the concrete mixture.
In this article we will tell you how to make a vibration motor with your own hands and what it is.
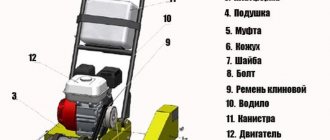
Making cinder blocks on a machine
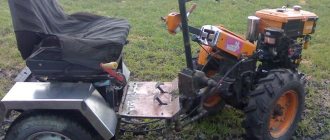
Photo of the structure from different angles
The machine can significantly increase work productivity. The equipment has a fairly simple design.
Vibrating machine
Assembling the machine
The main element of a homemade vibratory compacting machine is a mold (matrix) for slag concrete mortar. By its design, this form is a metal box with internal elements in the form of voids. The void stoppers can also be removable.
Compact cinder block machine
The work kit includes the following materials and tools:
- welding machine;
- standard set of locksmith tools;
- grinder;
- vice;
- sheet steel 3mm thick. It will take about 1 m2;
- a pipe with a diameter of 7.5-9 cm. Approximately 1 m of pipe is needed;
- metal strip 3 mm thick. You will need about 30 cm of material;
- electric motor with a power of 0.5-0.75 kW;
- nuts;
- bolts.
First step. We make a mold according to the size of the future blocks. We cut out the side faces of the matrix from sheet steel. We will make a form for 2 blocks at once. To do this, we cut out the inner central partition from steel and fix it in the box.
Second step. We determine the height of the elements to decorate the voids.
Third step. We cut 6 pieces of pipe along the length of the limiting cylinders to form voids.
Fourth step. We give the pipes a conical shape. To do this, we cut each piece of pipe longitudinally to the middle, compress it with a vice and connect it using a welding machine. We brew each cone on both edges.
Fifth step. We connect the stops in a row along the long edge of the cinder block. Along the edges of the row we add a 3-centimeter thick plate with holes for fastening with eyes.
Sixth step. We make a cut in the middle of each such compartment. We weld lugs on the back side of the form. They will allow temporary fastening of elements to create voids. A very convenient solution - it will be possible to remove the cylinders and make monolithic blocks.
Compact cinder block machine (press on top)Machine pressMachine press
Seventh step. On the outside of one of the transverse walls we weld 4 bolts for the mounting holes of the vibration motor.
Eighth step. Using welding, we attach an apron on the loading side and blades along the edges.
Ninth step. We prepare all structural elements for painting - we clean them and thoroughly polish them.
Tenth step. We do the press. It will look like a plate with holes repeating the location of the holes in the block.
We make the plate of this size and fix it in such a way that it can go deep into the box at the place where the limiters are installed by 5-7 cm.
Finally, all that remains is to weld the handles to the press, coat the structure with a primer mixture and mount the vibration motor.
An ordinary electric motor can be converted into a suitable vibration motor. To do this, it is necessary to weld eccentrics onto the engine shafts. We won’t bother too much - we’ll just weld the bolts so that their axes coincide. To regulate the frequency and strength of vibration, screw nuts onto the welded bolts.
Compact cinder block machineMotorMotorVibration device
Making blocks
Recommendations for preparing the solution are given above. You can use the standard recipe or modify it at your discretion. The main thing is to obtain optimal viscosity. It can be determined “by eye” - the lump of mixture should hold its shape steadily.
Before loading the mixture, lubricate the contact metal surfaces with oil. Thanks to this, the solution will not stick to the iron.
We place the finished mixture into the matrix and begin pressing.
Place the filled forms on a vibrating plate and let it compact the solution for 5-15 seconds. After the specified time, add more solution to the mold, because previously loaded will inevitably settle.
We repeat the process, only this time we do not turn off the vibrating plate until the clamp reaches the limiters. We remove the mold until the machine stops.
Ready cinder block
We give the blocks 1-3 days for initial drying, carefully remove them from the blocks, lay them out on a flat horizontal surface and cover them with plastic wrap. The material can be used for its intended purpose no earlier than after a month.
Comparison of characteristics of cinder blocks and foam blocks
Good luck!
Making a frame for a vibrating table
To make the frame, the author uses a profile pipe with a square section of 30x30 mm. Since the dimensions of the vibrating table in this case are small, a profile of 30x30 mm will be quite sufficient.
It will be necessary to additionally drill holes in the frame for a round rod with a diameter of 12 mm, onto which the rubber bushings of the reaction rods will then be placed. They just fit loosely onto the rod.
These rubber bushings are needed to separate the upper part of the vibrating table and the frame, because if they are rigidly connected to each other, then the vibrating table will be of no use.
The author also decided to make the legs of the frame from a 30x30 mm profile. The electric motor itself is mounted under the vibrating table (under its upper part). Then you can start assembling and painting.
We recommend watching the video on our website for details on how to make a vibration table from a conventional electric motor with your own hands.
Rate this post
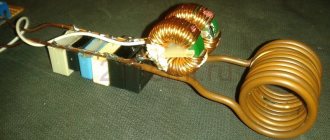
Types of combined winding “Slavyanka”
The combined Slavyanka winding can be single-layer or double-layer, and its pitch can be shortened or diametrical. The shift between the windings themselves - the main and additional (combined) - will be equal to 30 electrical degrees.
It is also customary to distinguish between two schemes for connecting the phases of a combined winding:
- parallel, in which the main winding is a “star” and the combined winding is a “delta”;
- sequential, presupposing the preservation of the original circuit of the main winding, recalculating the combined “triangle”.
As for the combined Slavyanka winding with a series phase connection circuit, it demonstrates higher performance characteristics compared to similar parallel ones.
Types of vibrating rollers by number of rollers
Based on the number of rollers, rollers are divided into:
- Single-drum. There is a roller on one side only. On the other side are the wheels.
- Double-roller. The rollers are located at the front and rear. Both rollers can be driving, or one can be driving and the other can be driven. The technique provides double compaction in one pass.
- Three-roller. Used for final compaction and leveling of the road surface. They are distinguished by good cross-country ability, thanks to the redistribution of the mass of equipment on uneven surfaces.
Engine on vibration table and drawings
The engine power should not be too high, which is why many people use motors from washing machines. Its only drawback is its small resource. But if there are no plans to provide tiles to the entire area, then one engine can work properly for several years under average loads. The motor can be modified, since its main weak point is the bushings or bearings. If you immediately change the bearings to reinforced ones and remove the bushings and replace them with bearings, the table will last even longer.
You can use a ready-made vibrator. IV99, for example, will cost 5-7 thousand, but it is practically eternal, since it has a power reserve and is designed for such work. An excellent addition would be a speed controller. With this, you can adjust the vibration frequency for each batch of tiles separately.
Vibrating plate motor: what to choose?
As mentioned above, the engine can consume gasoline, diesel, or electricity. The operating principle of a vibrating plate does not change depending on the type of engine, but the range of work directly depends on it.
The most popular gasoline engines are Honda, Robin, Wacker. These engines are 4-speed, so they must be “fed” with pure AI-92 gasoline. Oil marking is SAE 10 W 30 or SAE 10 W 40. Popular diesel engines are Hatz, Lombardini, and Kipor.
Not so often, but still some manufacturers offer electric vibrating plates. They are well suited for work in buildings where access to fresh air is limited; this particular type does not emit exhaust gases. A significant disadvantage is, of course, that the machine is connected to an outlet.
The heaviest are diesel vibrating plates. Their mass can reach a ton. For example, the Wacker DPU 130 diesel vibrating plate, according to the manufacturer, is capable of replacing a roller weighing 7 tons. This specimen has a two-section base plate and develops a centrifugal force of 130 kN. Comments about performance are probably superfluous, but such vibrating plates are also the most expensive. A gasoline vibrating plate, in turn, weighs a maximum of half a ton, the lowest limit is 50 kg.
Photo source: atlascopco.com Vibrating plates are often equipped with gasoline and diesel engines
Application of vibration motors
The basis of any vibration installation is a vibration motor. A vibrating machine can be useful not only for the manufacture of concrete structures, but for sifting bulk building materials, grain, and so on. Depending on why vibration is needed, the main parameters are selected, according to which it is quite easy to make a vibration motor with your own hands.
In this case, it is necessary to distinguish between two types of vibrators - for compacting concrete and for the production of concrete molded products, on a vibrating table. Regardless of the purpose of using the device, for constant use it will be more profitable to buy a ready-made vibrator made in an industrial environment. If we talk about piece production or the construction of one single house, then a homemade device will be the most inexpensive option.
Making a vibrating table at home
After the construction of the house and outbuildings, the owner strives to improve his plot: plant flowers and shrubs, lay out a garden path. It is unprofitable to buy paving slabs in large quantities, so it is better to make them yourself on a vibrating table - a device that allows you to obtain various shapes from concrete mortar using vibrocompression. The installation plays the role of a mechanism for triggering the action of plasticizers and evenly distributes the mixture throughout the mold. The process of its operation is simple, and therefore it is worth thinking about how to make a vibrating table with your own hands.
- What you will need for assembly
- Stages
Design and principle of operation
A homemade installation consists of a plate attached to a metal base with a movable connection, and an electric motor that imparts vibration to it. The countertop of the device, as a rule, has a perfectly smooth surface.
If these conditions are not met, then the vibrating table for paving slabs will produce low-quality products, which will subsequently cause problems during installation.
Before starting to work with the device, it is fixedly attached to the floor. Then a form with concrete mass is placed on the working surface and the electric motor is turned on. Thanks to vibration, the cement-sand mortar settles and compacts, leaving the remaining air out of it, resulting in a monolithic product with no internal voids. Once molding is complete, the vibration motor is turned off and the tiles are removed. They are dried for approximately 20-26 hours under natural conditions, then removed from the mold using a special formworking device.
It should be noted that the vibrating table for concrete should provide uniform vibration of the surface with a small vibration amplitude. Otherwise, the cement-sand mixture may “boil”, and instead of the desired compaction of the product, it will become saturated with air.
Required materials and tools
To assemble a vibration table yourself you will need:
- metal sheet for making countertops;
- electromechanical motor;
- metal plates;
- steel springs that will provide the necessary vibration;
- channel profile or corner;
- metal pipes;
- welding machine;
- bolts for fixing the electric motor;
- drill;
- metal washer;
- Bulgarian.
Frequency and cycle of vibration motor use
First of all, you need to determine the vibration frequency of the engine. It can vary from 750 to 3000 rpm. A high frequency with a small amplitude, or a low frequency vibration with a large amplitude may also be needed. In construction, as a rule, vibration motors with a high vibration frequency of 2 to 3 thousand revolutions per minute are used. However, a lot depends on the size and weight of the installation.
The higher the frequency, the more the installation structure is exposed to fatigue stresses, therefore, the steel of the load-bearing frame must be stronger and thicker. If the permissible frequency limit is exceeded, the structure will quickly deform. In this case, it is also necessary to take into account the operating cycle of the installation. Under heavy loads and frequent use of the vibration unit, it is not recommended to use a motor with a speed of more than 1500 rpm.
Petrol vibrating plate, how to choose the right one
In order to choose your own version of the tool for construction and increase labor productivity, it is worth exploring different equipment options. The choice of vibratory rammer or vibrating plate should take into account the following factors.
In addition to choosing a vibrating plate base, you need to consider the types of motors. The engine is electric. A vibrating plate with an electric motor is lightweight, economical, maneuverable, and produces less noise. However, the presence of an electric motor also creates inconveniences - the vibrating plate depends on the power source, and the electric motor can only be used within a small radius from this source. In vibrating plates with electric motors, despite the protective equipment, there is a danger of electric shock; they cannot be used in a damp environment.
Gasoline-type engines are installed both on small vibrating plates and on heavy devices. But more often, most gasoline engines are installed on small compact units. Vibrating plates are often equipped with a four-stroke Honda gasoline engine. The use of gasoline engines allows you to carry out work at any distance from a source of electricity and work in any weather.
However, units with gasoline engines are noisier than those with electric ones. An alternative to gasoline is diesel fuel. It is used on heavy duty diesel driven plate vibratory models used in construction.
DIY vibration screed
For small jobs, you can use a homemade vibrating screed.
Manufacturing
The simplest option is to assemble a vibrating screed from a board, timber and drill.
- First, the surface of the board must be sanded, all irregularities must be removed. It is this material that will serve as the basis.
- Next, a drill is attached to the board, about 25 cm wide and about 30 mm thick, with self-tapping screws. The drill should lie lengthwise on one of the sides.
- Also, a meter-long beam is attached to the board using self-tapping screws.
The vibration screed is ready.
Usage
It is easy to use.
You insert a curved drill into the chuck of an electric drill and connect it to the mains, thereby creating vibration movements of your board.
Don't forget about safety rules! Wet concrete can be a good conductor of electrical current. Wear gloves and boots.
Flaws
There are no shortcomings in a homemade vibrating screed. They are as follows:
- No matter how you sand the board, it will not have the same smooth surface as an aluminum screed.
- The power of the drill is not sufficient to work with a larger board, and accordingly, the work will be performed in small sections.
- Disposable vibration screed, because After the first use, the board will become unusable.
- It is impossible to regulate the speed.
Vibrating screed option with aluminum profile
It will be more difficult to make a vibrating screed with a metal lath with your own hands. In addition to the monetary costs, you also need to have technical knowledge.
Instead of a board, in this version an aluminum profile will be used. This design will last you longer. The function of the handle will be performed by a pipe, and, of course, a vibration motor.
We do not recommend using welding in this option. For safety reasons, cover the handle of such equipment with insulating material.
Adviсe
- Your homemade structure will be reliable if you secure all its components properly. The bolts must be tightly screwed. The wire should not dangle.
- After you have made a vibrating screed with your own hands, test it. To begin with, a small surface will suit you. Test your homemade tool first, otherwise you may ruin the entire screed. Do the work without rushing.
Recommendations for using a vibrating screed
After making the vibrating screed with your own hands, you should check the device and test it at work. First, the floor is cleared of various debris, a reinforcing mesh is installed to ensure high-quality concrete bonding, and then the beacons are installed on the surface. After this procedure, the floor is poured with concrete mortar; if the concrete protrudes beyond the guides, then leveling should be done.
Now you need to activate the vibrating screed. At this stage, there is no need to rush; it must be carefully moved along the concrete screed without jerking. This results in a smooth concrete surface without pores. It is not recommended for an inexperienced builder to perform such a complex of work on large areas. You need to start learning from a small room and preferably under the supervision of a familiar specialist. It often happens when concrete sags while working with a homemade vibrating device, in which case it must be added with a trowel to the sagging area.
Features of installation and use
If you know the features of using and installing a security alarm, you can install it yourself.
- Installation of the device must be carried out taking into account the rules that are prescribed in the documentation for the specific device. Also, each individual group of devices has its own individual rules for installation and use.
- Installation of a security alarm is the process of connecting electrical parts to each other. In this case, it is a device and a sensor.
- The parts must be connected by soldering on the block of the device itself or in a special junction box.
- It is necessary to correctly determine the installation locations of the sensors. Typically these are doors, windows and walls that are not load-bearing.
Purpose of the vibrating table
The main task of devices such as a vibrating table is to improve the quality of produced consumables by increasing their density; moreover, they significantly speed up production and reduce the amount of effort that had to be spent.
The vibrating table can be used in the future not only for paving slabs, but also for the manufacture of a large number of other materials.
In order to prepare paving slabs or mix concrete, it is necessary to increase the density of the working mixture. Surely you want to know how to make a vibrating table with your own hands, as well as what it is needed for and how it works.
The main principle of operation of this equipment is the creation of vibrations, thanks to which the mixture will fill all empty, unfilled areas of the mold, as well as release air from the mixture, eliminating the possibility of air bubbles appearing inside. Therefore, if you need to mix concrete and make special parts or blocks from it, you should create a vibrating table right at home.
Thanks to your skills and aspirations, it is possible to create a tool that will be of the same quality as a store-bought one, the main thing is to understand how this tool works and why it is needed. The table itself looks like an ordinary iron table, the legs of which contain hinges and springs.
Do-it-yourself vibration motor: drawings with an electric motor + Video of how to make it and connection diagram
In this article you will learn how to make a vibration motor with your own hands!
Necessary drawings for arranging a vibrating table with an electric motor + Video of how we do it and connection diagram, study in detail! During the period of arrangement of a country house or a courtyard of a summer cottage, the need for molded concrete products arises. Nowadays, you can buy everything without exception and even more. But you can also save your family budget by making paving slabs, curbs and drainage with your own hands. For this purpose, it is necessary to acquire a concrete mixer and special equipment to compact the concrete mixture.
In this article we will tell you how to make a vibration motor with your own hands and what it is.
The principle of operation of the device and the list of necessary materials
The mixtures used to cast various items have too thick a consistency. That is why they are not capable, unlike more liquid solutions, of qualitatively filling various containers. When filling the molds, the mixture flows unevenly, which leads to the formation of air pockets.
The air gradually leaves these bubbles as they solidify, but the void in the body of the element remains. Thus, weak points arise in a seemingly solid product. If there is excessive load, or an accidental impact, or fall, such voids cause the entire element to break.
If voids form at the very bottom of the mold (where the front side of the product is usually formed), then after solidification on the surface of the element you can find recesses, depressions and pits of various sizes, which significantly spoil the appearance of the cast mold.
The use of the device in question helps to avoid these troubles due to its vibration function. Light vibration causes the mass to slowly fall down under the pressure of its own weight. During this process, the air pockets are filled with the mixture, and the air itself is expelled out.
To assemble a vibration table with your own hands according to the drawing, you must first purchase the following materials (all dimensions are approximate; you can either increase or decrease them according to your own needs):
1. Vibration motor.
2. Welding machine.
3. Springs – Kamaz timing belt – 4 pieces.
4. Metal sheet – 0.3x75x120 cm.
5. Profile pipes - 0.2x2x4 cm - 6 meters (for legs) 2.4 meters (for the frame under the lid).
6. Metal corners – 0.2x4 cm – 4 meters.
7. Bolts (for mounting the engine).
8. Special paint (to protect the product from corrosion).
9. Water supply metal rings – 4 pcs. (the diameter should match the diameter of the springs, or be slightly larger).
Materials
All the materials that you will need to make this design yourself can be purchased in specialized stores and construction markets.
In addition, some of them have probably been collecting dust in your garage or home workshop for a long time. Here is their list:
- Channel, which will become the basis of the frame.
- Steel or aluminum corners.
- Bolts.
- Vibration installation.
- Electric motor of the required power.
- Rubber for insulation.
- Starter for an electric motor with variable speed control.
- Three-phase electrical cable.
- Two pieces of reinforcement, each about a meter long, which will be useful for making handles.
When making a vibrating screed, you will have to use a tool that does not necessarily need to be purchased specifically for this case. Perhaps you or someone you know has it.
What you will need to make this equipment:
- Welding machine. It should be used carefully, with mandatory use of protection for the face and hands. If you are not confident in your abilities, ask a professional welder to do this work. This work will not cost much, but you will have confidence that it will be done efficiently, which means that the equipment will last a long time.
- Drill and set of drills for metal.
- Screwdriver.
Classic version: manufacturing stages
You cannot make a unit by eye: it is unsafe and ineffective. On the Internet, find a drawing of a vibrating table of suitable dimensions. Start from the drawing, taking into account the characteristics of your materials and tools.
- Make a base from a corner, a channel also works well. Dimensions are set depending on the needs of the builder; the standard size is 70x70 cm. The area of the vibrating tabletop must correspond to the capabilities of the motor. Can be fastened with bolts or welding.
- Collect support. The pipes will serve as table legs; weld them to the base. To increase the stability of the structure, screw iron plates to the legs. They can then be fixed in concrete using anchors if the unit is intended to be used permanently. In the case of a portable table, stability depends on the rigidity of the floor and the material from which it is made. The height of the working surface is selected so that it is convenient for the master to work. The electric motor is installed on the platform at a distance of 15-20 cm from the working surface.
- Weld steel springs at the corners of the structure so that they support the work surface. Weld plates secured to an 8 mm metal sheet to the springs. If you make the base thinner than 8 mm, there is a high risk that the tabletop will bend under the weight of the concrete forms.
- Attach the electric motor to a square welded on springs across the structure. Make an eccentric from a metal washer attached to the motor shaft. It is he who will provide vibration with the required amplitude. On the side of the eccentric, make a hole with a figure-eight thread. By screwing a bolt into this hole, you can adjust the vibration amplitude of the device. Fix the bolt in the desired position with a control nut.
Expert opinion Kulikov Vladimir Sergeevich
The table should vibrate, not the motor. The electric motor must be firmly fixed to the stand, otherwise the duckweed will quickly render it unusable and the effectiveness of the vibrating table will decrease. To make the product last longer and work with it safer, strengthen the structure. Weld the channels crosswise on the sides, making sure that the springs are installed as rigidly as possible.
Unmolding option
Removing finished tiles can be a bit of a challenge. To speed up the process, cut a rectangular hole at the end of the work surface to the size of the future tiles. The form is placed on top of it, the motor is turned on, and due to vibration, the tile falls out of the formwork. Place elastic material under the hole to prevent the product from breaking. To be able to work with such a device, the concrete containers must have handles that can be used to support the containers on the edges of the table.
Installation manufacturing process
The most difficult stage of constructing a homemade vibrating table at home is selecting a suitable electric motor. A good option is an engine from a washing machine, the only drawback of which is its fragility due to wear of the bearings or disconnection of the axle.
Before you begin manufacturing the installation, you need to find a drawing of a vibrating table in the relevant literature or the Internet. It is recommended that further work be carried out in accordance with it.
- The base is made of a channel or corner. The size can be arbitrary; experts consider 700x700 mm to be standard. When planning the workspace area, remember that it must correspond to the power of the electromechanical motor used.
- Support. The legs of the vibrating table are metal pipes. They are welded to the base using a welding machine. To ensure maximum stability, metal plates are attached to the legs, which are then fixed with concrete mortar. If there is a need to move the vibrating table, then you should not do this. Then the stability will depend on the quality of the floor covering. The height of the table is selected arbitrarily, but it should ensure the convenience of the master’s work. The engine should be located at some distance from the floor.
- Springs are located in each corner and in the center of the structure and are welded to it. They can be taken from a moped or car and cut in half. They will provide vibration to the tabletop when the electric motor operates. Plates are welded to them and fixed to a metal sheet, the thickness of which must be at least 8 mm. If a thinner base is used, deformation of the working part may occur.
- The engine is attached to a square welded across the vibrating table on springs. Low-amplitude oscillations with high frequency are provided by an eccentric, which is made of a metal washer placed on the motor shaft. A hole is made in the side and a thread of 8 is created. Amplitude adjustment is achieved by screwing or unscrewing the bolt, which is fixed in the washer with a control nut.
It is important to securely fasten the electric motor so that it is not subject to vibration, otherwise its service life will be significantly reduced.
You can simplify the work and purchase an unbalanced engine in the store. The IV-99 E 220 V vibrator is perfect for this purpose. Its cost is 6,000 rubles and it copes with the task perfectly. It would also be a good idea to purchase an AC potentiometer, which will allow you to adjust the oscillation frequency to each type of concrete mixture used by changing the voltage.
The use of vibrating tables for the production of paving slabs has a number of advantages. This is not only strength and high quality of products, but also noticeable savings: you can use rigid mixtures with a small amount of cement without loss in quality. The productivity of a homemade vibrating table reaches 50-60 m2 of tiles per day. This quantity is enough to run a successful business producing and selling products for paving sidewalks.
Frequency and cycle of vibration motor use
First of all, you need to determine the vibration frequency of the engine. It can vary from 750 to 3000 rpm. A high frequency with a small amplitude, or a low frequency vibration with a large amplitude may also be needed. In construction, as a rule, vibration motors with a high vibration frequency of 2 to 3 thousand revolutions per minute are used. However, a lot depends on the size and weight of the installation.
The higher the frequency, the more the installation structure is exposed to fatigue stresses, therefore, the steel of the load-bearing frame must be stronger and thicker. If the permissible frequency limit is exceeded, the structure will quickly deform. In this case, it is also necessary to take into account the operating cycle of the installation. Under heavy loads and frequent use of the vibration unit, it is not recommended to use a motor with a speed of more than 1500 rpm.
Why do you need a vibration motor?
The basis of each vibration installation is an electric vibration motor. The installation may be needed not only for the production of concrete, but also for sifting bulk building materials. Depending on the goals set, key characteristics are selected, according to which it is not difficult to make a vibration motor with your own hands.
There are 2 types of vibration motors:
- for compacting concrete;
- for the production of concrete products.
If you plan to use a vibration motor on a large scale, then it is more profitable to buy a ready-made one from the factory. It will have all the characteristics for reliable operation. In the case of so-called one-time use, for example, for the construction of a country house, a hand-made vibration motor will be an excellent solution.
Important! The vibration frequency of the motor ranges from 750 to 3000 rpm. There are also motors with high frequency with small amplitude, low frequency vibration with larger amplitude. In construction, vibration motors with high frequencies are used - from 2 to 3 thousand rpm. An important factor is the size and weight of the structure.
High-frequency vibration motors require a stable installation made of strong, thick steel. When overloaded, the structure quickly deforms. It is important to consider the cyclical operation of the installation. If the equipment will operate frequently and under high loads, it is necessary to install a motor with a frequency of more than 1500 rpm.
Application of vibration motors
The basis of any vibration installation is a vibration motor. A vibrating machine can be useful not only for the manufacture of concrete structures, but for sifting bulk building materials, grain, and so on. Depending on why vibration is needed, the main parameters are selected, according to which it is quite easy to make a vibration motor with your own hands.
In this case, it is necessary to distinguish between two types of vibrators - for compacting concrete and for the production of concrete molded products, on a vibrating table. Regardless of the purpose of using the device, for constant use it will be more profitable to buy a ready-made vibrator made in an industrial environment. If we talk about piece production or the construction of one single house, then a homemade device will be the most inexpensive option.
Scope of application of milling and engraving machines
Milling and engraving machines are used to create products in everyday life and business. This:
- creation of three-dimensional logos, emblems, letters;
- production of souvenirs - icons, paintings, bas-reliefs made of wood and plastics;
- creation of elements of board games and 3D construction sets (prefabricated models);
- production of cliches, stamps for printing houses;
- jewelry products - engraving, making models for precision casting, creating products from semi-precious stones (gems);
- production of kitchen utensils and decorative elements;
- creating molds for chocolate confectionery;
- production of toppers (advertising signs for organizing holidays, anniversaries, weddings).
How to make a vibration motor with your own hands
To create a more dense mass of concrete in the foundations for a house and other structures made from it, submersible or surface type vibration motors are used, the power of which is from 1 to 1.5 kW, operating on a 220 V network. Drawings of a vibration motor can be found in the public domain on the Internet . To make it you need:
- Handles for directing, holding, carrying the device.
- Electric motor of the required power.
- Eccentric unbalance.
- Power cable.
- Bases of the required dimensions.
What is the power? In order to make a submersible type vibration motor, it is necessary to use a hammer drill with a power of at least 1.5 kW.
You will also need a metal rod of the required length, a metal plate with a diameter of approximately 60 mm. A plate is attached to the end of the rod or reinforcement by welding; the other end must be turned in such a way that it can be secured in the tail zone of the hammer drill.
The mechanism is capable of compacting concrete using rotational and translational movements. Air bubbles that form in concrete are removed quickly and without problems. The position of the vibrator must be changed every 2-3 minutes.
DIY 220 Volt vibration motor
A vibration motor of this type operates by acting on concrete through the supporting surface of the active element.
Equipment
To make it you need the following equipment:
- small hammer drill;
- electric drill.
For high-quality work, a power of 1–1.5 kW is enough.
Tool
For a design with a maneuverable shaft you need:
- electric drill;
- stainless steel pipe;
- metal cable in a protective casing;
- steel axle;
- ball bearings – 2 pcs.
It is necessary to make two bearing units in the pipe, on the inner race of which there is a steel rod with an eccentric.
It is combined with the drill using an elastic cable.
During rotation of the shaft, the nozzle oscillates, and as a result, the density of the concrete increases.
DIY vibration motor for vibrating table
Vibrating table components:
- power metal structure like a frame;
- tabletop fixed on a support machine;
- electric drive – vibration motor;
- springs that are needed to interact the platform with the steel frame;
- control panel installed on the machine.
The density of concrete is achieved subject to the following conditions:
- decrease in vibration amplitude;
- rhythmic vibration of the platform.
To achieve this, you need to accurately adjust the weight of the load, set the coordinates of the drive connection, and select a set of vibration motor characteristics. The motor must be carefully fixed to the frame of the mechanism and connected with a cable to the control panel.
There are different versions of high-quality execution, which differ in the location of the cargo.
One can be mounted on the motor shaft and also function autonomously. The second option involves transmitting torque using a belt drive.
Vibration motor based on a hammer drill
It has a simple design and is made of the following parts:
- steel rod;
- end washer.
The washer is attached by welding to the end of the bar, and its length corresponds to the depth of the mold. The operation of the device is realized during the reciprocating motion of the working body. The peak touches the bottom of the mold and affects the concrete mass, manifesting itself as a vibration key.
When carrying out activities related to landscaping the territory of a private house or summer cottage, the need arises to use concrete products. They, of course, can be purchased in specialized stores. However, it is possible to save financial resources if you make paving slabs and curbs yourself. This will require equipment for vibratory compaction of the mixture, including a vibration motor. Let's dwell on the scope of use, purpose, device. Let's consider the characteristics, as well as manufacturing technology.
Homemade vibration motor for concrete
To compact the concrete mass in foundations and other reinforced concrete structures, surface-type or submersible vibration motors are used. For a surface vibrator, a vibration motor with a power of 1 to 1.5 kW, operating on a 220 V network, is suitable. Its diagram is shown below, and it consists of:
- Handles for holding, guiding and carrying the device.
- Electric motor of sufficient power.
- Power cable.
- Eccentric unbalance.
- Bases of the required size.
Professional models of vibration motors have an adjustable eccentric, which allows you to adjust the amplitude of vibrations and the force with which compaction is performed. The eccentric is fixed on the output shaft of the electric motor. To do this, a bracket is rigidly fixed to the shaft, and the unbalance in turn is attached to it with a threaded connection. By loosening the thread, you can adjust the position of the eccentric in relation to the motor shaft, thus changing the amplitude of the device.
Purchasing a unit
If you still decide to purchase a unit, you need to take into account both the main criteria and minor nuances that will make the work easier or increase its service life. However, we cannot fail to mention the manufacturers of vibratory ramming devices.
Equipment from European manufacturers is especially important. German technology is distinguished by its reliability and long service life. Even rental samples show good quality and speed of work. All equipment has a double safety margin. Wacker, Weber, Ammann, Bomag produce professional equipment.
Israeli Shatal and Czech NTC have fewer resources than the Germans, but they also turn out to be good workers at construction sites and on private property.
South Korean equipment from Jeonil Minery is not inferior to products from the Czech Republic or Israel. In the Asian market, this is the best offer among all vibration units.
Russian products from, Motoprom and SZPO are inferior to average European models in terms of convenience and functionality. However, modernization continues, and new, more advanced models appear on sale.
The Chinese, as usual, charge a price. Their products are only suitable for occasional, light-duty work. Among the mass of unknown manufacturers, the companies TEKPACK, MASALTA, DYNAMIC, CIMAR stand out.
The use of a vibrating machine is important not only when working with sandy soils, but also when compacting crushed stone
Do you want to know how to assemble a vibrating plate with your own hands? I will tell you what materials and tools are needed and give step-by-step assembly instructions. I will also explain its principle of operation and introduce the types of this equipment.
Design and principle of operation
A classic vibrating table is a flat plate mounted on a metal base using a movable joint. An electric motor with an eccentric is connected to it, which makes the structure tremble. To ensure that future concrete tiles are smooth and of high quality, the countertop is made perfectly smooth.
The unit is firmly fixed to the floor so that it does not move to the side due to vibration. The concrete mass is poured into containers and placed on the surface of the device. After turning on the electric motor, the structure begins to vibrate strongly. Vibrations cause the concrete to become compacted and air bubbles to escape. The paving slabs are monolithic and not weakened by voids.
After a few hours, the engine is stopped and the containers with concrete are removed. Drying takes place under natural conditions for 24 hours, then the finished products are removed from their molds. For this purpose, a formwork tool is used.
To prevent the concrete from “boiling” in the mold on the table, vibration should be of minimal amplitude. Otherwise, the effect will be the opposite: the mass will be saturated with air and become cellular. Tiles can be thrown away.
What is a vibrating table for tiles
This is a brick making press designed for the production of different types of finishing materials:
- paving stones;
- tiles;
- structural elements of steps;
- wall blocks;
- concrete fence sections;
- foam blocks;
- window sills, etc.
The mechanism of action of this design is based on the ability to produce vibration waves , due to which the supporting frame makes up to 3000 oscillatory movements in 1 minute. This allows the cement mortar to be compacted in forms installed on a vibrating platform. As a result, the quality of concrete products increases many times: air bubbles disappear from the layer of material, the structure becomes more uniform, and layering is eliminated. Thanks to this, the service life of the tiles increases. It becomes resistant to high loads.
Vibration motor for vibrating table
It’s even easier to make a vibration motor for a vibrating table, on which paving slabs, cinder blocks, and curb stones are made. Depending on the mode of use of the installation, the required electric motor is selected according to the shaft rotation speed. Any motor is suitable for making tiles and blocks on a vibrating table, but unlike an external concrete vibrator, an eccentric cannot be installed on the motor shaft. The fact is that the silumin housing of a household electric motor (unlike industrial vibration motors) may not withstand the load and will quickly fail.
To manufacture a vibration motor of this type, you will have to use an additional shaft with an eccentric, which will be rigidly attached to the vibration table. The unbalance on the shaft is attached in the same way as in a surface vibrator for concrete, and the motor can be mounted separately on the installation frame and transmit rotation to the vibration shaft through a conventional belt drive.
This way you can inexpensively and quickly manufacture a vibration motor for any purpose yourself, in a short time and without significant financial costs. And you can save a fair amount, since the price of a factory-made 220 V vibration motor from the Yaroslavl plant is from 10,000 rubles, depending on the power. Good luck to everyone!
Platform vibrator device
The principle of operation of the vibrator is to deliberately create the maximum possible imbalance of the rotating parts of the drive. Thus, the engine rotor shaft must have a maximum shifted center of gravity, which will create a certain level of vibration when rotating.
The creation of significant centrifugal force, and, consequently, the occurrence of mechanical high-frequency vibrations can be structurally solved in two ways:
- Increase in unbalance mass;
- Increasing the location of unbalances on the shaft.