The most reliable way to organize water supply for a country house is to connect the internal water supply network to the existing system.
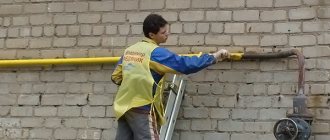
But it is not always possible to shut off the main water supply, so the question arises about making a connection to the water supply under pressure. This operation can be performed either with or without welding. But in any case, such work must be carried out by qualified specialists if they have special permission and a formalized permit to carry out the connection.
Coordination of work on tapping into the water supply system
Only with the permission of the relevant authorities can work begin on inserting an additional pipeline into the centralized water supply system. It is important to complete all documentation before starting work. If all this is not done, then you may incur administrative and financial liability for the illegality of your actions.
So, you need to start the insertion procedure in order to obtain a plan of a specific site to determine the presence of various utilities laid underground. With this document, you can go to the water utility and make a statement about your desire to connect to the central water supply system. You must also have with you documents indicating ownership of a specific house or plot.
Technical parameters that you need to know about when connecting:
- strictly defined insertion point;
- diameter of the connected pipeline;
- other information required in accordance with the purpose of the work performed.
Then you need to obtain permission from the sanitary and epidemiological service. With all the above documents, you can begin to develop and sign the project and estimate for the work being carried out. Independently tapping into a pipe without turning off the water supply is strictly prohibited, as is installing metering equipment. For these purposes, there are specialists who can be called from the appropriate government or certified private organization.
It is also prohibited to insert into the following types of pipeline:
- large diameter trunk networks;
- pipelines that are subsequently not connected to the sewer drain;
- other types.
Obtaining permission to carry out work
Considering the importance of the water main as an object for providing a vital product, permission to make a tie-in must be obtained from the local water utility department. The method of execution is not important - with or without welding.
A connection made without permission is considered illegal and is followed by administrative measures with financial penalties.
An approved copy of the site plan is issued by the Federal Center, which registers land ownership, and the technical conditions for connection are formulated by the Vodokanal department. They must contain the following information:
- place of insertion;
- main water pipe size;
- data that may be needed when making inserts.
Such a document can be executed by a specialized design organization, but this does not negate its approval by the water utility.
The document for the production of the insert will be registered at the local sanitary and epidemiological station office. The set of documents submitted to the SES is accompanied by a statement about the need to connect to the central water supply network.
Taking into account all sorts of restrictions, it is obvious that saving money by applying your own efforts is only possible when performing excavation work. The rest can only be performed by specialists with special permits.
Connecting to a water supply under pressure is prohibited under the following conditions:
- the pipeline is made of large diameter pipe;
- in the absence of a connection to the central sewerage system;
- if the tie-in does not provide for the installation of water flow metering devices.
Basics of tie-in
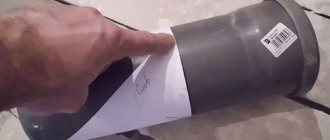
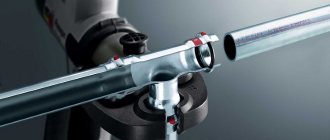
The determining factor when choosing the method by which the insertion will be made is the material used in the production of the central pipeline. Usually it is plastic, metal, metal-plastic, or less commonly found cast iron. Naturally, insertion is impossible without making a hole of the appropriate diameter, which means that when it is created, water will flow out of the pipeline. Only with the help of special clamp systems can everything be done with high quality.
A couple of basic rules for doing a sidebar:
- The internal diameter of the pipe that will connect to the larger pipeline must be equal to the diameter of the drill used.
- The outer diameter of the pipe should be slightly smaller than the hole into which it will be inserted.
The type of water supply affects how the insertion will be made. Most often we are talking about the use of welding and special clamps that allow work without draining water in the system. Clamps are also needed in cases where cutting the line is not at all possible. When working with polyethylene pipes, welding machines cannot be used.
When using welding, the water from the system will definitely have to be drained, and the inserted pipe must end with a coupling or thread for installing a root tap.
Documentation
The owner of the site, the one who has a power of attorney from him or the service with which he has entered into an agreement can submit an application to draw up an agreement to carry out work, connect water or change supplies. To obtain permission to connect to a neighbor’s water supply (the document sample is similar to the usual one) or the general supply network, you need:
- For individuals, it is necessary to collect details in the form of a postal address of place of registration or residence, full name, identity confirmation document and data for further communication with the applicant.
- Legal entities and private businesses must provide their number in the State Register and the date it was entered, TIN, current residential address with place of registration and postal code, as well as confirmation from the bank, which gives permission that the applicant can sign the contract.
- The application must indicate the name and location of the site or facility that needs to be connected to the network.
- Attach to the package of documents information about additional sources of water supply (volume and owner).
An example of an application with a list of attached documents Source gorodkusa.ru
See also: Catalog of companies that specialize in water supply and sewerage, as well as auditing construction work.
- If there are no additional septic tanks (cesspools, treatment plants) on the site, and standards have been established for waste disposal through the sewer system, then it is necessary to indicate the properties of these restrictions and the number of changes in the volume of network use per year.
- You must provide a copy of the site plan, which contains a sewerage laying diagram, a display of all constructed objects and their characteristics, as well as a list of residents.
- Information should be provided about what type of activity is taking place on the site. This is necessary for carrying out standardized spillways.
You also need to attach to the list of documents for filing the application:
- Copies of all concluded contracts for connection to the public network.
- Copies of documents that are drawn up when connecting, flushing, and cleaning the line and equipment in the designated area or indoors.
- A copy of the papers for measuring instruments (meters) to check these devices for compliance with state standards, their installation diagram and readings at the time of filing the application. If water consumption is less than 0.1 m3/hour, then installing a meter is not necessary, and, therefore, copies of the described documents are not needed.
Example of a meter approval certificate Source ekosf.ru
- A diagram of the location from which samples will be taken.
- Copies of papers that confirm that the applicant owns this site.
- A document on the maximum load on the water supply network, which indicates for what purpose the water will be used (everyday needs, fire system, swimming pool, irrigation).
- Expert decision from federal or private SES, if required.
Before starting the application, it is recommended to make a topographic plan of the site with the help of surveyors, if you do not have one or it was drawn up more than 1 year ago.
Topographic plan of the site Source pro-gkn.ru
Sequence of insertion
The main device for carrying out the work will be a specialized drill, which allows you to drill a hole of the required diameter in a pipeline filled with water. By following safety precautions and rules for working with the tool, you can achieve increased productivity of this device.
Initially, you need to remove the insulating materials and clean the pipe in the place where the tap will be made. Then you need to install a flange with an outlet to the main pipeline. It is fixed with a clamp. It is necessary to install our tool on the valve that closes the flange. If you are cutting into a steel pipe, you should not use a clamp, but a pre-welded pipe.
When work with the welding machine is completed, it is necessary to check the resulting seam for defects. If there are any, then you can go over the contour of the seam again to make it as reliable as possible.
When the coupling (pipe) is ready, you need to insert a cutter of a certain diameter and cut a hole for inserting the pipe. The equipment is then removed and the valve blocks the flow of water in the coupling. Once the embedded pipe is welded, the insulation and anti-corrosion coating can be restored. In this sequence you can work with cast iron and metal pipes.
Contract clauses
To obtain permission to put a water supply system into operation or to install a new supply line to a site, you must draw up an agreement with the water utility. This cannot be done without obtaining all the permissions described above. The clauses in the contract with the water supply company should include:
- Drawing up an agreement on the required connection conditions.
- The amount of time the applicant will receive water service.
- The quality of the water received and the procedure for monitoring this parameter.
- List of conditions under which water supply may be stopped for a short period of time.
- Water meter.
- Terms and conditions under which payments will be made for using the shared network.
- A list of items showing the division of responsibility for the use of water utilities between the consumer and the supplier.
- Rights and obligations that both parties must fulfill, as well as penalties for violating them.
- In what order will disputes between the supplier and the consumer be resolved?
- Permission to collect samples and access to meters for representatives of the supplier company.
Example of a water connection agreement Source rost63.ru
- When and how the user will submit data from the meter, if installed.
- How the user will be informed if the service provider transfers its rights to another organization.
- The conditions under which water will be supplied to those who are connected to the applicant’s water supply, if contractual obligations have been drawn up with the supplying company.
After installing all pipes and water supply units, it is required to draw up a report on the work performed, which must be signed by the applicant. If hidden work was done during the installation process, a separate form is required for this. They can be carried out when laying a pipeline. It is also required to draw up a SES report when flushing pipes and checking water quality for compliance with standards.
Example of a sewer connection agreement Source novostroy-s.com
Existing types of clamps
Today, the construction market offers several types of clamps that can be used for insertion:
- clip - cannot be used when it comes to embedding a valve into a pipe under pressure, but for a cleaned system it is ideal due to its simplicity of design and low cost. It can be found in both metal and plastic versions;
- saddle - when working under pressure on asbestos-cement, metal or plastic pipelines, you need to use this type of clamp. The flow of water will be blocked by a special locking plate;
- drilling - as one of the structural elements of this product, a rotating bolt mechanism is used, which remains on the pipe as a shut-off or control valve;
- Electric welded saddle clamp is suitable for working with plastic pipes. It is initially supplied with a milling cutter of the required diameter. To install it you will have to use additional tools.
The polyethylene pipe is inserted into the water supply using the last two types of clamps.
Main stages of the procedure
The choice of insertion method depends on the pipe material, operating pressure in the system and its operating conditions. It can be performed at an angle of 45 and 90 degrees, positioned upward or to the side.
Step #1 - determining the insertion area
Before you start cutting into the water supply system, it is necessary to clearly determine the location of the route. The central highway should be located in a straight line.
When determining the depth of a pipeline, they are guided by the level of freezing characteristic of a given area
For mid-latitude regions, this figure varies in the range of 1.2-1.5 meters.
At this stage, it is also necessary to determine what other communications “lie” within the site, so as not to accidentally damage them during the excavation and installation process.
Step #2 - selecting the necessary materials
For connection, pipelines made of polyethylene, cast iron or galvanized steel with a diameter of 50 mm and above are used. Work on highways with pipelines made of polyethylene excludes the use of electric and gas welding.
When working with cast iron, it is worth considering that it is a rather fragile material. Therefore, the pressure on the tool during operation should be minimal, and drilling should be performed at low speeds.
When choosing pipes for tapping, it should be taken into account that the diameter of the outlet pipe should not exceed the size of the one in which the hole is made. To connect to a plastic pipeline, the pressure of which is about 1.6 MPa, saddle clamps are used.
The devices are equipped with a heating coil and a cutter necessary to create a hole. The presence of a barcode on the body of the part allows you to set welding parameters with the required accuracy.
The body of the saddle clamp is made of durable plastic: installation of the device requires the use of additional equipment
To make a tie-in without turning off the water supply on pipes made of asbestos-cement, steel or cast iron, use a saddle or saddle clamp. It consists of two parts and is equipped with bolts, thanks to which it tightly compresses the pipe on both sides. The device is attached to the pipeline using a bracket.
Saddle clamps are made of metal, the modules are equipped with a locking plate or a special mechanism
Recently, clamps are often used, the modules of which are equipped with a cutter and built-in valves. They are used for inserting pipelines with a pressure within 16 bar. Such devices are equipped with couplings and allow insertion by welding.
The main advantage of these clamps is their resistance to corrosion, thanks to which they can last more than half a century. Craftsmen often use drilling clamps to insert pipes under pressure. They are sold complete with attachments and swivel connectors.
The drilling clamp is equipped with a rotary-bolt mechanism, which, after installation, is used as an adjusting or shut-off valve
There are several types of drilling clamps on sale that can be installed on pipes with a diameter of 80 to 300 mm.
You also need to prepare the following tools:
- bayonet and shovel;
- hammer drill with drill;
- cutter device;
- crown;
- Bulgarian;
- a piece of sandpaper.
When choosing a drill diameter, they are guided by the rule of equality of the size of the tool and the internal cross-section of the pipe being cut into.
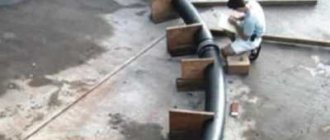
Step #3 - excavation work
To expose the highway, they dig a pit. It can be dug by hand or using an excavator. But even when performing excavation work using mechanization, as soon as the metal strip laid on top of the highway is exposed, further manipulations should be performed manually.
Having exposed a section of pipe, they begin to dig a trench in the direction of the house. It is laid below the freezing level of the soil.
On the section of the route in the direction from the tie-in into the highway to the entrance of the outlet pipe under the foundation of the house, a slope of 2 degrees should be provided
Any manipulations with a pipeline under pressure require strict adherence to safety precautions and strict implementation of all stages of the operation.
Step #4 - diverting from the main line
Using one of the methods described above, a connection is made into the existing water supply system under pressure. At the final stage, the pipe of the external branch of the water supply system is laid in a trench and connected to the shut-off valve using a crimp coupling.
When diverting a water supply line from the main, the beginning of the new water supply line will be located at the valve of the clamp, and the end - at the water flow meter. The meter, the main purpose of which is to record the volume of incoming water, is positioned so that it is located between the shut-off valves.
The metering device can be placed directly in the cavity of the well, or it can be brought into the interior of the house
To protect the meter from reverse flow of liquid, it is necessary to install a check valve.
If the tap into the water supply involves passing the input through the wall, then during installation a gap should be provided in the structure - a space of 0.2 meters in size. After installation is completed, this space is sealed with waterproof seals or resin strands. To disguise the formed seals, they are covered with a cement finish.
Step #5 - adjusting and testing the system
The correct alignment and connection of all system elements is checked by testing. To do this, pressure is applied to the new pipeline line, and the air accumulated in the system is released through a tap located at the other end of the pipe.
Having made sure that the water supply is tight, all that remains is to bury a trench laid from the point of connection to the house.
Connection to the main pipeline
When working with a main pipeline in which it is not possible to drain water, you must proceed as follows:
- First, get to the insertion site by digging out a significant layer of soil.
- Make a cut.
- Completely install the water supply circuit from the embedded element to plumbing fixtures or other objects.
Excavation work usually involves digging a pit of 150x150 centimeters. It is important to ensure that the bottom of the pit is slightly lower than the pipe (about 50 centimeters). Work can be carried out using an excavator, but no more than to a depth of 30-50 centimeters from the pipe itself, and then shovels are used. The location of the insertion point in the well greatly simplifies the work.
When using a “saddle” or a collapsible clamp, you need to puncture the reinforcement. This technology is similar to a tee on a water pipe, more familiar to inexperienced plumbers. A shut-off valve is screwed onto the side outlet, acting as a plug after a hole appears in the line. Read also: “Types of saddles for HDPE pipes, mounting and installation options.”
When working with plastic pipelines, it is permissible to use single saddle clamps or a combination such as a saddle-clip.
Polymer materials are best processed using an electric-welded collapsible clamp. Two parts of this design are mounted clearly at the insertion site, then soldered to the pipe. Such a connection has increased strength and absolute tightness.
The process is completed by diverting the side pipe from the clamp valve to the flow meter installed in the house.
Pros and cons of the idea
Welding polypropylene pipes using special equipment has been and remains an ideal technology. Therefore, before deciding to use alternative methods, you need to become familiar with their advantages and disadvantages. The advantages include:
But any alternative method cannot be called ideal. The first, not the biggest drawback of some methods of inserting into a polypropylene pipe without soldering is longer installation. However, the need to spend additional time can hardly be considered a good reason for refusing this operation.
Small expenses often turn into big expenses. The unreliability of the connection, which is capable of breaking sooner or later, is another argument cited by opponents of alternative methods.
Inspection well above the insertion point
Naturally, the location of the tie-in must be under the control of the owner of the house/site, because there is a risk of deformation of the connection, which will require prompt intervention. For these purposes, a special well (caisson) is created above the treated area. Work begins with the pit being deepened by 50-70 centimeters. The created depression is filled with gravel to a depth of about 20 centimeters, then roofing material is rolled out onto it and a concrete screed is poured into a layer of 10 centimeters. It is imperative to reinforce this layer using a reinforcement grid.
Concrete gains optimal strength (about 70%) in 3-4 days. Then a block shaft is installed above the concrete slab. Usually we are talking about a round or square shape.
A cast plate is placed on top of the shaft on the neck part, in which a round hole is made. Subsequently, a hatch will be installed in this place. The outer part of the shaft is coated with an insulating compound and filled with soil that was selected from the pit earlier.
Construction work involving the installation of a well requires significantly more time, effort and money than when inserting a water supply through a caisson. Getting to the underground part of the main canal is much more difficult.
Drafting
To obtain permission for land work for a water pipeline, you need to draw up a site plan. This may be necessary if the premises are undergoing major renovations or for newly installed buildings. To obtain such design documentation, you can contact private architectural firms or relevant specialists in the company that owns the water supply network.
During the compilation process, it is required to provide the current number of people living on the site, as well as a layout of sanitary facilities and household appliances that are connected to the water supply. If there are additional sources of water on the site, they are also indicated. You will also need a house plan, a topographical survey of the site, the type of plumbing that is used and a list of restrictions on the use of the plumbing.
With the help of a ready-made project, you can understand the layout of the pipes, the size and material from which they are made, the thickness of the concrete screed if the water supply is installed in a wall or floor, as well as the required amount of material for installation and additional means for pumping water (if the pressure is insufficient).
Metal pipes and connections to them
If it comes to how to cut into a metal water pipe, then a saddle clamp with drilling comes to the aid of the worker. There are several structural varieties of this element. Before installing it on the pipe, you need to clean the selected area from corrosion damage and various contaminants. In addition to the standard semicircle, which is present in each clamp, there is a shut-off valve at the top of the structure. There is a hole made in it through which drilling will be done. A suitable drill bit is also provided. The two parts of the structure are placed on the pipe by fastening them together using conventional bolts.
The tightest contact between the clamp and the pipeline is ensured by inserting sealing rubber bands. Once the clamp is secured, you can start drilling the hole and closing it with a special screw as a plug. Subsequently, the clamp remains in place and is used as a shut-off valve. There are clamps into which the valve is initially screwed. The drill is removed from the hole made and the valve is closed.
Video description
This video shows an example of drawing up a water supply plan:
The applicant must receive a package of documents from the construction organization, which includes:
- A title page that displays general data and contains an explanatory note.
- A plan diagram showing the location of the main water supply line.
- Pipe routing diagram, which indicates all the nodes and points at which the fastening is located.
- Three-dimensional diagram of the water supply and heating elements.
- List of materials used for installation and wiring, as well as what they are made of.
Without this diagram, it will be difficult to calculate the amount of water consumed and the correct location of the outlet to the main supply line.
Example of technical conditions Source dasiz.khabarovskadm.ru
Working with cast iron pipelines
A cast iron pipe can be drilled under pressure using special clamps with bimetallic crowns.
It is important to know the following features of this process:
- cast iron is an extremely brittle material, which requires caution from the worker;
- before drilling a pipe, you need to clean it from the anti-corrosion coating;
- it is unacceptable to overheat the crown on the clamp;
- the equipment should operate at low speeds.
After the stripping is completed, it is necessary to install a collapsible type saddle in place of the insertion. This place must be sealed with rubber pads. The pipe itself is drilled with a carbide crown, which simply cannot be replaced during the procedure.
The insertion sequence is as follows:
- The pipe is excavated and cleaned in the right place.
- The top layer of hot cast iron is cut using a grinder.
- A removable saddle is mounted. The joint between the reinforcement and the clamp is sealed using a rubber seal.
- The shut-off valve is then attached to the flange elbow required for insertion of the crown.
- The pipe is drilled with constant cooling of the cutting site.
- The crown is removed, and the water is shut off with a valve.
We must not forget about maintaining a constant slope of the embedded pipe towards the house. We are talking about a value of 2 degrees.
Briefly about the main thing
Before submitting an application that will allow the signing of an agreement with a company supplying water supply services, it is required to make a project of the site listing all equipment that consumes water and a topographic map.
Independent connection and installation of water supply must be officially authorized by the relevant services, otherwise administrative punishment will be received.
A connection to the general water supply network may not be necessary if it is possible to install a personal well, borehole and septic tank.
Plastic pipelines and features of insertion into them
It is very important to talk about how to properly cut into a plastic water pipe. You can work with such a pipeline without reducing pressure if you use an electric-welded saddle clamp. This clamp is made of heat-resistant plastic and is also equipped with a special heating coil and drill. Thus, the optimal temperature required for working with polymers is achieved (read: “How best to make an insert into a HDPE pipe - time-tested materials and methods”). We are talking about pipelines whose pressure does not exceed 15.7 atmospheres. In terms of strength and other characteristics, the clamp used is in many ways not inferior to the polymer pipes themselves. The product is resistant to corrosion and its service life can reach 50 years.
Cut-in sequence:
- The pipe is cleaned.
- The clamp is secured with bolts. This element has terminals through which the welding machine will be connected.
- The welding machine heats the spiral with which the outlet will be welded.
Often a clamp is used, which initially has a cutter and shut-off valve built into it. The job is to attach a coupling to the pipeline, and then, after cooling, drill a hole, closing it with a shut-off valve.
Bottom line
From all of the above, several conclusions can be drawn. Only a professional can weld a pipe to a steel water pipe. The saddle can be installed on cast iron or polymer products with your own hands, but only when the water in the system is completely drained. When working under pressure, you must take into account all the rules and recommendations given in this article. It is best to entrust any of the methods to a specialist to eliminate possible risks.
Joining of profile pipes
The most affordable way to connect profile pipes is by installing fastening clamps. Using these simple devices, it is convenient to assemble any type of small-sized metal structures, erecting canopies and shelving, greenhouses and fences, canopies and modular partitions.
The use of fastening clamps makes it possible to ensure the connection of pipeline elements, the stability and strength of which is not inferior to welded
The undeniable advantage of using fasteners is ease of installation and the ability to disassemble the assembled structure an unlimited number of times.
To implement this method you will need only three components:
- Rolled pipes cut to size.
- Required number of fastening clamps.
- Wrench.
Crab clamps can be “X”, “G” and “T”-shaped elements, with the help of which it is convenient to join straight sections of pipes, corner structures and simultaneously connect up to four segments within one unit.
When assembled, they have the shape of a square or rectangle, the sides of which tightly fit the joined parts of the metal pipes.
Crab clamps are made from galvanized or powder-painted sheet metal having a thickness of 1.5 mm
Fastening with crabs should not cause any particular difficulties. Anyone can insert the cut pipes into the clamp and secure the clamping sticks by tightening the bolts on the system.
But this method can only be used for profile pipes with a cross-section of no more than 20 x 20 mm, 20 x 40 mm and 40 x 40 mm. In addition, joining of elements can only be done at right angles.
You can connect square pipes without welding by installing fittings of a given profile.
For joining and inserting pipes, an adapter coupling is used, the diameter of which is one unit larger than the cross-section of the structural elements being joined
There are several types of fasteners in the form of fittings:
- Couplings - at joints on straight sections.
- Crosses and tees - for installation in branching areas;
- Elbows and turns – if it is necessary to change the direction of the pipeline.
With the help of fittings, you can obtain a fixed fastener, the only vulnerable point of which is the susceptibility to corrosion, which is typical for the ends of the joined elements inserted into it.
This situation occurs as a result of the accumulation of condensate inside the fastener. It will cause rusting if the metal pipes are not treated with an anti-corrosion compound.
No pressure
To insert a pipe into a HDPE pipe without pressure, it is necessary to use saddle bends without a cutter.
To insert into a HDPE water pipe, it is recommended to use a compression saddle, which is secured with bolts. The compression saddle pipe has an internal thread into which a ball valve or coupling is screwed to connect to a HDPE pipe. The seal is achieved using a standard rubber ring, which is firmly pressed when tightening the bolts. A hole in the support pipe is drilled using a drill.
Let's move on to step-by-step instructions:
- clean the surface;
- insert the o-ring (gasket);
- we put two half-clamps on the pipe;
- secure them with mounting bolts;
- we stretch the fastening connections so that the clamps close together;
- we drill a hole that goes into the tee of the clamp using a drill;
- install the saddle using the seal.
Electric welded saddle
Electric-welded HDPE pipe saddles are installed using a built-in heating element, which melts the plastic base. The molten base becomes liquid, and when solidified, it forms a reliable monolithic connection with the supporting pipe. Rotation 360 degrees around its axis makes it possible to accurately install the part, and indicators built into modern electric welding saddles facilitate the process of electrodiffusion welding of the structure.
When installing, you need to find a flat section of a water supply or other HDPE pipe, thoroughly clean it of possible contaminants and degrease it.
The electric welded saddle must similarly be prepared for work. After completing the preparatory work, you can carry out welding, and after it, cut in using the screwing method from the side of the main part of the milling element. After welding is completed, the cutter is returned to its original position, and a cover is installed in the hole.
Electric welding deal drawing
Crimp clamp
A lightweight analogue of an electric welded saddle is a crimp clamp. There are the following types of clamps (linings) for inserting into HDPE pipes:
- with shut-off valve;
- with a built-in cutter, with a safety valve for inserting HDPE pipes;
- with a flanged or threaded metal end;
- with a plastic end.
In order to insert into a HDPE pipe, the clamp must be put on the pipe and secured to it with bolts. After this, drilling is done through the outlet pipe and the outlet itself is attached.
You should not drill holes without first installing a clamp or saddle on it, as you can make a mistake with the diameter of the drill. It is optimal to drill through the branch pipe of a fitting already installed for the branch. So the diameter of the drill will be slightly smaller than the internal cross-section of the embedded outlet and you will install it in the required place.
Rules for installing new equipment
Insertion into the central heating system
Installation of new equipment or replacement of faulty equipment should not affect the performance of the entire system. Correct insertion into existing internal networks of heating pipelines is carried out with a minimum period of stopping the heat supply to a house or apartment.
This procedure should only be performed in compliance with the following rules and recommendations:
- Minimal coolant leakage. This is especially true for closed systems operating under pressure. In this case, the best option would be to tap into the heating without welding using special couplings;
- Reduce system downtime during work execution. To do this, it is necessary to provide in advance the availability of all tools and materials;
- Saving room heating parameters taking into account new equipment for modernization. The efficiency should not decrease or the temperature regime should change, unless this is planned in advance;
- Safety. This is especially true in cases where a heating element is inserted into the heating system.
To do this, it is recommended to first study the existing heating circuit in advance and develop a plan for its modernization or repair. For example, inserting an electric boiler into a heating system is carried out not only according to the manufacturer’s recommendations, but also taking into account the optimal location of the equipment. Let's look at common types of work that you can do yourself.
Steel pipe installation
Pipes made of steel are characterized by their rigidity and simultaneous plasticity. Their installation can be carried out in a manner similar to inserting polymer analogues. When working with them, you must follow a certain sequence of actions:
- the surface of the area for insertion is cleaned of corrosion deposits;
- a pipe is mounted on it;
- The seams are welded and then checked for leaks;
- the pipe is connected to a threaded or flanged valve, through which the main pipe is drilled under pressure;
- installing a new pipeline branch.
The upper layers of the main are drilled using a hammer drill, and the remaining few millimeters are worked out manually.
Required materials when connecting to the central pipeline
Depending on the material of the water pipe, it may be necessary to use certain additional pieces of equipment.
To cut into a plastic pipe with a pressure of about 1.6 MPa, it is necessary to use a ring saddle clamp. This device contains a spiral with a cutter, used when forming a hole
When purchasing a saddle for tapping into a water supply system, you should pay attention to the barcode marked on its body. It ensures the accuracy of the parameters of the created hole
To tap into a cast iron or steel pipe, you need to buy a saddle clamp. This device is divided into two parts, which are tightened with bolts during operation. The metal saddle is equipped with a locking plate.
It is mounted to the pipeline with a bracket. Insertion into a steel water supply can be carried out without the use of a saddle by welding the pipe, however, with this method, the diameter of the main pipe matters, which must have a large cross-section.
Today, thanks to their reasonable price and excellent quality, saddles with built-in valves and a cutter have gained great popularity among specialists. They are usually used when inserting into a pipeline under a pressure of no more than sixteen bar.
They are equipped with a coupling, which allows installation with a welding machine. The most attractive feature of such saddles is their good resistance to corrosion processes, extending their service life to fifty years.
The final stage of the tie-in
The final step in any pipeline connection process is to test the connected system components.
For this purpose, water under pressure is supplied to the created new branch, and the accumulated air is released from the other end of the pipe using a tap placed on it.
After checking all elements of the water supply system for leaks, you can dig a trench laid from the main line to the point of connection with the home network.
How to cut a pipe into a pipe without welding
Insertion using a welding machine
During the assembly or restoration of a pipeline, it is not always permissible to use welding equipment to form a reliable nodal connection. The solution in such a situation is to insert the component elements using various special devices. Such parts must have sufficient strength, durability and tightness in order to be used for a pressure or non-pressure system.
The fittings used allow you to assemble both detachable and permanent connections. The first are convenient in that the pipeline in a separate section can, if necessary, be disassembled and reassembled without violating the integrity of the constituent components. The latter are not suitable for re-installation, but they do not require the use of additional sealing materials and form a more durable connection.
Detachable connection type
*
The choice of one fitting or another is determined by the nature of the pipes. Thus, there are products for working with rigid metal (steel, copper, cast iron) or flexible polymer (polypropylene, polyethylene, metal-plastic) channels. Thus, manufacturers offer universal type options, which is especially important when assembling dissimilar highways.
For narrow-directional fittings there is one more difference. To connect polymer channels, the contact area of the elements is larger than that of metal ones. This difference is especially relevant for a rigid pipeline, which has to be worked with in spatially limited conditions.
Methods of cutting into sewers
The sewer pipe to which the plumbing equipment is connected can be located vertically or horizontally. Methods of cutting in with different line locations at 110 mm. are no different; they are divided into main types: correct and incorrect.
The right way
To carry out work in a plastic pipeline, standard plumbing parts are used: tees, regular and expansion couplings. The method consists of the following operations:
- Measure the length of the riser, which must be cut taking into account the dimensions of the mounted parts. It should be equal to the size of the tee and expansion coupling, taking into account the depth of the mounting sockets.
- The pipe is cut in the right places, its outer and inner edges are protected.
- Coat all parts with silicone grease and insert them into the cut in a certain order. There are several installation options:
- The tee, which is used to insert into the system, is fixed in the following way: the lower part of the tee is connected to the riser with an adapter coupling with rubber sealing rings, the upper part is secured with a compensation coupling. This technology is used for installation in vertical risers.
- With the second method, the outlet is located in the compensator itself, and there is no need to use an extra part in the form of a tee. Typically, the lead is located at an angle of 45 degrees to the center line of the compensator - this allows this method to be effectively used for cutting into horizontal sections.
Rice. 4 The main parts for correct tapping are an oblique bend, a tee, an expansion joint and a coupling
The correct method can be connected to a 110mm line. pipes that match in size or 50 mm bends.
In the case of steel or cast iron sewer pipes, they are shortened to fit the tee for insertion, which is then welded to the break point with a welding machine.
Wrong way
This technique is designed for cutting into an existing sewer line without completely cutting the pipeline, but using cutting, when a hole of the required diameter is made in the pipe.
Then the outlet pipe is placed over the cut hole and its body is secured. When carrying out work, special adapters or saddles are used, through which the sewer line is connected to the outlets of plumbing fixtures.
Construction of a well for the construction of a site
How to make a well.
The rules for installing a central water supply system provide for wells for inspecting the pipe and connecting new consumers. If they are located far from home, it is advisable to arrange them with your own hands at the insertion site. Such a structure will subsequently facilitate the operation of the home water supply system. A shut-off valve is installed in the well; if necessary, the water supply to the house can be stopped.
The pit dug at the connection site is deepened by 0.5 m and filled with crushed stone. Ruberoid is laid on top, 10 cm of concrete grade 200 is poured. To give strength, it is reinforced with reinforcement. A few days later, when the concrete pad has set, a shaft is erected above it. The manhole is given a round or rectangular shape, taking into account that there is 70 cm of free space inside. This is enough to fit a person to operate the valve.
To build a well, use bricks, blocks, or install well rings. If there is a threat of seasonal flooding, the structure is sealed. To do this, the hole is immediately dug wider so that there is access to the outer walls. They are treated with bitumen mastic, wrapped in roofing felt, then covered with excavated soil. You can install a plastic container of a suitable size and seal the pipe entry points well. The top of the well is covered with a lid with a hatch.
Do-it-yourself tapping method using a clamp
The clamp is used if the line is under pressure or is made of cast iron and plastic pipes, which exclude the use of gas or electric welding.
Tapping into a cast iron water main pipe is done carefully, since the plasticity of this material is low and can burst from excessive force. To drill a hole in a cast iron pipe under pressure, a drill with a feather sharpening is preferable
To prevent water from entering an electric drill or other cutting tool when removing the drill from the hole, it is necessary to make a protective screen from rubber or thick cardboard in advance and secure it between the chuck and the body.
- The connection point is protected from insulation (if any) and from rust.
- An overhead, collapsible clamp is installed on the pipe, with a rubber seal inside, which will ensure sealing of the joint.
- A tap is screwed into the flange outlet through which the cutting tool will be inserted.
- A cast iron pipe is drilled with a drill, if the line is under pressure, after removing the tool, the tap is immediately turned off.
It is a little easier to cut into a water main, which is under pressure and made of plastic pipes, using a clamp than into a cast iron one, since it is easy to drill. The principle of doing the work yourself is not much different from cutting into a cast iron pipe. The only difference is the ability to use a regular, cone drill or bit and make a hole with a hand drill or a brace, since the hole is made very quickly. It is also recommended to install a collapsible clamp, which is placed over the insertion point of the central water supply and soldered to it on both sides. This connection will ensure the tightness of the structure.
- A collapsible clamp is installed and secured.
- The tap is screwed on and opened for further access of the cutting tool.
- A hole is drilled with a drill smaller than the diameter of the upper pipe of the clamp.
- The valve closes after the hole is broken.
Installation of additional heating elements
Heating elements for insertion into heating radiators
Often the temperature in radiators remote from the boiler does not correspond to the optimal temperature. This may be due to an incorrectly designed system or inappropriate operating temperature conditions. To stabilize the parameters, you can make an insertion into existing internal networks of heating pipelines. Electric heating elements are most often used as an additional heating element.
Only models specifically designed for this purpose should be used. They are mounted directly into the radiator, since installation in pipes will affect their flow capacity. When installing a heating element into a heating system, you need to take into account the following radiator parameters:
- Battery model . Installation of the heating element is possible only in sectional radiators. It is made into the mounting hole of the heating device;
- Radius and threaded connection . When inserting a heating element into a heating system, not only its length is taken into account, but also the installation parameters;
- Power . The parameters of the main source of water heating in the pipes are taken into account.
It is recommended to choose models with an adjustable thermostat. This will make it possible to set an individual heating mode for each radiator separately.
The manufacture and installation of homemade electric heating elements is unsafe for the life and health of those living in the house. Only certified factory products must be used.
Construction of a well for the construction of a site
To simplify the installation into an existing water supply system, it is convenient to use an inspection well. The diameter of the structure should be about 70 cm. This space is enough to place shut-off fittings (in the form of a valve or gate valve), as well as perform all the necessary manipulations for insertion.
In the future, during the period of operation, the presence of such a structure will facilitate the work of repairing the home water supply system.
The water pipe tie-in unit, used to disconnect the input for the period of repair work, will be placed immediately inside the shaft near the connection point with the external water pipeline
To construct a well, a new pit of the appropriate size is dug. The bottom of the pit is covered with a gravel “pillow”, forming a layer 10 cm high.
To make a reliable foundation, sections of roofing material are spread over the leveled gravel fill and a concrete screed 10 cm thick is poured. When creating the fill, concrete grades M150 and M200 are used.
After three to four weeks, when the concrete has acquired the necessary strength, a shaft is erected above the slab. To do this, the walls of the pit are lined with bricks, cement blocks or reinforced concrete rings. The neck of the structure must reach zero level.
If the well is to be installed in an area where the groundwater level rises to one meter during the flood period, it is necessary to construct a waterproof structure.
It is most convenient to purchase a ready-made plastic container for this purpose. From below it is anchored to a concrete slab, from above this structure is covered with a cast slab equipped with a hole for installing a hatch.