In the process of renovating a house or apartment, it is often necessary to carry out operations that require a special approach to them. For example, a hole in a ceramic tile. This situation occurs quite often, because in kitchens, bathrooms, showers and other rooms where ceramic cladding is used, sockets, pipework, ventilation vents, chimneys, and so on are installed. and for them in the finishing you will have to make holes of different shapes and sizes. Therefore, it is worth considering all the ways to carry out this process. For example, how to make a hole in a tile for an outlet.
Features of working with tiles
To accurately cut a hole in a tile for an outlet, you should adhere to the following rules:
- Marking. You need to mark the area where you drill the hole using a marker - mark the outline on the outside of the tile.
- Pasting. If we are talking about glossy tile material, you should cover the cutting area with mounting tape or adhesive tape. This process will prevent the drill bit from slipping while cutting. You can make an outline with a nail by scratching the surface along the markings.
- Wetting. Professional craftsmen usually use special equipment that wets the tiles with water when cutting. But you can simply place the tiles in water for an hour to reduce dust formation and prevent cracking. You need to cut tiles at low speed. The diamond blade is used for dry cutting.
- Safe distance. It is necessary to drill with a distance from the edge of at least 15 mm to avoid spalling.
- Convenience. To make a hole conveniently, you need to guide the tool away from you from any edge. If you change the processing direction during drilling, the cut lines may not converge. Cutting must be done exclusively from the front side. If the tiles are already on the wall, you need to drill a hole with a hand drill.
This is interesting: Welding inverter Resanta SAI-190: reviews, characteristics, modifications
How else to drill a hole in tiles
Home craftsmen often have a question about how to make a hole in a tile that is already fixed on the wall. In such cases, a hole in the tile can be created using a cone or twist drill.
Processing using a conventional drill takes place in several stages.
- Paper tape or adhesive tape is glued to the place where drilling is to be done, which will prevent the drill from slipping off the smooth surface of the tile and protect it from scratches and other mechanical damage.
- The center of the future hole is marked using a regular marker.
- After this, they begin to make a hole in the tile at low speeds of the drill.
- To prevent the drill from overheating, it must be moistened with water from time to time. After the tool goes deep into the material being processed, you can cool the tile itself.
If you need to make a hole of a large diameter in the tile, you can carry out this process in stages - using tools of various sizes. You can also get a large-diameter hole in a tile using another method, which involves making a large number of small-diameter holes along its contour. Then the inside of the hole is simply knocked out along its contour, and the edges are sanded.
Crowns and ballerinas
There are special tools that can be used to easily make a smooth hole in a tile for an outlet or pipe. The easiest way is to use a crown of the appropriate diameter. It is put on the drill, installed exactly at the location of the drilling process and turned on. In just a few seconds, a diamond cutting tool makes an even hole of the required diameter in the tile.
In order not to displace the tool relative to the center of the hole, it is necessary to choose it with a centering element. This is a cone sticking out in the middle, which will need to be installed exactly in the center of the future hole. You can use special templates made of metal or plastic for drilling. They are installed on the tile plane in the required place, and a hole is drilled through it with a crown. The template prevents the tool from moving to the side. In this case, one template can have several holes with different diameters.
By the way, crowns can be different in terms of cutting edge. This can be a regular edge coated with diamond or tungsten. Crowns can be equipped with teeth of different configurations, made of pobedite or carbide tipped.
Attention! The vibration of the drill causes the tile to break. Therefore, a wooden substrate must be placed under it. You only need to drill at low speeds; one hole usually takes 1-2 minutes.
As for the ballerina, this is an ordinary drill with two cutters installed on both sides. All three cutting tools are located on one holder. There is also a ruler on it, which can be used to set the distance from the drill to the cutters, which determine the radius of the future hole on the tile. It is important to correctly position the drill in the center of the circle being cut. The cutting tool is installed in a standard drill chuck.
It should be noted that these two cutters (crown and baller) are the best way to cut a hole in the tile. Its edges will be smooth, clean, without burrs or chips. If the process is carried out correctly, cracks will never appear, because the cutting edges themselves are either diamond coating, tungsten, or hardened steel. That is, materials that can withstand heavy loads and cut almost any hard material.
Working with a crown
A tubular product costs a lot, but it will definitely complete at least one hole and will serve well later
Despite many positive qualities, it is important to properly handle the element in order to extend its service life
Application is possible only at low speeds, otherwise the cutting part will quickly wear out. Overheating the bit can cause it to burst, rendering the drill useless. To reduce the heating level, the crown is periodically lowered with its edge into water.
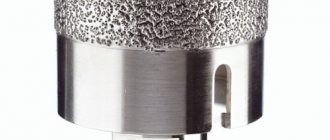
Diamond crown
One-time actions can be performed with a one-time model made of pobedit with cutting teeth. Unlike its diamond analogue, the product will not withstand more than 20 drillings
The power of this model allows you to make a good place for a sewer pipe, but you should act very carefully so that the teeth do not make the edges of the cut-out space chipped or uneven
When working with a crown, markings are first applied, the nozzle is secured and the coating is drilled along the front side. If the element used is in good condition, then it will take literally 2-5 minutes to create a recess.
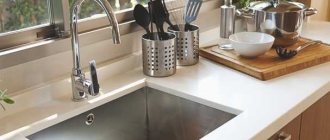
Fastening tiles
Checking the size match
We apply the tiles and check the coincidence with the pipes. If everything fits, apply glue to the wall, run a comb over it to evenly distribute it in a thin layer, and press the tile into place.
Do-it-yourself hole using improvised means
The hole at the edge of the tile can be made without using the above options. You will need a glass cutter and tongs/pliers. Stages of work:
- Marking the future hole.
- Soak the edge in warm water for a few minutes. This will soften the ceramic.
- Using a glass cutter, without lifting the tool from the tile, draw a line along the markings. You need to make a fairly deep furrow, so do the work with force, but carefully.
- It is necessary to tap along the cut line. This will make the groove deeper.
- Using tongs, break off small pieces of the tile at a time until the excess material is completely removed.
- If there are any uneven spots, use fine-grit sandpaper to sand down the edge.
Self-tapping screws with LM tip - bugs
There may be a situation where it is necessary to make holes in the tiles at a site or at home, but, as luck would have it, there are no crowns or drills. How to cut a hole in this case? It doesn’t matter if you have at least a few self-tapping screws with a drill-shaped tip that can be used to do what you have planned.
To do this, the diameter of the pipe is outlined and along the internal contour, screws are screwed in and out, thus cutting a hole in the ceramic tile. The closer the holes are to each other, the easier it will be to squeeze out the center.
Using all of the above methods, you can cut a round hole of almost any circumference.
This is interesting: Screw-cutting lathe 1K62: technical specifications, passport
Elementary technology for drilling tiles in the bathroom
In order to hang a shelf, hooks, install electrical equipment and for any other purposes, you may need to make a hole in a solid tile and it can be successfully drilled if you strictly follow all the tips and act according to the technological process. In fact, the operation algorithm is simple: you need to drill a hole that penetrates the wall, insert a dowel into it, and then screw in a screw or self-tapping screw. But first you should find out how to drill tiles in the bathroom, since the success of the entire enterprise may depend on this.
Advantages and Disadvantages of Tools
Before you start working directly, it doesn’t hurt to think about how to drill ceramic tiles in the bathroom, that is, to finally decide on the equipment. Today on the market there is a wide selection of a wide variety of drills, hammer drills, hand rotators and who knows what else. Among this variety, you should choose only the most suitable one.
The most suitable tool for drilling tiles is an electric drill, which has variable speed. It will be much more convenient and faster to work with it, and low speeds will eliminate or at least minimize the risk of cracking of the glazed ceramic surface. A high-quality drill is not cheap, but it is an indispensable assistant for the home craftsman, so you should not waste money on equipment from well-known manufacturers.
A battery-powered screwdriver is the second profitable and convenient tool that is suitable for drilling tiles in the bathroom without any problems. It also has one more advantageous property - it can be used even where the equipment cannot be connected to the network.
Rotary hammers from well-known companies also have enviable multifunctionality, so you can use such a tool when drilling holes in tiles. True, the price of such equipment is even higher than that of a drill if we are talking about professional models.
The most tedious and time-consuming process is drilling ceramics using a hand drill. However, if you only need to make a few small holes, you can try to do it this way.
Selecting consumables and components
Low-speed drills, screwdrivers or hammer drills are mainly used for drilling holes in ceramic tiles.
But choosing the right tool is only half the battle, since it is important to understand which drill to use to drill tiles in the bathroom so as not to damage the glazed surface. Moreover, you must take into account that drills for brick or concrete can be immediately put aside; their use does not bode well, the tile will simply crack and will have to be replaced. There are three most suitable consumable options that will best suit your purposes:
There are three most suitable consumable options that will best suit your purposes:
The best drills for drilling dense and slippery ceramics are diamond-coated drills, which makes their tips look like sparklers. These are quite expensive components, because their production uses chips of natural diamonds and it is impractical to purchase such drills for making one or two holes. If you are faced with major repairs, construction or finishing, this is your professional occupation, then you simply must have it in your “arsenal”. The second place is rightfully occupied by spear-shaped drill bits for drills with pobedite tips. They are designed in such a way as not to split the tiles, and the special sharpening does not allow them to slip off when starting work. Due to this shape, the adhesion of arrow-shaped drills to the surface improves, and the risk of cracks and chips is reduced
The price of such drills is much lower than diamond ones, but they cannot be called cheap either. When figuring out how to drill tiles in the bathroom, you can pay attention to drills made of refractory, durable metals, which are designed for processing metal surfaces, if nothing else is at hand. The cost of such a drill bit for a drill is quite affordable for everyone, however, you will have to work at your own peril and risk. It won’t hurt if such equipment is new, perfectly sharpened, and also has a pobedite coating or tip.
It won’t hurt if such equipment is new, perfectly sharpened, and also has a pobedite coating or tip.
Thus, it will not be at all difficult to decide on drills and all that remains is to figure out how to drill the tiles in the bathroom step by step so that they do not burst or become cracked, which will add more work to you in replacing them.
Hole without chips: recommendations
To avoid chips that spoil the appearance of the tiles, you must adhere to the following rules:
- Careful selection of the tool, namely its cutting part. It is necessary that the glazed layer gradually deteriorates, and only then the ceramics.
- Failure to comply with work standards. The tiles are placed on a hard surface, horizontal or vertical.
- Excessive pressure on the tool. The selected drilling option should be focused on cutting the ceramic sheet without additional pressure.
Depending on the purpose of the hole and the available tools at hand, the drilling method is selected. However, when performing work, it is necessary to observe safety precautions and adhere to recommendations to reduce the risk of chipping.
What is required for processing?
The best option for working with ceramic tiles would be a corded or cordless screwdriver. Its high rotation speed (800-1000 rpm) allows you to easily handle tile processing. An alternative to a screwdriver is an electric drill, or a manual modification if you have to drill a small hole.
Selecting a drill and auger
When the unit is prepared, all that remains is to choose the type of nozzle aimed at solving certain problems:
- Diamond coated drills. They give the best results for drilling even very hard tiles, but due to their high cost, it makes sense to use them only for a large volume of work.
- Drills with a tip made of pobedit. They work well with soft tiles and medium-hard tiles. It is recommended to drill ceramic tiles on the wall using so-called feather drills - they have a small sharpening angle that does not allow damage to the tile glaze.
- Spear drills. Suitable for laying dowels, they have a low price and an enviable service life.
- Single-sided sharpened carbide drills. These attachments reduce the risk of overheating and make working with very fragile and thin tiles easier.
- Core drills with tungsten carbide coating. Universal components that can easily cope not only with the most durable tiles, but also with marble, brick and porcelain stoneware.
Diamond core drills require periodic cooling with water, and work with them at low speeds - no higher than 500 per minute.
What else can I drill?
If you need to get a hole of a large diameter, a drill with adjustable teeth - the so-called ballerina - will come to the rescue.
The device can drill holes up to 9 cm in diameter, including non-standard shapes for which there are no suitable crowns. But due to the manually moving bracket, the edges of the hole are uneven. Therefore, it is advisable to use a ballerina in cases where the perforation will be covered with something.
Another option for work is a Pobedit concrete drill. Since the tip is not intended for working with tiles, its cutting part is sharpened as sharply as possible, and during the drilling process maximum care is taken so as not to damage the coating.
Tungsten string
There is a cutting tool that is made entirely of tungsten (the name makes this clear). It is very similar to a blade from a hacksaw for metal, and is made in its likeness with the same type of fastening. When used, such a string is installed on a hacksaw. How to use it to make a hole in a tile for a pipe or socket.
- First, you need to apply a circle to the tile itself, which will determine the location and size of the future hole.
- Then, anywhere in the circle, preferably near the edge, make a small diameter hole using a drill and drill bit.
- A string is inserted into it, which is then attached to a hacksaw.
- Now you can cut a hole in the tile exactly according to the markings. If the hole from the drill bit was not made at the very edge, then you need to saw through to the border, and only then strictly move along the drawn circle.
Circular drill bit "ballerina"
The tool is a guide drill, on which a rod is attached, holding a movable cutter. During rotation, the drill and cutter rotate simultaneously, making the necessary hole in the tile.
This product is good for its versatility, thanks to a movable cutter that can be adjusted to any diameter. Accordingly, if you are faced with the task of cutting a hole in a tile for an outlet, take a closer look at this method.
Pros and cons of a circular drill:
- This is a big plus - you don’t need to spend money on expensive diamond crowns, just buy a “ballerina” and you can cut any hole in the tile for sockets and more.
- But there is also a disadvantage of this tool - it is not suitable for professional use, since after 30 working processes the cutter will become dull and will no longer perform its functions efficiently, because of this the ceramics will suffer greatly.
How to use the ballerina correctly
All work consists of several stages:
- A hole for the socket is marked.
- The movable cutter is adjusted to the required diameter.
- The glaze is cut from the front side.
- Then the tile is turned over and cut from the back side, but not all the way.
- We finish the cut on the front side.
To avoid chipping, it is recommended to carry out carving work at low speeds.
Kinds
Processing porcelain stoneware is a complex process that cannot always be accomplished with a conventional drill for concrete. This is due to the monolithic structure of the material, which is not destroyed by such exposure.
Today, several types of drills can be used to work with porcelain stoneware:
- Feathers. Only tools that are equipped with a pobedite or diamond tip are suitable. However, they are not designed to work with such materials, so after creating a few holes, you will simply throw the product away.
- Annular drills. Outwardly, they resemble small cylinders with diamond chips. With these tools you can make many holes (more than 100-150 pieces).
The working surface of a tubular drill has no slots and is a solid circle. This does not allow for efficient removal of dust that is formed during drilling. This also creates strong pressure on the surface of the tile, which can lead to cracking. For this reason, you should work with tubular drills at low speeds, periodically removing the tool to remove dust.
Diamond crowns. This is a universal tool that is most often used for working with concrete. It can also process porcelain tiles.
The disadvantage of products with galvanic coating is the minimum service life. The structures fail after 5-6 holes. This disadvantage is compensated by the low cost, which allows you to stock up on products in the required quantities. When working with diamond bits, you should not worry too much about excess pressure, since it is reduced due to special slots at the ends of the tool.
Processing of porcelain tiles is also possible using conventional drills that are tipped with porcelain. However, it should be understood that they are not designed for such materials, so their service life will also be limited to a few drills.
Drill
A drill, as a cutting tool for processing ceramic tiles, is not used for drilling so often. But if you approach this process correctly, you can make a hole in the tile for any pipe. True, for this you will need to use a small diameter drill (up to 5 mm). But the smaller the drill, the more places you will have to drill. In this case, it will be necessary to drill not exactly along the applied markings, but slightly inward, so that the edge of the drill is closer to the contour of the circle.
In order for the drill to easily enter the ceramic plane of the tile, it is necessary to use a special cutting tool designed specifically for ceramics. There are several types that differ from each other in the design of the tip.
- Spear drills. They are usually used at low drill speeds. It is recommended to use them if ceramic tiles are already installed on the wall.
- Carbide drills with single-sided edge sharpening.
- Pobedite drill. By the way, this is what is most often used in this operation. It is important not to rush here, otherwise the tool may jam inside the drilled hole. It is recommended to add water to the drilling site.
It is clear that it will not be possible to accurately create round contours of the hole for the pipe using drills. Therefore, the contour will need to be modified. That is, first, many holes are made according to the applied markings. After which the inner part is squeezed out, leaving a hole with uneven edges. Using pliers, you will need to remove all protrusions, that is, reduce the circumference to a minimum of irregularities and defects. Next, an emery tool is used to level the edges, for example, a needle file or a file with fine notches.
What tools and materials are needed
Of course, without high-quality tools and auxiliary materials you will not succeed. Therefore, one of the main stages of our instructions is its thorough preparation. So, what do you need to “arm yourself with” in order to get an excellent result?
Drill
- for convenience, choose models with a portable battery;
- The tool must support trouble-free operation at low speeds.
In fact, your main trump card in the “fight” with unyielding tiles. The more drilling modes this “magic” tool supports, the better: a wide selection implies the use of different approaches to solving the problem - while the minimum set seriously limits the range of your actions.
drills
Hammer
- can only be used for drilling under tiles;
- creates a high risk of defects occurring on the tiles.
If you don’t have a drill in your work arsenal, it’s better to buy one.
And if for some reason it doesn’t work out, then you need to work with the hammer drill carefully, at low speeds with maximum pressure on the tile. Your task is to reduce the vibration that comes from this tool during operation
Drill
The overall quality of the result depends on which drill you ultimately choose for the tiles. Experienced professionals recommend the following options:
- Pobititovye
- the most affordable option in terms of cost, such a drill can be used if you need to drill a couple of holes, but if more, then it is better to choose another option, since even 1-2 holes will have to spend several hours of your life; - spear-shaped
- made of tungsten carbide, hard and effective, a cost-balanced option; - diamond
- drilling with them does not cause any negative emotions, they are ideal for the most critical cases, when, for example, a decent number of holes need to be made within a limited period of time, the only negative is the high cost.
It is important to remember that the diameter of the drill should correspond to the size of the dowel you are using, and the diameter of the drill should be slightly smaller than the drill. Otherwise, all the work will go down the drain - and the purchased cabinet risks hanging for no longer than the evening
Also prepare for work:
- level;
- masking tape (adhesive plaster);
- pencil;
- hammer;
- roulette
Prepare your work area: protect the floor from the inevitable dust in such cases by covering it with a protective film. If possible, remove everything unnecessary within a radius of several meters from you to create the most comfortable conditions for drilling.
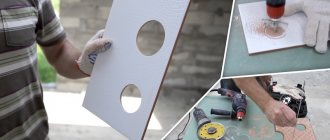
Using an angle grinder
The question of how to make a large hole in a tile arises in cases where it is necessary to install pipes or other plumbing communications in a bathroom or toilet, and also, if necessary, install an electrical outlet in these rooms. If the tiles are not yet fixed to the wall, then you can make a hole in this product for a pipe or socket using a regular grinder.
Start cutting a round hole with a grinder by stepping back slightly inward from the intended circle
Using a grinder, a shaped or round hole in a ceramic tile is made in the following sequence:
- The contours of the future hole must first be marked, for which you will need a marker.
- The angle grinder should be equipped with a diamond blade designed for dry cutting.
- You need to start cutting from a convenient edge of the tile, moving the tool away from you.
- When cutting a hole in a tile for a socket or pipe, you can stop at any time and start processing from a more convenient side, but then there is a chance that the cut lines being formed will not converge.
It should be kept in mind that you should only use a grinder to create a shaped or round hole in ceramic tiles from the front part of the product. At the same time, it is necessary to control that the cut is smooth, neat and without chips. When performing this procedure, strict safety precautions must be followed to minimize the risk of injury.
» data-lazy-type=»iframe» src=»data:image/gif;base64,R0lGODlhAQABAIAAAAAAAP///yH5BAEAAAAALAAAAAABAAEAAAIBRAA7″>
Processing tiles with improvised tools
The question of how to cut a hole in a tile if you have neither an electric jigsaw nor a grinder at hand can be solved using improvised means. An ordinary glass cutter, tongs or pliers can be used as such means. When using them, you can make a hole in the tile using the following algorithm:
- Preliminarily outline the contours of the future hole.
- To make the tile material more pliable, the product can be kept in warm water for some time.
- Using a glass cutter, a furrow is made along the intended contour. In this case, the working part of the tool must not be torn off the surface of the tile. When cutting a furrow, significant pressure is applied to the tool, taking care not to damage the workpiece.
- The cut made on the surface of the tile must be tapped with the head of a glass cutter to make the groove deeper.
- The cut section of the tile is removed using tongs or pliers, piece by piece, until a hole with relatively smooth edges is formed inside the cut line.
- To smooth out the edges of the cut, you can use fine-grit sandpaper.
Use a wooden block with sandpaper wrapped around it for sanding.
Trimming with a glass cutter
Many home craftsmen often face the problem of cutting ceramic tiles. It is irrational to buy an additional tool for one case. Therefore, you can get by with a good glass cutter.
The cut must pass along the front part, therefore, after measuring, the required size is marked on the tile and carried out with a continuous movement with a glass cutter until a well-cut train appears on the tile. Use the back side of the glass cutter to tap the cutting line (seam).
After this, use wire cutters or pliers to remove the cut piece with a sharp downward movement. It happens that if the job is unsuccessful, nicks remain, which can be smoothed out with sandpaper or a stone.
To make the material more pliable, it is recommended to soak it in warm water. But it’s unlikely that you’ll be able to cut a hole in a tile for an outlet with a glass cutter.
Glass cutter
Some craftsmen claim that using an ordinary glass cutter and wire cutters you can drill a hole in ceramic tiles. But with one caveat, if this hole must be drilled near the edge of the tiled element.
As usual, before cutting out a piece of ceramic, you need to mark the shape and dimensions of a circle on the surface of the tile. After that, an incision is made exactly along the line with a glass cutter. It is very important to make the cut deep, but at the same time create as little pressure as possible on the tile. You overdid it and got a crack or break in the material.
Next, you need to tap the material on the back side of the tile. Thereby increasing the depth of the cut. That is, everything is done exactly the same as with cutting glass. Then you take wire cutters or pliers in your hands and use them to bite off pieces of ceramic material according to precisely applied markings. After which the edges are processed to maximum evenness.
Difficulty drilling tiles
Ceramic is not easy to drill due to its structure. This is a durable and dense material, but its top layer (enamel) is quite fragile, so drilling or cutting often ends in cracks and chips. If you want to drill into tiles to prevent them from cracking, it is important to avoid the following mistakes when working with them:
- If you select the wrong drill, the tile cladding splits, sometimes completely. Drills for working on metal, wood or glass are not sharp enough. They are designed to deepen too quickly and when rotating create uneven pressure, thereby exceeding the strength threshold of the tile. Therefore, when working with ceramics, it is important to choose special tools and drill tiles at low tool speeds (from 200-400 rpm, but not more than 1000).
- Excessive pressure on the tool increases the stress on the tile, and its fracture strength is not enough to cope with this. A split occurs. It is important to apply light pressure on the drill just enough to hold it in the correct position and not to force the process.
- You need to drill a hole in ceramic tiles at a strictly right angle. If you break this simple rule, you can not only damage the tile, but also injure yourself or break the drill. At an indirect angle, the pressure in the tile is distributed unevenly, and the tool can jump off.
- If the tile cladding has not yet been installed, it is best to drill it on the floor, placing a piece of chipboard or wood underneath.
Bulgarian
Unfortunately, it is almost impossible to cut round holes in ceramic tiles with a grinder. Especially if they are small in diameter. The diamond cutting blade is too large for such operations. But you can cut a rectangular section without any problems. It's done like this.
- If possible, the cuts are made through along the applied contour. If this is not possible (the rectangle is small), simply make notches with a disk along the entire perimeter of the figure.
- Through cuts are made in the middle of the rectangle (along or across, preferably diagonally).
- Next, the cut piece is broken in any way, you can even hit it with a hammer. The main thing is not to break the outer edges.
- Now use wire cutters or pliers to straighten the edges.
- After which you can use a file to remove sharp pieces protruding beyond the contour.
How to make a hole
Depending on the required diameter of the hole for a pipe, sink, or just a dowel, one or another drilling option is selected. Some of them can only be used if it is necessary to obtain a hole for a nail.
Options
The principles of cutting tiles are similar in all cases, but has its own characteristics depending on the chosen tool. The main thing is compliance with safety precautions.
Drill for ceramics
Let's look at the drilling options:
- Gradual increase in drill diameter. The advantage is that the risk of chipping is minimal. Stages:
- We take the smallest drill diameter.
- Drill slowly, avoiding overheating of the drill. To do this, moisten it with water.
- After digging into the surface, when the tool does not slide so much, also spray the tile with water.
- After obtaining the first hole, take a drill of a different, larger diameter.
- When there is only a thin drill. Stages:
- Drill several holes along the contour of the future hole for the pipe.
- Next, without making much effort, knock out the center.
- Sand any existing irregularities using sandpaper.
To begin with, take coarse sandpaper and gradually reduce the grain size. This will ensure the smoothest inner surface possible.
Carbide drill for concrete
A carbide drill is also used for drilling tiles. Sold in construction stores as a drill with a pobedit tip. When working with it, you should adhere to the following rules:
- Drill at low speed.
- The use of a striking mechanism is not permitted.
- The pressure on the drill during operation is minimal.
- Turn on the impact mechanism only after obtaining a through hole in the tile, when the drill touches the concrete. At this time, you can increase the speed of the drill.
Diamond-coated crown
The diameter must be selected according to the size of the future hole. Drilling order:
- Masking tape should be applied to the tiles.
- Make markings.
- Start working with the drill at low speed. To prevent overheating, the crown should be moistened with water.
Circular tile drill/ballerina drill
There are special attachments on the market for making holes in tiles - ballerinas. Essentially, this is a drill with an additional cutting element.
Stages:
- Make a recess in the center of the future hole using any method.
- Secure the center drill into the hole you made.
- Work with the drill at low speeds at first. Gradually going deeper, the side nozzles will begin to scratch the tiles.
- When half the work is done, you should turn the tile over and perform the same steps until the center falls out.
Using self-tapping screws with a LM tip
In cases where a hole needs to be made urgently, and there is no drill with attachments or drill bits at hand, use self-tapping screws with a LM tip. Operating procedure:
- Outline the diameter.
- We screw in screws along the inner contour at small intervals and unscrew them.
- We squeeze out the center and smooth out the irregularities with sandpaper.
Bulgarian
To make through holes in the tiles before installing them or cutting them into shapes, a grinder is most often used. How to use the tool:
- Outline the contours.
- Install a diamond dry cutting blade.
- Make a hole gradually. The tool should be smoothly moved away from you. Take care of your fingers. Hold the tile to prevent it from slipping.
The work is carried out on the front side of the tile to avoid chipping.
Jigsaw
Used to make holes of various shapes at the edge of the tile or in its center.
Stages:
- Marking. Produced from the front side.
- Need to cut from the edge of a tile? You can start working.
- Need to make a hole in the center? A small hole is made with a drill to fit the cutting area of the jigsaw through.
- Place the tool on the border of the cutout.
- Slowly, we move the jigsaw along the markings.
It is recommended to make a small indent from the marked line deep into the tile so as not to catch the excess area.
Under the pipe
All options considered are suitable for making a hole. An exception is the method of drilling through ceramics with a gradual increase in diameter, since there is no tool of this size.
For the great snipe
You can make a hole for the dowel using almost any method considered. However, options such as using a jigsaw and ballerina are considered inappropriate in this case. It is best to use a ceramic or tile drill.
How to cut for a faucet
The size of the hole for the mixer is smaller in diameter than for the pipe. However, the drilling options are identical in both cases.
Under the socket
Sockets come in different shapes. Therefore, when choosing a tool, you should build on it. If the shape is round, then all options are suitable except for gradually increasing the size of the drill for ceramics. If it's square, the best solution is a jigsaw.
How to drill
There are several ways to drill a hole in porcelain tiles. Each has its own advantages and features.
Wet surface
Wet drilling involves regularly wetting the bit and tile surface with water or oil to cool it. When working “wet” with a diamond bit, gently rock the tool from side to side. This is necessary for uniform removal of wet sludge from the drilling area. It is recommended to carry out such manipulations every 5-7 seconds.
Diamond drills tend to heat up during operation and require cooling to increase their service life.
For personal protection, be sure to wear special glasses. Wet waste may fly around. And covering your eyes or regularly dodging will prevent you from making a perfectly straight hole.
Don't pour too much water. A small, thin stream, and sometimes a couple of drops, is enough. With this method of drilling, you need to add moisture as soon as you see the first haze of rising dry dust.
Dry surface
When using this method of drilling, turn on your home vacuum cleaner. It will help remove dust and sludge generated during operation. It is better to perform the dry process with diamond bits, the cavities of which already contain cooling oil. This will help avoid “washing out” the edges and make the final result neat.
It is important that there is enough free space between the nozzle segments for the sludge to escape. Otherwise, the operation of the tool will be blocked
Dry drilling of porcelain stoneware is used in cases where it is necessary to obtain a large number of holes in a relatively short period of time.
If you don't have a vacuum cleaner, try to stop working and remove fine dust. You will spend more time, but the result will exceed your expectations.
The dry drilling method is used when a large number of holes need to be made in a short time.
On the floor
If the tiles are already laid and glued to the floor and you need to drill a hole to install, for example, partitions, there should not be any difficulties in the work. In this case, the tile surface does not move or vibrate, especially if it is glued on.
The main condition for quality work is to ensure that the drill is placed accurately in the chosen location so that it does not move. To do this, stick some tape and the tool will not slide on the glossy surface. Make sure there are no voids under the tiles, otherwise cracks will appear.
And it is important to bring the drill already plugged in to the floor, and not to apply it while stationary.
Drilling should be carried out strictly perpendicular to the surface being treated.
It is convenient to drill on the floor using the wet method.
On the wall
If, before gluing the tile to the wall, you drill it from the matte, reverse side, this will lead to destruction of the surface
When working with porcelain stoneware, it is important to maintain the angle of the tool. Then the wall will become your assistant
Work at low or medium speeds, avoid sharp blows and jolts, and apply the same force during work.
As with floor tiles, mark the center of the future work circle and apply a piece of masking tape. This will prevent the tool from slipping.
Vary the diameter of the drill. If possible, create the initial indentation with a small diameter bit first. And then refine it with a larger one. These simple manipulations will help you quickly make a hole of the desired diameter.
Experts recommend using special clamping frames that can hold a drill or other tool in the desired position.
Using a jigsaw
Holes in tiles intended for placement of sockets or for installation of pipes can be made using an electric jigsaw equipped with diamond-coated wire. Such a device can be used both to start forming a hole from the edge of the tile, and for drilling carried out in the center of the workpiece. In the latter case, it is necessary to make a preliminary hole, for which an electric drill with a drill is used.
To cut tiles with a jigsaw, use special ceramic files.
The procedure for drilling a hole of significant diameter in a tile, for which an electric jigsaw is used, is performed in the following sequence:
- On the front of the tile, the edges of the future hole are preliminarily marked.
- If part of the resulting contour coincides with the edge of the tile, you can immediately begin processing.
- If the contour does not coincide with the edge of the tile, then a small diameter hole should first be drilled in the workpiece, into which the cutting thread of an electric jigsaw must be threaded.
- A circular or figured cutout is made along the inner contour of the marking. This will allow you to maintain the size of the hole being formed.
Secure the tiles with a clamp before cutting
Using the method described above, a shaped or round hole in a ceramic tile can be made using a regular hacksaw. However, in this case, the quality of its execution will be significantly worse than when using an electric jigsaw.
Drilling
You can drill small holes (up to 15-20 mm) using a drill by inserting a conical or spiral drill bit of the appropriate diameter into it.
Drilling is convenient if the tiles are already glued. But usually a hole must be drilled before the tile is glued in order to route the wire through it or put it on the pipe. Therefore, the tiles must be well fixed on a flat surface. Drywall or chipboard sheet is used as a substrate. To reduce the risk of the ceramic breaking during drilling, it needs to be wetted. It is recommended to fill the slats onto the chipboard to form a box. The slats are glued with silicone. The tiles are placed in the box and filled with water. They drill ceramics right in this box. The water will soften the tile, there will be no internal tension in it, and the drill will be constantly cooled.
The technology for performing drilling work in tiles is as follows:
- The first problem is that during the first revolutions of the drill, the drill slides along the smooth surface of the tile. Adhesive tape, which is glued to the drilling site, will come to the rescue.
- Mark the drilling point. It should be on tape.
- Drilling begins with slow rotations of the drill, so that the jerk does not cause the drill to float across the glaze and make a scratch.
- After the drill has caught on the tile, the drilling site is moistened with water. As you operate the drill, you must ensure that the work area always remains moist.
Using a drill, you can make a large diameter hole for a sewer pipe. But this method can be used when you need to make one or two holes, since the process is labor-intensive and the quality leaves much to be desired.
To do this, many holes are drilled along the contour of the cutout with a thin drill. Thus, a perforated contour is obtained. After completion, the inside of the hole is knocked out, the remaining teeth are cleaned with pliers and smoothed with sandpaper.
Correction of defects
If the tiles are glued incorrectly or simply crack as a result of use, there is a need to restore the integrity and appearance of the finish. To work you will need a few tools:
- marker or pencil for making marks;
- hammer drill or drill;
- a set of drills for working on tiles and concrete.
The choice of tool determines the quality of the work performed. It is preferable to drill ceramics with a hand drill, which does not exert strong pressure on the surface. In addition, you will be able to fully control the impact force of the drill and the pressure it exerts on the surface. And the absence of vibration will preserve the integrity of the fragile material. But if you don’t have a hand tool in your toolbox, then it’s perfectly acceptable to use a regular electric drill, but at very low speeds. However, you can also make holes with an electric drill without damaging the coating.
The main thing is to act carefully. Drills need to be purchased in a store in order to be able to consult with the seller about its parameters and technological properties
Drills for working on ceramics are glassy and have diamond chips. Moreover, glassy instruments are just as durable as diamond ones, but are much cheaper. If you do not plan to use such a drill in the future, there is no need to spend extra money.
If you do not find such tools, you can use a pobedit drill with a well-sharpened tip. To create large holes, use circular adjustable drill bits with a cutter designed for working on tiles, since the groove must pass through the tile and grip the wall. If it is made of concrete, then a drill is not enough; you will need a more powerful hammer drill with a special tip.
These are the basic principles of working on tiles. After studying them, you will understand that you should not be afraid to drill holes in it. Even if you do not have sufficient experience, you can cope with the task if you wish. The main thing is to follow the rules, be confident in yourself, and everything will work out.
Straight Tile Cutting Tool
When carrying out tiling work, ceramics are cut in a straight line using the following special tool.
Glass cutter
The glass cutter is suitable for cutting wall tiles; it is quite difficult to cut hard porcelain floor tiles with it; work with a roller glass cutter is performed in the following sequence:
- Place the product on a flat, hard surface and draw a line along the ruler with slight pressure towards you.
- Break the tile against a sharp hard corner along the drawn line.
Manual tile cutter
A standard tile cutter is a bed with a rubberized surface, above which there are two guides - the cutting element mounted on the handle moves along them. The slab is placed inside the device towards the base, the cut is made by smoothly moving the cutting wheel along the surface with slight pressure. Upon completion of the pass, the handle lowers and a special lever presses on the slab, breaking it along the cutting line.
For convenience, each tile cutter is equipped with an angular ruler, which allows you to cut pieces of the same size; high-quality expensive tile cutters have a floating bed and one durable guide, which allows you to cut with high quality edges.
Rice. 10 Tool for cutting ceramics straight
Electric tile cutter
The main elements of the device are an electric motor, on the shaft of which a diamond-coated disk is installed, and a water pump, immersed in a cuvette with water and supplying liquid to the working surface of the disk during cutting.
An electric tile cutter is a rather expensive device; it is used for high-quality cutting of tiles at right and sharp angles without dust; it can be used to cut narrow strips less than 10 mm wide, which is difficult with a conventional mechanical tile cutter.
When cutting holes for a pipe, an experienced tiler needs only one grinder with a diamond disc for concrete. To drill deep through holes in walls, it is better to use special crowns or Pobedit drills for concrete. In domestic conditions, in the absence of an angle grinder, holes in soft tiles can be made using special drill attachments in the form of feather drills, ballerina drills and crowns, while the price of the latter is too high for one-time household use.
Methods for cutting holes in tiles
The choice of tools for cutting holes for sockets is large, so there are many cutting methods. The choice of drilling option depends on the availability of the tool and the personal desire of the carver.
Cutting with a crown
If there is a drill in the house, then the set must include special attachments, including a crown. Otherwise, you can buy it at any power tool store. Moreover, you should choose a crown to drill through tiles in accordance with the size of the socket being mounted. The seller will tell you the appropriate diameter.
Cutting with a hole saw into rosette tiles is considered the fastest way to make holes. The main thing is to use a drill, not a hammer drill, to avoid chips and cracks on the tiles. It is necessary to drill at minimum speed, approximately 2-3 minutes per hole. You need to cut on a thick wooden board for better hole quality.
To work with tiles, 3 types of crowns are used:
- Diamond crowns. Usually used by professional craftsmen. They drill quickly and accurately, which leads to their high cost.
- Pobedite crowns. They are inexpensive and can be used up to 20 times. It drills efficiently, in the same way as a diamond-coated .
- Carbide crowns. They are not inferior in cutting quality to the two previous types, but cost 3 times less than Pobedit bits.
The drilling process is simple: insert the bit into the drill and press down. Then, according to the markings, drill a square or round hole, without pressing with much force. Cutting should be done on a flat board; it is better to use a diamond-coated crown. Uneven edges can be corrected with a file or emery.
Cutting with a ballerina
A metal bar with adjustable cutters and a drill is called a “ballerina”. This tool is similar to a nibbler and is an attachment to a drill. Usually a ballerina is enough for 20 cuts maximum, and it has a relatively low cost. The most difficult thing to do with a ballerina is to cut a hole in a tile, since you cannot change the inclination of the angle when cutting. Therefore, you need to install the drill on a special tripod.
The ballerina cutting process consists of 3 stages:
- in addition to the usual markings, you need to mark the center of the circle;
- set the guide drill to the center of the circle, and adjust the cutters to the diameter;
- Drill slowly and carefully for up to 3 minutes at minimum speed.
Tungsten wire cutting
To eliminate any defects in the tiles when cutting, you need to use a tungsten wire. This method is only relevant for home use, since one hole takes from 20 to 30 minutes, which is impossible for industrial purposes.
Cutting with a tungsten wire is performed as follows:
- apply markings to both sides of the tile;
- make a hole with a drill inside the circle;
- insert the string into the hole made by the drill and cut the hole according to the markings.
Tungsten string can be purchased at any hardware store. It is inserted into the saw in place of the cutting blade. This method is neat but time-consuming.
Cutting with a thin pobedit drill
If urgent cutting of tiles for a socket is necessary, but there are no special tools, a Pobedit drill is often used, which is inserted into a drill and a hole is made.
Along the marked line, 15-20 holes are made on the tile using a Pobedit drill up to 8 mm in size, and then the remaining tiles are removed with wire cutters or pliers. Irregularities can also be easily removed with sandpaper or a small file.
Using a grinder
A grinder is often used to cut holes. This method is applicable when there are no tiles on the wall yet. Cutting is carried out along the front part of the tile material. Initially, as a rule, mark the outline of the cutout using a marker. Then they begin drilling with a grinder with a diamond disc in the direction away from themselves.
How to drill into tiles without cracking: step-by-step instructions
Ceramic tiles are an excellent finishing material that is widely used in private construction and during renovations in apartments. Durability, water resistance, high hygiene, practicality, ease of maintenance, relatively low price and, on top of all this, excellent decorative properties make tiles an almost indispensable material for kitchens, baths, toilets, for finishing entrance areas - porches, verandas, hallways, etc. P.
How to drill into tiles
Learning how to lay tiles with high quality is quite accessible for the average owner of a house or apartment: a little diligence and diligence - and experience will come very quickly. But it is equally important to know how to drill tiles. Holes, one way or another, will be needed, for example, for hanging furniture, interior accessories, for wiring pipes or other communications, for installing sockets and switches, and for other needs. It's okay - we'll learn how to drill ceramics.
What you need to drill ceramic tiles
What, exactly, is the essence of the whole problem of drilling ceramics? The peculiarities of the technological process of tile production - high-temperature firing, the high density of the material and its surface strength (especially if there is a glazing layer) have, in addition to the obvious advantages, a logical drawback. Ceramic products are characterized by fragility, the absence of any kind of plasticity, and tiles, if handled carelessly, cutting or drilling, can easily crack, chip, or even completely fall apart into several fragments.
Disastrous result of unsuccessful drilling
In addition, the material itself, when processed, has a very strong abrasive effect on cutting tools, and conventional drills will become dull in a matter of seconds.
Conclusions - for drilling, you cannot apply excessive load, vibration, or a high number of tool rotations. And, accordingly, the drills themselves must be made of high-strength materials capable of passing through a dense structure, and have an appropriate configuration or sharpening.
So, what may be needed for drilling tiles:
| Drawing | Short description |
| Electric drill. The main condition for it is the mandatory presence of smooth speed control. | |
| A high-quality screwdriver with a powerful autonomous power supply may be sufficient. | |
| There is no need to write off already half-forgotten hand drills. For drilling small holes, such a tool will be quite sufficient, and adjusting the rotation speed is not a problem at all. By the way, sometimes even an ordinary brace can be useful. | |
| Standard drills with carbide tips. Frankly speaking, this is not the best choice - this sharpening option will create difficulties when passing through the most durable top layer of tiles. Rather, they will be needed to go deep into the thickness of the wall after the holes in the tiles have been made with other drills. More designed for shock-rotational action. | |
| Special spear-shaped drills for working with tiles. Very convenient for making small diameter holes (for example, for dowel fastenings). They can have a regular cylindrical shank for clamping in a drill chuck. There are also drills with a hexagon, the size of standard bits - they are convenient to work with when using a screwdriver. Typically, such drills are enough for a couple of dozen holes in ordinary tiles. It’s more difficult with porcelain stoneware - they can’t handle more than two or three holes. | |
| Special carbide drills with single-sided acute-angled sharpening. They “bite” into the tile well and easily pass through the outer, densest layer. Similar drills from a good manufacturer will do a lot of work. | |
| Special core drills with diamond or corundum coating. They already belong to the category of professional tools, they are able to cope with both tiles and porcelain stoneware. They are a hollow tube, which facilitates the drilling process - there is a free outlet for waste. Most often produced for large diameter holes. | |
| Similar to those already mentioned - core drills with tungsten carbide coating. Can be used not only for ceramic tiles, but also for natural materials - marble, granite, etc. They are usually sold in sets for a range of diameters, that is, they are most often purchased by professionals who are constantly faced with such a technological operation. | |
| For one-time work, if it is necessary to make holes of large diameter, it will be more profitable to purchase a special drill - a “ballerina”. It is inexpensive, but allows it to cope with the task in the range of diameters from approximately 30 to 90 mm. The design is simple - a central drill (usually spear-shaped) and a carbide-tipped leg located parallel to it. the reach of the leg can vary - this is how the desired radius of the hole is set. | |
| Some models of tile cutting machines are equipped with a built-in manual “compass” - a device that allows you to cut a hole in the tile without resorting to other tools. The pattern is similar to a “ballerina”, and the rotation is transmitted manually using a handle. | |
| For ease of work, special devices - jigs - can be used to accurately drill even holes. They are usually attached to the surface using suction cups and do not allow the drill to move to the side, which is especially important when starting drilling. | |
| When drilling some types of tiles, the tool quickly becomes hot and the quality of the work decreases. We have to resort to artificial cooling with water. To do this, special blowers are used that supply water under low pressure to the cutting site. |
Once you have decided on the tool, you can move on to practical work.
Prices for a popular line of electric drills
Electric drill
How to drill into tiles
First, a few general tips:
- If possible (there are fragments of unnecessary tiles), then it makes sense to do a little training first. When everything starts to work out, you can move on to completing the desired task.
- It is very important to make accurate markings. You can, of course, mark the future drilling point with a pencil or marker directly on the surface of the tile. However, firstly, not every pencil will leave a mark on tiles (especially glazed ones). Secondly, this mark is very easy to blur with an awkward movement. The optimal method seems to be a very simple one - the area of the hole is sealed with a piece of ordinary masking tape, and after that you can mark it - everything will be perfectly visible.
A small piece of masking tape solves several problems at once.
The positive “impact” of tape doesn’t stop there. Practice shows that it is much easier to start drilling this way - the sharply sharpened edge of the drill will not slip from the intended point. This is much better than trying to core the center. When working with a core (let it be a hardened dowel-nail or a sharp needle file), there is always the possibility of damaging the surface of the tile or even causing a chip (crack).
- You should never use high speed when drilling into tiles. The rotation speed range is from 100 to 400 rpm. It is difficult to indicate the exact value - it depends on the type of drill, its diameter, and the thickness and material of the tile itself. But in practice, the required frequency is very quickly found experimentally.
- It is necessary to take it as a rule - if you are using a drill that has an impact function, then you must check that this option is disabled before starting work.
- If you are drilling tiles that have not yet been laid, then you need to prepare a comfortable workplace for work. The surface must be smooth, stable and not vibrate. Material should be laid underneath that will not become an obstacle for the drill - it could be wood, plywood, or even an unnecessary piece of drywall.
To drill tiles, it is necessary to prepare a stable table with a wooden or plasterboard backing.
Be sure to check that there are no solid fragments left on the work table that would prevent the tile from fitting tightly to the surface.
- The cutting tool can become very hot during operation, and overheating of the drilling site often leads to cracks in the tiles. This means that you shouldn’t put in excessive effort - it’s better to give a little more time to get the hole. It is fashionable to cool the drill itself periodically by dipping it, for example, into machine oil. Sometimes, when working on horizontal surfaces, they resort to “local cooling” - a ring shaft is molded from plasticine around the intended center of the hole, and the resulting “container” is filled with water.
If a hole is drilled on a wall with tiles already laid, then you need to be extremely careful with the oil drill - drops of oil can get into the grout, and you will have to suffer a lot to get rid of such stains.
Sometimes you have to resort to forced supply of coolant. Many professionals have a special tool for this purpose - usually a blower vessel, in which excess pressure is created by a hand pump, and a special conductor, which centers the drill and ensures the flow of fluid into the drilling area.
Drilling ceramic tiles using a jig and forced injection of coolant
- The drill should always be positioned perpendicular to the surface of the tile - if there are no special holding devices, then you will need to constantly monitor this yourself.
The drill must be strictly perpendicular to the surface of the tile
- Drilling ceramics (especially when making large-diameter holes) can be accompanied by the scattering of microscopic but very sharp fragments. We should not forget about this - it is necessary to take measures to protect the hands and especially the eyes.
Now that the basic concepts have been outlined, we can move on to consider the most typical drilling of ceramic tiles - small holes for dowels, and large diameter holes - for laying communications and installing plumbing fixtures, sockets or switches
Drilling small diameter holes
A typical situation is when you need to hang some piece of furniture, a mirror, a towel rack, a cabinet or shelf, or another bathroom or kitchen accessory on the wall. In this case, driven-in plastic dowels with a diameter of up to 12 mm are usually used. The situation is considered when work is carried out on an already tiled wall, the glue underneath is completely frozen.
First of all, you need to decide on the location of the hole. The fact is that it is desirable that it be located no closer than 15 mm from the edge of the tile. Otherwise, there is a very high probability that either the drill will slip into the seam between the tiles, or the edge will simply crack or break off due to overheating or vibration during drilling.
Do not mark holes close to the edge of the tile
- After marking, you need to insert a drill of the required diameter into the drill chuck. We proceed from the dimensions of the dowels being prepared for installation - the hole in the tile should be 1 ÷ 2 mm wider than the diameter of the dowel plug.
- The drill is installed in the intended center (the tape should not allow the tip to slip), and then drilling begins at low speeds. The most difficult thing is to get through the top layer of tiles - then drilling will become more fun.
- As soon as the thickness of the tile has been passed and the drill has reached the wall, it is removed - there is no point in dulling an expensive tool. Take a regular drill for perforating walls, with a diameter exactly corresponding to the size of the dowel.
- The drill should pass freely through the hole in the tile, and then you can continue drilling into the wall itself to the required depth. Of course, this is done very carefully so that accidental distortion does not damage the edges of the hole in the tile, since a long drill may have a slight “beat.”
- Then all that remains is to insert the dowel into the hole made and carefully hammer it in. Remember, an awkward movement can ruin all the work done - an accidental blow to the surface can cause the tile to crack.
- After this, nothing should prevent you from screwing in a hook, self-tapping screw, or other fastener.
Drilling large diameter holes
Large diameter holes (from 20 mm and above) are most often drilled into the tiles before laying them on the walls or floor. Careful marking is carried out to determine the centers, and the tiles are laid on the workbench.
Here, drilling technology may vary somewhat - it largely depends on the type of drill used.
1. If you are using a “ballerina”, then first it is advisable to go through the center of the tile with a drill of small diameter (about 3 ÷ 4 mm) - this will greatly simplify the further process.
When installing the movable leg of the “ballerina”, do not forget that in this way we set the radius, that is, half the diameter - do not make a mistake here. After setting the desired radius, the locking screw is firmly tightened, with force, so that the movable leg does not move under the influence of vibration and centrifugal force.
The process of drilling tiles with a ballerina
When drilling, maintain low speeds, perpendicular position of the drill to the surface and not too much, but constant, uniform downward pressure. If you use too much force, the drill may jam, and it will be extremely difficult to hold the tile on the surface of the workbench. The sharp cutting edge of the tool should do the job itself.
It is imperative to ensure that the same depth of cut is maintained along the entire length of the resulting circle.
Sometimes it becomes necessary to slightly “work out” the edges of the resulting hole
Sometimes the edges of the hole will require a little work - this can be done with pliers and then sanded with sandpaper.
When drilling with a ballerina, extreme caution should be exercised - it itself is an eccentric, so the process may be accompanied by increased vibration. For greater safety, it is recommended to use a “ballerina” with a safety plastic casing.
Ballerina drill with safety guard
2. If the master has diamond, corundum or tungsten carbide core drills at his disposal, then the process is simplified.
Such drills can have their own shank for fastening in a drill chuck, or they can be a collapsible design with a replaceable crown for several diameters.
Set of crowns of different diameters
Please note that the photo shows crowns with a central guide drill. Working with them should not be particularly difficult - the center is set at the intended point, and then drilling is done with light pressure at low speeds. The holes usually turn out to be very regular, with smooth edges that do not require modification.
Some crowns are not equipped with a center drill
However, you can find crowns that do not have a central drill - this is especially typical for small-diameter tools.
How to center them, how to correctly set the center of the hole being drilled? For this, the already mentioned devices are used - conductors. Often they are even sold in the same set with drills.
Convenient kit - crowns with a conductor that can be connected to forced cooling
The conductor is attached to the wall (usually with a suction cup) so that a hole of the required diameter on it is located exactly above the intended center. After this, it will be simply impossible to make a mistake - drilling will take place exactly where necessary.
Applying a manual template
There are also “light versions” of this device - templates that are applied or taped to the wall in the right place, and then a hole is drilled. Of course, there are fewer conveniences in this case, but accuracy will be maintained. By and large, such a template is only necessary until the crown penetrates slightly into the surface of the tile. By the way, some craftsmen, saving money, cut out such templates for themselves from an ordinary sheet of 10 mm plywood.
3. Finally, we can mention the most “folk” way of making large-diameter holes in ceramic tiles. They resort to it when there is no way to find a suitable drill.
The old way of making a large hole with a small diameter drill
The idea is that a series of small diameter holes are drilled along the intended circle. Then you will need to carefully break out the central fragment, and then modify the resulting opening to the required round shape - with files, needle files or sandpaper.
This method cannot be called fast and easy, but nevertheless, it has a right to exist.
And at the end of the article - an object lesson on how to drill tiles from a professional:
Video: several options for drilling ceramic tiles
Another small instruction for drilling tiles
Let's look at an example of how to drill tiles with a regular drill.
Step 1. First, prepare all the materials and tools, and lay the tiles on a flat, hard surface. It is most convenient to place it on a piece of drywall or wood.
Step 2. Apply markings. How to do this on a smooth tile surface? Very simple. Glue a piece of masking tape on it in the place where the hole will be and apply a mark with a pencil.
Step 3. Position the drill exactly perpendicular to the tile, placing the drill bit at the point where you want the hole to appear.
Step 4: Carefully drill the hole.
If the tile is already fixed on the wall, then after it has been drilled, you need to change the drill to a concrete drill and drill the wall further if necessary. It is also worth periodically moistening the drill in water or pouring a little water on the drilling site.