What are the types of weather vanes?
Initially, the device was intended to determine the direction of the wind and measure its strength. Over time, weather vanes improved and began to be used for other purposes.
There are several types of design:
- The meteorological instrument, as before, is used for its intended purpose. The weather vane has precise balancing, and only forging is used for its manufacture. Modern weather stations use sophisticated electronic instruments, but some meteorologists like to follow the weather vane the old-fashioned way.
- Wilde's device, in addition to the direction of the wind, can measure its strength. It is equipped with a screw or a plate is suspended. The wind force is determined by the deviation of the plate from the vertical zero point and the scale. In addition, the noise of the propeller scares birds away from the ripening crop.
- Chimney weather vanes have many different names, for example, weather vane or chimney. But their essence is the same - it is a cap that protects the chimney pipe from destruction and penetration of birds. Often chimneys are improved with a deflector that protects the chimney from reverse draft. But on top of the cap itself, for beauty, many people put a rotating decorative figurine, maybe even with a propeller. This is the same weather vane.
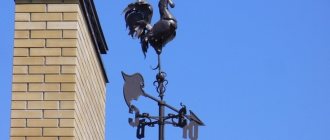
- Decorative models simply serve as roof decoration. They can be made even without a wind rose indicating the cardinal directions. Even if there are signs, they also serve more as decoration. It is unlikely that it will be possible to determine the exact direction of the wind from them. Similar weather vanes are made in the form of figures of birds and animals. The simplest is a wooden block mounted horizontally on an axis with a propeller, reminiscent of an airplane.
From plastic bottles
A plastic bottle gives the craftsman unlimited opportunities to express his imagination. The material is cheap, light, easy to process, but a weather vane made from it will not last long and is unlikely to be able to accurately determine the direction of the wind.
To make the most primitive weather vane, you will need:
- plastic bottle;
- scissors;
- steel rod
Step-by-step manufacturing instructions:
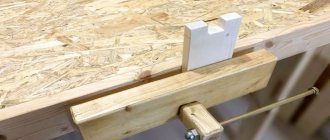
- It is necessary to cut off the neck and bottom to get the correct cylinder.
- Find its middle and pierce the bottle through with a steel rod at this point. Place limiters at the top and bottom: you can simply bend the upper part of the rod, and place a washer at the bottom so that it does not allow the cylinder to slide down, but also does not interfere with its free rotation.
- Weld the rod to the roof ridge or post.
A primitive product is unlikely to cope with the function of indicating the direction of the wind, but it will be able to protect the garden from feathered robbers, decorate the area and become an exciting activity for children.
The windmill rotor is a more complex device than the previous one, but still extremely simple.
It contains:
- axle (metal rod or piece of thick wire with a cross-sectional diameter of 1.5 mm);
- beads acting as limiters;
- cork;
- bottle.
The manufacturing stages are as follows:
- The bottom is cut off.
- There are 8 U-shaped cuts made on four sides of the bottle (2 on each side). The length of the cuts is 6 cm, width is 2.5 cm.
- The resulting rectangular elements are bent so that they make an angle of 35° with the plane of the bottle.
- A hole is drilled in the lid and a steel rod is inserted there.
- The rod is fixed using beads placed on a steel rod from the inside and outside of the lid. The main requirement: the lock must prevent the bottle from moving up or down, but not interfere with its free rotation under the influence of wind.
- The lower end of the rod is welded to a support (roof ridge, pipe, high pole) or simply stuck into the ground so that there is a distance of at least 15 cm between it and the bottle.
In the latter case, the windmill will become a repeller for small rodents and will not allow them to feast on the future harvest.
What parts does a weather vane consist of?
To make a structure with your own hands, you need to know its structure. Any weather vane consists of the following parts:
- The base of the weather vane is the body. It is mounted on the roof, and an axle with bearings is inserted inside it.
- The compass rose represents 2 crossed rods at right angles. At their ends there are letters welded to indicate the cardinal directions.
- A cone-shaped cap protects the housing with bearings from the penetration of rainwater.
- A rotating flag is a weather vane. It is made in the shape of birds or animals. Often this is an airplane. Opposite the balancing flag is a counterweight.
- The propeller is the most interesting part of the weather vane. The wind speed is determined by its rotation. The screw is made from solid sheet material or taken ready-made, for example, from a computer fan.
Children's windmill airplane made from PET bottles
If a windmill is needed only as a children's toy, you can make it with your own hands from plastic bottles together with your child. When choosing a figure, it is better to choose an airplane. To make it you will need a 2 or 1.5 liter PET bottle, a wooden block, cardboard and a cutting tool.
The aircraft is manufactured in the following order:
- For the body of a homemade windmill you will need 1 bottle. If you make a propeller from the bottom, you will need to take another container. They are washed from labels and dried.
- Cut out a long rectangle with rounded corners from thick cardboard. These will be the wings. The propeller can also be made from cardboard by simply placing it on the neck of the bottle, but it will not rotate well in the wind. It is better to cut this part from the bottom of the second bottle, as the photo shows.
- Using a stationery knife, make two slits along the body of the bottle along the width of the wings. The prepared cardboard rectangle is inserted into the slots, and a small cockpit window is cut out above them.
- Holding it with pliers, heat the nail red-hot over a fire and burn a hole in the center of the plug and plastic propeller. Next, these two parts are connected to each other, but with a cold nail. It is necessary to check that the propeller rotates freely around its axis.
- Similarly, burn a through hole in the neck. Through it, a weather vane is nailed to the end of a wooden block, which acts as a stand, and the lid with the propeller is screwed on.
- The body is decorated with colored stickers or you can decorate it yourself with acrylic paints.
In the cockpit of a finished aircraft, you can seat a pilot from a small children's toy, as shown in this photo. Now all that remains is to attach the weather vane to the high mast and admire the airplane you made with your own hands.
In this video you can see the making of an airplane weather vane from PET bottles:
Making your own windmill with a propeller
To make a weather vane with your own hands you will need a minimum of tools. The most necessary things are an electric drill and a jigsaw. When working with metal you will need a grinder.
So, having decided that the product with a propeller will represent an airplane weather vane, according to the drawn up drawing, they begin to manufacture:
- The housing that serves as a support can be made with your own hands from a 120 mm piece of metal pipe with a diameter of 15 mm. A thread for the cap is cut on top, and mounting plates are welded on the bottom.
- A bearing is driven inside the housing, but two are better so that the wind vane axis does not dangle. The axis itself is made of steel rod according to the diameter of the inner race of the bearing. The length is selected individually so that the rotating weather vane does not cling to the fasteners.
- Using a hammer, the axle is firmly driven into the inner races of the bearings. A protective cap is screwed onto the housing thread on top.
- Now you need to make a weather vane with your own hands. Since it was decided to equip it with a propeller, the best option for the figure would be an airplane. It is cut out of plywood or sheet steel with a jigsaw.
- The plane is secured with three bolts to the top of the axle and the manufacture of the propeller begins. The easiest way is to cut the screw out of sheet steel and secure it with a bolt between two washers to the nose of the aircraft. The factory propeller from a small fan can be fixed through bearings. The rotation of such a screw will be smooth and noiseless.
The finished weather vane with a propeller is installed on the roof and the wind rose is attached to the support with bolts or welding. To ensure that letters and signs correctly correspond to the cardinal directions, you must use a compass.
In this video you can see the making of a weather vane:
Homemade weather vanes of varying complexity: photo reports
When making a wind direction indicator with your own hands, many questions arise. The design is simple, but there are many options. For example, the swivel assembly can be made in different ways, not to mention the shape and size of the housing. Everyone chooses what they like best. To form at least a general idea of how you can make this useful device for a summer cottage or garden plot, we will give several examples of homemade weather vanes with step-by-step photos.
You can do something like this too
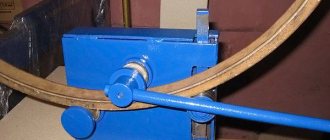
Based on a bearing from a VAZ pump
The bearing was taken from an old VAZ. Based on the size of the bearing, pipes were found - one of which this bearing fits into. We install a stopper in this pipe so that the bearing does not fall inside; after installing it, we weld it. From pipes of smaller diameter we make a cross, to which we will then attach letters indicating the direction of the cardinal points.
Making a weather vane with your own hands
We weld another piece of thin pipe to the top of the bearing. This will be the rotating part, to which the body of the weather vane will then be attached. We weld two short sections of pipe perpendicular to this pin - we will weld the cut weather vane to them. To protect the bearing from moisture and dust, we use a boot from the steering rod, pulling it before we started welding the rotating part.
We are gradually assembling the structure
A cat is cut out of an aluminum sheet 2 mm thick, the letters are made of galvanized steel. We'll spray paint them with bright red auto enamel, and the cat with black.
Components for a homemade weather vane
All that remains is to weld/attach all the parts to assemble the weather vane.
This is what everything looks like assembled
A homemade metal weather vane on a bearing is ready. Can be installed on the roof.
The simplest weather vane in 5 minutes from scrap materials
When hunting, fishing or dacha, you may need a wind direction indicator. You can make a very simple model literally from nothing. You will need:
- plastic or paper glass (preferably large capacity);
- thick wire (you can use aluminum or steel);
- plastic screed;
- a washer with an internal diameter not less than the diameter of the wire.
The manufacturing process is very simple. First of all, carefully, without damaging the walls, remove the bottom. You can remove it from a paper cup, but you will have to cut it off from a plastic cup. Next, stepping back from the wider edge about a centimeter, we make two holes in the walls, located one opposite the other, and thread the wire. We bend one edge of the wire so that the wind indicator does not fall off.
We make a weather vane with our own hands from scrap materials
From the opposite side - from below - we put a washer on the wire, raise it to the level of the glass, leaving a very small gap (a few millimeters). We take the tie, tighten it, fixing the washer at the desired level.
Pointer at work
That's all, we made a simple weather vane with our own hands. Of course, it is very short-lived, but long-term service is not always necessary. And it will correctly indicate where the wind is blowing.
Methods for attaching a weather vane to the roof
Traditionally, a weather vane is installed on the roof of a building. The mounting location can be a ridge, chimney or ventilation pipe. Any pole or roof of an outbuilding will do, as long as the minimum height from the ground is 5 m.
After you have made a weather vane with your own hands, it must be installed correctly. It is important not to forget to push solid oil into the housing with bearings. With plates welded to the body, the weather vane can be conveniently mounted on a chimney cap or ridge. If the base is flat, then it is better to make a round flange with your own hands with holes for self-tapping screws and weld it to the bottom of the body instead of plates. It will be more convenient to fix the product with clamps to a vertical pole.
Ready-made fasteners can be purchased at the store. Cheap models designed for mounting on a roof ridge are made in the form of a simple metal corner. More expensive products are equipped with adjusting screws.
A correctly installed weather vane will immediately make itself felt. At the slightest wind, the weather vane with the propeller will begin to rotate.
A metal windmill with a propeller has the ability to absorb lightning strikes, that is, it becomes a kind of lightning rod. This is especially dangerous if the weather vane is installed on a metal roof covering, for example, metal tiles. For safety, the structure must be grounded. You can do this yourself quite simply. They take a stranded copper wire in insulation and bolt one end to the weather vane, and the other to the ground loop near the house. If it is not there, you can drive a metal pipe or corner into the ground to a depth of 1.5 m, and weld a bolt on top for the wire.
A weather vane made independently will work and please the owners for many years. It is only necessary to lubricate the bearings once a year.
Final revision
In order for a metal weather vane to serve for a long time and at the same time have a presentable appearance, it must be carefully painted, having first prepared the surface well. First, use sandpaper to remove the rust, completely down to bare metal. Then we coat it with automotive primer (you can also use a rust converter). After the primer has dried, you can paint it.
Winged horse - why not decorate your home
We take paints for exterior work. All automobile ones are perfect, but oil-based ones, such as hammer ones, are also suitable. They give an interesting effect. You can also try painting with powder paints, but they require special conditions - high temperature. Otherwise, the coating will quickly fall off.
After applying the paint, leave the product to dry for two days without touching it with your hands. Such paints take a long time to dry (with the exception of powder paints), and after “testing” stains remain. If you are satisfied with the quality of the painting, you can install the weather vane in place.
How to make a weather vane with a propeller
Today, many country developers attach special importance to the uniqueness of their home. The distinctive feature becomes a highlight in the exterior of the building. True, there are not many such devices, and one of them is a weather vane. It has long been a popular element in Western European countries, but today you can also find a weather vane on Russian houses, the reason for installing it is to show the direction and strength of the wind.
Currently, manufacturers of various designer items offer a huge range of weather vanes made from different materials. There is no point in talking about shapes and design; the choice is actually wide. True, such a toy costs a lot of money, so it makes sense to figure out how to make a weather vane with your own hands from scrap materials.
Features of the weather vane design
The structural filling of the weather vane is based on two components:
- An axis, which is a rod that acts as a kind of fastening element. It is installed strictly vertically and attached to the roof of the house.
- A flag with a counterweight is installed on the axis. The wind presses on the flag, causing the horizontal part of the weather vane to rotate around its axis.
That is, there should be equal parts in weight on both sides of the axis. In principle, this is the difficulty of manufacturing.
The design features of the weather vane include some additional elements. For example, you can make a weather vane with a screw that will show the strength of the wind. The more intensely it spins, the stronger the wind. The design can be supplemented with a vertically installed plate. It must be secured in such a way that it remains free. In this case, the plate should swing in one plane. With its help you can also find out about the strength of the wind. The greater the angle of deviation from the vertical, the greater the wind force.
As for the shape and design, there are no restrictions. Everything is in your hands, it all depends on your imagination and taste preferences. The same applies to the size of the weather vane. True, experts recommend using a width of 40-50 cm and a length of 70-80 cm. For small houses and cottages this is the best option. If the weather vane is installed on the roof of the gazebo, the dimensions can be reduced.
Device
A weather vane is a simple meteorological instrument that can be used to easily determine which way the wind is blowing. It is installed on the roof ridge or on the head of a pipe and serves as an entertaining decoration, which also has practical applications. The design of this device includes the following elements:
- Frame. The body or glass is the part of the weather vane into which the axle is inserted and the wind rose is secured. With the help of struts it is fixed to the roof ridge. To make a housing with your own hands, use a piece of pipe; sometimes, to facilitate the rotation of the axis, a bearing is placed in it.
- Axis. The axis of rotation is the element due to which the weather vane rotates. It is made from reinforced twigs, sticks or other materials.
- Cap. A small part in the form of a funnel or circle with a hole in the middle is called a cap. It is attached to the axis of rotation of the weather vane and serves as a limiter and protection for the body from moisture penetration.
- Wind vane. The flag is attached to the axis of rotation, it is driven by wind currents and indicates its direction. The pointing part of the weather vane is called the arrow, and the opposite part is called the counterweight. Experienced craftsmen can make this part in the form of an animal or a whole plot picture, and they do not need drawings to work, just show the photo you like. You can make a weather vane from wood or plastic with your own hands.
- Rose of Wind. The compass rose is the name given to the compass pointer; it consists of two twigs crossed at right angles with letters or colors that indicate where north, south, west and east are located. To correctly make a wind rose with your own hands, during installation you need to orient the pointers along the compass.
Note! If you have visited seaside towns, you have probably noticed that almost every house there is crowned with an intricate weather vane in the form of animals, plants, or even entire scenes. It can reflect the occupation of the homeowners, the family coat of arms. At all times, people believed that a weather vane scares away evil spirits and protects against the evil eye. If you do not take into account superstitions, then a weather vane made by yourself is an excellent bird scarer.
Stages of making a weather vane with your own hands
First of all, you need to decide on the shape and design of the device. As mentioned above, use your imagination. After which your idea should be transferred to paper. The drawing must be done in all the smallest details.
Then you need to make a vertical support with your own hands. To do this, you can use any metal rod: fittings, pipe. Its dimensions: diameter – 13 mm, length 125 mm. In the upper part, a thread must be cut for fastening the horizontal part of the weather vane. You can do this yourself using a die. The process is not very complicated.
A bearing must be installed on the lower part of the weather vane; it is this that will allow the weather vane to rotate around its axis. The decorative element itself is fastened using four plates installed at the bottom, which are attached to a metal axis by welding on one side, and holes for self-tapping screws are made on the other side. It is with these fasteners that the weather vane is attached to the roofing material of the house.
Therefore, when assembling the weather vane, it is necessary to put a cap made of metal sheet material on it. Someone manages to make a cap from a plastic bottle cap.
An airplane weather vane is a dynamic design, which is why it is not installed on tall buildings. You simply won’t be able to see how the propeller is spinning. And it is precisely this that is the highlight. The complexity of this design lies in the fact that the rotating part must somehow be freely attached to the airplane figurine.
The plane itself can be easily cut out of a sheet of iron with a hacksaw, or you can make it with your own hands from plywood or plastic. But the weather vane propeller must be metal. It is important to understand here that the blades of the rotating element must be located at a slight angle relative to each other. The propeller can be cut from a galvanized piece of sheet iron using tin snips. A hole is made in the center of the strip for fasteners. After which the edges of the strip need to be turned slightly in different directions.
Now you need to attach the propeller to the plane. There are several options here:
- If the weather vane is made of plywood, then the propeller can be secured to its end part using a self-tapping screw. The fastener should not be screwed in completely, thereby leaving room for rotation.
- If the weather vane is made of metal, then a small pin is attached to it by welding or soldering to the nose of the aircraft. The pin must have a thread at the end onto which a nut and washer are screwed. This is both a fastener and a limiter. You can use a pin without thread, but with a cap at the end. This option is attached to the aircraft only with the propeller attached to it.
Making a weather vane with a deflector for the chimney
The weather vane on the chimney is called differently, for example, chimney, deflector or cap. Essentially, these are the same device. The weathervane is responsible for the decorative function here, but the chimney itself is protected from reverse draft by a deflector.
Before you make the weather vane yourself and install it on the chimney, you need to understand what a deflector is. Its design has a cap that protects the chimney from air flow. Even if the wind blows from below, the deflector will still provide traction and even increase it. A chimney with a rotating hood and the principle of its operation are shown in this photo.
In this design, the deflector is connected to the weather vane through a bearing. The wind turns the cap, creating turbulence that prevents air from entering the chimney.
However, the chimney may have a deflector with a non-rotating cap, and the upper weather vane itself plays only the role of decoration, as the photo shows.
This design is easier to do with your own hands. As an option, it is better to buy a ready-made deflector, and then decorate its cap yourself with a weather vane.
This diagram shows how to install a deflector with a round fixed cap on a chimney made from a round pipe with a diameter of 120 mm. Here the racks (4) are secured to the cylinder (9) with nuts (8) and bolts (7). The upper cylinder (3) is secured with a clamp (5). The reverse cone (2) and the upper cap (1) are attached to the posts with rivets (6).
The deflector is ready, all that remains is to decorate its cap with a weather vane. You can make a weather vane according to the presented diagram.
Manufacturing consists of the following steps:
- A support is made from a piece of pipe with a diameter of 15 mm and a length of 120 mm. A thread is cut on one side.
- The bearing is selected according to the size of the workpiece. It is hammered into the pipe.
- Two fastening plates are welded to another section of a similar pipe without thread. They are bent to the shape of the smoke cap. The bearing is hammered inside in the same way.
- A compass rose is made from thin strips of stainless steel. They are bolted to the support rack.
- To prevent water from getting into the bearings, a protective cap is screwed onto the pipe threads. The two workpieces are connected to each other by an axle made of a rod, tightly seated in the inner races of the bearings.
The finished rotating stand is bolted to the chimney, and a weather vane is fixed directly to it, for example, like this airplane.
Assembling and installing a weather vane
You need to decide on the installation location. It is believed that the weather vane should not spoil the symmetry of the roof structure of the house. Therefore, if there are pipes on the roof, then it is best to attach them to them. If there are none, then the best option is the roof ridge. To install on a ridge, you only need two fastening elements (strips), which will be located exactly at the angle of the roof slopes.
How to assemble a weather vane at the installation site.
- First, the main part, made of pipe, is attached to the roof of the house. It is attached to the ridge with long self-tapping screws. It is important that the fastening is carried out not to the roofing material, but to the roof sheathing.
- A bearing is installed inside the pipe.
- An axle is inserted on top, onto which a protective cap is first placed.
- At the bottom of the pipe, the bearing is secured with a nut and washer.
By the way, the inner diameter of the pipe is matched to the outer diameter of the bearing. And one more very important point. All parts and components of the weather vane must be made with a large margin of safety. This is especially true for fastenings. It must withstand fairly large wind loads. And the snow will be a big test for him.
Do not forget that the weather vane with the propeller is located in the open air. So the rain will wash it constantly. Therefore, it is recommended to lubricate the metal structure with grease. And this is after painting it. In addition, you will have to periodically tighten the threaded units, tint the device, lubricate the bearing, and so on. That is, a weather vane is not just a beautiful element of the external design of a house, it is a mechanical toy that must be constantly taken care of with your own hands.
Tools and materials for manufacturing
Since our meteorological instrument has to constantly resist the influence of the environment, sometimes very aggressive, it must be made of appropriate materials, otherwise it will not last long. Often weather vanes are made of wood (even plywood) and sheet iron . Copper is rarely chosen , although this particular metal is more suitable than others.
A wooden weather vane treated with a protective compound will last for several years. The steel analogue lasts for several decades, subject to periodic tinting, which is not always possible, but the copper product is practically eternal. Copper sheet is the easiest to process, and there are no problems with decorating it.
Recently, weather vanes have begun to be made of plastic. The material is easy to process - no complex tools are needed. However, if the product is suitable for the roof of a country house, then it will not look good on a large luxurious house; expensive materials will be required. The following tools will be needed:
- metal scissors;
- saw;
- hacksaw;
- file;
- Bulgarian;
- sandpaper;
- drill;
- pencil;
- ruler.
Features and dimensions of the design
There are two main points in the design of a weather vane . This means the following:
- The axis-rod, which is a kind of fastening element, is installed strictly vertically and attached to the roof of the house.
- A flag with a counterweight is mounted on the rod. The force of the wind presses on the flag, and the horizontal part of the weather vane rotates around its axis.
On each side of the axis there must be parts of equal weight, which is the most difficult thing in the entire manufacturing process.
Design features include additional elements. For example, a propeller, because many are attracted by the idea of how to make a weather vane with a propeller with their own hands. The more intense the propeller rotates, the greater the wind force - everything is simple and clear. There may also be a vertically mounted plate that is secured so as to remain free. In this case, the plate should swing in one plane. It also gives an idea of the strength of the wind - the greater the deviation of the angle from the vertical, the stronger the wind.
There are no restrictions in terms of shape and design - as long as the design fulfills its functions. The same applies to sizes. True, experts advise making a product 40-50 cm wide and 70-80 cm long. This is the best option for small buildings. When the weather vane is installed on the roof of the gazebo, the dimensions may be smaller.
Airplane windmill made of plywood
A more reliable and at the same time simpler design can be made with your own hands from sheet materials. In terms of durability, sheet steel wins, but it is more difficult to process. It’s easier to make an airplane weathervane from moisture-resistant plywood.
The manufacturing process involves the following steps:
- You can draw the airplane pattern yourself on a large sheet of paper or print it from the Internet. The simplest diagram, as shown in the photo, consists of triangles.
The self-made weather vane remains to be fixed at the highest point of the roof.
This video shows how to make a beautiful airplane weather vane:
Stages of product production
First of all, decide on the design of the device, and then draw up a drawing that will show absolutely all the details. Next, the algorithm of actions is as follows:
- Make a vertical support from rebar, pipe or other metal rod. The length is 125 mm and the diameter is 13 mm.
- In the upper part, use a die to cut a thread for fastening the horizontal part of the product.
- At the bottom, install a bearing that will allow the weather vane to turn around the axis. It is important that dirt and water do not get into the bearing. To do this, put a cap made of a metal sheet on it (some people make a cap from a plastic bottle cap).
- The decorative element is fastened using four plates installed at the bottom, welded to a metal axis on one side. On the other side, holes are made for self-tapping screws, with which the weather vane is attached to the roofing material.
Since a weather vane with a propeller is a dynamic design, it is not installed on tall buildings, since it will not be visible how much the propeller rotates.
The main part - the “airplane” - is cut out of iron sheet, plywood or plastic. The propeller is made exclusively of metal. The blades of the rotating element are located at a slight angle relative to each other. You can make a propeller from galvanized sheet iron using metal scissors. A hole is made in the center of the blank strip for the fastening element, then the edges of the strip are turned slightly in different directions. There are two options for attaching a propeller to an aircraft:
- If the weather vane is made of plywood, the propeller can be attached with self-tapping screws to its end part. The fastener is not screwed all the way to allow rotation.
- A small pin is attached to the nose of a metal airplane by welding or soldering, at the end of which there should be a thread into which a nut and washer are screwed. This is how we get both the fastener and the limiter. The pin can be without a thread, but with a cap, but this option is suitable if the propeller is already on.
Assembly and installation of a weather vane
First we decide on the installation location. It is considered good when the symmetry of the roof structure is not disturbed due to the weather vane. So, if there are pipes on the roof, it is better to attach the device to them. If there are no pipes, attach the weather vane to the ridge. To install the product on the ridge, you only need two strips (fastening elements), which are located exactly at the angle of the slopes. Assembly procedure on site:
- The main part of the pipe is mounted. It is attached to the ridge using long screws. It is important to attach not to the roofing material, but to the sheathing.
- A bearing is installed inside the pipe.
- An axle with a protective cap previously placed on it is inserted from above.
- The bearing is secured at the bottom of the pipe with a nut and washer.
The inner diameter of the pipe is determined by the outer diameter of the bearing. Since the weather vane is located in the open air, every time it rains it will be exposed to water. In this regard, it is recommended to lubricate the metal structure with grease after painting the product. From time to time you need to tighten the threaded connections, lubricate the bearing, and so on. All parts and components must have a large margin of safety, especially the fastenings, because the weather vane is subject to serious wind loads, and precipitation adds problems.
Recommendations on how to make a weather vane with a propeller with your own hands
Every country property owner wants to make their home beautiful and unique. If you know how to make a weather vane with a propeller with your own hands, then you can equip any building with it. Despite the availability of modern instruments with software, the weather vane remains a fairly accurate device for determining the direction and strength of the wind, which operates around the clock, without the need for energy sources, adjustment or frequent maintenance. In addition, these products perform a practical function by driving away birds that can destroy crops. Having a little free time, you can make a weather vane yourself from scrap materials that you can always find in the pantry.
Scheme of the weather vane. Despite the availability of modern instruments with software, the weather vane remains a fairly accurate device for determining the direction and strength of the wind.
Where to get it or how to make a sketch
Sketches for a weather vane can be found with dimensions, or you can create them from a suitable picture. To do this, any picture you like must be loaded into one of the photo editors, enlarged to the desired size and printed. This trick can be done with COREL.
Another option is to open the drawing in AutoCAD, outline the contours with half lines. You will get the desired outline. It can be increased to the desired size.
In programs, you can make a sketch for a weather vane from any image
If you are not very comfortable with computer programs, you will have to work with your hands - draw the drawing into small squares, then transfer it to paper on a large scale.
Materials used
Weather vanes made from a wide variety of materials are used to decorate houses.
Metal weather vane design.
Handling them requires different skills, tools and equipment.
- Tree. This is a lightweight and easy-to-work material that has been proven over centuries. There is no need for complex tools or professional skills to process wood. To make a windmill, it is necessary to take waterproof wood with good hydrophobic qualities. The wood must be impregnated with a special composition that will protect it from dampness and insects. But a significant disadvantage of wood products is its low strength and fragility.
- Steel. This is a fairly durable material that is resistant to strong mechanical stress. You can make a weather vane from black or stainless steel. Stainless steel is resistant to corrosion and has an almost unlimited service life. Regular steel can last quite a long time with periodic maintenance and repair. But, given the location of the outbuilding, performing this task is quite difficult.
- Copper. This metal is strong enough to withstand strong gusts of wind. Sheet copper is quite easy to cut and saw. An important factor is that soldering can be used to connect copper parts together. The softness of the material makes it possible to process it using the embossing method. In addition, copper can be coated with silver using photographic development reagents. The metal is resistant to corrosion and does not require additional finishing.
- Plastic. Modern polymer materials have sufficient strength and resistance to ultraviolet radiation. Plastic lends itself easily to all types of processing. It can be sawed, glued or soldered. Polymer plastics do not lose their qualities when subjected to strong heating or cooling.
- Plywood. Only multi-layer waterproof plywood is allowed to be used in the work. But a plywood product will not last long. Even covering it with several layers of paint will not save it from destruction. If a plywood outbuilding lasts one year, it will be considered a great success.
When choosing a material for work, you should take into account the ultimate goal of making the outbuilding. In any case, it is better to choose a durable material that will last for many years.
Weather vane device
Scheme for creating simple weather vanes.
As a rule, outbuildings are installed on the roof of the house. At this point they can be seen from anywhere on the site. Based on this, increased aesthetic requirements are imposed on the appearance of such a product. Based on it, an opinion will be formed about the tastes, worldview and wealth of the owners of the land plot. Therefore, when making a weather vane, you should show maximum imagination and creativity when designing and creating every detail.
The design of the weather vane is quite simple:
- Frame. It is made from inch steel pipe. It is possible to use brass pipe, which is quite durable and resistant to corrosion.
- Bearing rod. It is inserted into the body. It is steel reinforcement without notches. The windmill itself is attached to it. Based on this, it is recommended to use reinforcement with a cross section of 9 mm. This is enough to withstand the wind load acting on the weather vane.
- Wind vane. It is the rotating part of the device, which indicates the direction of the wind. In addition, the weather vane contains an artistic component that determines the theme of the product.
- Bearings. These parts are necessary for free torsion of the supporting rod inside the housing. For assembly, products with an internal diameter of 9 mm are used.
- Fasteners Depending on the method of fastening the outbuilding, corners, plates, screws, bolts or rivets are used.
- Propeller. This is a part whose rotation frequency can be used to determine wind speed. The propeller is made of tin, plastic, plywood or wood. A good option is to use an old computer fan.
Despite the abundance of ready-made products on sale, a homemade weather vane will allow you to put your soul into your work and bring together all family members to implement a joint project. When making this device with your own hands, there is a job for everyone.
Since the main part of the windmill is the weather vane, its design needs to be given special attention.
It may look like this:
- cockerel;
- sailboat;
- ship with propeller;
- an airplane with one or more propellers;
- galloping horse;
- a cat sneaking after a bird;
- hunter with a gun;
- moon with stars;
- lion on the hunt;
- angel;
- swans or stork in the nest.
You can make a weather vane in any design. For a fishing enthusiast, this could be catfish or pike. Car enthusiasts will love the contours of a sports car. There are no restrictions for imagination in this matter.
Basic elements of a weather vane
Regardless of what shape your weather vane will be, it must contain certain elements, the main ones being an axis and a flag with a counterweight.
Vane body and axis
The body serves as a support for the entire structure. Both steel and brass pipes with a diameter of 1 inch are suitable for its manufacture. The body has a strictly vertical axis - a rod, usually made of steel reinforcement.
The main function of the support rod is to hold the windmill. The diameter of the reinforcement is about 9 mm, this is enough to withstand strong winds and any other mechanical load that will act on the weather vane.
The weather vane body is the support of the entire structure
Flag with counterweight (wind vane)
The main part of the device located on the vertical axis. The flag shows which direction the wind is blowing. The counterweight serves to balance the flag and is located on the opposite side. The main difficulty in the manufacture of this element is that the flag and the counterweight must be located evenly on both sides of the axis, that is, have the same mass.
Of the entire structure, it is the weather vane that is of artistic value. An experienced craftsman is able to make a part of any shape without disturbing the balance between the flag and the counterweight.
When making a weather vane, it is important to maintain an even distribution of mass on both sides of the axis
Protective cap
The protective cap has the shape of a circle or a cone and is located on the axis of the weather vane, most often directly above the body. Its main function is to protect the housing and bearings from moisture and dirt.
Rose of Wind
A cardinal direction indicator consisting of two rods crossed at an angle of 90°. As a rule, the rods are attached to the top of the lid in a stationary state. At the ends of the pointer, letters are installed to indicate the cardinal directions. To fix the element in the correct position, you need to use a compass.
To set the cardinal direction indicators in the correct direction, you need to use a compass
Bearings
They are located inside the body and ensure free movement of the supporting rod under gusts of wind. The internal diameter of the parts is 9 mm.
The choice of fasteners depends on the material used and the method of fastening. These can be corners, overlays, bolts, rivets.
It helps determine wind speed. You can make the propeller yourself from plastic and wood or use ready-made parts.
It is the airplane with the propeller that looks most organic, since this detail is also present in the original design. And it’s much easier to model this shape than others.
The plane is ideal for making a weather vane with a propeller
Manufacturing and installation of a weather vane
First of all, you need to decide on the installation location. As a rule, the base is a chimney. It must be thick enough to withstand the pressure of the weather vane. If the pipe is asbestos, then its walls can be reinforced with steel linings. For a brick pipe, reinforcement is not needed. A base in the form of a shelf is attached to the side of the pipe. A weather vane will be installed on it. After preparing the base, assembly is carried out.
It is carried out in the following sequence:
- A piece of steel or brass pipe 120 mm long is sawed off. Holes are drilled in it for attaching the corners. The corners are attached to the support with rivets or bolts. To do this, threads are made in the holes.
- Bearings are inserted into both ends of the pipe. They can be secured by welding or pressing. The bearings can be fixed thermally. To do this, the end of the pipe is heated and a bearing is inserted into it. After cooling, the pipe firmly compresses the bearing. Solid oil is filled into the pipe.
- The top of the case is closed with a cap. A brass or plastic plug is used for this. To achieve a tight seal, insulating or plumbing tape is wound. A felt seal is placed between the cap and the body.
- A weather vane is being made. First, a drawing is made on paper. Then, using carbon paper, it is transferred to the material. The figure is being cut out and polished. The size of the figure should be proportional to the structure on which it is installed. As a rule, the length is 400-600 mm, the optimal height is 200-400 mm.
- When the figurine is ready, it is secured to the supporting rod. This is done using bolts, clamps or welding. The workpiece is painted or varnished.
- The propeller is mounted. It can be mounted on a weather vane or on a supporting rod. It depends on the weather vane model. The best option is to use a bolt. The propeller is secured to a bolt between two washers. To increase the service life, it is recommended to mount the propeller on a bearing. This way it will work much quieter.
For better entertainment, a wind rose is installed on the base. It is made from wire and sheet metal. The weather vane is installed on the roof either assembled or in stages. It is more convenient to mount the base first. After this, all that remains is to insert the weather vane attached to the rod into it and fasten the parts together.
Step-by-step instructions for making an airplane weather vane
This device will become the hallmark of the house only if the element is properly made and installed.
Metal weather vane
It is performed in the following sequence:
- Cut a pipe 120 mm long. Make small holes in it for fastening to the support with rivets or bolts. The holes must first be tapped.
- Insert bearings from each end into the pipe, securing with welding. Additionally, the bearings can be fixed by heating the pipe into which the bearing must be inserted. After the pipe has cooled, the bearings will sit quite firmly in it. Fill the pipe itself with grease.
Bearings help the weather vane to easily rotate around its axis
It is very easy to cut steel sheets with special metal scissors
Weather vane made from plastic bottles
You can make an airplane weather vane from plastic bottles. To do this you need:
- Collect empty containers and wash them thoroughly. For a weather vane in the shape of an airplane, 4 bottles are enough. Cut off the top part of two bottles with the cork halfway. As a result, you should have 2 cut tops with cork and 4 bottoms, the height of which is 5 cm.
You need to cut off the top and bottom of the bottle
The bottom of the bottle must be cut into strips
Use an awl to make holes in the plugs for the axle.
A weather vane made from a plastic bottle does not look very aesthetically pleasing, but it performs its functions effectively
Plywood weather vane
For a homemade weather vane, you can use scraps of plywood. In addition to this material, you will need:
- nails or screws;
- flat beads - 3 pieces;
- special glue for plywood;
- small wooden block;
- protective paint.
All work on the manufacture of a weather vane from this material is carried out in the following order:
- Cut 3 equilateral triangles from the prepared material. The first is the base, its dimensions are 30x20 cm. In the middle of this part you need to make a small hole for attaching the weather vane to a wooden block. The dimensions of the second component are 12.5x12.5 cm. It is necessary to cut a hole in it in the form of a rectangle reaching to the middle of the part. The third is the smallest, its side is 7.5x7.5 cm. You need to cut the same rectangle, but from the base side.
For a plywood weather vane you need three triangles of different sizes
The service life of a plywood weather vane is only one season
DIY propeller
It consists of several blades that are attached to the axis of rotation. To make it you will need:
The propeller can be made from any material
The manufacturing process is as follows:
- Prepare a wooden block with a side of 5 cm. Draw diagonals on each face of the cube and mark the place where they intersect. Drill a through hole in one of the planes.
- On a sheet of tin, mark segments equal to the width of the bar. Cut strips measuring 15x5 cm. There should be 4 such strips. Process the edges of each strip with a sharpening machine.
- Each strip is roughly divided into 5 parts. Bend one of them with pliers at a right angle. As a result, you should have four L-shaped blades. Place each piece diagonally on one side of a wooden cube with a hole.
- The protruding parts of the sheet must be cut off in such a way that the part that will be fixed is sharp-angled.
- Now the blades need to be fixed with screws in two places.
- Sharpen another wooden beam at one end into a cone, and attach the cube with blades to this side using a nail. This propeller can be installed on a pre-made weather vane.
Remember that when installing a weather vane on the roof, you need to ensure that the waterproofing of the latter is not damaged, otherwise leaks cannot be avoided. It is also not recommended to install a weather vane on a ridge or chimney pipe. Incorrect installation can also lead to the device making a lot of noise, scaring away birds and irritating others.