When carrying out soldering work, do you constantly lack available tools that will support parts or highlight hard-to-reach places? This is a fairly familiar situation for many masters. But there is a way out; it’s enough to make your own universal assistant - a “third hand”. Let's look at below how to construct it and what you need to purchase.
Homemade and purchased options
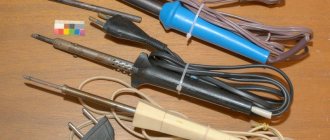
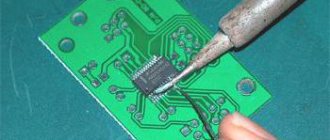
Many soldering specialists face a lack of a third hand. You can hold a soldering iron in one hand, and in the other hand the element that needs to be soldered, but the board itself remains unfixed, which causes certain difficulties when working.
A simple device can solve this problem - a third arm for soldering (it can also be called a tripod or holder). The presence of this device allows you to make the microcircuit absolutely motionless.
3 hand can be made independently from unnecessary things that are stored in the garage or storage room. And here there can be different options - it all depends only on the imagination and specific needs of the master.
In addition, there are many instructions and articles on this topic. It is better to make such a device as a third hand from non-flammable materials, although some consider it quite normal to use wooden and plastic elements.
In any case, the third hand must have a strong, stable base made of metal, a flexible vertically located elongated part that can change orientation in space (this is necessary to fix the clamp in a certain place), as well as the alligator clip itself of a suitable size.
If you don’t want to bother with this yourself, then you can order a board holder for soldering in an online store or on the radio market. Commercially available “third-hand” devices are, for the most part, not expensive, but they are very convenient.
A shop tripod for high-quality soldering can easily withstand high temperatures of hundreds of degrees and allows you to ensure amazing stability of the assembled structure.
In addition, many store accessories may include a backlit magnifying glass (the backlight runs on standard batteries), clamps of different formats, and so on.
The magnifying glass in such holders can be fixed in a convenient position and adjusted both vertically and horizontally. When soldering circuit boards, having a magnifying glass in the “third hand” holder allows you to see the smallest areas and avoid mistakes.
Manufacturing sequence
Installation of the “Third Hand” assistant occurs in the following sequence:
- Alligator clips are attached to the prepared pieces of wire;
- a saw is used to prepare the support on which the structures will be attached;
- Markings are made on the finished base: the points where the clamps need to be installed, the place for the lamp and the battery crown;
- holes for fastening are drilled with a drill;
- use a chisel to make a recess for the battery;
- the wire with the “crocodile hook” is inserted into the prepared holes and fixed with glue;
- other elements are secured in a similar way (battery, wire with socket);
- A heat-shrinkable protective tube is placed on the teeth of the clamps.
The design is ready, all that remains is to try it in operation and evaluate its effectiveness.
Magnifiers, microscopes and glasses for soldering circuit boards
When choosing a tripod with a magnifying glass, you should definitely pay attention to how much magnification it can create.
For some work with SMD boards, a twofold magnification is enough (and such tripods are actually found in large quantities); for other work, much more powerful lenses may be needed.
Indicators such as the number and diameter of eyepieces are also important (and it is not a fact that large-diameter glass is better - lenses that are too bulky can interfere with the soldering process).
Professionals may also be interested in expensive microscopes for soldering microcircuits. They are used to detect tiny cracks in motherboards.
Current microscopes for SMD boards are quite compact, portable and light in weight. They have a small eyepiece, which is located at a considerable distance from the soldering area.
As a rule, in addition to everything, they are equipped with manual focus, a stepless zoom system, backlight and other interesting functions - this is very advanced equipment compared to a conventional third-hand tripod.
The webcam and USB cable included with some microscopes greatly facilitates working with microcircuits. With their help, videos and photographs are taken and then transferred directly to the computer.
With the help of special software, such a microscope can also be used to measure distances, perimeters, diameters and angles of objects with micrometer accuracy.
It should also be said about such a device as soldering glasses with a magnification of up to 20 times. Glasses (usually binocular type) should be placed on the head as usual.
They are similar to watch repair glasses, but they are not the same thing. In watch repair glasses, in order to see a certain area, you sometimes have to bend very low to the board - this is not a very good solution if there is a hot soldering iron in this area.
Practice shows that not many soldering glasses are used by soldering glasses; usually preference is given to lenses and microscopes.
What you need
To make the device you need to acquire the following materials:
- rigid and thick metal wire - two pieces, approximately 20-25 cm each (any length at your discretion);
- single-core wire for lighting;
- for the base - a square made of material that can ensure the stability of the structure (board, plywood, MDF, laminate, etc.);
- “super glue”, one small tube will be enough (can be replaced with hot glue);
- connector for batteries. To provide power, you can use a Krona battery;
- base and weak lamp;
- two crocodile clips;
- heat-shrinkable tubes that will be placed on the sharp teeth of the clamps to prevent deformation of parts during the soldering process.
In addition to the required consumables, you will need the following tools:
- drill, with a thin drill bit;
- small wood saw;
- chisel;
- pliers.
Having prepared the materials, you can begin the assembly process.
Other possible adaptations
The kit of a good radio amateur and soldering master may include not only a third hand, lenses and microscopes, but also other devices and tools:
- special thermal tweezers (it is needed for retracting and maintaining contacts, heating elements are installed at its ends and this is how it differs from ordinary tweezers);
- miniature pliers or wire cutters (these devices remove insulation and defective wires);
- needle file (necessary for cleaning the soldering iron tip);
- technical awl and sharp knife.
Of course, this list is far from complete; to solve specific problems in the field of soldering microcircuits, additional devices may well be needed. More and more devices are appearing that allow you to test and repair electronic devices.
Instructions:
Installation: 1. After the package is opened, loosen and remove the fastening nut;
2. Insert the head of soldering tip with conducting ring into the soldering iron seat; 3. Insert and tighten the nut; tighten the soldered tip; 4. Rotate the thermal control turntable and set it to proper temperature (increase the temperature it is rotated clockwise; reduce the temperature it is rotated anticlockwise); 1.5 Power on the well-prepared power adapter (DC12-24V); insert the DC plug to DC seat of the control handle of the soldering iron. Change Solder Tip:
1. Disconnect SH72 power supply. 2. Loosen and remove the fitting nut. 3. Pull out the original solder tip and insert another solder tip again. 4. Insert and tighten the fitting nut again.
Okay, guts - that's why you're all here
Remove the adjustment knob:
It turns out that this is what the handle did not return to its place - the hole was displaced.
Then I’ll finish it with a drill. It's a bit empty inside. But there is room for a light guide.
I immediately try on the T12 tip. Due to the fact that on the T12 the thrust skirt is in the wrong place, the tip can be pushed further and at least damage the microcircuit.
Let's sum it up
Pros: + price + power + standard power connector + compact size + ability to install tips from your T12
Cons: - optional need to refine small jambs
Taking into account mobile use, they could provide some kind of case. On the other hand, there are cases for hard drives in which this device will fit perfectly along with charging with solder, etc...
Well, then decide for yourself. To be honest, I would have bought it even if it wasn’t for item 18, but since they offered it, why not? Even despite step 18, I really liked the soldering iron.
PS While I was writing the review, I had to work at a site without an outlet nearby. And the Makita-style screwdriver battery was nearby. Actually, the idea came to make an adapter for it to power a soldering iron, if anyone shares a proven model, I will be glad
P.P.S.
From scrap material
By using materials that are available in the house, you can save the costs required to make the stand.
To build a convenient structure you will need to prepare:
- coarse sandpaper;
- hacksaw for metal;
- Phillips screwdriver (you can use a screwdriver);
- thin screwdriver;
- iron plate;
- a spring that can be removed from the pen;
- a tin covering the board (can be removed from a broken receiver);
- metal retainer from the antenna;
- self-tapping screws 20 mm - 4 pcs.;
- bolts - 4 pcs.;
- Thin-sheet chipboard (up to 18 mm).
Also during the work, in addition to improvised means, you will need pliers and 2 rubber stoppers from chemical test tubes.
For reference! On Avito or Yula you can find craftsmen who make interesting and unusual stands for soldering irons. Such products look almost like works of art.
Step by step guide:
- The cut chipboard sheet is sanded, giving it a rounded shape.
- Rubber plugs are sawn straight. To achieve uniform thickness, you should use sandpaper.
- 1 self-tapping screw is screwed into each rubber leg.
- Holes are made in the structure and legs with screws are screwed in.
- The iron plate is bent, giving the outline of a hook.
- Using a screwdriver, holes are made for a pair of bolts intended to secure the hook.
- The final stage of making a stand from scrap material will be tightening the bolts and checking how well the hook holds.
Rework
So, the plan of action is clear: 1. “Break” the hole with a drill 2. Make a light guide 3. Make a stop for the tip
We make the light guide from a piece of filament for the printer and drill a hole for it on the assembled body. We print the stop on the printer:
(all links at the end of the review)
Glue it in place:
check:
We put the cover on and check the light guide:
excellent visibility from all sides!
So, well, we have a fishing rod? The tip sticks out from the body by as much as 70mm, and with the bushing it’s a full 80mm! It’s a mess, but it was solved by someone Dialog from thingiverse, and something tells me that this is our colleague from Muska. We print from PET-G:
The left bushing has already been carefully painted by my brother with “liquid rubber”, also known as soft-touch. For which I thank him very much. original tip assembled:
T12:
Now it is much more convenient to use. And no, nothing melts when used.
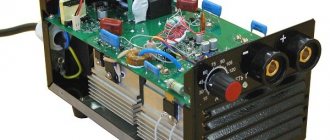
Characteristics:
Power: 65W Power interface: 5.5 x 2.5 Working voltage: DC12-24V, (inner positive and outside negative) Work current: >=1.5A Temperature range: 220-400℃ Type: SH-B2/SH-BC2/SH-C4 /SH-D24/SH-I/SH-K/SH-Ku Size of the control handle: 110 x 16 x 15mm Tip size: 115 x 5.5mm Weight: 28g Package size: 165 x 85 x 22mm Package weight: 60g
For For those who have not yet understood, the main feature of this soldering iron is its low cost and connection method. DC Jack 5.5 x 2.5 is the most universal jack on laptop chargers. And due to their popularity, the price for them is not high. For those whose most popular is Type-C, there are adapters:
For modelers - XT60: