Device, characteristics and properties
A traditional soldering iron looks like a metal rod with a heating element hidden inside, on one side of which there is a handle for holding, and on the other side there is a heat-transferring metal end - the tip.
A power wire is connected to the handle; at the point where it meets the rod there is often a thrust ring in the form of an extension of the diameter of the handle, which prevents the hand from slipping towards the heated elements.
Some models have a thermostat that allows you to set the desired tip heating temperature.
Lever
The soldering iron handle can be straight or curved (pistol type).
For electric models, the power wire is connected to its end part.
The purpose of the handle is to ensure comfortable holding of the tool during operation, to prevent heat transfer from the heating element, as well as the hand slipping onto the heated rod.
In addition, technically the handle acts as the body of the soldering iron itself.
During work, the rod versions of the tool are held in the same way as an ordinary pencil while drawing.
Cable and plug
The power cord of an electric soldering iron is made of soft, durable wire with reliable insulation that protects it from accidental mechanical damage and contact with heated elements.
The connection point between the cable and the plug is also made as strong as possible to avoid breakage when tensioned.
As a rule, the fork is produced in one piece, i.e. having a non-demountable design.
The cross-section of the wire cores is selected in accordance with the power of the tool with a margin, which prevents its heating and damage to the insulation.
Types and shape of soldering iron tips
The tip is the working part of the soldering iron.
The shape of its tip determines the convenience of performing a specific job, so it can be very different, for example, in the form of a cone, a needle, with a beveled edge, etc.
The most popular because of their versatility are flat blades made in the form of a screwdriver.
So the soldering part heats up quickly precisely because of the large bevel area, and the solder adheres well to a wide flat surface.
The tip of the sting can have a variety of sizes, again, with the expectation of performing certain tasks.
In this case, the tip itself is a metal rod, which can be either straight or curved at various angles (up to 90 degrees) and other options.
Material
To make soldering iron handles, you need high-quality heat-resistant material that does not conduct heat, and therefore they are made of wood and special plastic.
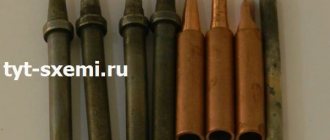
Pure copper is often used in the production of stings.
This soft material can be easily sharpened and given the required shape, and it also has good thermal conductivity.
There are so-called “fireproof” tips, coated with a protective metal, such as nickel, that require careful handling.
Dimensions and weight
To perform normal work, use a soldering iron weighing about 360 g and 200 mm long.
Large parts with high heat output require more powerful tools, which can weigh more than 1 kg.
In general, the length of common models varies between 160 - 240 mm, while they are equipped with a tip 32 - 56 mm long and 0.8 - 12 mm thick.
Heater type
The design of a soldering iron implies the presence of one of the types of heating elements, each of which has its own positive and negative qualities.
The most common:
- Nichrome heater - it is based on a nichrome wire wound in a spiral, which is heated by alternating or direct current. In the simplest models, the spiral is wound around a body with a tip. Soldering irons of this design are durable, shock-resistant, and affordable, but at the same time, their heating takes quite a long time, and the nichrome thread can simply burn out during intensive work.
- Ceramic heater - based on ceramic rods, the heating of which is provided by energized contacts. Among the advantages are the high speed of reaching operating temperature, the possibility of intensive use, and durability. However, such a heater requires the use of only a set of original tips, and has extremely low shock resistance.
In addition to the above heaters, less common types are also used, discussed below.
Power
By power, soldering irons are conventionally divided into:
- Low-power (15 - 40 W). Used for “fine” soldering of radio components.
- Medium power (40 - 100 W) - tinning, soldering of wires and large elements.
- High power (more than 100 W) - soldering and heating of massive parts with increased heat transfer.
Differences from a regular soldering iron
The main differences between a pulse soldering iron and a conventional one are as follows:
- There is no heating element as such. The tip itself heats up due to the strong current passing through it. The tip is included in the circuit of the secondary winding of the transformer.
- Quick heating of the tip (a few seconds).
- Economical (electricity is consumed only during soldering).
- Safety. The soldering iron heats up for a few seconds and cools down just as quickly.
- Ability to adjust power (in some circuits)
Pulse and regular soldering irons
Among the negative differences, it should be noted that such a device is not applicable for soldering microcircuits and other elements that are sensitive to overheating and damage from static charges.
Nichrome soldering irons
The types and design of pulse soldering irons have their differences. In the case of the device inside, they are insignificant. The models themselves differ more. There are quite a few types of soldering irons, which is due to the features of their design, operating principle and purpose. Let's look at the main ones.
Nichrome soldering irons have a spiral of the same name through which electricity passes. It can be constant, as from an electrical network, or variable, such as that which can be obtained from transformer installations.
More expensive models are equipped with a special temperature sensor, which can limit the device’s operating temperature, depending on the user’s preferences. This is done using a good old thermocouple.
The design of such soldering irons may vary slightly, depending on the manufacturer and price category. Cheaper modifications work with a nichrome spiral.
This option is not very economical, so more expensive modifications already use an insulator system to which a nichrome element is attached. This increases useful energy transfer and reduces energy losses. This design is similar to a ceramic tip, which is why buyers are often confused. We will talk about such models a little later.
Advantages and disadvantages.
Advantages of a pulse soldering iron:
- The main advantage of pulse soldering irons is the fast heating of the tip
(5-7 seconds);
- Convenient pistol-shaped shape, which increases the comfort of working with the device;
- Electricity is only consumed during soldering.
Disadvantages of a pulse soldering iron:
- High weight of the device;
- Overheating may occur during soldering for a long time. This may cause the soldering iron parts to melt.
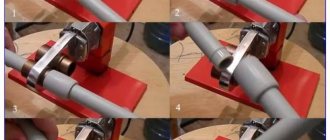
Soldering iron for soldering plastic pipes
When choosing such a tool, you should pay attention to what equipment it is equipped with and whether it has a variety of attachments. Metallized or regular Teflon can be used as a material for these devices.
However, it is more preferable to use metallized.
Selection of required capacities:
- The power value of a professional device ranges from 1-2 kW. For work at home (in case of repairs or when performing landscaping work), the use of such a tool is unnecessary.
- For not too large-scale work, it is worth using devices with a power of 680 W. They are well suited for repairing and installing pipes with a diameter of 16-65 mm.
- To solder plastic pipes with a diameter of 65-90 mm, you should use soldering irons with a power rating of 850 W.
- With a diameter of more than 100 mm, craftsmen need models from 1 kW.
Along with the soldering tool, you should take care of purchasing: a stand, a file, wire cutters, tweezers, a scalpel (stationery knife), and an awl of different sizes.
When choosing a stand for any type of tool, you should approach it as responsibly as possible in order to prevent injuries and ensure fire safety.
Operating principle of the device
The pulse soldering tool has a fairly simple design. The heating element is a U-shaped wire bent from 1 to 3 mm, depending on the degree of work being performed. Direct heating of the tip occurs due to the fact that a current of minimum operating voltage, but of large magnitude, passes through it. This causes the principle of short circuit or so-called spot welding.
A low-power high-frequency step-down transformer and converter built into the housing, which produces electric current with a frequency of 18 to 40 kHz, helps to achieve a similar effect. At the ends of the secondary winding there are current collectors, on which the sting is fixed.
Soldering Features
The process of soldering various IP connections differs significantly from the method of soldering with other types of tools. The tip and solder wire are combined at the junction of the parts. By pressing the trigger, the soldering tip is heated until a drop of molten alloy forms. Solder and soldering iron are removed from the work area.
Additional Information. Lead-tin solder is made in the form of wire of different diameters. For impulse soldering, it is better to choose solder with a diameter of 1-3 mm.
Making a homemade pulse-type electric soldering iron
There are two motivational reasons for making a pulse soldering iron with your own hands:
- low quality of Chinese products flooding our market;
- high cost of soldering irons from such well-known brands as: Blp, Ersa, HS, Intertool, Multisprint, etc.
Making a homemade pulse-type soldering iron is not as difficult as it might seem. As an example, let's look at three options, starting with the simplest.
Instructions for making a simple pulse-type soldering iron.
The figure below shows a circuit of a pulse soldering iron made from a low-power transformer. A power source is connected to the primary winding, a soldering iron tip and an operation indicator lamp are connected to the secondary winding. Simplicity of execution ensures high reliability; such a soldering iron is not afraid of voltage surges.
Scheme of a simple soldering iron
Many domestic soldering iron models have this implementation, for example: Zubr, Sigma and Svetozar. As you can see, everything is very simple, we only need to slightly change a regular power transformer, which can be removed from old electrical equipment. First of all, it is necessary to disassemble the transformer and remove the winding. Try to do this carefully, since the primary winding wire will be useful to us later.
Photo of a disassembled transformer
Reduce the size of the coil (to fit the secondary winding)
Photo of a transformer with a reduced coil
Using a special machine or manually, we wind the primary winding; it should contain 1300 turns (you can use wound wire). We make the secondary winding from one turn of a copper busbar (in our case, 7x3 mm).
One turn of copper busbar
Heat shrink or fiberglass can be used to insulate the secondary winding.
Photo of the secondary winding insulated with fiberglass
After the transformer is assembled, you can begin making the handle. It can be made from any dielectric (in our case, wood was used). The shape is also unimportant, the main thing is that it is comfortable.
Video: DIY pulse soldering iron.
We make a sting from copper wire with a diameter of 2-3 mm and attach it to the ends of the copper bus.
Photo of the attached tip
As a result, we get a pulse soldering iron, the reliability of which is not inferior to products from Epsy, Toolex, Topex, ZD and other well-known manufacturers, however, our model does not have a power regulator.
Image of the finished soldering iron
We list the main materials that we needed to make a soldering iron:
- power transformer;
- copper busbar;
- copper wire for the tip;
- handle material.
As you can see, you can use almost improvised materials; therefore, assembling a pulse-type soldering iron will cost much less than buying ready-made NG, PK-SC, Rexant or RT models, not to mention professional Weller and Stern tools.
However, this implementation has a serious drawback - high power consumption. Therefore, we will consider more elegant solutions to cope with this problem, in particular, making a pulsed soldering iron based on an adapter for halogen lamps or from an energy-saving lamp.
The standard adapter needs to be slightly modified, namely, to add one winding, in the diagram below it is designated 4.
Diagram of a typical adapter
The winding can be made from one or two turns of braid taken from a standard television cable. Since it will be problematic to wind it without disassembling the transformer, we unsolder it.
Photo of a partially disassembled transformer
After adding the winding, the transformer is installed in place, and its ends are soldered to the tip.
Installation in the case
In our case, we used the body and tip from a broken soldering iron from an unknown Chinese manufacturer. As a result, we get a soldering iron with low power consumption. The only drawback of this soldering iron is that you cannot adjust the power, but considering the cost, it is a good alternative to Sting, Sturm and other soldering irons of famous brands.
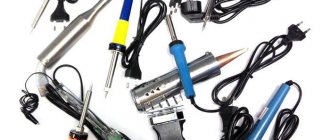
We prepare everything you need
It all starts with preparing the workplace and tools. Remove everything unnecessary from the table and turn on the light. You will need: a soldering iron, solder (tin or lead), flux (rosin), tweezers or pliers and a sponge.
Tin and its alloys are considered low-melting solder, and lead is considered refractory. Although it all depends on the alloy. If you bought a soldering iron with a power of 5 to 40 W, use low-melting solder.
Solder is needed to connect circuit elements together. But you need to not just drip it onto the soldering area, but make sure that the solder gets into the gaps between the contacts. This results in higher conductivity and strength.
Rosin is needed to prevent the oxidation of metals by isolating them from oxygen. Beginners, by the way, can use solder with the addition of rosin.
Turn on the soldering iron and wait a couple of minutes until the tip warms up. Then apply some solder and flux to it. Moisten the sponge with water and wipe the sting. This cleans the soldering iron of old, oxidized solder.
During soldering, you will have to repeat this procedure periodically. Just don’t keep the wet sponge on the tip for too long - the soldering iron will cool down and you’ll have to start over.
Method No. 3 Powerful pulse soldering iron
This soldering iron is not suitable for a beginner, since its creation requires basic knowledge of electrical engineering and skills in reading electrical circuits. The basis for the manufacture of this unit is a switching power supply from halogen lamps. It would be good to get a diagram of this device; in the example under consideration, it looks like this, although it could be any other, depending on the model of the soldering iron block:
Rice. 11: power supply diagram for a pulse soldering iron
The principle of operation of a pulse soldering iron is to short-circuit the secondary winding of transformer T2 to obtain maximum heating of the tip. For this, a homemade winding with one turn and a short of thinner wire under the tip is used.
To make a soldering iron, you will need a block from a halogen lamp, a body (in this case, a gun from a children's toy is used), copper wire with a diameter of 6 mm and a wire with a diameter of 1 mm, ceramic fuses, bolts for fixing the parts of the soldering iron, a button and a power cord with a plug. The tools you will need are pliers, a screwdriver, a tap and a hacksaw.
The manufacturing process of a pulse soldering iron consists of the following steps:
Remove the cover from the power supply from the halogen lamp, being careful not to damage the internal elements, solder points and parts. Rice. 12: remove the cover from the power supply. From the transformer, remove the low-voltage winding, represented by several turns of copper wire. Rice. 13: remove the low-voltage winding Try the board into the prepared case and determine the most advantageous placement method. Please note that the heating element will get very hot, so it is better not to leave any elements under it; it is safer to move them further away by dividing the board. Carefully divide the board into two parts; for the safety of the parts, you can remove them while cutting, if you have at least some kind of soldering iron on hand
Otherwise you will have to be extremely careful. Rice
14: Trim the board Connect the button and power cord to the board. Thread a 6mm thick copper wire into the coil with the high-voltage winding of the transformer and bend it around the coil using pliers, as shown in the figure. Rice. 15: thread the copper wire into the coil onto the leads of the heating element and put on parts of the ceramic fuse jacket, they should protect the plastic body of the soldering iron from high temperatures. Rice. 16: put on pieces of ceramic jacket. Flatten the ends of the heater, and use a tap to make holes for the fixing bolts. Rice. 17: cut the thread Short-circuit the heat sink with copper wire with a diameter of 1 mm. If, when turned on for the first time, this conductor overheats and burns out due to the tip temperature being too high, it will need to be replaced with a thicker one of 1.5 or 2 mm. If the heating is weak, install a thinner wire of 0.5 mm.
You now have one of the most powerful soldering irons operating from a 220V network - it can easily solder parts with powerful legs, connect power circuit contacts, etc.
Rice. 18: ready pulse soldering iron
But this soldering iron cannot be called disposable, since it is assembled purposefully and requires serious effort to create. It is also advisable to have at least some kind of working soldering iron when making it, this will greatly simplify the work of separating the board.
Idea No. 1 – Use a resistor
The first and simplest technology for making an electric soldering iron with your own hands is using a powerful resistor. The device will be designed to operate at voltages from 6 to 24 Volts, which will allow it to be powered from various current sources, and even make a portable version powered by a car battery. In order to make your own instrument, you will need the following materials:
- Soviet wirewound resistor (WWW), covered with ceramic insulation with a resistance of 20 Ohms and a power of 7 Watts. You can choose components with other characteristics, depending on what power you want to make the soldering iron and what voltage you plan to power it from. Here is the simplest formula for calculation: R = U²/P. Where R is resistance measured in Ohms; U is the voltage that is planned to power the soldering iron, in Volts; P is the desired heater power in Watts. This part can be bought at the market or in a radio parts store, or it can also be pulled out of an old Soviet device.
- Textolite or plywood plate for making a comfortable handle. You can also use other non-conductive materials that can withstand high temperatures, such as some types of plastic.
- Two copper rods of different sections. The thicker one is selected strictly according to the internal diameter of the resistor. The quality of heat transfer from the heating element to the tip, and therefore the heating time and ease of operation, will depend on this. The second one should be thinner; it will act as a sting. Using a file, you will need to sharpen it to a shape that is convenient for you. The main types of stings are shown in the picture. I would immediately like to note that the most convenient option is the type of flat screwdriver, since it is convenient to transfer solder to the place of work, and it is possible to both solder massive contacts and perform delicate work.
- One bitten off spring ring (will serve as a retainer), a screw and a washer. You can see all the components in the photo below.
To make your own soldering iron from a resistor at home, you must complete the following steps:
- You need to drill a hole in the end of a thick copper rod and drive the thread under the screw using a tap. It is also necessary to cut a groove for the retainer, which in our case is the spring ring. This can be done using a triangular file or a hacksaw for metal.
- From the second end, drill a hole with a diameter similar to that of a thin rod, which will act as the tip of a mini soldering iron.
- All elements of the rod must be assembled into one whole, as shown in the photo.
- The resistor is prepared for attaching the soldering iron tip, which must be inserted and secured at the back with a screw and washer.
- From a textolite or plywood plate you need to make a comfortable handle with your own hands with a seat for a resistor and wire. To do this, use a jigsaw to cut out two identical halves of the handle and make holes and recesses for screws and nuts.
- A power cord must be connected to the heater terminals. It must be screwed to ensure reliable contact.
- The finished homemade soldering iron is twisted and tested.
Please note that with such a portable gun you can easily solder microcircuits and even make a charger for a car battery with your own hands. It can work not only from a power supply, but also from a battery
We came across many reviews on the forums where this homemade version was connected from a 12-volt cigarette lighter, it’s also very convenient!
Please note that when first turned on, all soldering irons may smoke and stink for a while. This is normal for any model, as some elements of the paintwork fade
This will stop later.
Current sources for powering pulsed soldering irons
Before you start making your own soldering iron, you should, based on the available materials, decide on the type of source to choose.
Traditionally, a pulse soldering iron used a powerful step-down transformer as a power source and was called that only because of its short-term operating mode.
This device is simple in design, but has a large weight and dimensions.
Power supply
Switching power supplies that became available not so long ago are much more complex. They first rectify the low-frequency mains voltage coming to their input, then convert it into high-frequency (20-40 kilohertz) and then apply it to the primary winding of the transformer. High-frequency transformers are several times smaller in weight and size than low-frequency transformers, so the entire switching power supply, despite its complex design, takes up space several times less than one low-frequency transformer.
To summarize, we can say that transformer sources are simple and reliable, but heavy and bulky.
Pulse ones are much more complex in design, but they save weight and dimensions.
Price overview
When compiling the table, we considered retail prices for the relatively inexpensive Weller 8100 UC soldering iron; the cost of models from unknown Chinese manufacturers was not taken into account, as was the delivery price.
| City | Cost, USD | City | Cost, USD |
| Dnepropetrovsk | from 24.8 | St. Petersburg | from 24 |
| Donetsk | from 24.8 | Minsk | from 26 |
| Krasnodar | from 25.4 | Moscow | from 24 |
As can be seen from the table, the price of this electric pulse soldering iron in different cities of Russia and the CIS countries does not vary much; this result is explained by the large number of stores selling online.
The best soldering iron for radio amateurs
The best option for beginners is T12. This is more of a soldering station than a standalone soldering iron. And yet, he is many times better than all of the above representatives.
Its main advantage is the design of the tip. More precisely, these are not stings, but cartridges. Why is that? The fact is that the T12 tip is a heater, a thermocouple and a tip, they are all collected together in one housing. And thanks to this, heating and temperature maintenance are much better than other soldering irons.
But on the other hand, such tips are much more expensive than the same Hakko 936. 1 T12 tip can cost as much as 8 Hakko 936 tips.
And the T12 has a fairly large set of tips. There are various designs and shapes that help make soldering easier. They are produced by different manufacturers, so the price tag may vary.
You can also make such a station completely from scratch with your own hands.
Of course, the T12 is not a competitor to the JBC soldering iron, but for the money, it is the best solution of all those presented.
Post Views: 108
Remaking an electronic transformer
The switching power supply for the soldering iron is taken “as is” and undergoes minimal modifications. Most often, a switching power supply is used for halogen lamps with a voltage of 12 volts and a power of 60 watts, but any with similar parameters will do.
Since modern power supplies use non-separable toroidal transformers wound on a ferrite ring and firmly fixed to the board, the old secondary winding is not removed, but simply turned off.
A new secondary winding is made from just one turn of a large-section copper busbar, carefully inserting it into the central hole of the output transformer.
If the wire or busbar found at hand has an insufficient cross-section, then two secondary windings should be made from one turn, connecting them to the current conductors in parallel.
In general, the process of converting an electronic transformer into a pulse soldering iron with your own hands is simpler than in the case of a low-frequency transformer.
Soldering techniques with a soldering iron
What is needed for soldering? When working with metals, it is necessary to use consumables: flux or rosin, which results in a strong, permanent connection.
Important! Additional compounds are needed to ensure high adhesion of solder to parts. Soldered parts
Soldered parts
Rosin
Rosin is a glass-like material with a softening point between 55-70℃. For its production, coniferous tree resin is used. The regulations are prescribed in GOSTs 19113-84 and 14201-83, which state that the product dissolves patina. The working temperature range for soldering household appliances is 100–130℃.
Rosin is used in 2 cases:
- Preparing the tip for work - cleaning it, heating it, coating it with a molten wax component, and then with tin. The parts are processed in a similar way, distributing the solder.
- Working with parts that do not require preparation. In this case, tinning of the contact surface is performed; for this purpose, a hollow rod made of an alloy of lead and tin is used, inside of which there is rosin.
Rosin
Flux
Flux goes on sale in a liquid state, or in the form of a gel, paste, or powder, which is explained by the different composition of the material. So, the former are used to work with microcircuits, and the latter - with copper pipes. All materials can be divided into three groups:
- Neutral, without acids in the composition and with minimal conductive ability.
- Active - with hydrochloric acid in the chemical composition.
- Protective – to prevent damage to contacts and rust.
Important! Reactive group flux cannot be used as an insulating material due to its low electrical resistance. Neutral materials include powdered rosin, which is diluted in industrial alcohol, glycerin or turpentine.
This tool is used to work with microcircuits and radio equipment, copper and alloys based on it. The presence of a thin film of oxides is acceptable
Neutral materials include powdered rosin, which is diluted in industrial alcohol, glycerin or turpentine. This tool is used to work with microcircuits and radio equipment, copper and alloys based on it. The presence of a thin film of oxides is acceptable.
Flux
The other two components may contain rosin in combination with organic components. Such compositions are relevant for soldering copper, aluminum, nickel, silver and steel. For complex work, there are compounds with zinc chloride additives, and they serve to protect the metal from corrosion.
Which soldering iron to choose for soldering wires, microcircuits and radio components
Soldering iron for microcircuits: which one should beginners and experts in the field of radio electronics choose? First of all, it is worth considering that high temperatures can cause the board to burn out.
Experts recommend giving preference to models whose power does not exceed 10 W. With them it will be easy and convenient to solder wires, microcircuits and radio components. The device must be equipped with a built-in thermostat.
The nichrome device is not sensitive to mechanical damage
Soldering iron based on an energy-saving lamp
Home craftsmen have developed another scheme for creating a pulsed soldering iron - from an energy-saving lamp. The lamp itself is not included in the design; its components will be required.
Scheme for assembling a soldering iron based on an energy-saving lamp
List of required components and materials:
- Converter (or ballast) from a fluorescent lamp.
- Transformer from 220 volts to any low voltage.
- Copper wire 2-3 millimeters thick.
- Fasteners
- Wires.
- Power cord with plug.
You should not interfere with the ballast circuit from a fluorescent lamp; it will work “as is”. The stability of the device and its safety is ensured by means of an electronic circuit - a thermistor will protect against overheating, and a fuse will protect against short circuits.
The primary winding of the working transformer is connected to the output contacts of the ballast
The working transformer should be wound on any available ferrite ring. The primary winding contains 10-120 turns of wire 0.5 mm thick.
The secondary one is one turn of thick copper wire with a cross-section of 3-3.5 mm. 2 A sting made of a V-shaped piece of copper wire with a diameter of 1.5-2 mm is attached to it on bolt or collet clamps.
The handle and body are made from any available material.
If you find an error, please select a piece of text and press Ctrl+Enter.
Making a pulse soldering iron with your own hands is not difficult for a person versed in electronics. A soldering iron is the main tool of any craftsman who repairs and creates electronic equipment. A standard soldering iron is equipped with a heating element, which consists of wire made of nichrome. The heat generated during the heating process is transferred to the copper tip. A soldering iron can be easily made at home. One of the disadvantages of this design is the time required to heat the soldering iron tip. A home-made pulse soldering iron does not have this drawback. A homemade tool with a pulsed operating principle heats up to the desired temperature very quickly, in fact within five seconds or even faster.
The pulse soldering iron is used for assembling elements and assemblies of electrical products.
Most often, the tip of a tool that has a pulse operating principle is made of copper wire with a diameter of 2 mm. A pulse soldering iron is very convenient when soldering small parts with frequent breaks during work and in cases where urgent work is being done.
Operating principle
The device is based on the simple physical principle of heating a conductor when passing a strong electric current through it.
When you turn on the device by pressing the button, the input circuit of the power supply is closed, the high voltage is converted by the transformer into low voltage on the secondary winding, and a current arises in the output circuit, which quickly heats the tip. When the button is released, the circuit opens, the current stops flowing and heating stops.
The current strength in the operating circuit reaches 25-50 amperes at a low voltage of about 2 volts. The secondary winding of the transformer must be wound with wire and must have a cross-section several times larger than the cross-section of the tip wire. The same applies to the conductive busbars connecting the ends of the tip to the secondary winding. This will prevent them from overheating and wasting energy to heat them.
Instead of a transformer, switching power supplies have recently begun to be used more and more widely. They make it possible to reduce the weight and dimensions of the unit several times with the same performance.
DIY soldering iron: simple assembly diagrams
Before making a soldering iron with your own hands, you should determine what exactly it will be used for and what materials are available at home.
“Moment” from a house-saving lamp
Components of the device:
- Converter from an energy-saving lamp (power 40 W);
- Transformer;
- Copper wire;
- Frame.
The characteristics of the converter are suitable for a medium-power soldering iron. The safety of the device is enhanced by a standard fuse and overheating control on the thermistor. The circuit is very compact and can be placed in any housing.
The transformer is made independently. You can use a ferrite ring from a broken electrical transformer. The primary winding must be wound from 0.5 mm wire, the number of turns is 100-120. And the power one should be made of wire with a cross-section of 3 to 3.5 square meters. mm. You need to make one turn. We attach a tip made of nichrome or copper wire (1.5 - 2 mm) to it. The thickness of the last winding should be greater than the thickness of the tip. Next, you need to come up with a body for the device, make a switch, and the device is ready.
From a Chinese transformer
For manufacturing, you need either a working twelve-volt power supply, or one with a burnt-out secondary winding. Any Chinese device will do just fine.
It is necessary to remove the circuit from the case and check the serviceability of the parts. We do not touch the converter, since we only need to change the appearance of the transformer. Next, we remove the secondary winding and make a new one from copper wire (the cross-section should be 1.5-3 sq. mm). If the cross-section is small, fold the wire in half
What is important is the overall cross section, which will be at least three squares. The winding is equal to one incomplete turn
Then, carefully thread it into the transformer body, first bending it like a hairpin. The transformer is soldered to the control board, and the power winding must be fixed with dielectric glue (for example, cold welding)
Next, we insert the circuit into the case.
A wooden handle from a regular soldering iron can be used as a handle. Other options are possible, given the compactness of the device as a whole. We insert a non-fixed switch into the handle. The operation of a pulsed device is based on a short circuit of the secondary winding, as a result of which prolonged heating can lead to destruction of the transformer and a fire. For this reason, a fixed starter is not permitted. Next, you need to assemble the device completely and install the clamps for the tip (for example, inserts from a terminal box for wiring). This device is very compact and easy to use for small soldering jobs. Thanks to the replaceable tip, you can change its appearance.
These options are only a small fraction among the variety of schemes for manufacturing pulsed devices.
It is important to understand the principle of operation:
- A device that converts electricity into high-frequency voltage;
- Step-down transformer, designed only for high frequency;
- The secondary winding, which forms a closed ring with a loop-shaped tip.
A pulse soldering iron is a reliable and economical device, and if you do it yourself, it’s also practically free. And in most cases, even a novice electrician can assemble a homemade instrument without having professional knowledge of working with radio equipment.
The process of converting a step-down transformer
When choosing a step-down transformer, you should remember that its power should be from 50 to 150 watts. A smaller one will lead to overheating and failure of the device, a larger one will lead to unnecessary weight and bulkiness.
Transformer-based pulse soldering iron
The primary winding does not need to be redone, but the secondary winding should be removed by disassembling the plates. An exact calculation of the secondary winding is not required; it is more important to ensure the maximum cross-section of its wire or bus. Typically, two to six turns are wound. The cross-section should be in the range from 6 to 10 mm2.
Important! The turns of the secondary winding should not touch each other and the transformer core.
If the secondary winding is made of a copper busbar, its ends can be left longer and used as current conductors by attaching the tip directly to them. The absence of unnecessary connections will increase the reliability of operation and improve the temperature regime of the device.
After finishing winding and installation, be sure to check the winding with a tester for absence of short circuit
Pulse soldering iron from a step-down transformer