It will be difficult for a person who knows nothing about the hardware range to understand the definition of their varieties. Especially if there is no proper experience in measuring the correct dimensions of fasteners. If we start with something simple, then for a basic understanding we need measurements of thickness, length and diameter. However, when faced with seemingly ordinary bolts and nuts, many do not know how to correctly determine the size.
The parameters by which you can find out basic information about the product are length, thickness, diameter, and maybe also height.
It is customary to write the first letter of the name of an individual parameter using drawing symbols. It can be in large or small font. We get the following:
- “D” is from the word “diameter” and corresponds to diameter;
- "L" is from the word "lenght" which means length;
- The "S" for "stoutness" defines thickness;
- The "H" for "high" measures height when possible.
When measuring a particular piece of hardware, there are subtleties that should be followed in order to determine the correct size.
Proper Bolt Measurement
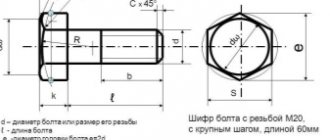
If the bolt being measured has a metric thread type, then the designation MDxPxL is given in the information about it.
This abbreviation means the following:
- M - product with metric thread;
- D is the value of the hardware diameter;
- P - information regarding the thread pitch. There may be small, large and especially small. If the step is large, then the value is not written;
- L is the length of the product.
The readings that were measured are recorded in millimeters.
In order to accurately determine the size of bolts and their type, you need to understand their varieties. For this, there are strict GOST standards from Soviet times, and by European standards ISO. There may be German standards marked DIN. Only when the type is known can measurements begin.
Special tools are required to take measurements. They can be a caliper, a micrometer or a template ruler. To control the measurement thread, it is necessary to use “PR-NE” gauges. The literal transcript reads as “pass-no-pass.” Where PR is screwed on effortlessly, whereas NOT is not screwed on at all.
It is better to measure the length with a ruler or a more precise tool - a caliper. Each threaded hardware has its own specific thread pitch. And to find out there is a tool called a pedometer. If such a tool is not at hand, then you can make interturn measurements with a caliper.
This measurement method will more accurately determine the pitch if the hardware is large in size. Unfortunately, on small items there may be errors in the correct measurements. To avoid this, you should measure several turns. For example, if you measure 10 turns and divide the result by 10, you get the required step.
When the hardware is remeasured, the corresponding value can be tracked in a special table. If there is no such value, you may be holding hardware in inch increments. This row also has its own table. And to correctly determine the size you should resort to it.
The bolt itself is not as simple as it might seem. The scope of application of bolts is unusually wide, which indicates a variety of geometric shapes and sizes for various tasks. The bolt head can be of the following types:
- The head protrudes above the surface;
- The head is hidden flush in the material.
When measuring the length of hardware with a protruding head, it is not taken into account. The following GOST standards will help determine the type of hardware by its head:
- Hardware with a protruding hexagonal head - GOST 7805-70, 7798-70, 15589-70, 10602-94;
- For some cases, fastening requires reduced hex heads according to GOST standards 7808-70, 7796-70, 15591-70;
- If the part will be subject to any type of load, then it is necessary to use high-strength hardware in accordance with GOST 22353-77;
- To fasten large parts, hardware with six edges of increased size GOST R 52644-2006 is used;
- A bolt with a hex head, which has a screw direction GOST 7811-70, 7795-70, 15590-70;
- If accuracy is required, then a reduced bolt head is used for fastening in the holes after passing the GOST 7817-80 reamer;
- For bolts with an enlarged head, there is GOST 7801-81;
- To lift or fasten parts in a suspended state, use an eye bolt with a loop according to the domestic standard GOST 4751-73;
- Heads in the form of a semicircle of large sizes with a square head GOST 7802-81 are also used.
The countersunk bolt is measured together with the threaded part according to the following standards:
- Hardware for tires GOST 7787-81;
- Head for a secret entry with a mustache according to GOST 7785-81 standard;
- The headrest is square, and the inner part under the secret entrance can be different according to GOST 7786-81.
To find out what standard the bolt is, you need to know what types of heads there are. If the head has six sides, you can use a wrench. There are types when the head is cylindrical for secret places, then the gradation is determined by the diameter.
Working principle of bolted connection
As a rule, a bolt is never installed alone - unless for a purely constructive purpose, without the task of withstanding a significant load. This solution is used if the goal is simply to fix one part relative to the other, to eliminate rotation, slipping, vibration, or to supplement the main fastening system.
In 99% of cases, bolted connections are presented in a group - from 4 to 36 products.
They are placed around a circle, in the corners of a symmetrical regular polygon (square, hexagon) or along a complex perimeter (along the line where the edges of the parts meet). The latter option is inherent in assemblies of housing parts - gearboxes, pumps, compressor equipment, etc.
There are three basic options for bolted connections:
- durable - aimed at resisting external loads;
- tight - designed to maintain the specified sealed position of the unit;
- tight-strong - when it is necessary to ensure both resistance to loads and complete tightness.
Most often you can encounter the third complex category, when tightening the bolts at the interface of the parts guarantees complete immobility of the product, even when the applied forces will “loose” and “pull” the elements in all directions. The most typical example of such an assembly is flanges with an intermediate seal.
During operation, the bolt experiences stress itself and has the same effect on the tensioned parts on which it is installed. When tightening, the total load is distributed in the form of two cones with the center relative to the axis of the bolt. This phenomenon is called a "pressure cone". Both cones demonstrate an increase in effective loads from the place where the bolt head or nut contacts the end of the part around the hole, to the plane of the joint of both parts. When exposed to external forces, all major micro- and macro-deformations also occur within the “pressure cone”.
During operation, the fastener simultaneously experiences:
- tightening force;
- bolt elongation when tightening;
- force that occurs when an axial force is applied to a node;
- bolt elongation when exposed to axial force;
- response resistance of parts that are deformed when tightened. At this moment, the supporting ends come closer together, and the degree of their movement (flattening) will depend on the compliance of the material.
If we simplify the entire diagram, then some of the loads are directed directly to the bolt, and some are directed to the compressed parts. But in total they are all converted into tension, which is experienced by the bolt, which is already partially stretched during installation. Add to this the possible effect of heating and the picture becomes even more extreme.
However, nothing simpler and more reliable than bolted connections has yet been invented. And the fasteners withstand any test with honor. The main thing is when thinking about the question of how to select a bolt, look for a solution based on its operating conditions, and not just “by eye.”
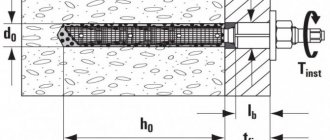
In a through hole with a nut
The classic bolt installation scheme is to pass it through two coaxial through holes and tighten it with a nut on the reverse side. There is an old engineering joke that a bolt "hangs" in a hole. In part, this comparison illustrates well the actual position of the fastener in the assembly.
When tightened, the rod bends slightly within the gap between its surface and the wall of the hole. Due to this bending, the bolt compensates for both the skew of the parts and the non-parallelism of their supporting ends, as well as their compliance (compression).
There are several designs of bolts for through holes:
- normal - with the same amount of gap between the rod and the walls of the hole along the entire length of the connection (usually 0.5..1 mm);
- with a reduced diameter of the smooth part of the bolt (with thinning);
- with thinning and two centering journals, which align the position of the bolt in the hole according to the clearance fit;
- with thinning, two necks and a centering belt in the middle;
- with an extremely reduced diameter of the smooth part (self-aligning).
The first type is the most common, otherwise it is called “hard”. This is a standard GOST fastener and is used for most assemblies, although it exhibits its properties best in short assemblies.
The remaining options are called “elastic” bolts. Reducing the diameter by 20..30% of the original opens up more room for bending during installation and tightening. Such products are optimal when working with shock loads.
For quite a long time, there was an opinion that when designing fastening joints, a minimum gap should be provided between the surface of the bolt and the walls of the hole in order to prevent bending of the rod. This is due to the fact that additional bending stresses negatively affect the overall load characteristics of the fastener. Later, this statement was partially refuted, but “elastic” type bolts still have not found widespread use - contrary to scientific evidence, they are much less trusted.
When installing, first place the bolt in the hole. A nut is attached to the output threaded end by hand until it comes into contact with the end of the part. Then the bolt is secured against turning by placing the key on the head and resting it on a convenient plane, and the nut is already tightened with a certain force. Most often, the operation is performed using ordinary metalwork tools, and the worker controls the tightening force according to his own feelings. In critical mechanisms, the connection is tightened with a torque wrench, controlling the preliminary deformation of the bolt.
In a blind hole
Infrequently, but still sometimes, bolts are installed in assemblies according to the principle of a screw - screwing the product into the thread on the mating part. This option is used when placing the nut on the reverse side is structurally impossible or undesirable. This scheme should be avoided if possible.
Bolts in blind holes operate under much more stressed conditions than with a “traditional” placement. This is due to two phenomena:
- If transverse forces arise when the assembly is loaded, they wedge the threads and create local crushing stresses. Over time, the connection is guaranteed to weaken and self-unwinding may occur;
- in the area where the threaded end of the bolt enters the hole and begins to “pull” it towards itself by the threads, a zone of stress concentration is formed. Under heavy loads or frequent assembly and disassembly, this place will crumble. And if the nut can be easily replaced, then correcting a piece of the part is much more difficult, and restoring the original strength in that zone is virtually impossible.
A bolt installed according to the screw principle feels worst under alternating load cycles. It “wobbles” in the hole from side to side.
This installation scheme can only be used in non-critical structures or by taking additional measures to relieve the fasteners from the slightest displacement in the transverse direction. To do this, keys are placed in the assemblies, smooth pins and pins are hammered in, and smooth precise belts are machined on the bolts to remove the gap in the hole of the first part.
Definition of a bolt with inch graduations
When familiarizing yourself with documents and standards, you may come across the abbreviation D”-NQQQxL, which has the following meanings:
- D” – indicates diameter and can be represented as an integer. In the case of different sizes, fractions and numbers may be used in the case of small sizes;
- N - designation of the number of turns in one inch;
- QQQ is a direct designation for an inch thread, and can also be found with four letters;
- L - defines the length, measured in inches.
When it becomes necessary to find out the thread diameter on an inch bolt, then the resulting measurements must be divided by 25.4 mm. The result will be an inch value that will need to be found in a suitable UNC table.
| Nominal thread diameter d=d1 | Thread pitch P | S | e | k | d3 | l-l1 | |
| large | small | ||||||
| 6 | 1 | 10 | 10,9 | 4,0 | 1,6 | 4,0 | |
| 8 | 1,25 | 1 | 13 | 14,2 | 5,3 | 2,0 | 4,0 |
| 10 | 1,5 | 1,25 | 16 | 17,6 | 6,4 | 2,5 | 4,0 |
| 12 | 1,75 | 1,25 | 18 | 19,9 | 7,5 | 3,2 | 5,0 |
| (14) | 2 | 1,5 | 21 | 22,8 | 8,8 | 3,2 | 5,0 |
| 16 | 2 | 1,5 | 24 | 26,2 | 10,0 | 4,0 | 6,0 |
| (18) | 2,5 | 1,5 | 27 | 29,6 | 12,0 | 4,0 | 6,0 |
| 20 | 2,5 | 1,5 | 30 | 33,0 | 12,5 | 4,0 | 6,0 |
| (22) | 2,5 | 1,5 | 34 | 37,3 | 14,0 | 5,0 | 8,0 |
| 24 | 3 | 2 | 36 | 39,6 | 15,0 | 5,0 | 8,0 |
| (27) | 3 | 2 | 41 | 45,2 | 17,0 | 5,0 | 8,0 |
| 30… | 3,5 | 2 | 46 | 50,9 | 18,7 | 6,3 | 10,0 |
Thread pitch is measured in the same way as metric bolts. But in this case, turns are measured at an inch distance. You can simplify the task if you have a thread gauge with inch values.
The length of the product is the same, but calculated in a different form. The main thing is not to forget that to correctly calculate the size, the measurement must be divided by 25.4 mm. Based on the table, you can easily find the appropriate value.
What do the strength class numbers mean?
The first number marks the tensile strength (temporary resistance). To find out how much tension the bolt material can withstand before breaking, you need to multiply the first number in the marking by 100. If this is, for example, a bolt with strength class 6.8, then the tensile strength for its material is 6 * 100 = 600 N/mm2 (newton per square millimeter section). Although most often the tensile strength for different materials or structural elements is measured not in this value, but in megapascals (MPa). For example, in specialized literature you can often find mention that when installing critical structures, high-strength bolts with a tensile strength of 800 MPa and higher are used (strength classes 8.8 and following)
The second digit in the strength class indicates the yield strength. This is the level of tensile strength (tensile strength) at which irreversible plastic deformation of the material begins. It is expressed as a percentage. To determine the yield strength, you need to multiply the second digit in the marking by 10. For the same bolt with strength class 6.8, the yield strength is 8 * 10 = 80% of the ultimate strength or 600 * 80% = 480 MPa. Simply put, at a tensile load of 480 MPa, a class 6.8 bolt already begins to deform and attention must be paid to this when designing and installing structures.
In addition, by the strength class of a bolt, you can determine the grade of steel from which it is made, and even the manufacturing technology. Thus, simple bolts of classes 4.8 or 5.8 are made from St. 10, but high-strength bolts of class 8.8 are made from St. 35. Bolts of class 5.6 are turned on a lathe, classes 6.6 and 6.8 are stamped, and 8.8 are also hardened.
The screw and everything about its sizes
Like bolts, a screw has a metric thread and is designated by the following abbreviation MDxPxL. The explanation is similar to that for standard threads:
- M - means that the thread is metric;
- D - shows the diameter of the product;
- P - thread type;
- L is the total length of the hardware.
Measurements should be made only after determining the exact GOST to which the product belongs. Please note that there may be several varieties of the product. To determine the thread diameter, you should use a caliper to get an accurate value.
All mounting screws have 4 different groups:
- With a protruding upper head;
- With half recessed head;
- The head is completely recessed;
- The head on the screw is missing.
According to existing Soviet standards, a suitable fastening option is determined:
- The fastening element with a cylindrical upper head for an internal hex key complies with GOST 11738-84;
- If the products are made in the form of a semicircular element, GOST 17473-80 applies to them;
- When the head is half hidden in the material - this is GOST 17474-80;
- In the case when the fastening head is completely hidden, this is GOST 17475-80;
- If the hardware is equipped with a straight slot, several standards GOST 1476-93, 1477-93, 1478-93, 1479-93 comply with it;
- If there is a hexagon in the hardware, then the fastener complies with GOST 8878-93, 11074-93, 11075-93;
- Fasteners with a square head, which are rarely in demand, are made according to the following standards GOST 1482-84, 1485-84.
Marking
Let's say we saw this code:
Nut M10-6N.5 (S18) GOST 5915-70.
Here M10 is the thread diameter in mm, 6H is the tolerance range, 5 is the strength class, S18 is the spanner size, that is, the external distance between parallel edges.
We told you how to select a nut for metric, inch and hex keys. They gave advice on unscrewing the cut fasteners and provided a table with weights.
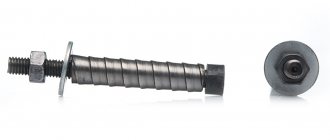
How to correctly determine the size of a hairpin
The main thread used on studs is metric. It corresponds to the following designation in the form MDxPxL. There is nothing new here, the measurements are the same as in the previous versions:
M - hardware with metric thread;
D—product diameter;
P is the pitch, measured in millimeters;
L is the length of the part that will be used in the work.
Taking the corresponding GOST standard as a guide, measurements are made according to the type of stud. To understand for what purpose the hardware will be used, they are divided into 2 groups:
- The design of hardware that will be screwed into smooth holes;
- End with fastener element for screwing into hole.
The first type uses the entire length of the thread for fastening. Whereas in the second option the thread is cut only at the end.
The production of hairpins complies with the following standards:
- Threaded rods DIN 975;
- Dimensional option DIN 976-1;
- Used when screwing in smooth areas GOST 22042-76, 22043-76;
- If it is necessary to fasten the flanges, then it is worth using hardware of the following standard - GOST 9066-75.
There may also be other varieties that are subject to separate GOST standards.
What is important to know?
When designing and installing prefabricated structures, it is necessary to use fasteners that can withstand a load equal to 2-3 times the maximum load for this structure. That is, if, when designing a structure, the calculated loads on a threaded connection are about 400 MPa, then it is necessary to use high-strength bolts of class 8.8 and higher.
You can purchase both regular bolts of classes 4.6-5.8 and high-strength bolts of classes 8.8-12.9. In addition, for installation in aggressive environments there are bolts and nuts made of A2 and A4 stainless steel. All products are certified and comply with GOST and DIN standards. Don't test your luck - use fasteners of appropriate strength!
Determining the size of the rivet
A rivet is a solid hardware with a head that is mounted on the product using a hammer. According to the documentary component, it has the following designation DxL. The designation says the following:
D—diameter of the rivet body;
L is the total length of the rivet.
When measuring, you can make a mistake, since GOST standards use several groups due to differences in length:
- Head protruding above the plane;
- Hardware with secret fastening;
- Possibility of partial concealed fastening.
During production, manufacturers adhere to the following standards:
- If the head of the hardware is cylindrical - GOST 10303-80;
- Production of fasteners with countersunk heads in accordance with GOST 10300-80;
- Option when the head is semicircular - GOST 10299-80;
- When the head of the hardware is not completely hidden - GOST 10301-80.
Breakaway type rivets can be used. Their principle is to pull out a rod that seals the rivet between two materials.
These hardware have separate production standards:
- Blind rivets with cylindrical head according to DIN 7337, ISO 15977, ISO 15979, ISO 15981, ISO 15983, ISO 16582;
- Convex rivet with countersunk fastening conforms to DIN 7337, ISO 15978, ISO 15980, ISO 15984.
Dimensional types of cotter pins
There are three options for cotter pins, and they are all measured differently.
Adjustable cotter pins are characterized by an additional nominal diameter size. This relative diameter concerns the hole for mounting the cotter pin. The nominal diameter will always be larger than the real one. The difference in diameters is reflected in GOST 397-79.
To determine how long the cotter pin is, you should do the following. All adjustable cotter pins end in a long and a short end. So, the correct length of the hardware is from the bend of the head to the end of the short edge.
In the case of a needle pin, the size is fixed and controlled according to DIN 11024. The size of the hardware is determined by its diameter.
The cotter pins are quick-release, have a ring, and their length is always fixed. In most cases, products are used according to DIN 11024. The size of the cotter pin is determined by its diameter.
Wrench: what do you need to know when choosing?
A wrench is a tool designed for screwing and unscrewing fasteners (usually nuts or bolts). We have already stated above that keys come in different types. For example, by design they are divided into:
- carob;
- caps;
- end;
- combined;
- adjustable;
- clamping;
- tubular;
- drums;
- split;
- with ratchet.
The most popular type is the open-end wrench. The requirements for its technical characteristics are set out in detail in GOST 2839-80, but we are only interested in the size of the pharynx (the cavities between the jaws that resemble horns). Markings are usually found on each side of the key body.
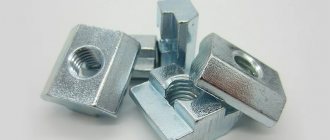
Taking measurements of the nut
The main part of the nuts has metric threads. To understand what diameter you will be dealing with, it will be necessary to take additional measurements. The correct value is always given by a screw or bolt from a nut. Such measurements will be considered the most accurate.
When the thread inside the nut is measured, we obtain the internal diameter d int.
To more accurately determine the result of a metric thread, it is necessary to know the correspondence of d external to the diameter of the same bolt. To make calculations easier, use the table.
If you use gauges, you can accurately determine the required thread. The pass-no-go gauge technique is based on the loose connection of one edge and the absence of connection of the other edge.
The appearance of the nuts is also different; even with the naked eye you can see the difference. To determine the hardware standard, it is necessary to measure the height. Since there are several varieties of high, low, extra high and other hardware nuts.
The nut, just like the bolt, uses turnkey dimensions. In this case, there is a difference between the hardware.
The exact thread pitch size can be measured using the method of measuring the thread pitch on a bolt. For measurements, you will need a thread gauge tool, or if you don’t have one, then you need to count the number of turns in the hardware gap.
Washer and its dimensions
The washer has its own designation, which is written as the letter D. In the attached documentation, this decoding states that this is the diameter with a metric thread of the hardware product used together with the fastener.
To accurately measure the washers, you should use a caliper. The result obtained will always be slightly larger than in the notation. This property of the hardware is determined by the free movement of the washer when installing it on the product. Thus, such a gap helps to install the washer without problems.