Average diameter of threaded connection
To determine the average diameter of a thread, you need a micrometer with special tips in the form of a cone and a cutout. It is used to determine the size of the part at the top of the thread and at the root to calculate the average value. When selecting a kit, it is necessary to take into account the measurement limit, which is indicated in the marking with the letter M and numbers indicating the minimum and maximum allowable thread pitch. Also, to obtain the average thread value, calipers with ball tips are used, the profile of which matches the type and pitch of the thread. The tips are calibrated on several sides of the part for the most accurate result.
The process of measuring turns
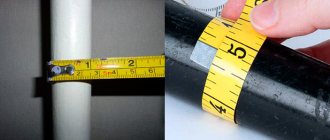
When considering how to determine the thread pitch, the features of the chosen method should be taken into account. When using a ruler it is enough:
- Measure the length of the rod on which the profile was applied. It is worth considering that by measuring the entire length of the rod, and not just part, you can determine a more accurate result.
- Count the number of turns.
- Take depth measurements to determine the main parameters of the threaded connection.
In this way, only the average can be determined. If errors were made during the cutting process, the distance between them may differ slightly.
An example of measurements looks like this:
- 20 turns are counted.
- We measure the length of the rod, for example, the indicator was 127 mm.
- We divide 20 turns by the length of the rod, the result is 6.35 mm. It corresponds to the pitch of the threads in millimeters.
To convert to inches, simply divide the calculated value in millimeters by 25.4. The result will be 0.25 or ¼ inch. If you measure yourself, there may be an error, so the result is rounded to an approximate standard value.
You can also find special templates on sale that can be used to check the features of the thread. This procedure is quite simple to perform:
- The most suitable template is selected. On sale you can find simply a huge number of special templates, which are represented by a plate with a certain profile. Such an element is not expensive; you can purchase it in various specialized stores.
- It is applied to the surface to monitor basic indicators. The template must fit without obstacles, and there should be no free space between the plate and the working surface.
If the template easily fits into the grooves, then the basic parameters of the surface can be determined.
Measuring thread pitch with a ruler and thread gauge
In addition, you can take measurements using a caliper. This tool has become widespread. The step-by-step actions are as follows:
- The depth gauge determines the height of the rod.
- The next step is to count the number of turns. This is quite difficult to do; you can use a marker to indicate the profile threads that have already been counted.
- The information obtained allows you to calculate the tangent of the angle of inclination.
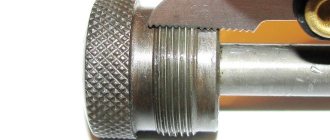
It is possible to determine the indicator in question by direct measurement between adjacent vertices. It is recommended to clean the surface. Otherwise, it is almost impossible to get an accurate result.
Caliber
Unlike a micrometer, calipers and other instruments, for each diameter, type and thread pitch there is its own separate gauge, which is the standard of the maximum permissible value. To match the thread to the gauge, it is necessary that the latter can be screwed freely without any effort or gaps along the entire length. There are nut gauges and plug gauges for external and internal threads, respectively. The advantage of this method is the simplicity and accuracy of measurement. The main disadvantage is the need to use a set of gauges when checking more than one type and diameter of threaded connections.
Measurement methods
There are quite a large number of different ways to determine the thread pitch. All of them are characterized by their own specific features that need to be taken into account. Common methods include:
- Using a regular ruler.
- The use of a special tool that can be used to determine the value in question. A thread pitch meter can be purchased at a specialty store.
- A caliper is a precision instrument. It is used quite often due to its high accuracy and versatility in use.
Inch thread table. Classification
An inch thread is a thread, all parameters of which are expressed in inches, the thread pitch is in fractions of an inch (inch = 2.54 cm). For inch pipe threads, the size in inches characterizes the clearance in the pipe, and the outer diameter of the pipe itself is slightly larger.
Inch threads are used in threaded connections and screw drives. Inch threads come in the following types:
- Inch cylindrical – UTS (Unified Thread Standard). This type of carving is widespread in the USA and Canada. The apex angle of this thread is 60 degrees. Depending on the step, it is divided into: UNC (Unified Coarse); UNF (Unified Fine); UNEF (Unified Extra Fine); 8UN; UNS (Unified Special). The most widely used thread is UNC. This thread conforms to ANSI 1 standard.
- British standard inch thread - BSW. Fine pitch threads are called BSF (British Standard Fine). The apex angle of this thread is 55 degrees.
- Inch tapered NPT or cylindrical NPS. Meets ANSI/ASME 20.1. This thread is used for pipe connections. Has an apex angle of 60 degrees. In Russia, such threads correspond to GOST 6111-52.
Most often in Russia recently you can find fasteners with inch UNC threads (unified coarse thread).
Such fasteners are often found on equipment imported into our country (lawn mowers, trimmers, generators, cultivators, American-made cars, etc.) from the USA, China and some other countries.
When working with inch fasteners, you must remember that the sizes of the keys for inch fasteners are different from the keys for metric fasteners.
The main dimensions of inch UNC fasteners are given in the table of inch threads
Standard size Outer diameter, inches Outer diameter, mm Drilling diameter, mm mm Number of turns per inch Pitch, mm
| N 1 – 64 UNC | 0,073 | 1,854 | 1,50 | 64 | 0,397 |
| N 2 – 56 UNC | 0,086 | 2,184 | 1,80 | 56 | 0,453 |
| N 3 – 48 UNC | 0,099 | 2,515 | 2,10 | 48 | 0,529 |
| N 4 – 40 UNC | 0,112 | 2,845 | 2,35 | 40 | 0,635 |
| N 5 – 40 UNC | 0,125 | 3,175 | 2,65 | 40 | 0,635 |
| N 6 – 32 UNC | 0,138 | 3,505 | 2,85 | 32 | 0,794 |
| N 8 – 32 UNC | 0,164 | 4,166 | 3,50 | 32 | 0,794 |
| N 10 – 24 UNC | 0,190 | 4,826 | 4,00 | 24 | 1,058 |
| N 12 – 24 UNC | 0,216 | 5,486 | 4,65 | 24 | 1,058 |
| 1/4″ – 20 UNC | 0,250 | 6,350 | 5,35 | 20 | 1,270 |
| 5/16″ – 18 UNC | 0,313 | 7,938 | 6,80 | 18 | 1,411 |
| 3/8″ – 16 UNC | 0,375 | 9,525 | 8,25 | 16 | 1,587 |
| 7/16″ – 14 UNC | 0,438 | 11,112 | 9,65 | 14 | 1,814 |
| 1/2″ – 13 UNC | 0,500 | 12,700 | 11,15 | 13 | 1,954 |
| 9/16″ – 12 UNC | 0,563 | 14,288 | 12,60 | 12 | 2,117 |
| 5/8″ – 11 UNC | 0,625 | 15,875 | 14,05 | 11 | 2,309 |
| 3/4″ – 10 UNC | 0,750 | 19,050 | 17,00 | 10 | 2,540 |
| 7/8″ – 9 UNC | 0,875 | 22,225 | 20,00 | 9 | 2,822 |
| 1″ – 8 UNC | 1,000 | 25,400 | 22,25 | 8 | 3,175 |
| 1 1/8″ – 7 UNC | 1,125 | 28,575 | 25,65 | 7 | 3,628 |
| 1 1/4″ – 7 UNC | 1,250 | 31,750 | 28,85 | 7 | 3,628 |
| 1 3/8″ – 6 UNC | 1,375 | 34,925 | 31,55 | 6 | 4,233 |
| 1 1/2″ – 6 UNC | 1,500 | 38,100 | 34,70 | 6 | 4,233 |
| 1 3/4″ – 5 UNC | 1,750 | 44,450 | 40,40 | 5 | 5,080 |
| 2″ – 4 1/2 UNC | 2,000 | 50,800 | 46,30 | 4,5 | 5,644 |
| 2 1/4″ – 4 1/2 UNC | 2,250 | 57,150 | 52,65 | 4,5 | 5,644 |
| 2 1/2″ – 4 UNC | 2,500 | 63,500 | 58,50 | 4 | 6,350 |
| 2 3/4″ – 4 UNC | 2,750 | 69,850 | 64,75 | 4 | 6,350 |
| 3″ – 4 UNC | 3,000 | 76,200 | 71,10 | 4 | 6,350 |
| 3 1/4″ – 4 UNC | 3,250 | 82,550 | 77,45 | 4 | 6,350 |
| 3 1/2″ – 4 UNC | 3,500 | 88,900 | 83,80 | 4 | 6,350 |
| 3 3/4″ – 4 UNC | 3,750 | 95,250 | 90,15 | 4 | 6,350 |
| 4″ – 4 UNC | 4,000 | 101,600 | 96,50 | 4 | 6,350 |
Tightening torques
Tightening torques for UNC inch fasteners for SAE grade 5 and higher bolts and nuts are shown in the following table.
Thread Size, in. Torque for Standard Bolts and Nuts N*m*lbf-ft**
| 1/4 | 12± 3 | 9±2 |
| 5/16 | 25 ± 6 | 18± 4,5 |
| 3/8 | 47± 9 | 35 ± 7 |
| 7/16 | 70± 15 | 50± 11 |
| 1/2 | 105± 20 | 75±15 |
| 9/16 | 160 ± 30 | 120± 20 |
| 5/8 | 215± 40 | 160 ± 30 |
| 3/4 | 370 ± 50 | 275 ± 37 |
| 7/8 | 620± 80 | 460 ± 60 |
| 1 | 900 ± 100 | 660 ± 75 |
| 11/8 | 1300 ± 150 | 950 ± 100 |
| 1 1/4 | 1800 ±200 | 1325 ±150 |
| 1 3/8 | 2400 ± 300 | 1800 ± 225 |
| 1 1/2 | 3100 ± 350 | 2300 ± 250 |
Source: https://avto-bolt.ru/dyuymovaya-rezba/
Determination of nut thread pitch:
To measure the pitch of an internal thread, the best way is to select a counter bolt that would screw freely into the threaded hole, and then calculate it. If there are no suitable screws, then you can use the old, proven old-fashioned method. To do this you will need a piece of paper and a ruler.
Tear off a small strip of paper and place it in the nut. Press the paper against the thread with your finger until an imprint of the threaded surface remains on it. For better visibility, you can draw fuel oil or a marker along the edges of the coils. Applying a ruler to the print, measure the distance L between the extreme marks and count the number of marks n in this area minus the first (zero). Perform calculations using the formula P = L/(n-1).
For example, the print produced 6 clear marks on a segment of 10 mm.
P = L/(n-1) = 10 mm / (6-1) turns = 2 mm
Instead of paper, you can get an impression on the edge of a match or pencil. Knowing the internal diameter of the nut (in our case 14 mm) and the calculated pitch, we compare the obtained data with the table. We find in the thread row the value M14 and the desired pitch of 2.0 mm (main). Nut designation: M14x2.0.
In addition to metric bolted connections, inch fasteners are widely used in the modern technical world. Read the following article to learn how to determine the pitch of an inch bolt.
Source: krepcom.ru
How to use a thread gauge correctly
A thread gauge is a tool that determines the main parameters of a thread. A metric thread gauge is used to check the accuracy of metric threading. An inch thread gauge is used to measure the parameters of an inch thread: by finding the pitch and number of threads per 1 inch of thread. Thread gauges help evaluate the accuracy of the cutting performed and the size of its main elements in a short period of time. The cost of the measuring tool is at least 150 rubles. The price depends on the type of materials used and build quality.
Bolt thread pitch definitions:
Place a straight edge on the threaded part of the bolt.
If its millimeter divisions coincide with the tops of the threads, then you undoubtedly have a pitch of 1 mm. If not, then count the number of turns n on a certain segment of length L. Do not take the first thread into account, since the counting comes from it, and it is zero. Number of turns per 2 cm
| Thread pitch, mm | |
| 9 | 2,5 |
| 11 | 2,0 |
| 12 | 1,75 |
| 14 | 1,5 |
| 17 | 1,25 |
| 21 | 1,0 |
| 26 | 0,8 |
| 29 | 0,7 |
Divide the length of the taken segment in millimeters by the number of turns and get the pitch P.
Main types of thread gauges
There are main types of thread gauges - with metric and inch threads. Metric ones are designated M60 (60 is the angular value of the profile of metric threads). Available in increments from 0.4 to 4.5.
To determine the parameters of pipe and inch threads, thread gauges marked D55° are used. The number indicates the angular size of the profile of this type of thread. The inch set consists of 17 templates. The smallest of the controlled standard threads has 28 threads per inch, the largest - 4 turns.
Safety rules when working with the device
Despite the simplicity of the tool, there are certain rules for its operation that must be strictly followed. The main provisions are as follows:
- The cleanliness of the device must be excellent, regardless of whether it is metric or inch. This will help extend its service life and avoid possible failure.
- To store the device, you need to get a strong and dense container with a hard surface. The ideal option would be a box or container.
- You cannot use other devices that are not intended for carrying out measuring manipulations instead.
- The workpiece with the markings made must be firmly fixed and in a stationary position. If this is not done, a significant measurement error may occur.
- The master, regardless of experience and skills, must wear special clothing to avoid the possibility of injury.
- It is strictly forbidden to operate a faulty product. The probes should be smooth, no scratches, chips or dents. The presence of defects will negatively affect the accuracy of the measured data and subsequent calculations.
It is worth noting that many problems arise due to the poor quality of the materials used in the manufacture of products. Long service life is guaranteed for steel structures. If you purchased an inexpensive product with a body made of plastic, expect it to fail prematurely. Plastic is not particularly durable, so with regular active use of the device, it can quickly fail.