Home production of various kinds of crafts for yourself and even for sale is a very attractive topic. Many entrepreneurs insist that only business that is truly interesting brings a large and stable income. If a person is captivated by a hobby, then he will work tirelessly and rejoice that his favorite hobby also brings him money. A promising activity from this point of view is the production of plaster crafts - piggy banks and other things.
There are a lot of silicone molds in this Chinese store.
What to make a mold for pouring plaster from
To create plaster molded decor for home decoration, as well as to make various souvenirs using the casting method, various forms are used.
The ability to create one yourself will be useful both in business and in the implementation of creative ideas. Molds are made of wood, cement, plastic or metal, and sometimes they are made of resins or plasticine.
Nevertheless, polyurethane and silicone forms are considered the most common due to their convenience and practicality .
Polyurethane and silicone molds for pouring plaster have several differences, but one cannot say that one is better than the other, each is suitable for solving certain problems. The first is stronger and more durable, but toxic and more difficult to handle: you need a lot of release agent, otherwise the product will stick to the mold. Silicone is easier to work with, it is soft and elastic, that is, it is both durable and “friendlier” in relation to plaster, which does not stick to it. This means, firstly, that the resulting product will be of ideal shape, and secondly, you can easily separate it from the silicone; no special lubricant is needed at all.
Making molds for casting from gypsum
The most used materials are plaster itself and silicone.
Gypsum forms are traditional and familiar to many generations of craftsmen. They are more demanding in terms of craftsmanship in manufacturing. In recent decades, they have been increasingly replaced by silicone molds.
Molds made of silicone are distinguished by high accuracy, the ability to work out small details, and ease of production and removal from the casting. The original composition is somewhat more expensive, but this is compensated by increased manufacturability and durability.
When designing and manufacturing a mold, it is important to pay attention to:
- Careful attention to detail.
- Method of connecting mold halves and their subsequent disassembly
- Method of fixing the halves relative to each other
- Location of casting holes. It should allow the liquid plaster to penetrate into all corners of the mold and completely fill it.
- The configuration of the flask should allow air bubbles to escape freely.
To fix the parts of the flask relative to each other, rubber bands are usually used. Rubber bands for money are suitable for small products; for larger ones they are cut from bicycle or car inner tubes.
How to choose silicone for plaster casting
Almost always, two-component silicone is used for work, consisting of a base and a catalyst (the substance responsible for hardening). Catalysts are tin or platinum. Silicone on tin is more popular due to its optimal price-quality ratio. In addition, platinum-based silicone reacts with almost all natural objects.
Another parameter to choose is hardness. There are several options for hardness on a special scale (Albert Shore scale), but usually substances for working with soft materials are designated by the letter A, and for working with hard materials - by the letter D.
The numerical value of the hardness index is also divided. Silicone with an index of 10 to 15 is suitable for working with small, light molds; an index of 20 to 70 means that such silicone can be used to cast a mold for a heavy statue or other large product. Letters and numbers are present in the name of the silicone, pay attention to them when choosing.
Gypsum casting process
The gypsum casting process consists of several stages. Casting into plaster molds itself takes minutes; much more time is spent on preparatory and final operations. Preparatory ones include:
- Making a product model.
- Design and production of a mold, or flask.
- Preparation of materials for casting and lubrication of the mold.
Gypsum casting process
Check that all necessary materials, equipment and tools are at hand, washed and cleaned from the last time. When casting, minutes count.
Immediately before casting into plaster, the molding box should be lubricated and the casting solution should be mixed. The raster should be poured into the hole in a thin stream, making sure to allow the air to escape. After pouring, the mold must be rotated and shaken slightly to achieve maximum adherence of the solution to the small details of the relief.
The final steps are no less important. They also determine the quality of the product. These include
- Drying (at natural temperature or on a radiator). Drying too quickly can cause the casting to crack.
- Disassembling the form. If it does not come away from the product well, you can lightly tap it with a wooden or rubber mallet.
- Removing sprues and reworking parts of the finished product.
- Cleaning the flask (if one or more castings are planned).
Casting in plaster molds is slightly different from casting in silicone molds. Silicone does not require lubrication, it is elastic and it is easier to remove the casting from it, and it also gives more opportunities for working out details.
Making silicone molds for plaster, process
When preparing to create a product, it is also important to understand what your model will be: flat or three-dimensional (3d). There are no special requirements for a flat one, but a volumetric one is assembled from two parts (halves). Then the formwork is installed around the model. Or the model/figure can be placed in a suitable container if the size allows. Silicone is poured in, the required time is counted, which is indicated on the packaging or in the instructions. The optimal hardening time is considered to be from 30 to 50 minutes.
The model can also be coated with compound; this method is suitable for large figures: tall statues or columns. Some experts recommend using coating when there are an abundance of small patterns/details for better rendering.
Example 1 - Fill with silicone: https://www.youtube.com/watch?v=aeeitOYrNPc&fea-
Example 2 - Coat with silicone: https://www.youtube.com/watch?v=EW-
Manufacturing of gypsum molds for casting
Casting in plaster molds requires a certain skill, good planning and precise coordination of the master's actions. How to make a casting mold from plaster?
First, a flask is built around the model of the future product - a box made of cardboard covered with tape, or hard plastic. The gaps between the base and the walls are coated with plasticine. The model is coated with lubricant and placed inside the flask at equal distances from the bottom and walls. Pieces of plastic and cardboard are used as supports. Sometimes they simply hang the model by strings.
Gypsum is diluted to the consistency of sour cream
Gypsum is diluted to the consistency of sour cream and applied with a brush to complex relief elements of the model - corners, depressions, etc. Everything is ready for casting. Then the model is poured to the line where the flask halves meet and the plaster is left to thicken.
Plaster casting mold
After thickening, check how well the model separates from the lower half, lubricate it and the model, and fill the upper half of the mold. After the upper half has thickened, holes are drilled in the corners for pins that will secure the halves during casting. After this, the upper half is removed and the model is removed. The flask is ready for casting. If you are a beginner, plan on ample time to gain experience and develop skills. Casting in plaster may not work the first time.
Where to buy and how to look for molds for pouring plaster
Of course, it is not necessary to make the mold yourself; there are many ready-made options, ranging from items available at home to choose from, to foreign suppliers.
Many people use molds designed for making soap. Their direct suppliers willingly sell forms, including through Instagram and other social networks. For example:
https://www.instagram.com/betoforma/ https://www.instagram.com/form3d.ru/ https://vk.com/album-98743363_245301419
Forms are sold in specialized stores and product manufacturers.
How to Make Cheap, Easy Plaster Molds at Home
Casts, copies, real and replicas.
Casting and mold making are both the subject of specialized artistic and scientific endeavors and the basis of mass production. From fountain heads and amulets to the haunting plaster figures that are now synonymous with this ill-fated city, this month's craft spot is inspired by the use of castings and molds in ancient times to create artifacts.
Casting and mold making can be incredibly complex, but it can also be as simple as brushing with a piece of damp paper pulp or sticking your fingers into a cup filled with silicone. So here I've collected my favorite methods for beginners, all simple, fairly cheap and with a wide range of materials from the craft box, hardware store or specialist suppliers so you can choose what level of effort and experimentation you use. on the. These are not the precise, technical methods you would use for a beautiful lost wax sculpture, but they are quick and easy for beginners of almost any age.
Set everything up to start
You will need:
- A couple of plastic sheets and/or old sheets (whatever you use for messy activities like painting)
- Bucket with water and sponge, as well as a napkin
- Carton boxes
- Painting clothes or apron
- Latex gloves
Silicone cup mold
Silicone cup mold.
Silicone may be the most expensive material listed here, but it's also the easiest to work with: safe on skin, quick to cure, and the molds are very durable, flexible, and capable of casting a variety of different materials.
But here's the first rule. Do not pour the silicone casting into the silicone mold, otherwise it will stick to itself.
materials
- Plastic glasses
- Mixer
- Pinkisil or other two-part silicone mixture (used about $10 for this activity)
- Kitchen scales
- A little clay or plasticine
- A simple object to apply, such as a figurine, a light bulb. Something without holes or porous surfaces.
- Casting material of your choice: wax, crayons, plaster, chocolate
- craft knife
- Insulation tape
Gather your materials.
instructions
STEP 1. Place your item at the base of a disposable cup, in a shallow bed of plasticine or clay. Choose the part that matters less.
Step 1: Place your item in a disposable cup to create a shape.
STEP 2: Mix the silicone thoroughly according to package directions. Pour this into a second cup for additional mixing, as uncured parts may ruin your mold.
STEP 3: Pour the silicone into the cup containing your item and let it dry for 15 minutes.
STEP 3: Pour the silicone into the cup containing your item and let it dry.
STEP 4: Carefully use scissors to release the silicone mold from the plastic cup.
Since we haven't created a technically correct mold by having the proper registration keys for the two pieces, we're going to cheat and cut the piece through the mold in a zigzag direction equal to half to two-thirds of its length. That we can easily remove the impressions without disturbing them.
TIP: You will definitely need a responsible adult for this step.
STEP 5: Place the mold on a flat surface, tape it together, and begin pouring your first cast.
Step 5: Ready, set, toss!
Glove mold with plaster bandages
Bodycasting.
Do you have silicon but want it to last a long time to get maximum value? This technique uses a thin layer of silicon and then makes a support out of plaster casts. This is great for bodycasting small areas such as fingers or feet.
materials
- Plastic glasses
- Stirrers (tongue depressors work really well)
- Pinkisil (or other two-component silicon mixture)
- Kitchen scales
- A paint brush you're ready to ruin
- Plaster casts (or porous fabric for immersion in plaster)
- water
- Your hands/feet or someone else's (even easier!)
Gather your materials.
instructions
STEP 1. Mix a small amount of silicon (about 60 g) according to package instructions. Pour this into a second cup for extra mixing to be safe as uncured bits may ruin your mold. You can always go back and make a second batch if you run out - unless you're using your own hand, in which case doing anything that requires two hands while the silicone is wet is quite a challenge.
Step 1: Mix silicon according to label directions.
STEP 2: Apply your silicon to the surface of your non-dominant hand/fingers as if you were ironing a cake. Continue layering the silicon to achieve an even, thorough coating that is not too brittle or thin. Nails and fingertips will require extra effort as they are prone to blistering and breaking. If there are thin spots after the first coat has cured, reinforce those areas with a little extra silicon.
Step 2: Paint the silicone.
STEP 3: Once the silicon is dry, you can begin applying plaster casts to form a support glove around the silicone mold. Ideally, you want the crystallizer to be able to stand up so that molten liquids can be poured into it. You can also use boxes/cups/newspaper to help with your support structure if needed.
Step 3: Remove dried silicon.
STEP 4. The plaster takes a while to dry as once it starts to harden you may want to disentangle yourself from the mold at some point and leave it on a supported surface as it dries.
Step 4: Apply plaster bandages to support the mold.
Once this is dry you are ready to start pouring the castes.
2-piece plaster mold
This exercise is one of the cheapest methods, but also the most labor-intensive. If you don't choose the right object, use enough lube, you can easily end up with a large piece of plaster stuck to the object.
Csat shell using a two-part plaster mold.
materials
- Vaseline or vegetable oil spray
- Plaster of Paris (about $8/3 kg from hardware stores)
- Clay or plasticine
- Small cardboard box
- A simple small object such as a seashell. The adhesive is not flexible, so choose something that will easily pop out of the mold once it sets.
Gather your materials.
instructions
STEP 1 . Place the object in a cardboard box. Make sure the box is not too big, just big enough for your subject.
Dip your item halfway in plasticine or cheap clay and rub this piece of clay into the base of the box. Make sure there are no cracks or fissures that are not filled with clay where the plaster can grow and end up molding into your object.
Step 1: Place your copy object in the box.
You can use tape around the edges of the box to ensure a seal.
STEP 2: Place some "keys", small indentations, into the clay around the surface of your object using the tip of a brush so that you can create a 2-piece shape interlocking. Vaseline until your clay and your object are very thorough. Plaster will stick to any surface without lubrication (except, of course, plasticine).
Step 3: Create “keys” in your shape by indenting the clay with the end of your brush.
STEP 3 . Pour the mixed plaster into the box. Sit to the side to dry off.
Step 3: Pour the mixed plaster into the box. Sit to the side to dry off.
STEP 4: Tip or tear off the box to remove the plaster mold.
Step 4: Tip or tear off the box to remove the plaster mold.
STEP 5. Let the plaster dry completely. Place the plaster mold in the bottom of the box (if you destroyed your box, rebuild another one to fit) and replace the object.
Step 5: Place the plaster mold in the bottom of the box and replace the item.
STEP 6. Add a clay spout to this side of the object and add more Vaseline to cover the mold and object (if this is not done properly you will end up with a large piece of plaster instead of a mold!). If the underside of the object has holes and complex undercuts, fill it with clay so you have a simple/smooth surface for the mold.
Step 6: Coat the object and sprout with lubricant.
STEP 7: Pour more plaster on top and let it dry completely (this may take a day or so).
Step 7: Pour more plaster on top and let it dry completely.
STEP 8: Cut the box and carefully lift the mold to remove the item. You may have to break off the edge with a tool to open it up first.
STEP 9. Grease the pan again. Place the two sides together and you are ready to start casting.
Cheats using the paper casting method
Paper casting.
materials
- Undyed napkins or handmade paper pulp
- plump brush
- Simple object - eg. plastic mannequin, decorative frame, nameplate, silicone mold
- Water in the tray
Gather your materials.
Necessary equipment and materials
Casting gypsum products does not require highly professional equipment. The process is quite accessible in an amateur home workshop.
Important: preparation, the casting process itself and final operations are associated with the appearance of a large amount of dust. High-quality ventilation and cleaning of the premises must be ensured. You should not do this in residential areas or in houses where allergy sufferers live. In addition, a mixture of air and dust in a certain concentration is explosive. Avoid using open flames in the workshop.
Gypsum casting molds
The main equipment is a casting mold. To make it, you must first prepare a model of the product. Plasticine, polymer clay, and any plastic material are suitable for this. If a copy is made, then the original itself is the model. It is imperative to mark on the model the line where the halves of the future form meet.
It is important to choose the right material for the flask. If you are preparing a small mold for casting a pendant or parts of a scale model of equipment, hard cardboard will do. For casting large castings, it is better to take multilayer plywood - it will not be crushed by a large mass of gypsum.
Rigid cardboard flask for plaster casting
- Container for mixing gypsum with water.
- A glass with a spout for pouring plaster.
- Elastic bands for tightening parts of the form.
- Lubrication brushes.
- Drill for drilling holes.
- Spatulas and knives.
- Cardboard and tape.
The best plaster for casting should be chosen. Construction alabaster can be used, in extreme cases, it is better to sift it through a 0.2 mm sieve, make sure that it has reached a “fluffy” consistency and does not contain lumps or foreign inclusions.
Lubricating plaster casting molds
You can purchase ready-made lubricant for the mold, or you can make it yourself from grated baby soap, water and sunflower oil.
Generalization on the topic
The business described is a wide field for activity. It can bring good profits if it is constantly developed. This must be done by involving professional artists and sculptors. The cost of exclusive works is much higher than products made according to standard sketches. Garden decorations that glow in the dark can interest buyers. And if you open a multidisciplinary company and add to the staff employees involved in landscape design, providing services for the care of the created landscaping, profits will only increase.
Where is homemade polymer used?
This material is used in almost every area of human life - for household purposes, in construction, manufacturing, medicine. Silicone has earned popularity due to its characteristics that are not available in analogues. The substance helps reduce or increase adhesion processes and add hydrophobicity to the object.
The substance retains its basic properties even in extreme conditions - at high, low temperatures, and high humidity. The following qualities of the material should be noted:
- bioinertness;
- good elasticity;
- long operating time;
- environmental friendliness.
In industry, liquids and silicone emulsions are good anti-adhesive lubricants, which are used for large-sized molds, the manufacture of lubricants, cooling, shock-absorbing compounds, and sealants. Silicone defoamers are very popular.
Silicone is used to create bushings, gaskets, rings, cuffs, plugs, as well as other special parts that can be used at temperatures from minus 60 to plus 200 degrees.
A few more qualities inherent in the composition are resistance to:
- radiation;
- sea water;
- sun rays;
- alcohol;
- alkalis, acids;
- boiling water;
- mineral oils;
- electrical discharges.
Silicones are available for sale in a wide range, but some craftsmen prefer to make them themselves. This allows you to cut costs and express your creativity.
Making your own silicone can be done using several methods. But the resulting substance is not identical in properties to the purchased one. Homemade mixtures are inferior in quality to factory samples, and can only be used at home.
How to make a plaster figurine - preparing and pouring the solution into the mold
We use architectural gypsum G16. Its packaging is in the photo.
This grade of gypsum is the highest. The cast gypsum product is very durable. There is no need to add any additives to its composition to improve the characteristics of the casting.
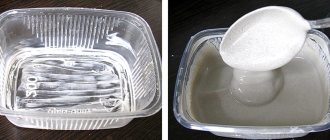
In our case, we measure 18 grams on the scales. plaster and take 8 ml of water with a syringe.
It is also advisable to maintain these proportions if your workpiece is of a different size. Gypsum should be poured into water in small portions, and not vice versa.
In this case, you need to wait until it completely absorbs the water, and then the mixture is completely stirred.
First add 1 drop of some detergent to the water instead of a plasticizer.
All these actions will help the mixture be more fluid and not harden longer. This time is needed in order to have time to vibrate the mixture to release air bubbles.
Since the shape is small, an electric toothbrush was used as a vibrator. She did a great job.
So the plaster is poured, the bubbles are released, we wait for it to harden and get stronger.
After an hour, remove the plaster figurine from the mold and use a knife (while it is cutting well) to trim the base. You may also have to remove seam marks if necessary.
After processing and drying, we cover the plaster figurine with one layer of water-based varnish (you can even use PVA). Let it dry thoroughly. To speed up this procedure, use a hairdryer.
Next, dilute color paste in water or use liquid pigment. We select the color as desired. To get a dark chocolate shade, mix black and brown dye.
After this, quickly wipe the painted surface with a dry porous cloth. The paint will be erased on the raised areas, but will remain in the depressions. That's all.
Good luck to everyone in your work and see you again on the pages
Video: how to make a silicone mold