The sinker is one of the consumable components of the tackle and often disappears along with the hook when biting large and strong prey. In stores, the cost of sinkers increases in direct proportion to their weight. Therefore, if catching large fish is carried out using several tackles, then purchasing sinkers becomes quite expensive.
At the same time, this element of equipment is quite simple to manufacture and practically does not require careful processing and complex preparation for use.
The material for the sinker is also quite common and accessible, so even complex sinkers can be made independently using appropriate blanks.
Lead smelting molds
As noted earlier, lead is cast into molds to produce parts. Casting molds are made from different materials - steel, cast iron, graphite, and aluminum alloys are used in industry. At home, sand, gypsum, silicone and other materials are used. The lead casting mold can be made by hand, but mechanized equipment is most often used. Moreover, in many home workshops you can find hobby mechanical equipment.
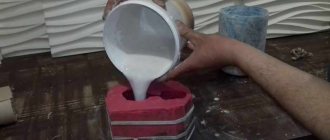
Structurally, the mold for casting lead products consists of several parts: 1. The mold itself, as a rule, includes two parts. 2. Fusible or non-fusible rods, guides and locks. To make a plaster mold, you need to prepare two boxes made of wood. Then, gypsum, diluted to a creamy state, is poured into a wooden box. After some time, the plaster begins to harden, at which time the future product can be installed in it. In this case, it should be half immersed in plaster. This will form the first half of the mold. A similar operation must be performed to obtain the second form. After the plaster has dried, the form is ready. In order to be able to pour molten lead during the manufacture of the mold, it is necessary to form a casting hole.
Mold making
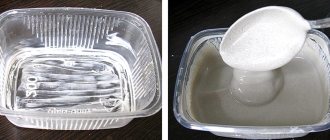
You need to prepare the gypsum mixture according to the “powder to water” rule, in a ratio of approximately 1:1, you need to focus on the consistency, it should be creamy.
Pre-lubricate our mold and samples with the prepared fatty cream.
Pour the mixed plaster into the container to fill exactly ½ of the container and tap it on the surface, expelling air bubbles. As soon as the gypsum begins to set, it is necessary to immerse our samples halfway in the hardening plaster. The setting time of the gypsum depends on the brand of the powder itself, the minimum time is 2 minutes, i.e. after 2 minutes we begin to carefully look at the surface of the plaster. As soon as it becomes matte, it’s time!
We insert guides along the edges of our form. It can be anything, I use pieces of wire, toothpicks, lollipop tubes.
Now we wait for complete hardening, 20-30 minutes is enough.
Read also: How to make a questionnaire in Word?
Then we lubricate the surface of the mold and the samples recessed in it with our rich cream.
We dilute the plaster again and fill the container to the top. We also remove air bubbles by tapping and leave to harden for the same 20-30 minutes.
After hardening, carefully remove the mold from the container and carefully separate it into two halves, removing the samples
Pour fishing weights into molds
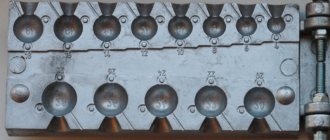
To obtain calibrated weights of various shapes and weights, metal molds of various types are used.
Let's look at how to cast weights in a metal mold of this type:
The form consists of two halves. After pouring, you should get sinkers weighing 130 grams with swivels.
In addition to lead, we will need two clamps for clamping forms, swivels and files with cutters for removing roughness from the resulting weights. Before casting the weights, lubricate all molds with machine lubricant so that the weights can be easily removed after pouring.
First, we insert the swivels into the four sinker molds.
Then we press the halves together with clamps.
Next, set to heat the lead in a suitable container. This mold has large enough sprues, so there won't be any problems with casting. That part of the lead that remains near the sprues is collected and used in the next pour.
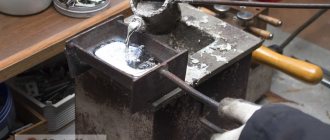
Place the mold on a flat surface. When the lead melts, we begin to pour:
We clamp the container in which the lead is melted with pliers, and begin to carefully pour the lead into the holes.
After pouring, wait a few minutes and disassemble the mold. The result should be ribbed weights like this:
It needs to be slightly processed with a file. Remove the section from the sprue side. Large growths can be bitten off with nippers, after which the area can be treated with a file. As a result, you can make a very large number of sinkers.
They can be used in feeder fishing to break through the bottom. Such heavy sinkers are useful for bottom fishers when fishing in strong currents. They fly far and hold the bottom well.
Simple options
The simplest thing is to make lead weights using a plaster or sand mold. This method has a number of undoubted advantages:
- accessibility and prevalence of material;
- lead melts at a relatively low temperature - 320°C;
- ease of manufacture.
The use of lead and gypsum when making sinkers yourself has several significant nuances:
- at a temperature of about 200°C, water begins to actively evaporate from gypsum , which leads to destruction of its structure and splitting of the product;
- Lead, when hardened, is pressed into plaster , which makes it almost impossible to remove the sinker without destroying the mold;
- a gypsum workpiece has a large number of micropores , which leads to the need to polish the finished product.
When using sand instead of gypsum, the process of preparing the mold is greatly simplified, however, the requirements for the material of the box in which the workpiece will be located when pouring lead are increased; it is advisable to use a metal support. The product itself will be somewhat less aesthetically pleasing and will require serious polishing.
Lead Die Casting
Injection molding technology is used when the task is to produce small castings with thin walls.
This technology has certain advantages: 1. High precision castings.2. High surface quality.3. There is no need for further mechanical processing of cast products.4. Possibility of manufacturing workpieces with complex configurations.5. High productivity of the injection molding complex.6. Low number of substandard products.7. Saving money and resources when producing large batches of castings.
Homemade feeders for feeders
For feeder fishing, you can use various types of feeder feeders, both industrial and self-made.
A group of fishermen revealed the name of the secret bait during interrogation.
Category: regional news.
This method allows you to obtain not very attractive products, but they are quite suitable for fishing. One should take into account the fact that the feeder is a consumable element of fishing, and appearance is not of fundamental importance. They can successfully compete with feeders made from curlers or plastic bottles.
The advantages of this method of making feeders
- simplicity - you need to spend minimal time making a mold for casting the load of the feeder;
- ease of giving the desired shape and weight of the feeder;
- The output is not expensive material.
To make your own feeder for feeder fishing, you need the following materials and tools:
Pros and cons of making your own sinkers
The most important advantage is the low cost of the resulting weights. It is also important that you can always cast the missing weights within 10-15 minutes if you have ready-made molds. I practice this quite often; before fishing, I quickly cast a dozen weights, if necessary.
Another plus for these homemade products is that you can choose a special shape and weight of the sinker for your fishing conditions, equip it with any accessories, “play” with the diameter and size of the loops, etc. Also, this is a quite exciting and educational lesson in physics and chemistry for your children! Children are happy to get involved in the process, even for this alone it’s worth trying to make a mold and cast weights yourself!
Now about the disadvantages: the most important one, as I already mentioned, is the fragility of the form. You can add reinforcing additives to gypsum, such as lime and others, but this will not fundamentally change the situation. Also, one of the disadvantages of this method is a certain amount of flash on the finished weights, this applies to collapsible forms. A mold for a “bullet” with a hole is the most successful option both in terms of durability and ease of making the mold, and in terms of casting the sinkers themselves. I 105% recommend making a mold for bullets! Another disadvantage is the difficulty of marking such cargo. The grams have to be marked manually.
In general, making such sinkers does not require any special equipment or any special knowledge or skills, everything is extremely simple!
That’s probably all, if you have any questions, write in the comments, I’ll be happy to answer;)
Characteristics of the material and use in the manufacture of sinkers
For those who are just starting their career, experienced fishermen advise not to hesitate to stock up on a whole set of sinkers at once. Both very tiny and quite substantial ones are suitable here. But, this is for the first time, and then, when the fisherman gains experience and thoroughly studies all the nearby bodies of water, it becomes necessary not only to replenish the supply of weights, but also to make them as convenient as possible for fishing. This is where a soft, fusible and fairly heavy metal that does not react with water or air comes to the rescue - lead.
One of the reasons why lead and its alloys have become so popular for casting weights is the availability of the metal. First as the main metal for casting shot, and later as a metal widely used in the automotive industry, in railway transport, and in communication lines, lead, in fact, has never been a big problem. On the other hand, it was possible to melt the metal with a melting point of only 327.5 degrees using kerosene gas or a fire, and it could also be melted in an ordinary large tablespoon or tin can.
Where can I get lead?
Do-it-yourself fishing sinkers are poured from any lead that you have on hand. The easiest way to obtain lead is to go to a tire shop and buy used balance weights. Such lead will cost much less than if you buy sheet lead. You can buy the required number of kilograms and get a large number of weights from them for various purposes. The only thing to consider is the steel pieces molded into the middle of some of the weights. It is advisable to remove them during melting. But you usually don’t come across many such sinkers. The weights can be melted all together without sorting them by density.
The second way to extract lead is from old batteries. It is better to find points where they accept old batteries and buy them at a reasonable price. This is a more complicated method, since you will have to disassemble the batteries to remove the lead.
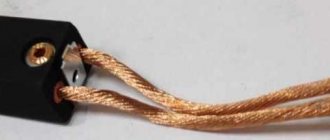
The third way to get lead out of cable braids. It is made of sheet lead with a thickness of 1, 1.5 and 2 mm. If you know any electricians, ask if they can get this braid. From such lead you can not only cast weights, but also cut strips for feeder feeders.
The most expensive way is to buy lead. It is sold in sheets and ingots. Better, of course, is sheet metal, but its size is very large. In such cases, fishermen unite and buy one sheet together.
You can also make weights with your own hands from old weights, which almost every angler probably has.
One thing is certain: absolutely any lead is suitable for casting sinkers with your own hands. It doesn't matter if it has impurities, or how dense or soft it is. Our task is weights for bottom fishing.
Safety precautions
When casting sinkers over an open fire, fire safety requirements must be observed. Keep water nearby to extinguish potential fires. NEVER pour it into a container with lead.
The room should be well ventilated, ideally have a hood. The melting process should not be left unattended, but you need to choose thick clothing.
Long sleeves and gloves are required to protect your hands from burns if lead is splashed. Make sure that there are no flammable substances or flammable objects near the stove, fire or electric crucible. This especially applies to clothing. In addition, it is very difficult to remove the chemical smell of lead from it.
Making simple disposable molds
The fragility and destruction of the gypsum structure when water evaporates makes it difficult to use this material for reusable use. However, as a disposable and easy-to-make mold, gypsum is ideal.
Make it a rule, on every fishing trip, the first thing you do is start.
To make a shape for a simple sinker you need:
- Prepare a box for pouring the mold; it should consist of two parts, tightly mounted on top of each other; you can use small boards fastened with screws;
- Dilute the gypsum to a creamy state, while trying to ensure that there are no air bubbles in the resulting mixture, since voids then appear in their place;
- The first layer of gypsum is poured into the lower part of the box, which should harden a little;
- The required sinker is immersed halfway into the plaster and, using a drill, a hole is made in the plaster on the side of the workpiece for pouring lead (it is better to insert cylinders of suitable size into these holes);
- The surface of the frozen layer is greased with vegetable oil so that the halves of the mold can then be easily separated;
- The second part of the box is installed on top, into which gypsum is poured;
- After the entire structure has hardened, the box is disassembled, both parts of the mold are separated and the sinker and cylinders of the filling channels are removed;
- The mold is cleaned and covered from the inside with a layer of soot using soot from a burning candle;
- The ears and loops for the sinker are secured, the mold is assembled and secured with wire;
- The finished form should dry well; to do this, you need to place it in a dry place for 1-2 days or use the oven.
The easiest way to make a cone-shaped sinker is to use a paper cone in the sand:
- A paper blank (a piece of paper rolled into a cone) is inserted into any container tightly filled with sand; a metal loop for a sinker is inserted into the sharp end of the cone;
- Lead is melted and poured into a paper cone;
- Part of the cone burns, but during this time the lead has time to cool a little and begin to harden;
- The cooled workpiece is removed from the sand and processed with a file.
You can use aluminum foil instead of paper.
The material for the sinker is also quite common and accessible, so even complex sinkers can be made independently using appropriate blanks
Making a reusable cement mold
Creating a cement mold is quite time-consuming, this is due to the relatively long hardening of the mixture.
The process of creating the form itself looks something like this:
- Formwork is made , preferably collapsible;
- The inner surface of the formwork is covered with liquid soap and installed on a flat surface, also treated with a soap solution;
- The formwork is filled with cement mortar;
- in the not yet hardened cement ;
- The cement must harden completely , this may take 1-2 days;
- After the cement has completely dried , the formwork is disassembled and reassembled for the next filling;
- The first, frozen half , together with the protruding workpiece, is smeared with soap;
- The second half of the mold is prepared , cement is poured into it;
- The first half , with its surface covered with soapy water, is placed on the second part of the mold;
- The cement hardens again;
- After the cement has dried in both halves of the mold , the central cone-shaped holes in each half are bored with a round needle file for pouring lead, and two side channels are also made for air removal;
- The surface of the sinker mold is sanded;
- Before pouring, the mold halves are tightly held together with a clamp.
Casting sinkers
Now we can start casting the lead weights! To do this we need wire for the ears, lead, a torch or crucible and a clamp.
We bend the ears from the wire using pliers and put them into the mold.
We connect the two halves of the form and fix them with a clamp.
Melt the lead. I have old cheburakhs, tire weights and other lead scrap. I heat up the lead with a gas torch, it literally takes a few minutes, it’s very convenient! Next, pour the lead into the sprues and let it cool, that is, when you pour it into the last mold, the first one has already cooled down, everything is very fast!
Now we separate the mold and remove our weights.
Next we repeat in the same sequence.
Weights are cast very quickly, sometimes before fishing I remember that I have run out of a load of a certain weight, and then, in literally 20 minutes, I cast the dozen or one and a half weights I need. It takes less time than going to the store for the same goods)
In this way, you can experiment with the shapes and weights of sinkers, and invent some special shape of sinkers that are not available in stores. For example, last season I experimented with stick weights, making several versions of non-snagging weights with different lengths and diameters. The weight of such “stick” sinkers can be reduced directly while fishing, thanks to the small diameter of 6 and 8 mm (if you need to reduce the weight, you can simply bite off part of the sinker with pliers). Also, thanks to such diameters, the load passes 95% of hooks!
Another simplest version of the mold for casting weights is the “bullet” for Carolina. To make such a mold, you need to pour plaster into any sufficiently high mold, I took the cap from an aerosol can, and simply place the bullet samples coated with the same cream on top with the sharp side into the hardening plaster - that’s it, the mold is ready.
To cast such bullets, it is necessary to insert a “mortgage” made of steel wire, lubricated with ordinary toilet soap, into a mold, and pour lead on top. That's all.
The insert is removed from the bullet, leaving a hole for the fishing line.
Equipment Workshop
First, let me tell you about my unsuccessful experiences in creating a mold for casting lead weights. Perhaps this will keep many from repeating my sad experience. For those who want to get to the essence of a proven working method, read point 2.
1. Trial and error.
In search of a method for casting weights, I read a lot of materials. I read a lot about weights with clamps, and wooden forms, and steel forms, with replaceable (plug-in) horns for holes in the weights. But it seemed to me that all this was too labor-intensive in the conditions of a 9-story building with a minimal set of tools and materials. Therefore, I decided to make an injection mold from building materials (gypsum, finishing putty, cement, clay...). To begin with, I assembled a collapsible box from rough boards found on the balcony and a piece of chipboard for the bottom. I’ll say right away that I didn’t think about its beauty at all, so I assembled it in 20 minutes. I sawed the board into 4 parts, almost by eye. I screwed 2 opposite sides to the bottom with self-tapping screws. The remaining two sides are inserted between them and screwed with the same screws to the already standing sides. In order to get the finished form, remove the two sides that are not attached to the bottom.
At first there was a decision to make weights on wire clamps. To do this, I bought plasticine, made a mold from it and lowered it into a prepared solution of Knauf finishing putty. After complete hardening (about 4 days), I took out the plasticine. But there were shells and other irregularities on the form. I puttyed them and, after drying, sanded the entire shape. I found a steel wire. But he didn’t immediately bend the clamp, but simply poured a loop into the lead. After the lead has hardened. It was not possible to get the load, despite the smoothness of the shape. I had to split it in half. However, if you tie it with wire, you can pour and pour, and then take out the weights halfway (by simply untying the tie). But this did not suit me, because later I suffered a lot with bending the steel wire. I abandoned this idea.
I decided to cast standard loads. I tried to make a beautiful shape out of plasticine, but it didn’t work. “I gave up” on this matter and bought a beautiful load in the store for $5. And it began...
The first form is made of putty. A complete disaster, this time for some reason it didn’t dry out and didn’t grab properly, and when I tried to get the load, it fell apart in pieces.
Hmm... What can you come up with? Maybe cement. Fine. I filled it with cement, which was better, but the horns (which later make the longitudinal holes) fell off immediately. And a piece of the mold also fell out.
Maybe clay? So that it does not stick too much to the load. The clay cracked and the entire mold fell apart piece by piece, not to mention the horns, which immediately remained in the lead weight.
The next attempt is with plaster (it’s in the 1st photo). Gypsum has huge advantages, namely: it hardens in a matter of minutes and after hardening it is sooooo strong.
The first plaster mold did not work out for the same reason - I couldn’t pull out the load, it stuck there. The horns broke off immediately. And to get the load I had to break the mold.
Second attempt with plaster. But this time I tried buttering the load. It’s already better, but still not the same, the load is difficult to get, the shape breaks!
... (cleaning the cargo cover, polishing the cargo, pulling it out until it hardens, etc.)
The last most successful attempt. The mold is all made of the same plaster. The cargo was covered with tape over the entire area. In addition, he then coated it with oil. It fell out of the mold quite easily. The shape turned out beautiful. Plus, minor flaws were covered up and polished with fine sandpaper. Everything is great! But…. After casting the first load, the horns fell off along with the finished product... B...! The horns fell off “beautifully”, that is, evenly, without crumbling. I put them in place. And he tried to pour out the second load. This time they fell off and completely crumbled.
2. Hurray! It's working!
After the attempts described above, I decided to turn to the World Wide Web and came across a website of people who are engaged in independently casting soldiers, small weapons for these soldiers, etc. The process itself is as follows:
We will NOT need wood, steel sheets, welding, a file, a hacksaw, a milling cutter, a cutting wheel, or a hammer. Everything we need is shown below:
That is, you will need plaster (in this case I used building plaster, alabaster) and building silicone. Yes, yes, silicone. Although its instructions say the operating temperature is up to 120 degrees, people still cast soldiers (although it contains tin, and its melting point is much lower than lead)!!! What came of it later - a little later. It is better to buy transparent silicone, if only because the surface being treated and air bubbles can be seen through it. which can then give a “shell”. The original source recommends either transparent or black silicone. White is a little worse. Initially I had leftover white, and only for the 2nd layer I bought transparent.
The cost of gypsum is 1 dollar per 2 kg, silicone - 2 dollars per bottle. The bottle should be enough for a load weighing 1 kg.
In addition, of course, we will need a container for casting a plaster mold (not a mold for the load!!!, but an auxiliary one), the load itself, which we will clone (you can either buy 1 for “breeding”, or ask a friend for a while, or sculpt it yourself from plasticine), in the shape you like.
Next, I painted the cargo with white (well, whatever it was ) water-based paint. Why her? for me , because you can then wash it off completely and polish it with a wet washcloth, and it’s easier to wash your hands. You can cover it with acrylic paint and polish it, or simply cover it with a thin but greasy layer of something (machine oil, sunflower oil, margarine, plasticine, rub it on a pie :lol:). The coating is necessary so that the silicone can be peeled off from the load more easily.
We place the prepared cloned load with the flat side (the one that will then be pressed against the catch ) on a smooth surface. In my case, it was a glossy lid from a shoe box. What does smooth surface mean? Again, this means that we will have to easily tear off the silicone from it without damaging the integrity of the latter.
And then we coat the load with silicone.
Attention! It smells very strongly of vinegar and other chemicals, so you need to work in a well-ventilated area or even outside!
The original source advises applying layers no larger than 3 mm and drying each layer for at least 8 hours. I admit honestly – I couldn’t stand it. I immediately filled the outside of the load with a 3-mm layer, and filled the inside part, where the cutouts for the belt are, completely, that is, it turned out to be a kind of cake.
Separately, I would like to note that it is necessary to squeeze out all the air from the silicone and fill all the cavities of the mold. I did it with my finger. Silicone cannot be washed off with anything ! However, it can be successfully wiped off with toilet paper. And the thinnest layer on the fingers then goes away on its own.
Oh, this impatient one! The cardboard with the weight poured on it, so that it would dry faster, was put in the oven. Warmed it up 3 times to about 60-80 degrees. It stank... Mom, don't worry!
After that, I laid it all out on the closed balcony. There really wasn’t any sun, but it wasn’t in vain that I posted it. Because the next evening after work, there was a nasty smell on the balcony.
After that, I decided to add another layer of silicone, because 3 mm is still not enough. However, not believing in this whole idea, I decided to pick out the load and see what happened, so that if something happened, I would not waste time and silicone further. To do this, I carefully, consistently, tore off the dried silicone around the perimeter so as not to tear it. Gradually, circle after circle, he tore off more and more. In the end, I was left in my hands with a silicone cake with a load immured in it. In the same way, slowly, I sequentially tore off the silicone from the load. Moreover, turning out already torn parts is quite acceptable. Soon he released the entire load. Damn, it turned out beautiful! I used nail scissors to cut off all the excess sagging. Then he inserted the weight back and put it back on the cardboard.
After this, I applied another control layer of silicone. And then the same thing, drying in the oven, on the balcony.
The next evening, I diluted the plaster, poured it into a molding box and lowered a cake into it on top, with silicone in the plaster, of course.
Some clarifications. The plaster mold around is only needed for hardness, because the silicone mold is easy to warp with the same molten lead, consider it rubber. Plaster hardens very quickly! There was a case where I didn’t even have time to dilute it and it began to turn into stone. If it still seems to you that the gypsum is taking a long time to harden, add table salt to the water, the hardening reaction will speed up much more. The hardening time of the gypsum is about 10-15 minutes. Yes, after this it is still wet, but it is already very strong, even with a screwdriver it is difficult to pick
Initially I thought that the silicone mold would then have to be pulled out of the plaster mold. for extracting cast cargo. No, you don’t have to, the lead itself falls out with a bang, but more on that later.
That's almost all. Literally 30 minutes after “plastering” I really wanted to try to pour out the load. So what if the plaster is still wet? The main thing is that he is already like a stone, and you can’t pour lead into plaster!
I read that it is better to treat the mold with graphite so that the lead can be separated more easily. To do this, I disassembled the AA battery. It has a central rod made of graphite. I rubbed graphite on a file, poured it into the mold and rubbed it evenly with my finger. Graphite is very difficult to clean, be careful.
It is unlikely that you will get a good load the first time, because you need to catch the “horizontal” of the shape. That is, to pour lead into a strictly horizontal profile.
The first heat was difficult. Slightly acrid clouds of white vapor (smoke) rose from the silicone.
Again, I didn’t want to wait for the loads in the mold to cool down. And why should silicone be subjected to high temperatures once again? Therefore, as soon as the lead “set” a little, I sprayed water on it from a flower spray bottle. So it cooled down a little. How to pick out the finished cargo? Let's start with the easy methods. I cover the pan with a wooden cutting board. And I turn it over. Nothing. I knock on the bottom of the mold. Boom! Yes, the load fell out quite easily. Place the mold back on the stove. Place the weight in a bowl of water to completely simmer and not burn the kitchen cutting board. Subsequent weights fell out on their own, without knocking. Be careful, it’s still a kilogram blank, the temperature is much more than a hundred degrees...
By the way, it is better to melt lead while wearing clothes and glasses, God forbid lead will splash!
I didn’t remove the container with molten lead from the heat, I just made it quieter so that the lead didn’t boil.
Comment! I think everyone knows, but I’ll repeat myself. Lead vapors, and lead itself (especially in the form of a bullet ) are very harmful to the body. You need to work with it in a well-ventilated area or outside.
We carry out quality control inspection of the received cargo. 1 kg. Class!
I level the “horizontal” of the form (for the first time I noticed where and how much the form should be tilted) and pour a second load, a third... until the lead runs out.
What happened to silicone? The top layer of the mold, which was in contact with molten lead, became the consistency of heated plasticine, but this layer is not critical, tenths of a millimeter. The form itself has not deteriorated one bit.
Moreover, using my finger, taking advantage of the softness of the top layer, I covered up all the irregularities
Externally, the weights, of course, did not turn out to be for an exhibition, but they perform the main function, namely, they pull to the ground with their 1-kilogram mass. But it is also impossible to say that they turned out to have a very disgusting surface.
True, I had to wipe all the received loads with toilet paper, because they seemed to be greasy to the touch.
For connoisseurs of beauty, I can suggest the following treatment: wash the received loads with some cheap solvent, and then paint them either with anti-gravel (if you want “rubber-coated” loads), or with “household” acrylic paint, or with automotive aerosol paint. Color from black to bright pink! Fantasize yourself!
So far I have got 5 loads of 1 kg each. I think the shape will hold up for a long time. At least I know for sure that I will run out of lead sooner. And I also think it will be enough for all my friends if they bring me lead.
However, in contrast, I can say that “industrial” production of cargo will not work in this way.
Good luck to you!
Finished products: on the left are 2 freshly cast using the “new” technology, on the right in the foreground is a cloning object, behind it is a load obtained from a purely plaster mold.
View of the uniform after all the melts. Black is graphite. The photo is bad, overexposed, but there is a silicone mold in a plaster mold. Marker notches turned out to be unnecessary.
Here I show that the silicone mold has not lost its flexibility and is still completely viable.
Form for sealant weights
You can make a mold for making sinkers or spinning baits yourself without much difficulty, using plaster or silicone sealant, as well as a ready-made sample. For example, it is easy and also very unusual to make a mold from a sealant like “Hermesil” and the like. The main factor when choosing a sealant is its ability not to change physical properties when exposed to high temperatures.
Making molds for plaster weights
- The melting point of lead, that is, the state from which lead changes from solid to liquid, is 320 degrees.
- At a temperature of 200 degrees, water begins to evaporate from the gypsum mold, the hardness of the gypsum is destroyed and it begins to crumble.
- When lead hardens in a mold, it tends to be pressed in, and it becomes impossible to pull out the sinker without destroying the inner edges of the mold, especially for heavy carp sinkers weighing over 100 grams with spikes and corners in shape.
- The product obtained by this method is subjected to polishing, since the plaster mold is impregnated with micro pores, they cannot be removed with Goya paste, the mold can only be smoked, coated with chalk or talcum powder. Soot, chalk, talc allow lead to slide freely along the inner surface of the mold and fill all voids. These components affect the smoothness, quality of the sinker and allow it to be easily removed from the mold.
- Even dental plaster is not able to withstand repeated tearing of a pressed sinker out of shape.
- A plaster mold can be impregnated and coated from the inside with various sealants and chemical compounds, but this does not solve the issue of water evaporation.
- The plaster weight mold needs to be closed and opened. Can this mold withstand repeated opening as the lead is pressed into the mold?
Molds for casting several weights
For faster work, you can make molds for several weights at once. For formwork, you can use a grille from neon lamps.
When preparing a mold for multiple pieces, additional assistance may be required as you may not have time to place all the pieces before the material used has cured.
- The porosity of a plaster mold and the tendency of lead to stick when curing can be greatly reduced
by using chalk or talc on the inside of the mold to fill voids and create a layer between the lead and the plaster. - To increase the service life of a plaster mold, you can impregnate
and treat it from the inside with a sealant to reduce water evaporation when pouring metal. It won't be durable, but it will probably last a few more uses. - When making small sinkers, regular matches or nails can be used to create outlet channels
by simply sticking them into the mold material before it hardens. - Instead of soap solution and vegetable oil,
you can use silicone grease.
I bring to your attention a method for casting high-quality sliding sinkers (droplets) at home.
For work we will need the following components: 1) Two aluminum plates 1.5-2 cm thick, maybe more or metal 2) paper clips 3) drills (you can choose the diameter yourself) 4) a drill press or drill 5) lead 6) a file
We take our two aluminum plates (metal can also be used, but aluminum is easier to process), it is desirable that they be the same in size
First, we put the plates together and drill holes in the corners for the tightening bolts. After drilling the holes for the bolts, twist the plates together. We take the smallest drill that you have, preferably if the diameter of the drill is a maximum of 2 mm. And we drill holes in a row through the two plates. Unscrew the plates back, take drills of different diameters. The diameter of the drills is selected based on the mass and size of the load you need. In my case, I took from 4 mm to 8 mm. We will drill on those planes that are joined together. You need to drill according to the following pattern. In the end, you should get something like this. After the forms are ready, you need to drill the filling holes. We assemble the two forms together (be sure to twist them) and drill small holes from the end, then take a large-diameter drill and remove the chamfers (that is, we make a filling groove) That’s it - the form is ready. We take an ordinary paper clip or insert it into the hole and fill it with lead. At the end you get beautiful and very high-quality cargo.
Making fishing weights
If you decide to make fishing sinkers with your own hands, then this article can help you. Here I tried to outline my experience in working with .
Let me start with the fact that there are no uniform rules for working with sinker casting molds. There are only general recommendations for obtaining the desired result. There are a lot of factors influencing the casting process of fishing cargo. This is the temperature of the lead, the temperature of the mold, the temperature of the surrounding air, the speed of pouring the lead, the chemical composition of the lead... Yeah, we got scared!!! In fact, all this is not difficult and comes with experience. If you understand the processes, you can manage them. Well, the chemistry of lead will interest us superficially and we will not interfere with it, because we have home-made production of weights, and not mass production for our entire vast homeland.
First, let's describe the process of making sinkers: we transfer lead to a liquid state, pour it into a mold, the mold for casting sinkers takes the heat of the lead and it hardens.
Now let's get to work. Be sure to protect your eyes and wear easily removable clothing. We protect our hands.
The fewer open areas of your body you have, the better. Work either outdoors or under a hood. We heat lead to its melting point of 327 degrees Celsius... but it refuses to melt and does not go into a liquid state. How so? Oh yes, we pour ourselves loads not from pure lead, but from lead with many impurities. Most likely this is lead smelted from batteries, or at best from car weights. Well, if we have lead from recycled metal, then we can generally consider ourselves the kings of casting sinkers. So, different lead will have different melting points. It can be either more or less. From what I have worked with, insulating lead has the most comfortable melting point, lead from tire shops melts worse, and lead from batteries melts very hard and needs to be heated very hard. But the hardness after hardening of battery lead is higher than that of other “leads”. Hardness is also good, since the weight does not become covered with cavities from colliding with the bottom and does not lose weight on its side during long-term transportation in a bucket with other weights. Also, lead of different compositions has different densities, which ultimately affects the weight of the weight. From personal experience I can say that on a 14g Cheburashka the difference in lead composition can be up to 2-3g in weight. So we melt harder, the lead began to flow, it melted. We take an injection mold and fill it with lead. When you open it, you see the halves of the sinkers, everything is crooked and ugly. What's the matter? But the fact is that our loader is not warmed up; it very quickly takes heat away from the lead, causing it to harden ahead of time. Solidified lead does not allow liquid lead to pass down, forming a cavity unfilled with lead. To shed such a mold, we need to do the following: either increase the temperature of the lead, or heat up the casting mold for casting the sinkers. If we raise the temperature of the lead, then we will be able to make weights, but after several pours the mold for making the weights will warm up and it will no longer have time to take away heat from the lead to solidify it, and we will need to keep the liquid lead in the mold to cast the weights for 10-15 seconds before it hardens. In principle, we are in no hurry and can wait, but when we open the mold for casting the weight, we will see a flash (the lead around the weight has leaked into the gap between the two halves of the weight).
The flash can be removed with a file, but this is a waste of time; it is better to optimize the process. As you might have guessed, refractory lead under the same conditions will produce less flash, since it is less fluid, and vice versa, purer lead at the same temperature will produce flash along the entire seam of the joint of the fishing sinker mold. So we have to play with the temperatures of the lead and the mold for casting the weights.
To maintain the required lead temperature, I recommend using a casting crucible.
Its scientific name is crucible furnace, but it is also called “smelter” or simply “furnace”. The LEE crucible has a lead temperature adjustment knob, thereby maximizing the process of casting weights. All you have to do is monitor the cooling rate of the injection mold sinkers. Although I have repeatedly cast weights both on a fire and on a gas burner, the yield percentage of weights is much less than using a stove.
The temperature of the loader is regulated by heating with lead or heating over a crucible furnace, and cooling while placing the fittings into the injection mold. If during operation the mold still overheats, causing flash on the weights, then you can cool it under a fan and under no circumstances use water. For these purposes, I installed a computer fan costing about 60 rubles, powered by an AC/DC power supply with a 12V output. At an ambient temperature of +17 and below, there was never a need for a fan.
Now let's talk about the most important detail of our business... no, not about the fish as you might think about the molding of the sinkers. There are a huge variety of them, both with swivel mounting, and with blind mounting on the eye, and jig heads, and sliding (inline). All forms are different in size, weight, heat capacity, and you need to find your own approach to each form. The only thing that unites the forms manufactured and sold by us is their durability. With household (non-commercial) use and following simple rules, the molded fishing sinkers will last more than one fishing season, and may be inherited by your children. Of course, you can make an injection mold for casting sinkers yourself, for example, from potatoes, wood, heat-resistant plastic, or plaster. But as a rule, such forms can withstand a small number of fills, do not have very good manufacturing accuracy, and as a result, the result is difficult to repeat. I'm not even talking about the time spent on making the mold yourself.
You just need to remember:
Do not pick out finished sinkers from the mold with hard metal objects (screwdrivers, etc.). Aluminum alloys are a fairly soft metal and are easy to scratch or chip. It is necessary to pull out the weight by the sprue (the lead in the upper part of the sinker is hardened in the hole for pouring).
Do not heat the sinker mold over an open flame or cool it in water. Sharp temperature fluctuations unevenly change the density of the metal, which leads to its deformation and aging.
Do not allow water to get into liquid lead. This will entail rapid evaporation of water with strong splashing of lead in different directions.
I won’t remind you that lead fumes are poisonous. Let me just remind you that you need to work either under a hood or in a room with good drafts, making sure to protect exposed areas of the body with clothing, hands with gloves, and eyes with safety glasses.
You are responsible for your own health, so take care of it!
Video for the article “Form for casting sinkers.”
Buy at good discounts for personal use and as a gift to friends and acquaintances.
Buy quality products at affordable prices at. Give gifts to yourself and your loved ones!
Subscribe to us on Facebook, Youtube, Vkontakte and Instagram. Stay up to date with the latest site news.
Making homemade weights is not only useful, but also a very simple procedure. Weights are needed mainly by bottom fishers and spinning fishermen for rigs with retractable mounting. Even a novice angler can master this technique. The main thing is to have lead, create a fire source and find suitable utensils. In this article we will learn how to make fishing sinkers, where to get lead and what fire sources are best.
Forms for regular use
A plaster mold, even a very well made and dried one, will sooner or later collapse and you will have to make a new one or use a product suitable for frequent use.
Of course, for repeated use, molds made of heat-resistant steel or cast iron are best suited, but making these yourself is almost impossible. But cement is good for creating a melting mold, although this will require a little work.
Materials and tools for reusable uniforms:
- formwork material (wooden boards);
- liquid soap;
- cement;
- round file;
- fine sandpaper;
- clamp;
- cylinders for inserting into the filler hole;
- wire for making loops for the sinker.
For repeated use, molds made of heat-resistant steel or cast iron are best suited, but making these yourself is almost impossible
Making a mold for casting weights
Making a mold is not that difficult. First, we take a small box and completely fill it with high-quality sealant. When filling, be careful not to form bubbles.
Next, the original weight needs to be lubricated with a solution of wax or paraffin in gasoline. After drying, the sinker on a thin wire is completely lowered into the sealant, but it should not touch the walls of the box itself.
The weight sample should remain in this position until the sealant hardens. Due to the characteristics of the sealant, this process can last a couple of days or drag on for 5-6 days. Do not remove the weight until complete polymerization.
After the substance has hardened, we cut a small hole through which we extract a sample of the sinker. The elastic form is ready, which means you can try to make your own weight from lead or its alloy.
The metal is poured through the same hole that you made earlier to remove the original sample weight. Thanks to its unique physical properties, the silicone mold allows you to easily remove homemade sinkers or baits, after which it returns to its original form and is ready for use again.
We pour out a sinker for a donkey with a rubber shock absorber
Let's first look at how to make fishing weights for elastic bands. We will perform this procedure outside. We will need a fire or a gas burner with a spray can. In the first case, it takes more time to melt lead, but there is no need for equipment or extra costs.
Melting lead with a gas torch takes just a few minutes, but requires a can of gas.
We also need a tablespoon, a lead tin and a little patience. We will dump the load in the ground. We find a damp piece of land and press a hole with a spoon to make a boat like this. Next, take a stick and insert it into one of the ends of the resulting form. Then we wait for the lead to melt.
After it becomes liquid, pour it into the resulting recess. We wait until it cools down a little, after which we take out the stick. The result will be a load weighing about 300-350 grams. It will lie well on the bottom and is easy to cast over long distances. We inserted a stick to create a hole in the weight.
You can pour several pieces at once if you can get a fire source with a high temperature.
Many fishermen ask the question: “How to make fishing sinkers for elastic bands of light weight, so that they stick well to the bottom and are not carried away by the current. Making such weights is quite simple. You need to take 3-4 pieces of wire 10 cm long and bend them into staples. Then place it in the recess. After pouring you will get a spider like this. After casting, the weight will lie in one place, and these pieces of wire will hold it. The weight of the cargo in this case may not exceed 150 grams.
Technology for making lead weights at home
Casting lead sinkers, despite the ease of technology and availability of materials, is still a mini metallurgical production, so before starting work it is necessary to at least superficially study the basics of metal melting. And although there is nothing special here, it is very important to listen to advice and instructions - both the result of the work and the safety of the work depend on it.
Materials
For the work you will need several types of materials - plaster, cardboard, tape, twine, wax or paraffin, and of course, lead.
Plaster or alabaster is usually used to make molds. Gypsum is more reliable than alabaster, but alabaster is more affordable. These two materials are required to make casting molds.
The auxiliary material for the work will be wax or paraffin. From them, models of future sinkers are made.
Clamps are used to secure the halves of the forms, but it is cheaper and easier to use twine or a clothesline, or, in a very modern way, adhesive tape.
Lead for melting can be found at any scrap metal collection point. Not only rechargeable battery scrap is scrapped; often lead-sheathed communication cables, lead alloys such as babbitt or typographical lead font are scrapped.
Mold making
The classic method of making a mold consists of sculpting a sinker model from wax or paraffin and then casting a reusable mold from plaster or alabaster.
Several models of sinkers are made from wax or paraffin. In principle, you can use plasticine, but then, in order for the model to separate from the plaster mold, it will be necessary to lubricate it with Vaseline or fat-based hand cream. After receiving the models, a gypsum solution is made and poured into a plastic or cardboard mold, so that the top surface is as smooth as possible. Until the plaster completely hardens, the model is pressed halfway into it at a distance of 1-1.5 cm from the top edge of the mold. After final hardening, the entire surface, including the model, is smeared with Vaseline, grease or fat-based cream and filled with plaster on top. When pouring, make sure that the height of both forms is the same.
Pour out flat sinkers for donks
In bottom fishing, flat weights are often used. As a rule, they have an oval shape. Such sinkers lie well on the bottom even when fishing in strong currents. How to make such sinkers for fishing? To do this, cut out an oval piece 4 cm long and 2 cm wide from elastic 3 mm thick. You can also make heavier weights. For this we will use larger workpieces
Next, we make 7-8 dents in the ground, as in the previous case, when we poured out a large sinker for the elastic band. We will be making two types of weights. One type is sliding, and the second is with an eye. To pour the sliding weights, cut thin wire into pieces that are 1 cm longer than the length of the recesses. Insert the wire into these recesses.
To obtain weights with eyes, we will do exactly the same as when pouring cone weights. Only the ear this time will peek out from the recess. If necessary, you can drill holes on the edge of the sinkers
Carefully pour the molten lead into containers and wait about 5 minutes. After this, you can carefully collect them with a spoon.
Lead casting process
Lead alloys are multicomponent compositions that can contain up to 10% copper. Its presence significantly increases the melting point. The second most important component is antimony. The main advantage of lead alloys is that molds of almost any configuration can be used to work with them, at fairly low pressures. The melting point of lead is quite low - 325-350 degrees, and this allows you to cast lead parts at home.
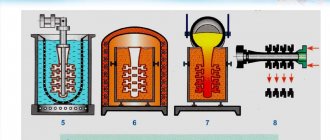
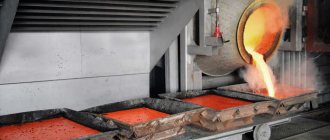
For casting lead, injection molding technology is used. Melting furnaces use equipment that runs on various types of fuel - gas, fuel oil, coke and electrical energy. This equipment must meet the following requirements: 1.
minimum time spent on melting. 2. Minimal material loss. 3. Minimum fuel consumption. 4. Safe and comfortable work. To obtain molten lead and its alloy, the temperature provided in the furnaces is sufficient to melt the lead. Lead is processed in crucible furnaces. The main difference between this class of equipment is that the melt does not come into contact with fuel combustion products. Lead and its alloys are melted in furnaces with metal or graphite crucibles, which can operate on several types of fuel.
Crucible furnaces are produced in two versions: • stationary; • rotary. Furnaces with graphite crucibles for casting make it possible to melt various metals - lead, tin, and aluminum. Moreover, the transition from one metal to another occurs with minimal costs. But crucibles made of graphite have low durability and therefore crucibles made of cast iron are more often used.
The procedure for obtaining lead parts is as follows. Lead pigs or scrap are immersed, where the transition of lead from solid to liquid occurs. After this, the liquid material is poured into prepared models. The principle of castings in industry and households is the same, the key differences are only in scale.
Pour out the cone weights
Donkers and spinning fishermen often use hand-made conical weights. The former are used because they fly far and accurately, while spinners use them in spaced rigs. Making these weights yourself is very easy. You don't even need forms. We will need hard paper, with which we will make cones in the form of small bags.
We also need thin and stiff wire. From it we will make eyelets through which the weights will be attached to the main fishing line.
We will pour the sinkers with our own hands in exactly the same way as last time. Instead of a gas burner, you can use a portable one with two burners. It will be possible to pour in two containers to make the process faster. In this case, place the jars on the stove at intervals of 5 minutes. The lead has melted in one, pour it straight into the molds. After this operation, the lead should melt in the second container.
We insert wire staples into the paper molds so that the eye sticks out from the top of the cone. We immerse the molds in the ground so that they take a vertical position. We select the size of the molds experimentally. We estimate by eye what kind of weight we need. As a standard, you can take a 35 gram weight and look at it. It will be enough to pour out the first batch of sinkers for fishing with your own hands. We will use the resulting weights as samples when we make molds for the next batches.
The pouring process is identical to the previous one. You can use an unnecessary metal mug as a container for lead. It is convenient to take it by the handle and pour lead from it. To avoid burning your fingers, it is better to wear gloves on your palms. After pouring, you should wait a little and remove the weights from the molds. We just tear off the paper without sparing, since initially the molds are disposable.