For many, the term “foundry” is closely associated with back-breaking labor and specialized professional skills. In fact, casting a part from the required metal is possible for the most ordinary person without professional training at home. The process has its own subtleties, but it can be done at home with your own hands. Outwardly it resembles the production of lead weights for fishing. Features of the aluminum casting process are related to the technical characteristics of the material.
Aluminum: characteristics
Before the discovery and implementation of an accessible method of industrial production, this metal was considered precious. At a certain historical stage, it was more expensive than gold. Its properties could be used in many industries. Aluminum is a lightweight and ductile material. It can be stamped, bends, and molds well into complex shapes, especially under pressure. Its melting point is 660 °C, which can be achieved without industrial equipment. This means that casting aluminum at home is quite possible.
Who will benefit from this? Aluminum is a proven material. It was used to make dishes and parts for the aviation and space industries. Castings with good thermal conductivity, corrosion resistance and acceptable strength are valued by tinkerers. The material is suitable for making souvenirs, decorative elements of utensils, for repairing or restoring parts and components in equipment.
Burnout casting: technology features
Manufacturing a part from aluminum using burn-out casting has its own characteristics, which will be discussed below. The work is performed in the following sequence:
- Foam plastic is used as a material for the model at home. Using cutting elements and glue, make a figure that resembles the required shape in outline.
- Prepare a container for making the model. You can use an old shoe box. Mix alabaster with water. Pour the mixture into the box. Place the foam model. Level it out. Give the material time to harden well. Due to the rapid hardening process of alabaster, perform the work at an accelerated pace.
- Remove the box. Heat the mold in the oven to dry the alabaster and remove any remaining moisture. Otherwise, all the water from the alabaster will enter the aluminum and turn into steam, which will lead to pores in the metal and aluminum splashing out of the mold during work.
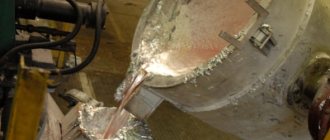
- Melt the aluminum. Remove molten slag from the liquid surface. Pour the metal into the mold in place of the foam. Due to the high temperature, the latter will begin to burn out and aluminum will take its place.
- After the metal has cooled, break the mold and remove the resulting cast aluminum model. You can watch the process in more detail in the video.
Aluminum casting at home
The melting point can be reached without the use of industrial technologies in various ways. In the old days, blacksmiths forged steel and heated it with the energy of burning coal. This is the first option, but to implement it you will need a forced air furnace.
The second option is the use of natural or liquefied gas. The process can be organized in a homemade oven. There is another possibility if the melting volumes are insignificant. In this case, you can use a household gas stove.
Aluminum casting at home can also be organized if the household has an acetylene generator and a cutter. An option with an electric muffle furnace is also suitable. Such equipment can already be classified as industrial. But if you don’t want to make a stove, it’s quite possible to rent it and order the service of an operator.
Advantages of aluminum casting
The advantages of aluminum casting, products obtained through this method, are focused on the special characteristics of the aluminum material. Due to its softness, pliability during processing, high data on anti-corrosion resistance, the formation of an oxide film (provides anti-corrosion properties) when interacting with air, cast aluminum products acquire the following advantages:
- relatively small mass;
- safety, including environmental;
- resistance to temperature changes;
- the ability to be used in environments with different levels of aggressiveness and load;
- sufficient coefficient for sound-absorbing properties;
- durability.
Product characteristics are adjusted by adding different types of additives with impurities. Products are obtained with quite complex shapes, of varying quality, depending on the technological characteristics and features of the casting method.
Technological process
In principle, the situation of industrial casting should be modeled with a reservation for home conditions. In any case, it is necessary to prepare the raw materials. Aluminum scrap is cleaned of dirt, foreign impurities, and all kinds of fillers. Large parts are crushed to the desired size.
Aluminum casting technology consists of several stages. The prepared scrap is melted using the chosen method. When the fluid phase is reached, the slag is removed from the surface of the melt. In the final phase, the mold is filled with liquid metal. The disposable form breaks after cooling.
First you need to decide what is to be cast. Even if this is a trial attempt at melting, it makes sense to prepare at least some form. What if it is possible to reach the desired temperature? It is interesting to see the result of melting and evaluate the results: appearance, porosity, cleanliness. Any experience, even a bad one, will be beneficial.
Conditions and necessary equipment
When melting secondary raw materials, the coating burns, fumes are released, and there is smoke. Working in an enclosed space without an intensively functioning hood is problematic. The best option is open space.
Even in this case, an additional source of ventilation will be useful. Molding casting of aluminum into foam plastic is accompanied by intense release of combustion products. A fan with side ventilation of the work area will remove acrid smoke, which will ensure normal conditions for casting.
A well-equipped and well-organized workplace is also important. It is advisable to have sheet metal or another surface as a base on the table that is not susceptible to the high temperature of molten aluminum. The likelihood of splashes and spills of liquid mass is high. With this in mind, you should think about the need to carry out work in a residential environment.
How to melt aluminum cans at home
Aluminum is a common and useful metal known for its corrosion resistance, malleability and light weight. It is safe enough for use on food and in contact with skin. It is much easier to process this metal than to refine it from its ore.
You can melt old aluminum cans to make aluminum. Pour metal into a suitable mold for making jewelry, tableware, decorations, sculptures or other metalworking project. This is a great introduction to home recycling.
Materials for melting aluminum cans
Melting jars are not difficult, but this is a project for adults because of the high temperatures involved. You will want to work in a clean, well-ventilated area. There is no need to clean the jars before they melt, as organic matter (plastic coating, residual soda, etc.) will burn during the process.
aluminum cans; a small electric stove oven (or other heat source that reaches an appropriate temperature, such as a propane torch); a steel crucible (or other metal with a melting point much higher than aluminum but lower than your oven; could be a durable stainless steel bowl or cast iron skillet); heat-resistant gloves; metal tongs; the shapes you will pour the aluminum into (steel, iron, etc. - be creative);
Melting aluminum
The first step you want to take is to crush the jars so you can load as much as possible into the crucible. You'll get about 1 pound of aluminum for every 40 cans. Load your jars into the container you are using as a crucible and place the crucible in the oven. Close the lid. Run the furnace or furnace to 1220°F. This is the melting point of aluminum (660.32°C, 1220.58°F) but below the melting point of steel. Aluminum will melt almost immediately after reaching this temperature. Give it half a minute or so at this temperature to make sure the aluminum is melted. Wear safety glasses and heat-resistant gloves. You should wear a long-sleeved shirt, long pants, and covered shoes when working with extremely hot (or cold) materials. Open the oven. Use tongs to slowly and carefully remove the crucible. Don't put your hand in the oven! It's a good idea to line the path from the oven to the mold with a metal pan or foil to aid in cleanup of spills. Pour liquid aluminum into the mold. Aluminum can harden on its own. If desired, you can place the mold in a bucket of cold water after a few minutes. If you do this, be careful as steam will be produced. There may be some residual material in your crucible. You can knock the waste out of the crucible by slamming it upside down onto a hard surface such as concrete. You can use the same process to knock aluminum out of molds. If you have problems, change the mold temperature. Aluminum and mold (that's another meta) will have different coefficients of expansion, which you can use to your advantage when freeing one metal from the other. Be sure to turn off the stove or stove when you're done. Recycling doesn't make much sense if you're wasting energy, does it?
Homemade smelting furnace
The easiest way is to take a few refractory bricks and build a fireplace out of them. It is convenient to do this in a suitable metal container (an old pan), which will be used as a frame. A hole is made on the side for connecting the air supply pipe. You can adapt a piece of metal pipe of suitable diameter. A vacuum cleaner hose, hair dryer or other air supply device is connected to it.
Charcoal (stone) charcoal is placed inside. The fire is lit and the air supply is turned on. The vessel where the aluminum will be melted is installed inside the furnace. It is also lined with coal on the sides. It is advisable to put a lid on the stove so that the heat does not go away in vain, but leave only a hole for the smoke to escape.
Ideally, the firebox is made solid with an oval arch. Special mixtures are used for laying heat-resistant bricks and lining furnaces. Such a structure can easily be built from an old bucket. The inner vault is formed using plastic flower pots of a suitable size. A metal mesh can be embedded inside the reinforcement mass. After the mixture hardens, you will get a high-quality furnace that can withstand more than one heat.
Using a stove
Piece casting of aluminum can be organized without the manufacture of a special furnace. The required temperature is achieved using domestic gas. The smelting process itself takes about half an hour if the volume of aluminum does not exceed 100-150 grams.
A tin of condensed milk, for example, is used as a container. Cleaned and crushed aluminum scrap is poured into it. But you won’t be able to melt it by placing a tin can on the grate over the burner - there won’t be enough temperature. To reduce the loss of thermal energy, the inventors came up with a clever design.
A can of raw materials for smelting is placed inside another tin and placed on spacers so that there is a gap of 5-10 mm from the bottom to the bottom and from the sides to the walls. The second jar, accordingly, should be of a larger diameter. A hole (3-4 cm in diameter) is made in it from below to supply a jet of flame. The divider is removed from the gas stove burner.
The flame is ignited. The structure is installed strictly above its wick. The flame should go inside and heat only the tin with the crowbar. A larger diameter jar acts as a shell and retains heat inside. The opening is covered from above, leaving only a gap for the combustion products to escape. The combustion intensity is adjustable.
Crucible and auxiliary equipment
A tin can can withstand one heat. Its further use is possible, but with the risk of being burned through. In this case, molten aluminum runs the risk of getting inside the stove, which can not only lead to clogging of the burner nozzles.
To work in a furnace running on coal or liquefied gas, and indeed for reusable melts, it is advisable to make a special container - a crucible. It is made of steel. A piece of pipe with a welded bottom will do. A good option is made from a cut-off fire extinguisher or a small-sized oxygen cylinder with an oval arch. It is advisable to make a side gutter for easy pouring of a thin stream.
What additional equipment may be needed for aluminum casting? Reliable pliers or their version with clamp fixation will come in handy. Ideally, the crucible can be equipped according to the principle of industrial designs: with side grips of a removable suspension and a lower fixed stop for ease of turning it over. You need a spoon with a long handle to remove slag from the surface of the melt.
From tools and other things we will need:
- container for mixing anything and everything;
- stirrer (you can do this with your hands, but if you have one, good);
- pre-made frames for molding so that the halves of the mold fit smoothly without displacement;
- stove;
- sieve for sifting sand and clay;
- measuring cup or diamond eye;
- brush for applying talc and cleaning the mold;
- the model that we will cast;
- a couple of pieces of pipes or cans or anything with a diameter of 80-100 mm and a height of 50-80 mm (for molding sprues, you can also get by with your hands - make a donut, but with cans it will be neater and easier =)
- thin-walled tube with a diameter of 20+- mm. for molding sprues;
- metalworking tools for processing castings; (the list is quite comprehensive, but all the tools are trivial and most of them can be found around the house).
Simple forms
What are the methods for casting aluminum? The easiest way is to pour the molten metal into a metal mold: an old mug, a frying pan, a tin can. After cooling, the blank is removed. It’s easier to do this if you tap the mold while it’s not yet cooled down. If it had grooved sides or reverse corners, the frame will have to be cut. You can simply pour a slightly cooled drop of metal onto a prepared fireproof surface. Such methods are called open.
If there is a need to make a special casting, you first need to prepare a mold to fit it. In order for the metal to acquire clear outlines after cooling, closed molds are made from two or more component parts. One of them is the main one, and the other usually forms the arch or lateral surface. Holes are made in it. Often another part of the form is added above them - funnel-shaped flyers for convenience.
Third stage
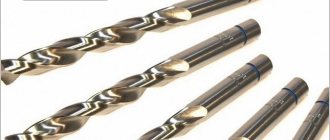
Holes need to be drilled and threaded in the pipes.
Now all that remains is to clean up the marks from the joints. For this we use a Dremel and metal cutters.
If you need to remove many layers of metal, it is better to use an emulsion. In this case, dust and shavings will not fly throughout the room. Drill holes for fasteners in the pump cover.
Our workpiece is completely ready. The products turned out to be practically indistinguishable from each other. Only our part is made of aluminum and will serve the owner for a long time. This casting method is quite simple and almost anyone can use it. I hope this instruction helped you, good luck in your endeavors.
Material
Aluminum casting molds, depending on the method, can be produced using different technologies. There are several simple options. For open pouring into a simple mold, sifted earth (silica) is often used. It is laid in layers and compacted. After removing the forming element, the earth holds its shape and withstands pouring. This material is simple and cheap to use.
There are craftsmen who pour aluminum into sand. When mixing, use liquid glass (silicate glue). There is information about the use of cement. The mixture is mixed, oddly enough, with brake fluid. Knead with your hands and rub through a sieve to avoid lumps. The consistency should be such that when clenched in a fist, a lump forms. When tamping, sand and cement are well held inside the flask and even repeat small details of the workpiece shape.
To make the molding sand we will need:
- sifted quartz sand in quantity to fill our mold and sprues. Let's take sand as an integer part - unit (1) or 100% for ease of calculation;
- bentonite clay. We will need 0.15-0.20 (15-20%) of the total mass of sand;
- water. The moisture content of the mixture should be about 0.06 (6%) of the total mass of sand + clay (yes, I took sand as a whole part, and now the whole part is sand + clay).
First, mix sifted sand with sifted clay.
Mix well and dry. Otherwise, if you do this at the same time as water, you will suffer trying to break up lumps of raw clay.
It is convenient to use a spray bottle to moisten the mixture. It will allow the moisture to be evenly distributed, but if it is not there, then just add water a little at a time.
Allow sufficient time to stir the mixture. It should turn out homogeneous and be completely moistened with water (those 6 percent are more than enough for this)
Once everything is funny, our mixture is almost ready to be molded! You just need to let it brew so that the moisture is distributed evenly. Leave the mixture alone for 1 hour or even 2. This is what is good about this mixture - it is easy to make and there is no need to rush anywhere, and if the proportions are not met, this can always be corrected by adding the missing part of sand or clay.
After an hour, the mixture significantly changes its properties for the better - it sticks less to your hands and retains its shape well if you squeeze a handful into a fist (This, by the way, is a popular way to check the quality of the mixture - take a handful of the resulting mixture in your hand and squeeze it. And when When you open your hand, the mixture should follow the curves of your fingers and palm. Then try to break it in half. If the lump breaks exactly in half and does not crumble, that’s what we need)
Now let's move on to the molding process.
Place the prepared frame on a flat surface and pour the mixture into the mold. Don't rush to fall asleep all at once. Add a third and compact it so that the sand fills all corners of the mold. First I make a sandy bottom - I fill it with sand, tamp it, and then I fill the entire mold without tamping and press the model into the loose sand. Before installing the model, it would be a good idea to sprinkle it with talcum powder so that it does not stick to the mixture. I compact it with my fingers along the perimeter and add more mixture as needed. It would be easier if the model was divided in half, but that's another story. We have a specific example. Therefore, the sequence is exactly like this. It is convenient to tamp with a small wooden block - it is strong and heavy enough for a comfortable process. Then use the same block to level the surface. The model should be filled exactly in the center, as it has roundings. To prevent the form from collapsing when removing it, I had to strain a little, but I managed. You can do it too!
Manufacturing of complex shapes
Castings of complex configurations are made using a different technique. The most common material is gypsum (alabaster). Forms without reverse corners and undercuts can be collapsible and consist of two or more parts. They won't last long, but it's quite possible to get a few castings.
A complex knot or decorative three-dimensional model can be made once, but the mold will have to be broken. There are two methods at work. You can make a wax (paraffin) model and fill it with plaster. Later, during the intensive drying process, this material will melt and flow out through the flaps.
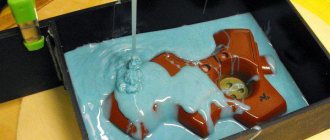
Casting aluminum into a plaster mold using foam plastic involves making a model of the future casting from this material. It is filled with the prepared mixture and cannot be removed. Molten aluminum is poured over the top. The temperature of the metal melts the foam, it evaporates in the process, and liquid aluminum fills the space vacated.
How to cast a complex-shaped part from aluminum
Industrial enterprises often use metal molds. Aluminum casting molds can be made from a variety of materials. Most often, gypsum is used. Gypsum can be purchased at any hardware store at any price acceptable to you. It is recommended to use sculptured or white plaster.
An excellent option is sculptural, which is marked G-16. Due to the high price, it can be replaced with G-7 - ordinary white plaster. It is strictly forbidden to replace it with alabaster, despite the fact that they are often interchangeable in construction work.
Let's look at a simple way to cast an aluminum part with your own hands at home.
To cast an aluminum part we need:
- melting vessel;
- scrap metal;
- melting mold.
Main stages of the process:
1. Prepare a vessel for melting (you can use a vessel from part of a steel pipe).
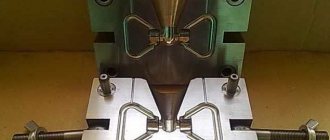
2. We make a mold for melting. If the part has a complex structure, then the shape may have several components.
In our version, the form will consist of two parts. First, think about how to simplify the part for convenience (we recommend strengthening the holes with tape).
The mold is very easy to make from sculpting plaster (do not use alabaster!). You can use plasticine.
3. Before pouring plaster, you should lubricate the container with oil so that the plaster cannot stick to the container.
4. Carefully pour the plaster, shaking the mold periodically to release the bubbles.
It is important to know:
The hardening process of plaster is quite fast, so be careful and try to install the model in plaster in time.
In addition, it is recommended to install an object (for example, a small stick) in the plaster, which will become a channel for pouring our part.
5. A primary layer is required for the upcoming filling.
Take a drill and make 4 small holes, treat the shape with oil. This is necessary to ensure that the finished mold parts lie as stable as possible during the casting process.
6. Fill the second layer.
7. After hardening occurs, you need to carefully remove the mold from the container and separate the halves.
8. Before casting, we treat the mold with soot to avoid sticking of liquid aluminum. The form must be dried. The natural drying process takes place all day long. It is advisable to dry the gypsum blank in the oven. Start at a temperature of 1100C - one hour and two hours at a temperature of 3000C. It is necessary to provide holes in the plaster for pouring aluminum and removing residual air.
This is how we melt aluminum.
9. Then we place the liquid metal in the mold and wait for it to cool completely.
As a result, we obtain the desired workpiece, then we grind it and make special holes.
Casting errors
Making molds from plaster is a convenient and inexpensive way. But there is moisture in the material. With natural drying it remains. When molten metal is poured, moisture begins to evaporate rapidly. Even intensive oven drying does not guarantee its complete absence. Depending on the amount of moisture remaining in the mold, the aluminum casting may have small pits or large frozen bubbles and craters.
If the metal was not heated up enough or it had time to cool before pouring, the aluminum does not pour out well and does not fill the volume of the mold. In fact, a drop is formed that does not have sufficient fluidity. The same thing can happen when using a small amount of metal in a cold form. Aluminum gives off heat quickly and does not have time to spread.
Experienced craftsmen do not recommend immersing the casting in water to speed up its cooling. In such a material, damage to the internal structure and the appearance of microcracks is possible. Such workpieces may not be suitable for subsequent turning.