Every craftsman who works with metalworking or carpentry tools probably knows how to harden metal at home. It is believed that to do this, it is enough to heat the product until red hot, and then cool it in a container of water
However, in a home workshop, this method can only produce hard and brittle metal, which is quite suitable for chisels and knives, but unsuitable for hammers, punches or chisels. Heat treatment modes depend on the steel grade and the required parameters of the product after hardening, and these include not only hardness, but also strength, wear resistance, ductility and toughness.
In home workshops, as a rule, there are no measuring instruments with which you can find out the temperature of the part. Therefore, in order to harden a part, the boundaries of heating and tempering have to be recognized by the color of the metal or its tarnish.
In addition, before hardening any product, the craftsman must determine (at least approximately) the grade of steel or alloy from which it is made.
Over time, both knowledge and skills accumulate, but a novice thermal engineer, even in order to successfully harden a drill, cutter or some kind of fastener at home, will first have to replenish his theoretical knowledge, communicate with experienced specialists and do several trial hardenings.
Methods for household hardening of metal
To harden a metal product at home, you first need to decide on a method for heating it to the required temperature, and also select containers for coolants.
In addition, you need to choose a home or a place in the yard where you can do hardening in compliance with all safety requirements. Open flame sources can be used for heating. But in this way it will be possible to heat and harden only small parts.
In addition, an open flame causes oxidation and decarbonization, which negatively affect the surface layer of the metal. Home craftsmen, as a rule, determine the heating temperature by the color of the heated workpiece.
The figure below shows a color chart, without which it is impossible to properly harden a carbon steel product. For alloy steels, the temperature range is usually shifted upward by 20÷50 °C.
In order to harden a steel product with complete and uniform heating, it is best to use heat sources such as forges and closed furnaces. This equipment is easy to make yourself in a home workshop, and it can be used both indoors and outdoors.
An industrial hair dryer is usually used to pressurize a forge, and charcoal, which is sold in any supermarket, is suitable as fuel. A small closed oven can be easily made from a couple of dozen fireclay bricks. Moreover, depending on the method of hardening the metal, it is possible not only to harden it, but also to temper it with heating of the entire volume of the product.
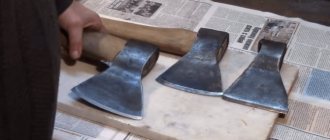
The easiest way is with cooling containers and a clamping tool. Any non-flammable vessel of sufficient size will be suitable for the quenching liquid, and the part can be held and moved with tongs or hooks with handles of a suitable length. The video below shows how you can harden an ax at home using a homemade forge and two containers with different cooling media.
Hardening on an open fire
The easiest way to harden a small part at home is to heat it over an open flame to the desired temperature, guided by color tables.
In such cases, you can use a gas burner, a blowtorch, or even a burner on a home gas stove as a heating source. The main disadvantage of such hardening is the difficulty of uniformly heating the product throughout the entire volume, since the flame creates a high temperature in a narrow, limited area.
This method is suitable when it is necessary to harden the end of an elongated product, for example, the cutting part of a drill or a chisel blade, or a small part several centimeters in size.
Another problem that a home craftsman may encounter if he decides to harden carbon steel with an open flame is severe oxidation and burning of carbon in the surface layer of iron, which leads to degradation of its structure.
Steel tarnish color scale
The color of carbon parts at appropriate temperatures is indicated in the following scale of steel tarnish colors:
Temperature of tarnish colors for carbon steels
| Color | Temperature limits, °C |
| Citric | 220 – 229 |
| Yellow (straw color) | 230 – 245 |
| Gold | 246 – 255 |
| Earthy or brown | 256 – 264 |
| Scarlet or red-orange | 265 — 274 |
| Purple | 275 – 279 |
| Amethyst | 280 – 289 |
| Heavenly | 290 – 294 |
| 295 – 299 | |
| Indigo Crayola | 300 – 309 |
| Light blue | 310 – 329 |
| Aquamarine | 320 — 339 |
On workpieces made of stainless steel 12Х18Н10Т, containing 18% chromium, 10% nickel and 1% titanium (values defined in GOST 5632-2014), tarnish colors are formed at other temperatures. This is due to the fact that this material is corrosion-resistant and heat-resistant. Therefore, during quenching and cooling, the smallest particles of metals and oxygen interact more slowly, which prevents the formation of an oxide film during quenching and heating.
GOST 5632-2014 Alloyed stainless steels and alloys are corrosion-resistant, heat-resistant and heat-resistant
1 file(s) 674.58 KB
The following table of tarnish colors presents the features of color changes in stainless steel products:
Temperature of tarnish colors for stainless steels
| Color | Temperature limits, °C |
| Light straw | 300 – 399 |
| Golden | 400 – 499 |
| Earthy or brown | 500 – 599 |
| Red or purple | 600 – 699 |
| Blue or black | 700 – 779 |
Rainbow streaks may appear on the surfaces of stainless steel workpieces. They may appear when the product is heated to boiling temperature (100 °C). The appearance of rainbow marks is due to changes in the crystal lattice of the metal. The rainbow color on the surface of the workpiece does not indicate overheating of the stainless steel.
Common media for self-heating
For hardening steel at home, the following cooling media are usually used: air, water and aqueous solutions, mineral oil. 10-15% sodium chloride (table salt) is usually used as aqueous solutions, and mineral oil in home workshops is most often used as a regular engine oil.
To harden individual parts of a product with different hardness, hardening with sequential cooling in two environments is used. Each of these quenching media is characterized by its own cooling rate, which directly affects the structure of the metal being processed.
For example, air cools steel at a rate of 5÷10 °C per second, oil - 140÷150 °C, and water (depending on temperature) - 700÷1400 °C.
In order to properly and without problems harden your product, you need to know the brand of metal from which it is made, since both the heating temperature and the cooling method depend on this. For their products, craftsmen most often use used products made from high-speed and tool steels, which can be hardened in a home workshop, as starting materials.
The table below shows the recommended temperature conditions and cooling environments for various steels.
Hardening metal in oil
Oil conducts heat rather poorly, which contributes to the slower formation of structural elements of steel.
Therefore, if it is hardened in an oil environment, it will acquire strength and elasticity along with hardness. In production, industrial oil I-20 or modern quenching oils such as “Thermoyl”, “Thermo” or “Voltex” are usually used for hardening. In home workshops, craftsmen use what is available. Most often this is new or used motor oil.
To safely quench a part in such oil at home, you need to remember that it has a much lower flash point compared to industrial quenching liquids, and when hot metal is immersed in it, it ignites for a short time, releasing acrid smoke.
Therefore, a hardening container used in a home workshop should have a minimal exposed surface and be used only outdoors or in a ventilated area. In addition to ordinary buckets and cans, one of the most common designs of such containers, which are used by home craftsmen, is an elongated section of pipe of a suitable diameter with a welded bottom.
How to harden?
When you have a forge, hardening can be done quite simply:
- First the fire is lit. Small-sized wood (chips, small branches, woodworking shavings and paper) is used for ignition.
- Prepare the containers in which the hardening will be carried out. Mineral oil (from internal combustion engines) is the best cooling for parts. The container must allow the part to be loaded completely. Synthetic and semi-synthetic oils can be used, but keep in mind that some may boil. The cooling rate will decrease. Therefore, the use of such oil is used with caution.
- A water container is needed to rinse parts after hardening.
- You will need coal. Brown and black coals are used. In practice, charcoal obtained after processing birch is often used.
- To pick up the workpiece and move it around inside the forge, you will need pliers. Experienced blacksmiths have several types of pliers.
- After obtaining a stable fire on the grates, you can add coal. It burns slowly at first. When the air supply is turned on, intense heating begins. The coals change color to white.
- It's time to lay down the part that they want to harden. She is put into the fire. Watch the warm-up.
- Need a magnet. It will show whether the required heating has occurred or not. Austenite is not magnetic.
- If a dark cherry-colored glow occurs, you can count on heating to similar temperatures.
- Take out the workpiece and try whether it is magnetized or not. If not, then the temperature has been reached.
- Warming up is required for at least 15...20 minutes. The thermal conductivity of heated metal is low, so incomplete heating may occur inside massive objects. In this case, bends are observed during hardening.
- After removing the part from the fire, it is dipped into oil in several stages. Lower and raise with rhythmic movements. This is how high cooling rates are achieved. Raising and lowering stirs the coolant during the hardening process. A fire may occur. It will go out quickly.
- All that remains is to rinse the part.
- You can check whether hardening has occurred or not with a file. If the file “does not take”, it means that hardening has occurred.
Test the quality of tempering on glass. If it is possible to leave a mark on the glass with a tempered part, then an HRC hardness of more than 55 units is obtained.
Video: how to harden metal with your own hands?
Manufacturing a chamber for hardening metal
The main materials for the manufacture of home furnace bodies for steel hardening are solid refractories in the form of blocks of various sizes and fireclay clay.
In such a furnace, a temperature of over 1200 °C is reached, so it is possible to harden products not only from carbon or tool steel, but also from high-alloy steel. When making home stoves from fireclay clay, a cardboard frame is first made according to the shape and size of the working chamber, which is then covered with a layer of fireclay.
A heating coil is wound over it, and then the main heat-insulating layer is applied. With this design, the heating area is isolated from the heating element, which is important when it is necessary to harden steel that is sensitive to oxides and carbon burnout.
The most common design of home hardening furnaces are installations whose thermal bodies are made of fireclay bricks or similar refractories. The operating temperature of such materials is more than 1400 °C, so in such furnaces it is possible to harden almost any type of steel and many refractory alloys.
Structurally, such a home oven is similar to a conventional wood-burning oven, only it is much smaller in size. The metal in it is heated using an electric spiral placed in grooves along the perimeter of the internal space.
If it is necessary to qualitatively harden steel, it must be heated to a precisely specified temperature, so most of these homemade products are equipped with thermostats (they can be freely purchased on Aliexpress).
The video below shows the design of such a home furnace with end loading and a thermostat, which allows you to harden steel with precise temperature conditions. Its thermal body is made of mullite-silica refractory plates ShPT-450.
A detailed description of the design and recommendations for creating a top-loading furnace, in which you can harden products up to 54 cm in length, can be seen in the following video. Here the thermal body of the furnace is made of fireclay bricks (ShB type) and a thermostat is also used. In addition to the top loading, a special feature of this device is a kanthal spiral, which lasts many times longer than traditional nichrome and fechral.
Step-by-step making of a simple forge
Fireclay bricks are used for production. It differs from ordinary brick in that it contains fireclay clay, which can withstand heating of more than 2500 ⁰C.
It is not difficult to distinguish fireclay bricks from ordinary bricks. On the surface there is an extruded circle with a diameter of 55 mm. The structure itself is noticeably different from the fired product.
To ensure that the bricks maintain a constant shape, they can be held together using a special mortar. But in practice they do things differently. A frame is welded from the corner. It will not allow you to change shape. A cast iron cylinder is installed in the center (used in internal combustion engines). In this case, a cylinder from a V-2M tank engine was used.
To prevent bricks from falling out, support ribs are welded. The load from the main fragments of the forge will be distributed on them.
Having placed the cylinder on the corners, mark the cutouts. They will have to be done using cutting discs and angle grinders.
After marking, the lines left by the scriber are visible.
The necessary cuts have been made. All that remains is to weld the ribs in place.
Holding the parts in place, spot weld the components. After making sure that the parts are located in the right place, the final welding of the forge frame is carried out.
Turning the frame over, they look at how the frame of the forge will look in working position.
Now you need to lay the bricks correctly. It is clear that they have been sampled. A certain ledge is formed, located below the level of the brick surface.
Having laid all the bricks in place, you can see the formation of a recess. Its purpose is to install a grate.
The grate is installed in the center of the forge. It is designed to supply air from below into the combustion zone. Only with air flow can constant combustion of the fuel be guaranteed. But to obtain temperatures above 1300 ⁰C, forced air flow from a fan will be required.
You will need to weld a pipe to the cylinder, which will have:
- centrifugal fan;
- plug for venting combustion products.
The fan is being fitted. To supply it you need an intermediate profile pipe. It is necessary to weld it so that the air flow enters the combustion zone without unnecessary resistance.
A hole is marked in a cylindrical pipe.
After the first cuts, you need to mark the remaining elements.
The parts are ready for assembly. All that remains is to fix the parts and then weld the entire blower structure.
The result was a structure welded to the cylinder. Now we have to install the fan.
The forced air supply system to the forge is ready. It's time to assemble the rest of the small-sized forge structure.
Another view. The quality of welds is checked.
After painting, the forge takes on a professional look. It is mounted on supports. The height is selected according to the height of the master who will work on this forge.
There is a rotary valve on the pipe. It is needed to temporarily block access to the fan. Usually they are closed when there is a need to clean the grates.
There is a lid at the bottom. In the “closed” position it is held by a counterweight. To open the passage for slag and other combustion products, simply turn the counterweight slightly. The hole will open. The slag will leave the furnace.
The bricks take their place. Soon the forge will be ready for use.
To limit heat loss, a screen is installed. This is sheet steel that is installed around the perimeter of the hearth. A handle is mounted on the front. It is needed for hanging auxiliary tools that the blacksmith uses when performing work.
Having laid the fuel (start ignition with ordinary shavings and wood chips), light the fire. Gradually add coal. It is the main fuel for the forge.
After turning on the fan, the combustion intensity increases. The coals begin to burn not red, but white. The flame temperature increases above 1000 ⁰С. Now you can heat up parts on the forge in order to further forge metal or harden workpieces.
In addition to the forge, blacksmiths use anvils. The main work on forming the desired shape is performed on it. They work with heavy and light hammers. Additionally, streams of different shapes are used.
How to take a holiday on your own
Tempering of steel is carried out to reduce its brittleness and increase its ductility, which occurs during its heating to a low (compared to quenching) temperature, followed by slow cooling.
Most steels (carbon and low alloy) that can be hardened in a home workshop are tempered at temperatures ranging from 150 to 250 °C (see table above). Unlike hardening, such heating does not require special equipment, so many home craftsmen use household stove ovens with thermostats for this purpose.
The heating temperature during tempering can be determined by the color of the tarnish - a multi-colored oxide film that appears on the surface of the steel when heated (see figure below). If you harden steel “to martensite,” that is, with rapid cooling in water, you will get a very hard but brittle structure. Therefore, tempering is a mandatory procedure when heat treating a cutting tool.
VIEW Melting furnace on AliExpress →
Low Vacation
Low tempering is carried out in the temperature range of 120÷300 ºC.
The choice of a specific temperature regime depends on the grade of metal and the desired result. Most often, this method reduces internal stresses and slightly increases the toughness of tool steels, which require increased hardness and wear resistance. At 120÷150 ºC there is no change in hardness, but only residual stresses decrease. To reduce it, the product must be heated to at least 200 ºC and kept under these conditions for at least one hour. In the range from 200 ºC to 300 ºC, the formation of tempered martensite begins and the hardness decreases with a simultaneous increase in the toughness of the steel.
In some cases, a significant decrease in viscosity is observed in this temperature range, which is called temper embrittlement. The consequences of this phenomenon are eliminated by additional heat treatment. In addition to tool steel, low tempering with heating up to 250 ºC is also used for structural steels, the surface of which has been subjected to thermochemical treatment.
Checking the quality of hardening
In order to determine whether a steel product has been hardened to the required hardness, the home craftsman does not have many ways.
The traditional way is to try to scratch the metal with a file (not a diamond one), which usually has a hardness of 55÷60 HRC. If grooves remain on the surface, this means that it was not possible to harden the steel to the required value and its hardness is below this value. If the file slides over the surface of the hardened metal, then its hardness is normal.
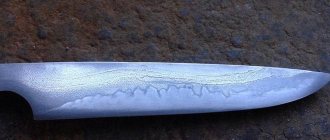
Another way to test the quality of home tempering is to scratch the surface of a bottle glass with tempered steel (see photo below). In addition to hardness, at home, if you have certain skills, you can also check the structure of the metal. To do this, it is necessary to harden several samples of the same steel in different modes, and then compare the structure and grain size by eye.
High holiday
High tempering is carried out in a temperature range close to the critical point: from 450 ºC to 650 ºC.
After such heat treatment, the steel becomes ductile, its relative elongation and contraction, as well as impact strength, increase. This is due to the fact that the metal acquires the structure of tempered sorbitol and its internal stresses are reduced by 95%. In this way, products operating under shock loads are released: shafts, axles, connecting rods, parts of presses and forging hammers.
If steel is tempered at 690 ºC, then granular pearlite will prevail in its structure, and it will have maximum ductility and minimum strength. In some vanadium, chrome and tungsten steels, when tempered with heating up to 560 ºC, troostite may form, which leads to an increase in hardness (the so-called secondary hardness).
Features of aluminum hardening
The need to harden any aluminum product at home rarely arises, since all finished products made from casting and wrought alloys usually undergo the required heat treatment and practically do not lose their hardness and rigidity during operation.
A home craftsman may have such a need after welding parts made of aluminum alloys together, since in this case they very often lose their rigidity in the area adjacent to the weld. But it is very difficult to harden aluminum at home, because to do this you need to know exactly the type of alloy and maintain thermal parameters with an accuracy of at least ±5 °C.
Cooling also requires certain skills, because if the technology is not followed accurately, the product may malfunction. If you still want to master this type of heat treatment for use at home, then first of all you need to acquire a furnace with an accurate thermostat, and also be prepared for the fact that each time you will have to harden several samples in turn to select the necessary parameters of the thermal process.
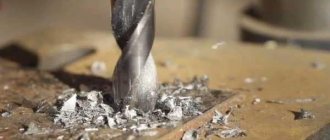
How to cut threads in hardened metal
Tools made from high-speed steels and carbide alloys are also best suited for this operation. Taps are used to cut internal threads, and dies are used for external threads.
Internal threading technology
To cut internal threads of a certain size, three taps are usually used: rough (No. 1), semi-finish (No. 2) and finishing (No. 3).
Proceed according to the following scheme.
- Make the markings.
- Punch the hole.
- Lubricate the future hole and drill.
- Secure the part.
- Install the drill.
- Set the cutting mode. Start processing at low speeds. After the drill is immersed in the metal, the speed can be gradually increased.
- Drill a hole for the thread and countersink. Remove the shavings. Lubricate the #1 tap and the workpiece.
- Install the tool. The axes (its and the holes) must match.
- Make the first pass. After each full turn of the tap, make a half turn in the opposite direction. If necessary, remove chips.
- Make passes using semi-finishing and finishing taps.
External thread cutting technology
For this, dies are used. Process workpieces using this technology.
- Place the tool in a holder of the appropriate size. Secure the die with screws.
- Make a chamfer at the end of the workpiece.
- Apply coolant to the surfaces.
- Place the die on the workpiece. Its plane must be perpendicular to the axis of the workpiece.
- Cut the thread. After one or two turns, return by half a turn.
- Make sure the threads are cut accurately.
Features of copper hardening
Heat treatment technologies for steel and copper have fundamental differences. Heating copper to red heat (over 600 °C) and rapidly cooling it in water causes it to release (i.e., it becomes soft).
Tempering copper at home is more difficult than tempering it, because to do this it only needs to be heated to 400 °C, at which point it does not glow. After heating to the specified temperature, the copper product is slowly cooled in air, after which it acquires hardness, as after hardening.
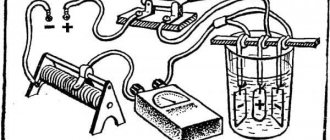
If there is still an urgent need to harden a certain amount of copper parts in a home workshop, you will have to acquire a pyrometer to control the heating temperature.
We have described two ways to check the quality of hardening at home. Which ones do you know? Please share information in the comments to this article.
Average holiday
Medium tempering is intended for heat treatment of steel products, which must combine increased strength and elasticity with specified toughness parameters. As a rule, spring and spring steels operating under variable dynamic loads are tempered in this way.
The temperature range in this case is from 300 ºC to 450 ºC, and the hardness is reduced to 45÷50 HRC versus 60÷63 with low-temperature tempering. After such heat treatment, the steel acquires a troostite structure. The heating time during an average tempering can be up to several hours, and cooling is carried out naturally in calm air.
How to temper hardened steel correctly?
This operation must be performed immediately after hardening, since the part may become cracked due to the presence of high residual stresses. If the tempering regime is violated - insufficient heating or short holding time - “under-tempering” occurs, in which the part remains brittle. To eliminate this drawback, repeated tempering is used.
Approximate hardness of steel (Rockwell) after heat treatment in various modes, including quenching and tempering
Source: metallz.ru
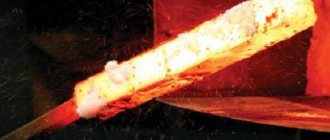
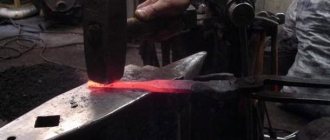
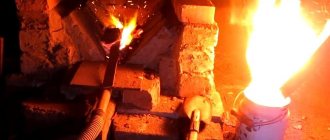
Hardening steel over an open fire
It is possible to harden metal at home. For an easy and useful hardening process, you need to light a fire and prepare two large containers. There should be a lot of hot coals in the fire.
Diesel or motor oil is poured into one container, clean water, preferably from a well, is poured into the other. You should first prepare a tool with which you will need to hold the hot product.
It is advisable to find blacksmith pliers, but if they are not among the tools, you can arm yourself with something else similar to pliers.
When the preliminary work is done, metal drills or other objects are placed in the very center of the flame, that is, on hot coals.
The rich white coals are hotter than the rest. It is important to watch the hardening process - the flame should be crimson, not white. If the fire is painted in the latter color, there is a risk of overheating and even burning of the metal.
It is necessary that the color is distributed evenly across the entire area of the fire. Black spots should not appear on the edge of the product that is being hardened.
And if the metal turns blue in places, this indicates that the material has softened too much and become too plastic. This should not be allowed under any circumstances.
Therefore, the process requires increased care, because you can overdo it and heat the ax blade white-hot.
When the metal equipment is heated in the fire, it is time to remove it from the high heat.
A hot object must be lowered into a container of oil many times with a frequency of 3 seconds, gradually increasing this period of time.
You cannot hesitate with these actions; you need to carry out operations to harden the metal edge quickly and sharply.
When working with your own hands, the element should be dipped into a container with liquid until the color loses its saturation and brightness.
Next, the object is immersed in a bucket filled with water, which will have to be shaken a little.
At this stage, do not forget to be careful, as oil droplets on a knife or ax may burst into flames if they end up in water.
The table shows how to correctly and incorrectly immerse various parts, including drills and disc cutters, in water:
Very often there is a need to harden drills. It is not recommended to immerse thin long elements flat into water, otherwise the lower layer of metal, cooled first, will shrink.
Drills should be lowered into the liquid with the thicker end.
If you follow all the rules and precautions, then hardening yourself will not seem like a complicated and dangerous procedure. It will bring the desired guaranteed effect.
But sometimes at home you have to harden steel equipment or melt non-ferrous metal. Such operations require extremely high temperatures, 700-900 degrees.
And only a muffle furnace or an electric furnace can heat metal objects to this level. You can make a muffle furnace yourself. It is unlikely that you can make an electric oven at home.
Metal moonshiners! Let's unite! For the benefit of the site and communication!
I'll ask. How to temper hardened steel to the required hardness at home. wimpex273, 24 May 13, 23:42
Thrust wheel of a sewing machine for sewing leather. wimpex273, 25 May 13, 00:30
To sew leather, instead of pressing a rag, use a wheel. So it needs to be made according to all the rules. wimpex273, 25 May 13, 00:44
Last ed. 25 May 13, 01:01 from Benz
I'll ask. How to temper hardened steel to the required hardness at home. wimpex273, 24 May 13, 23:42
As far as I remember from a school course or something, hardness is achieved precisely by hardening, and tempering relieves internal stress and increases strength. Archon, May 25, 13, 00:53
Last ed. 25 May 13, 01:00 from Benz
Well, it’s not like I’m building a spaceship. Therefore, such precision is not needed. It is necessary that the balls from the bearing do not roll into the groove, and that the edges do not break off. The hardness is needed like a wrench, the old wheels were approximately the same. The machine is ancient, the parts have not been sold for a long time, but it works well. There is an old method for hardening. Heat the part until it stops being magnetic. It is determined using a magnet. When it stops magnetizing, put it in oil. Do not keep it in place in oil, but constantly move it. After such an operation, the metal becomes very hard, but also very brittle. This is normal during hardening. Now let's release the part. wimpex273, 25 May 13, 22:23
alekslug Researcher Lobnya 4917 1606
I'll ask. How to temper hardened steel to the required hardness at home. wimpex273, 24 May 13, 23:42
Last ed. 25 May 13, 23:03 from Efim
All posted materials reflect solely the opinions of their authors and may not coincide with the opinion of the Administration of the HomeDistiller forum.
© 2022 HomeDistiller (forum for moonshiners, brewers, winemakers, rectifiers, grain growers) & Simple Machines LLC Full version Simplified version
Source: forum.homedistiller.ru
Coolants
The main coolant for steel is water. If you add a small amount of salts or soap to the water, the cooling rate will change. Therefore, under no circumstances should the quenching tank be used for other purposes (for example, washing hands). To achieve the same hardness on the hardened surface, it is necessary to maintain the coolant temperature at 20 - 30 degrees. You should not change the water in the tank frequently. It is absolutely unacceptable to cool the product in running water.
The disadvantage of water hardening is the formation of cracks and warping. Therefore, only products of simple shapes or cemented ones are hardened using this method.
- When hardening products of complex configurations made of structural steel, a fifty percent solution of caustic soda is used (cold or heated to 50 - 60 degrees). Parts heated in a salt bath and hardened in this solution turn out light. The solution temperature should not be allowed to exceed 60 degrees.
Modes
The vapors generated during quenching in a caustic solution are harmful to humans, so the quenching bath must be equipped with exhaust ventilation.
Be careful not to let water get into the oil bath, as this may cause the product to crack. What is interesting: in oil heated to a temperature above 100 degrees, the ingress of water does not lead to the appearance of cracks in the metal.
The disadvantage of an oil bath is:
- release of harmful gases during hardening;
- formation of plaque on the product;
- oil's tendency to flammability;
- gradual deterioration of hardening ability.
- Steels with stable austenite (for example, X12M) can be cooled with air supplied by a compressor or fan. At the same time, it is important to prevent water from entering the air duct: this can lead to the formation of cracks in the product.
- Step hardening is performed in hot oil, molten alkalis, and low-melting salts.
- Intermittent hardening of steels in two cooling environments is used for processing complex parts made of carbon steels. First they are cooled in water to a temperature of 250 - 200 degrees, and then in oil. The product is kept in water for no more than 1 - 2 seconds for every 5 - 6 mm of thickness. If the exposure time in water is increased, cracks will inevitably appear on the product. Transferring the part from water to oil must be done very quickly.
Do you need to cut metal quickly and efficiently? Use a plasma cutter! How to do it correctly, read this article.
If you are interested in how to turn metal products, read the article at https://elsvarkin.ru/obrabotka-metalla/tokarnaya-obrabotka-metalla-obshhie-svedeniya/ link.
What is the hardening process?
To harden metal, you need to complete the following basic steps:
- Heating to temperatures that allow the atoms of the crystal lattice to be mobile and rearranged;
- Cooling in a certain environment (water, oil, air), which makes it possible to record changes in the structure of the metal.
Instructions for hardening metal
When heating a workpiece, it is necessary to monitor the condition of its surface, namely, the change in color of the metal. There is a special scale where, based on the color shade, you can approximately understand to what temperature the part is heated at the current moment in time. A bright red tint indicates that the process is happening correctly. Spots should not be allowed to appear on the surface, indicating overheating and excessive fragility of these areas.
The environment in which the metal is cooled solely depends on its physical properties and directly affects the result of heat treatment. If the coolant or holding time is incorrectly selected, the entire procedure may not give any result, and sometimes it may worsen the physical and mechanical properties of the workpiece.