Removing pipes is a labor-intensive, dirty and dusty process. Every plumber thinks about how to simplify it.
I’ll tell you how to make this work easier; I didn’t use it myself for several years until someone suggested it.
This is my grinder, an indispensable dismantling assistant.
This is exactly what it looks like, without the protective cover and without the handle. They make our work very difficult.
This is due to the fact that you always try to make the smallest number of cuts, and you often make them in hard-to-reach places, where the handle and casing only get in the way due to their size. For example, I will give the dismantling of water pipes located behind the toilet cistern, or under the bathtub.
Do you know what I mean?
Where you can get by with one cut, in the presence of these “strays” you need to make two, or even three. Naturally you follow the path that is easier. I agree there is no safety, but if you are a pro in your work, then your hands hold the grinder confidently, and in order to prevent the disc from biting, you do not make the cut completely, but leave a small bridge. Which you then break off with ease, with rotational movements and a gas wrench. So I wanted to recommend you a cutting disc 1.2 mm thick.
It is very thin, this is the whole “beauty”, there are few sparks, and no dust. There is no need to apply force to press, it cuts the pipe like butter.
The only thing you need to do is stick to the given trajectory, that is, do not change the angle of the angle grinder, otherwise the disc may fly apart. Although this is not scary, it will absolutely not cause any damage to your fingers or other parts of the body. Since, due to the fact that the disk is thin, it scatters into dust, and does not crumble into “slices”, like disks with greater thickness.
I affirm this with confidence as I am a witness to such cases. These cases are very, very rare, but they did happen. There was absolutely no harm to health. I’m just sure that once you try such a circle at work, you won’t refuse to use it.
Structure and capabilities of the grinder
An electric angle grinder is used for grinding, polishing and cleaning surfaces, welds and edges. The technique is effective in cutting various materials and making products from metals, stones, bricks and concrete. The development of artificial diamond technology has made it possible to turn the grinder into a universal cutting machine. Now the quality of their execution is regulated by GOST R IEC60745-2-3-2011 and is tested in laboratories.
Grinder grip
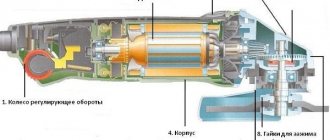
In general, the device in an angle grinder is as follows:
- The rotation of the motor rotor is ensured by an electric motor with a control unit and a current supply cable.
- A gear and a fan are installed on the shaft. The mechanism is engaged with a driven gear mounted on the drive spindle. The latter rotates the working tool - a disk or stone.
According to their design, there are one- and two-handed grinders:
- One-handed tools. There is no main handle, they weigh up to 2.5 kg, the diameter of the circle is 100, 115 and 125 mm.
- Two-handed instruments. There are main and additional handles, the diameter of the circle ranges from 125 to 230 mm, the weight of the machines is 2.5-6 kg.
Tools for home and semi-professional use
To install water supply or sewerage systems, heating and ventilation circuits in home construction or when providing construction services, tools from this category are often used.
Among the most common devices are:
- Cutters with pruner design . This tool is used for cutting polymer pipes whose cross-section does not exceed 75 mm. The gear mechanism of the device allows you to apply the force necessary for work. The design of such a cutter includes a special shelf on which the pipe is laid, which ensures an even cut at exactly 90º. Prices for such tools can be very different, it all depends on their quality, dimensions, capabilities, manufacturer and other factors.
- Disc type pipe cutter . In such a device, the pipe is cut by a special disk, which is made of durable material and has sharpened edges. Using a lever, the cutting disc is pressed against the surface of the pipe and guided along its cross section.
Preparing to work with an angle grinder
The rules for working with power tools and their accessories always provide for preparatory work. Bulgarian is no exception. First of all, you should prepare the required protective equipment.
Safety precautions when working on a lathe
Note! The minimum program is glasses and a casing. Failure to comply with these requirements may result in sparks entering the eyes and injury.
You should also have protective gloves. During the labor process, the hands are close to the disk. This causes particles, scale and sparks to land on your fingers and palms. Thick gloves are used to protect hands and preserve their skin. This is a minimal set for home use. If we are talking about production, then in the work area you need full protective clothing that covers all parts of the body.
Features of working with an angle grinder
Safety precautions when working on a drilling machine
A modern angle grinder allows you to replace the emery when working on metal. To avoid problems, it is useful to remember a few guidelines when using the tool:
- The angle grinder should be held with both hands during operation. In the event of a kickback, a strong fixation will minimize displacement. Otherwise, the risk of injury increases.
- Work should be carried out on a flat surface, confidently maintaining balance.
- Place the power cord on the opposite side of the disk. The operating instructions for the angle grinder make these requirements in order to avoid short circuits and shock waves from the unit.
- When completing work, the tool should be held firmly in your hands until the disk comes to a complete stop.
- If there is a power outage, you must unplug the tool from the outlet. Otherwise, the angle grinder may start working without operator control.
- The work process is accompanied by heating of the disks. After turning off the tool, they should not be touched until they cool down.
Fixing the material
What tools will you need?
- Miter box - this aluminum, plastic or wooden professional carpentry tool has the shape of a groove in the shape of an inverted letter P. With its help, the material can be sawed at the required angle. Usually it is mounted on a table or workbench. It is safe and easy to use;
An electric miter saw that replaces a miter box. Provides high cutting accuracy; An electric jigsaw that can be used to accurately cut corners; A sharp and well-sharpened knife for processing foam baseboards; A saw for manipulating wooden baguettes or a blade - when working with all others, including foam and plastic.
How to hold an angle grinder correctly
Many people have an angle grinder, but most people do not know how to use it correctly and how to hold it. This leads not only to work failure, but also to serious injuries. An angle grinder is a rather dangerous power tool.
The circle should be installed with the pattern facing up and clamped with a special nut.
The person with the leading right hand holds the grinder by the handle with his right hand. In this case, the circle should be located on the left side of the machine, and the protective cover should cover it on top. The rotation occurs in such a way that during cutting, sparks fly towards the worker. If the grinder's circle jams and the grinder breaks out of your hands, then it will not go towards the carver, but in the opposite direction.
The left hand holds the machine by the handle, which is screwed into a threaded hole on the body. There are several of them for special cases of use, but the correct position of the handle is only the upper one.
This position of the machine requires the use of protective equipment. To protect the eyes and the exposed part of the face, use safety glasses, or even better, a protective mask. To protect exposed parts of the body from sparks and small fragments during the cutting process, it is necessary to wear a suit made of thick material.
How to cut the corners of a ceiling plinth - general rules
Trimming should be carried out along the outer edge of the plinth, as well as from the inside (when forming an external corner) or the front side (for internal joining). If everything is done correctly, the texture of the cornice will not be disturbed. At home, foam finishing materials are most often used. The technology for joining elements is as follows.
- Using a protractor, measure the angle between the walls. If it is strictly equal to 90°, you need to cut the edges at 45°. The action is performed on both elements.
- If the joints between the ceiling and walls are not even, the corner radius should be divided in half. In this case, the baguette, which will be attached on the left side, is cut on the right, and the right element, accordingly, on the left.
- The edges of the inner corner parts are cut so that the top part is shorter than the bottom. The edges of the outer corner are formed differently: their lower part is shorter than the upper.
- Unlike foam baseboards, wooden parts must be precisely adjusted to each other and to adjacent surfaces, applying and cutting along the abutment line.
Ceiling plinth (corners): the photo demonstrates techniques for trimming and joining elements:
Instructions and recommendations for cutting with a grinder
Working with materials is characterized by one sentence: the directions of tool movement and disk rotation must coincide.
Safety precautions when working with disinfectants
Note! It is necessary to come into contact with the surface being cut at maximum spindle speed - otherwise jamming may occur.
Wherein:
- The cutting line should pass by the working person, and not rest against him. If the disc jams, the reactive movement of the tool will pass by the operator.
- Start cutting profiles from the place with the smallest cross-section.
- The protective cover provides safety only if it is between the person and the circle.
- When cutting walls, a cable, fittings or pipe may get caught, which will lead to a kickback. Be away from the possible displacement line.
Why do you need to set tiles?
Now I will tell you how to make manual tile installation. Gripping involves sawing and grinding the tiles at 45 degrees. Joining tiles cut at 45 degrees gives a beautiful visual effect and is useful for decorating niches and other external corners.
Without grooves and decorative outer corners, tiles are often joined in such a way that the edge of one tile rests against the edge of another. In this case, the end of one of the tiles is exposed to our viewing.
This can often be seen in hospitals, schools and other public institutions.
When tiles cut at an angle of 45 degrees are joined, such an outer corner looks much prettier.
Ideally, a seamless convergence can be achieved at the junction of the tiles. There is also a simpler option - leave a small gap between the tiles for sealing with a fugue.
Now I will show how this is done in practice.
What is a kickback?
This is the name of one of the most dangerous cases that can happen during work. The effect occurs when the wheel is strongly jammed into the workpiece, as a result of which the power tool is sharply thrown back. It is necessary to carefully monitor the process and hold the grinder tightly.
The points weren't enough
How to avoid kickback
To do this you need:
- Always hold the tool by the standard handles.
- Take a stable position on the ground.
- Use both hands.
- Be slightly away from where the tool will hit.
- When the angle grinder moves away from itself during a reverse impact, it bounces onto the person.
- Be especially careful when working around corners and edges.
How to cut smoothly
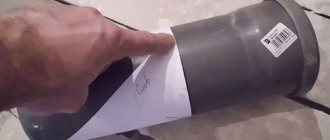
To cut something evenly with a grinder, you need to make the correct markings. For example, before cutting a piece of pipe, you need to mark the size with a marker or thin chalk. Then we take a sheet of paper with a straight edge and wrap the pipe around the mark. We will get a paper pipe on top of a metal one. The border of the paper will be the exact trajectory along which part of the pipe will be cut off.
For these purposes, you can also use construction tape, which makes it easier to wrap the pipe and secure it. Draw a cutting line along the edge of the paper or tape. We remove the paper, heal the pipe in a vice and cut it with a grinder.
You can cut a corner, profile or sheet in a similar way. Just don’t forget that you can’t change the position of the machine while cutting. Misalignment of the circle will lead to jamming or breakage. Do not press too hard on the circle, especially thin ones. The deformation will immediately be reflected by curvature. The machine should eat into the material itself, you just need to hold it.
The evenness of the cut also depends on the correct selection of the wheel. It is difficult to achieve an even trajectory when cutting off part of a thick-walled pipe with a thin circle.
Features of cutting various angles
We have discussed the general technology of how to cut ceiling skirting boards. But there are also some nuances when cutting different corners of this product.
Indoor floor
View of the internal corner
First, let's set the left and right plinths at right angles. We insert the left product into the miter box, applying it to the outside, and cut off the left inner corner. Then we perform a similar operation with the right one. Ready.
External floor
View of the external floor corner
In this case, using a miter box, we set the mode not to the inner, but to the outer edges. Otherwise the operation is similar.
External ceiling
View of external ceiling corner
We already cut the ceiling corners on the inside of the device. Inserting the left plinth into the miter box, cut off the left outer corner. We substitute the right one – the mode is right outer edge.
Internal ceiling
View of the internal ceiling corner
By analogy with the outer corner, we also cut the inner one. Just cut the inner left and right edges respectively.
It is important to remember: the product is always attached to the ceiling upside down. Therefore, insert it upside down into the miter box.
This will help you cut the baseboard correctly.
Methods for cutting metal pipes at an angle
There are several ways to saw off a pipe or cut it into pieces. Of the available tools, a grinder is the best for this task. But the biggest problem remains the need to correctly mark the cutting lines. They can be different, most often you have to maintain either a right angle relative to the axis of the pipe, or 45 degrees. The techniques vary somewhat depending on what products need to be cut:
pipes for laying water supply, gas and for heating distribution;
profile products for assembling gates, canopies, and other metal structures;
large-diameter pipes - as a rule, this is rarely needed at home, where the widest clearance is only in the sewer system;
pipes made of steel, cast iron, thin-walled of non-ferrous metals and soft alloys.
Both problems can be solved quite simply even without the use of a special pipe angle pattern.
45 degree cutting
One particular example of such a situation is the need to cut a metal pipe at an angle of 45 degrees. Such cutting of material is often required when laying water pipes or heating systems. In this case, you have to deal with steel pipes. For these purposes, conventional cylindrical pipes are usually used. If we are talking about the installation of some kind of metal structures, then profile pipes of rectangular or square cross-section are more often used. The main problem here is that in order for the elements to be connected to coincide, the cut must be as smooth as possible, which means that especially close attention should be paid to marking the material.
In cases where cutting at an angle is required, a simple square sheet of paper can be used as a marking template. It must be folded strictly diagonally, and then wrapped around the pipe with the template. In this case, it is necessary to carefully ensure that the side of the sheet, which is located closer to the end of the pipe, is perpendicular to its central axis. Next, using marking material, a series of dotted lines is applied and after the marking is completed along the entire circumference, the template can be removed.
Photo of the template for cutting pipes - side view
Larger pipe blank
Marking a 45 cut using a template
If you have to cut a profile pipe, then it is advisable to make a special template from the same pipe, but with a larger cross-section. In this case, you will only have to use the measuring devices once. To apply markings you will need to use a protractor or a construction square. After sawing off the template, the pipes to be cut can simply be inserted into it and marked. This approach will significantly save work time and cutting a profile pipe at 45 degrees will be convenient.
As for what to use when carrying out work, you should choose the most suitable and familiar one. This can be a simple hacksaw for metal, or a grinder with an installed cutting disc.
90 degree cutting
When the need arises to cut at 90 degrees, the situation is even simpler. In the case of cylindrical elements, you can use the same sheet of paper that is used to wrap the pipe as a template. It is important to ensure that the edge of the sheet is smooth and matches the entire circumference. After marking is applied, the element to be cut is fixed and the cut is made.
The video shows the process of cutting a pipe at 90 degrees.
How to cut a profile pipe evenly
You can cut a profile pipe in much the same way, but here it will be easier to use a square. The device is applied to each side in turn, for which the element to be cut will need to be rotated, and markings are applied. Next, the pipe must be secured firmly and work can begin.
Any suitable tool can be used for sawing. If you have to cut a lot of pipes, then it is advisable to make full-fledged templates from scraps. In this case, measuring and marking work will have to be done only once.
Large diameter pipe cutting
When it is necessary to cut a large diameter pipe, a number of special devices and tools can be used. This may be necessary if, for example, a pipeline needs to be repaired.
- Bulgarian. The use of an angle grinder is justified from the point of view of the availability of tools and the comparative cheapness of the work. However, you should not count on greater productivity in this case; in addition, carrying out work in this way is associated with considerable risk.
- Roller machine. Such devices are also often called pipe cutters. In essence, such a device is the same grinder, but more suitable for this type of work. The machine includes a special frame where the element to be cut is fixed, as well as a holder with installed cutting rollers, which do the actual work. It is important to understand that each machine must be purchased for specific tasks, that is, for the size of the pipes.
- Gas cutting. This option is most often used when working with large diameters. Cutting is carried out due to the action of a high-intensity flame, and the waste produced is blown away by gas pressure. The method can be considered the most practical and effective.
Gas cutting is the fastest option in this case.
There are other options for carrying out the task, such as the use of plasma, waterjet or laser cutting, but in private use they are practically not used.
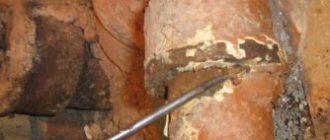
How to cut a cast iron pipe
If the pipe is made of cast iron, then in order to cut it smoothly you will have to apply certain knowledge. The fact is that this material is characterized by high fragility, which means that before cutting such a pipe, you need to determine an algorithm of actions.
- We mark in the same way as steel pipes.
- At the cutting site, you need to place a wooden beam as a support.
- Next you need to make a cut of a few millimeters around the entire circumference.
- After this, a chisel is inserted into the groove and a sharp and strong blow must be applied with a hammer.
As a result, it will split along the line, forming a fairly even cut area, which can be further processed if necessary.
Industrial equipment
In professional construction and when working with large engineering projects, the question of how to evenly cut a large-diameter pipe is solved by using special equipment. Quite often these are stationary units with a certain set of qualities.
Among the most interesting and functional devices are the following:
- Lathe of various modifications . Using such a machine, you can evenly cut a profile pipe for both ordinary water supply and especially durable products through which liquids with an aggressive environment will pass.
The maximum cross-section of the pipe to be machined will vary depending on the distance between the support heads and the diameter of the holes in the spindle. These units can be called universal, because they can carry out cutting, chamfering, and also carry out a number of other actions, often in automatic mode.
- Belt type cutting machines . Such units are used for cutting pipes of water supply or sewer lines, previously laid in trenches or installed in a building.
The cutting belt machine can process pipes, even those that have undergone quite severe deformation. Additionally, such a cutter can chamfer the required shape.
- Cutting machines with circular knives . Equipment of this type is capable of cutting pipes from any metals, including non-ferrous ones. In addition, they have no restrictions on the shape of the product - they can be either round or profiled, with a fairly large cross-section.
As a rule, such units are installed on conveyor belts and are additionally equipped with a machine, which, after cutting, collects and packages a given number of pipe sections, which will then be sent to customers.
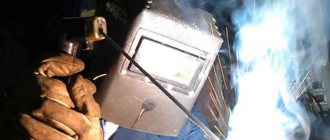
- Manual disc cutters . They are used mainly in cases where cutting a large number of pipes is required directly at the places where they are laid. These machines have a special clamp that tightly grips the pipe during cutting, preventing it from shifting and deforming. Thanks to this quality, such equipment can be successfully applied to metal-plastic, copper or steel pipes.
A number of disc-type cutting machines have a built-in orbital welding and rotation system, which allow cutting and subsequent joining of parts with one mechanism. Such a device can be very useful if it is necessary to perform a very large amount of work on cutting, welding or joining pipes without having stationary equipment.
However, such a multifunctional device is not necessary if you have a small amount of work to do that does not require complex mathematical calculations and compliance with standards.
Often, you can cut pipes evenly using simple improvised tools that every owner has.
Straight cut
An even cut at an angle of 90º can be made only after marking has been applied. Use a piece of paper or masking tape. The latter is preferable, because it is attached directly to the surface and does not move.
The sequence of actions looks like this:
- Using a tape measure, measure a piece of the required length, mark this place with a line with a marker.
- Next, stick tape along the resulting mark around the circumference of the pipe. The smoother you apply the adhesive tape, the better - it is optimal that the wide edges meet as accurately as possible. This will allow you to accurately cut the pipe according to the mark.
- The next step is to secure the pipe in a vice or press it to a flat plane so that it does not move during operation and an even seam is obtained. Note that one end of the pipe must be left in a free position so that during the cutting process the disk is not pinched by the walls. Cutting starts from top to bottom.
- The last thing you need to watch out for is how to cut the pipe smoothly with a grinder. To do this, you need to guide the disc as accurately as possible along the edge of the adhesive tape.
In cases where tubular products with large sections are being cut, the work must be done in small sectors. To do this, the pipe will have to be constantly rotated around its axis upon completion of the next cut.
When working with cast iron pipes, the procedure will be slightly different. First, a continuous cut is made along the entire diameter of the product, then, using a chisel and a hammer, the resulting groove is gradually tapped, as a result of which the pipe should split strictly along the cut line.
Preparatory work
To make the process quick and simple, use a tool such as a miter box. This is a template that has a U-shape. There are slot patterns in its side walls. They have different angles of inclination.
There is another technique that allows you to evenly glue the ceiling plinth. It is possible to cut corners without a miter box. But still, using such a tool makes the work much easier.
First you need to mark the baseboard. If you need to create an external corner, the length is measured along the ceiling, the internal one - along the wall. For fillets, a line slope of 45 and 90 degrees is used. Since this is a fairly small number of slot options, it is quite possible to make the template yourself. All you need is a sheet of paper or cardboard.
If the repairman has significant experience in carrying out such operations, he can cut the corners without additional tools. The craftsman places the fillet against the wall, and then makes marks on the product right here. After that, he trims off the excess. An inexperienced craftsman will most likely not be able to cut straight corners the first time. Therefore, it is better to use a miter box or cover the unevenness with decorative corners.
How to properly cut pipes from different metals
Accurate cutting and trimming of pipes depends not only on well-executed markings. The material is also of great importance - metal of different thicknesses and hardness is cut with different forces and side effects. To properly cut a cast iron pipe, it should not be sawed all the way through. Cast iron is a brittle metal, so several cuts are usually made, and then a specialist knocks a piece out of them with one precise blow of a chisel.
To work with thin-walled pipes, you will have to very accurately check the position of the grinder. At the same time, the master must choose the right [discs for cutting metal with a grinder]. In industrial settings, special pipe cutters, gas cutting machines and welding machines can be used to perform the same tasks.
Safety when cutting a gas pipe
When working with gas pipes connected to the mains, it is important to follow safety precautions. First turn off the gas supply valve, then make sure that there is nothing in the pipe. To do this, just open the stove burners and light the gas - when it runs out, the flame goes out.
Instructions
- If you have nothing at hand except a sheet of paper and a pencil, then you can get by with even these supplies. To do this, very carefully fold a sheet of paper in four, while smoothing the folds well. As a result, at the place of the double fold you will get a right angle that has 90°. Fold the corner in half again, and you get the desired angle of 45°. True, in this case a small error will appear in the form of a loss of several degrees. For a more accurate drawing, trace a right angle with a pencil onto a blank sheet of paper, carefully cut it out and fold it in half - this will give an angle of 45°.
You can draw an angle using right triangles, which can be different - with angles of 90°, 45°, 45° and 90°, 60°, 30°. Take a triangle (with angles 90°, 45°, 45°) and trace an acute angle of 45° on a piece of paper. If you only have a triangle with angles of 90°, 60°, 30°, then on another sheet of paper draw a right angle, cut it out, fold it in half and trace it on the desired drawing. This will be an angle of 45°. The most accurate construction option would be one that uses a protractor. Draw a line on a piece of paper, mark a corner point on it, attach a protractor and mark a 45° point, then connect them together. Interestingly, even with the help of a compass you can also draw an angle of 45°. To do this, it is enough to have a depicted 90° angle in front of you (for example, using a right triangle or by folding the paper in four). Then draw a circle from the corner point with a compass. At the intersection of the circle and the sides of the right angle, mark the points. Now, from each of the two points, use the same compass solution to make two more circles. At the place where they intersect, you will get a point, which you connect to the corner, resulting in two angles of 45°.
Safety precautions when operating an angle grinder
Note! It is no secret that when interacting with a dangerous tool, there is always an instruction consisting of rules that allow you to avoid unpleasant consequences when working with an angle grinder.
The following points should be emphasized:
- Compliance with requirements and instructions.
- Do not work with a damaged disk.
- Use the wheel according to its intended purpose: cutting wheel for cutting, grinding wheel for processing.
- A good master is careful, attentive and calm.
- Monitor the situation both before and after the operation.
- When using an angle grinder, do not stretch
Skirting material
Experts agree that polyurethane is the best material for the presented finishing products. But even it has a number of disadvantages. These should be taken into account before cutting corners on ceiling plinths. Polyurethane is susceptible to temperature changes. Therefore, it is not used for finishing in the kitchen or bathhouse. Otherwise, the baseboards will quickly crack and lose their aesthetics.
Expanded polystyrene has almost all the positive characteristics inherent in polyurethane. But it is still a more fragile material. It is easy to break.
PVC skirting boards are relatively cheap. But it is very easy to leave dents or gouges on them. Therefore, you should work with such products very carefully.
Wood looks very beautiful, but not in all interiors. In addition, it is quite difficult for a non-professional craftsman to work with such material. Do you want to do the renovation yourself? Then you are better off choosing polyurethane or expanded polystyrene.
How to cut a pipe with a grinder
To cut pipes with a grinder, it is recommended to use cutting wheels with a thickness of no more than 1 mm, otherwise the cut will be more difficult, and there will also be too many sparks and flying hot particles.
The technology for carrying out the work is as follows:
- The pipe is secured in a vice or secured in another way. In this case, the cut part should hang down. It is not allowed to place the workpiece between two supports and make a cut in the middle, as the cutting blade will jam (due to sagging pipe).
- Markings are applied using a strip of paper and masking tape. The ends of the tape should meet as accurately as possible. Home craftsmen recommend lowering the pipe into the liquid at the required angle, and then marking the cut line along the dry and wet boundary.
- The cut should be made from the top of the pipe, gradually lowering the angle grinder lower. The cutting disc should go along the very edge of the glued strip.
A large diameter pipe is cut a little differently, since the working part of the circle does not allow this to be done in one go. The wall is cut sector by sector, and the pipe is turned to the desired side.
How to make the correct connection
If after gluing part of the baguette there is some distance left to the corner, you need to think about how to avoid making a mistake - a small margin will not hurt. First, it is better to cut off a piece with a good margin of about 10-15 cm. Then, having cut off the corner using any convenient method, try it on a dry surface. To do this, you should attach a bar to the ceiling and mark the point where the shortening border will pass. We cut at right angles.
Equally important is the correct alignment of the corners. Finished skirting boards are usually fixed at an angle slightly less than 45 degrees, so there may be inconsistencies between the cut edges and the appearance of gaps. Here, the initial cutting of the corners is followed by dry, as precise as possible joining of the skirting boards on the ceiling itself. Problems usually arise when using wooden and plastic materials.
After completing the rough joints of the fillets, they should be glued or screwed, and then, if necessary, use putty and then seal all existing seams.
Final part
You should not think that a grinder with a cutting disc is a tool used exclusively for dismantling metal structures and does not require careful operation. Quite the contrary. An angle grinder requires extreme concentration and accuracy in work. This is a rather traumatic tool, and therefore, when working with it, you should not forget not only about the correct markings, but also about safety requirements.
Only accurate calculation and cutting will allow the pipes to be perfectly aligned at an angle Sources
- https://instanko.ru/osnastka/kak-pravilno-rezat-bolgarkoj.html
- https://instrument-blog.ru/elektroinstrumenty/kak-rezat-bolgarkoj.html
- https://trubaspec.com/montazh-i-remont/kak-rovno-otrezat-trubu-instrumenty-i-sposoby-otrezaniya.html
- https://rezhemmetall.ru/sposoby-razmetki-i-rezki-metallicheskix-trub.html
- https://WikiMetall.ru/metalloobrabotka/kak-rovno-otrezat-trubu.html
- https://alsver.ru/rezka/metalla-bolgarkoy
- https://HouseChief.ru/kak-rovno-otrezat-trubu-bolgarkoj.html
[collapse]
Similar posts:
- How to work with an angle grinder correctly: step-by-step instructions
- Why is an angle grinder called an angle grinder, and what else is it called?
- FBS GOST blocks: foundation blocks 13579 78
- How to cut a plastic window sill evenly
- Do-it-yourself semi-automatic inverter: reworking algorithm
- How to become a good leader - where to start
Composition and features of the material
To understand how to properly cut a plinth, you need to understand its composition. This will help you choose the right tool and cutting technology.
- Styrofoam. The price and strength of this material are the lowest. But since we are creating a decorative decoration for the ceiling, strength is not particularly required.
- Ceiling plinth made of polystyrene foam is more dense. than regular foam. To cut such material, the most ordinary knife is used.
Tip: sharpen the knife well before use. This will eliminate the presence of torn edges at the incision sites.
How to cut a skirting board straight
Tree. Here you will have to put more effort into processing. For wood, use only a hacksaw.
Tip: the smaller and more frequent the saw tooth, the smoother the edges will be. You can even use a metal cloth.
Plastic. How to cut plastic baseboard? The same method is suitable here as with wood - a saw, a hacksaw. Alternatively, you can also use a grinder.
Using a regular hacksaw blade