CERAMICS
(Greek keramike - pottery art, from keramos - clay; English ceramics, French ceramique, German keramik), the name of any household or artistic products made of clay or mixtures containing clay, fired in an oven or dried in the sun.
Ceramics include pottery, terracotta, majolica, faience, stone mass, porcelain. Any object formed from natural clay and fixed by sun drying or firing is considered pottery. Porcelain is a special type of pottery. Translucent, with a glassy sintered shard and a white base, real porcelain is made from special varieties of clay, feldspars and quartz or quartz substitutes. Also on topic:
CLAY
Making pottery is an ancient art, predating metallurgy or even weaving in most cultures. Porcelain, however, is a much later invention; it first appeared in China ca. 600 AD, and in Europe - in the 18th century.
Material.
The main material for the production of ceramics is clay. Extracted clay is usually mixed with sand, small stones, rotted plant debris and other foreign substances, which must be completely removed to make the clay usable. Today, as in ancient times, this is done by mixing clay with water and letting the mixture sit in a large bath. The mud settles to the bottom, and the top layer of clay and water is pumped out or scooped into an adjacent reservoir. The process is then repeated, sometimes several times; the clay is purified with each subsequent sediment until the material of the required quality is obtained.
Also on topic:
DECORATIVE ARTS
Purified clay is stored in a damp state indoors until it is used. Aging clay for several months significantly improves its working qualities, allowing the clay to maintain its shape during the creation process, remaining pliable and plastic. Fresh clay is often combined with old clay from a previous mixed batch; this increases bacterial activity and appears to improve the quality of the material.
Any product molded in clay undergoes some degree of compression, both during drying and during the firing process. To ensure even drying and minimal shrinkage, roughly ground pieces of terracotta, usually pottery scrap, are added to the clay. This also increases the strength of the clay, reducing the possibility of it shrinking abruptly during molding.
History in Russia
One of the branches of ancient Russian pottery was the production of glazed dishes.
Remains of such dishes are found at excavations of ancient settlements. In rural areas it is much less common. Most of the finds of implements in the form of glazed ceramics from the 10th – 11th centuries are found in the territory of southern Russian cities (Chernigov, Kyiv, Vyshgorod). Single-tier and two-tier pottery forges were used in the production of ceramics. The Byzantine trend had a significant influence on art. During excavations near the St. Sophia Cathedral, dishes were found with a color and a characteristic rim, but the nature of origin is undoubtedly recognized as Russian. These finds indicate that Russian craftsmen, using local raw materials, imitated Byzantine potters. However, such imitation can be traced only in products of the 10th-11th centuries. Later finds were made in the tradition of classical circular ceramics.
Glazed pottery was also found in Novgorod. It is distinguished by a mottled pattern with alternating brown, green and yellow colors. Such utensils include pots and vessels. Spotted watering remained popular until the 16th and 17th centuries. But the traditions of watering have not been lost, and materials obtained in Moscow and the Moscow region are proof of this.
Until the 14th century, wall tiles were somewhat popular in Pskov. It was used to cover the roofs of Orthodox churches. Most likely, the facing tiles and tiles came from it. Nowadays, monuments of glazed ceramics can be found on the territory of the Pskov-Pechersky Holy Dormition Monastery. Ancient tombstones of priests, as well as galleries built into the walls, were made from it. Pskov ceramics differ not only in physical properties, but also in shape.
The famous Gzhel is a separately developing direction. For the first time, Gzhel as an art was mentioned in the Spiritual Charter of Ivan Kalita (1328), but excavations prove that the local population has been engaged in pottery since the 11th century.
Band ceramics.
A later invention was the ring molding technique, in which the vessel was built from several clay strips. A flat, hand-shaped clay base was surrounded by a thick strip, and then pressure and smoothing achieved a strong connection between the base and the strip. The remaining strips were added until the pot reached the desired height and shape. To facilitate the process of building and smoothing the walls, a rounded stone was sometimes placed inside the pot, and the outside surface was treated with a spatula. This technique produced beautiful pottery with walls of uniform thickness. The band pottery method is reminiscent of the technique of weaving baskets from long fibrous ropes (or bast), and it is possible that the band pottery technique has its origins in this method.
Improvements in the tape technique led to the molding of the pot on a small piece of reed matting or a curved shard (a fragment of a broken vessel). The mat or shard served as a base during the construction of the pot and as a convenient axis of rotation, thanks to which the vessel turned easily in the hands of the potter. This manual rotation gave the potter the ability to continuously smooth the pot and symmetrically align the shape as it was built. Some primitive peoples, such as the American Indians, did not create anything more progressive than this technique, and all their ceramics were made by this method. Large jugs for storing food were made using the belt method even after the invention of the potter's wheel.
Decoration
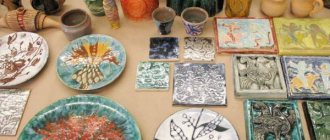
Decorating is the creative part of pottery making. There are many decoration methods:
- relief;
- painting;
- glazing;
- inlay;
- embossing;
- seal;
- reservation;
- openwork;
- silkscreen printing.
Clay plate with painting.
Any chosen option will turn the product into an unusual, unique work of art.
Potter's wheel.
The invention of the potter's wheel dates back to approximately the end of the 4th millennium BC. Its use was not immediately widespread; some regions adopted new technology much earlier than others. One of the first was Sumer in Southern Mesopotamia, where the potter's wheel began to be used around 3250 BC. In Egypt it was already in use by the end of the Second Dynasty, around 2800 BC, and in Troy, wheel-made pottery was discovered in the Troy II layer, c. 2500 BC
An ancient potter's wheel was a heavy, durable disk made of wood or terracotta. On the underside of the disk there was a recess with which it was mounted on a low fixed axis. The entire wheel was balanced so that it rotated without wobbling or vibration. In Greece, the wheel was usually rotated by an apprentice potter, adjusting the speed at the command of the master. The large size and weight of the wheel ensured a fairly long period of its rotation after launch. Having an assistant turn the wheel allowed the potter to use both hands in shaping the vase and give the process his full attention. The foot potter's wheel does not appear to have been used until Roman times. In the 17th century the wheel was set in motion by means of a rope thrown over a pulley, and in the 19th century. The steam-powered potter's wheel was invented.
The process of making a pot on a potter's wheel begins with kneading the clay to remove air bubbles and turn it into a homogeneous, workable mass. Then the clay ball is placed in the center of the rotating circle and held with bent palms until the circle moves evenly. By pressing the thumb into the middle of the clay ball, a ring with thick walls is formed, which is gradually stretched between the thumb and the rest of the fingers, transforming into a cylinder. This cylinder can then, at the request of the potter, open into the shape of a bowl, stretch out like a long pipe, flatten into a plate, or close to create a spherical shape. At the end, the finished product is “cut off” and placed to dry. The next day, when the clay dries to a hard crust, the vessel is turned upside down into the center of the circle. On a rotating wheel, the shape is sharpened, or cleaned, by cutting off the unnecessary part of the clay, for which tools made of metal, bone or wood are usually used. This completes the molding of the product; the vessel is ready for decoration and firing. The leg and other parts of the vessel can be dressed and ground separately and then attached to the body of the vessel with clay coating - liquid clay used by the potter as a fastening material.
Casting.
The casting technique is used to create mass-produced ceramics. First, a plaster mold is made according to the model to be reproduced. A liquid clay solution called casting mud is then poured into this template. It is left until the gypsum absorbs moisture from the solution and the layer of clay deposited on the walls of the matrix hardens. This takes about an hour, after which the mold is turned over and the remaining solution is poured out. The hollow clay casting is finished by hand and then fired.
In ancient times, soft, pliable clay was pressed into a mold by hand rather than poured as in the casting technique. The production process began with the molding of the model itself. The clay sample (patrix) made by the master was created taking into account both the final use of the vase and the intermediate production stages. Most of these sculpted vases have the molded part attached to a piece, such as a mouth, shaped on the potter's wheel. Therefore, the production of patrix was limited to only this molded part.
Why plaster molds?
Plaster absorbs moisture, it will draw excess moisture from the clay slurry. It’s easy to work with plaster; you can make a homemade mold, giving it the required pattern and size.
Solid or collapsible forms?
The configuration and type of mold does not affect the quality of the ceramics, only the simplicity and convenience of removing the product from the mold. It is easier to remove the finished product from a collapsible mold.
Requirements for clay slip:
- A liquid solution without impurities, large particles and debris is used. Before cooking, sift the dry clay, remove debris, etc.
- Strain the finished slip through an old nylon stocking.
- The thicker the solution, the thicker the walls of the mug will be.
Burning.
The technique of treating dried clay with heat to transform it from a soft, brittle substance into a hard, glassy material was discovered ca. 5000 BC This discovery was undoubtedly accidental, perhaps the result of a fireplace built on a clay base. Probably, when the fire went out, people noticed that the clay base of the hearth had become extremely hard. The first inventive potter could duplicate this phenomenon by molding something from soft clay and placing it in the fire, and then find that the fire did not damage his product, but rather gave it a hard, stable shape. This is how the technique of ceramic firing could appear.
Primitive methods.
Ancient potters did not use kilns; they collected dried clay vessels in a small pile and covered them with any combustible material at their disposal: wood, charcoal, brushwood, straw or dry manure. Among the primitively communal tribes of Africa and North and South America, this practice continues to this day. Because the pot pile is not at the same temperature and some are not heated enough to sinter the clay, this type of firing produces uneven results and causes unusable pottery. When unbaked pots are filled with water, they become soggy and turn back into soft clay. The color of this ceramic is unpredictable, as some areas are completely exposed to the oxidation process, and others - to a much lesser extent. Therefore, some products turn out to be brownish-red, while others are grayish or black.
Bake.
This is a specially built chamber for firing ceramics, allowing the potter to have greater control over the process than would be the case with open fire firing. Usually the firebox is separated from the place where the dishes are placed. To control the fire, place and move products, monitor firing and adjust air draft, holes are provided in the furnace.
During the first stage of firing, moisture is gradually removed from the clay. Firing is carried out slowly to avoid cracking of the products. When the temperature reaches 600° C, the clay is completely dehydrated. It becomes a uniform red color and a brittle, porous and absorbent (capable of absorption) shard. During the second firing, after glazing, the temperature reaches 600–900° C. If air flows freely into the kiln during firing, the clay is oxidized and all carbonaceous substances are removed. If there is no air in the kiln, the clay shard will be black, “restored.”
Underglaze decor.
As the name implies, underglaze decor is applied to the piece before it is covered with a clear glaze. Paints are made using oxides of cobalt, nickel, chromium, manganese, iron, etc., which give the glaze the desired colors. The oxides are mixed with substances, which must melt during subsequent hot processing, thus bonding with the shard. The decor is applied by hand painting, transferring the design using the decalcomania method, silk-screen printing (i.e. using a silk mesh as a stencil) or spraying paint through other types of stencils. The decoration method, called sgraffito, involves painting the entire surface of the product with an engobe (liquid clay coating) of a different color than the product itself, and then scratching the intended pattern through this coating. Underglaze decor is extremely durable, as it is protected from wear and chemical attack by the glaze covering it.
Painting clay products
You can paint the clay with acrylic or latex paint if it is allowed to air dry. It is important that you follow certain rules here too.
Some painting tips:
- Make sure that if you are firing clay, the paint is suitable for kiln use.
- Some paints do not require firing, which can sometimes be a convenient option.
- Choose a paint that matches the required temperature, as air-dried clay cannot be fired.
- Apply paint with brushes, sponges or other methods.
- Allow the paint to dry according to the paint instructions.
- If you are going to kiln cookware for food and liquids, use paint and sealant first, and then start firing after drying.
- If you are using a kiln, also use glaze to fully seal the paint.
Painting will add a unique touch to your artwork, and while it may not be necessary at first, you can really benefit from it if you have some interesting painting ideas. Some also prefer to paint the products after baking in the oven, you decide for yourself what you like best.
Overglaze decor.
In this case, pigments composed of coloring oxides and materials that leave a metallic residue are applied over the fired glaze. Since overglaze paints are fired at fairly low temperatures (700–870° C), a variety of colorants can be used that cannot withstand the higher temperatures required for underglaze firing. Metal decor consists of either metal salts or very small metal particles with some kind of binder that forms a consistency suitable for painting or silk-screen printing. During the firing process, the binder evaporates, leaving a metal film on the surface of the product. If this film is very thin, the metal particles have not so much a metallic but a pearlescent tint; such a covering is called a chandelier. The color of the chandelier can vary by using different metals. If the pigment is applied in a thicker layer, the result is a shiny metallic surface, which is usually achieved using gold, silver and platinum. The pigment containing sprayed metal particles is usually applied in a fairly thick layer using the silk-screen printing method, which produces the most durable metal decor. Since the surface of such products becomes dull after firing, they should be polished.
see also
DECORATIVE ARTS; TERRACOTTA; articles on ceramics from countries around the world.
What kind of clay is needed
To make ceramics you will need natural clay - this is the main ingredient. Glazes, varnishes, pigments and enamels will be needed to coat the finished ceramics and color them in the desired color.
Natural clay is:
- White - after firing, the product acquires the color of ivory, in the original state of clay it has a grayish tint;
- Red – the color is due to iron oxide. The clay molds well, is convenient and easy to work with, and turns red after firing.
- Blue – used in medicine and cosmetology.
There are also porcelain and dark brown clay, but we will focus on the first two types.
