When crimping conductors, one of the main conditions for obtaining high-quality contact and its reliable operation in the future is the use of a professional tool.
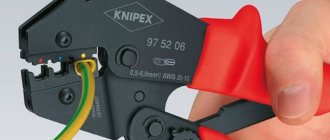
One of these tools is press pliers or crimpers, designed for crimping bushings, insulated, non-insulated lugs and automotive terminals. Crimpers for automotive terminals and insulated lugs must have matrices with a double-circuit crimping profile - along the core and along the insulation. Also, its geometry and shape must correspond to the crimp part of the tip.
As a rule, it is best to buy sets at once, which include the pliers themselves and all the necessary dies.
Among domestic manufacturers, the KVT company stands out and its two crimping kits:
- press pliers CTF
- press pliers CTB
Let's look at their configuration, differences and principles of operation. Both of these kits are designed for crimping both insulated and non-insulated ferrules.
Historical perspective
Initially, as a tool, pliers were intended to remove hot metal blanks and crucibles of molten metal from forges.
They were also used by blacksmiths to hold various workpieces during forging. Archaeologists prove that the prototype of pliers - tongs, which had a rod-axis - was invented back in the Neolithic era. Back then this instrument was made from burnt wood. The first depiction of hand pliers tools dates back to the 6th-5th centuries BC. In the Bronze Age, blacksmiths used primitive pliers as clamps. They are currently found in the burials of blacksmiths as burial goods, indicating that the deceased had a special and fairly high social status.
Since ancient times, pliers have been two castor beans connected by a rivet that acts as an axis. This tool has been evidence of specialized blacksmithing skills since ancient times. Together with the anvil and hammer, pliers were an attribute of numerous ancient Greek and Roman blacksmith gods and lords of thunder (Thor, Vulcan, Hephaestus, etc.).
Much later, pliers began to be used in construction work, in plumbing activities, widely used in electrical work, etc. Depending on the specialization and principle of the device, various pliers are called side cutters, pliers, wire cutters, pliers, etc.
Why do you need crimping and crimping wires?
Is it even possible to do without sleeves and crimping? What's wrong with simply attaching wires to machines and other devices?
With a simple clamp, the bundle of wire fluffs up and is crushed to the sides. Some individual conductors may even be damaged. Such conductors, destroyed and separated from the main bundle, no longer take part in contact and the passage of current load through themselves.
All this leads to the fact that the remaining cores are not enough and the connection points heat up. In addition, the bare copper from which the wire strands are made remains accessible to moisture and oxygen. And this leads to its darkening and oxidation. By crimping the conductor once with a tip or sleeve, you will save yourself from all these problems in the future.
Crimping process
In order to crimp tips and sleeves using crimping pliers, no special knowledge and skills are required; to do this, it is enough to familiarize yourself with theoretical information on this topic and try to perform this procedure yourself at least once. So, to make high-quality contact, you need to use the following algorithm:
- It is necessary to free the end of the cable or wire from the insulation to a length of approximately 1–1.5 cm, for which you can use crimping pliers of the appropriate design. On their lower working jaw there is a semicircular groove into which the wire is laid, and on the upper jaw there is a blade that cuts the insulation layer to the required depth. The process of stripping the insulation is as follows: after the wire is laid in the groove, the jaws are brought together and the crimping pliers make several turns around the wire, as a result of which the insulation on it is cut. It can then be easily removed.
- After the cores of the electrical cable or wire are stripped of their insulation, they must be placed in the internal cavity of the cable lug or connecting tube. It is very important that the contact element is correctly selected according to the diameter of the internal hole. The conductor strands must fit tightly into the cavity of such a contact element, then the compression will be performed efficiently.
- The contact element, into which the wire cores, stripped of insulation, have already been inserted, is placed in the corresponding working socket of the crimping pliers. After this, you need to smoothly close the handles of the tool until the ratchet mechanism is activated.
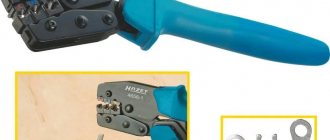
The process of crimping a copper tip
Cleaning the insulation
Insert the wire into the lug
Place the tip in the work area
Squeeze the handles of the press pliers
We get a pressed tip
Working area number on the reverse side
Many home craftsmen who have never encountered electrical work before are wondering how to crimp wire lugs without tools. If you don't have crimping pliers on hand, you can use simple tools such as pliers, a hammer or even a chisel, but only as a last resort. The fact is that this can damage both the cable lug or connecting sleeve and the conductor on which they are installed. In addition, the use of non-specialized tools instead of crimping pliers does not guarantee high-quality and reliable contact of the conductor with the tip or sleeve.
How to choose the right wire and tip
First, you need to find out what cross-section of wire you will be crimping. This can be done by following the inscriptions on the core insulation, or using a caliper. Further, when choosing certain sleeve tips, you can be guided by the color marking of their insulated skirt. Each color must correspond to a specific section and size of the tip sleeve.
True, there are also manufacturers who don’t bother with this and produce single-color products of different sections. After choosing, be sure to physically check how tightly the wire fits into the sleeve or tip. In this case, there is absolutely no need to twist the wires before inserting them into the tip.
The tip at the entrance has a special skirt that will help you put it on even a slightly fluffy wire. In addition, this skirt acts as an insulation retainer. You can compare how many kinks in different directions the wire will withstand and without a skirt. As you understand, the result will not be in favor of the latter option.
Another important point that needs to be remembered: many wires are manufactured not according to GOST, but according to their own technical conditions.
And therefore, their actual cross-section may be less than that stated in the nomenclature. Accordingly, because of this, a slack is formed in the pressed part of the tip, although as it seemed to you, you selected everything according to the tables and seemed to have made no mistakes anywhere.
It often happens that a 2.5mm2 wire easily fits into a tip with a cross-section of 1.5mm2. Therefore, choosing from tables is, of course, good, but you can’t do without practical fitting of the sleeved part and wire.
Wire lug crimping pliers: how to choose
In the variety of terminal crimping pliers and ferrules offered by manufacturers, it is quite easy to get lost. Product descriptions in online stores are full of positive characteristics. The following tips will help you navigate and choose the appropriate tool model:
- The choice should begin with a clear definition of the tasks. It is on the basis of these that it is necessary to select the size and functionality of the press jaws. If you have to repeatedly crimp, strip contacts and cut wires, it is worth purchasing a universal version of the tool.
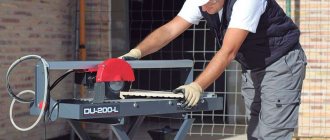
- For crimping and connecting cables with a large cross-section, it is more convenient to use a hydraulic mechanism.
- Important criteria are the price and manufacturer of the tool. Trusted brands are always more reliable. A low cost will most likely be an indicator of the fragility of use.
- When purchasing, you should definitely check the press pliers for crimping tips for defects and evaluate the quality of the assembly: using a visual inspection, identify possible dents and chips, check the correctness of the contact lines of the blades, and the position of the handles.
- Be sure to pay attention to the shape of the handles. The presence of recesses for gripping helps to hold the tool more securely.
- It is recommended to hold the pliers in your hands. Possible inconveniences associated with shape and weight will certainly appear.
Among the wide range of crimpers on the market today, everyone can easily select a tool according to their profile
Crimping solid wires
Many people often wonder whether it is possible to crimp solid wires? Yes, of course, it is not prohibited to do this, you just need to use the appropriate tool for this. Ordinary crimpers are no longer suitable here, since they are designed for less force required when compressing a monocore. You will have to purchase specially designed press pliers PK-16u or PK-35u for this.
This is a universal tool and can also be used for crimping stranded wires. In order for the compression on the monocore to be high-quality and there is no play inside the sleeve, the basic rule here is to choose a sleeve or tip one size smaller than the cross-section of the wire being pressed. These pliers are also convenient for pressing several conductors simultaneously in one sleeve. This is done, for example, when making connections in junction boxes.
Tip material
Another relevant point in choosing a tip is the material of manufacture. When purchasing, make sure that they are selling you copper or tinned tips. To do this, it is enough to first purchase one tip and file it with something foreign.
With copper material, especially if high-quality copper is used, the cut will be reddish in color. If ordinary copper alloys are used, which is most often the case, then the cut will be a pale yellowish color.
When exposed to air, copper may darken and lose contact quality. Copper tinning is a long-known method that makes the contact durable and reliable.
Advantages of crimping wires with lugs
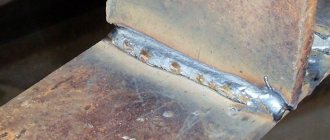
- the crimped end of the wire is considered airtight
- the ferrule sleeve prevents individual wires from being damaged or excluded from contact
- tinned tip surface – reliable protection from environmental influences
GOST
GOST has not been developed for the crimpers themselves, but literally all types of tips with which this tool works are standardized.
This means that the crimper dies are also manufactured to the tip standards.
So the following GOSTs are considered the most popular:
- For cable lugs this is GOST 23981-80 and 9581-80;
- For cable sleeves these are GOST 23469.0-81, 23469.2-79 and 23469.3-79;
- For cable pin lugs these are GOST 23598-79 and 22002.5-76;
- GOST 9688-82 has been developed for cable ring lugs.
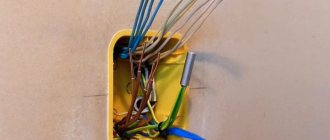
Do-it-yourself crimping of wire lugs
In theory, wire crimping is not a complicated process. The presence of a tool, appropriate consumables and some physical effort is all that is needed. In reality, connections may leave much to be desired, and sometimes you even have to repeat the procedure. This sequence of actions when crimping wires will be useful for those who are ready to do the termination with their own hands:
- It is necessary to process the cable, remove the insulation using a special device, leaving a margin of 0.3 - 0.5 cm. If stripping was done with a knife, you should make sure that the core is not touched. If damage is found, the area will have to be removed.
- Place a piece of insulating braid over the wire. Wipe the open part with alcohol, degrease and apply a special paste to it.
- Set the desired section size and tip type in the matrix. Insert the tip all the way.
- The cable cores in the straightened state should be inserted into the tip until they stop.
- Press the crimper handles. After a characteristic click, compression can be considered complete. The handles should return to their original position.
- Return the piece of braid to the joint and heat it with a hair dryer.
Crimping of wire lugs is performed in a certain sequence
There is an opinion (and some do) that crimping is easy and without special tools, using ordinary pliers. To a certain extent, this is acceptable, but only for small cross-section wires and, if necessary, make a temporary connection. A tight fit of the tips to the core can only be ensured by a matrix. And then the entry of air, water, and metal oxidation is eliminated, and the connection functions for a long time and reliably.
Pliers, pliers, round nose pliers, pliers and wire cutters
Main types of ticks
Crimping pliers are divided into two types. The most common type is a design that works like pliers. That is, the sleeve is compressed on both sides. Other pliers are diaphragm crimpers. Crimping pliers.
Pliers
The tip is crimped in the same way as pliers grip a part. The working surface of the dies has cutouts into which the tip shank is threaded. This design is suitable for those fastenings that do not require special reliability.
To increase crimping force, hydraulic ferrule crimping tools were invented. Thanks to this improvement, the pliers became more efficient. The design uses cylinders with pistons filled with oil, which creates a large pressure of the matrices on the tip sleeve.
Pliers with removable dies
Some crimpers are equipped with several types of removable matrices. The versatility of the tool eliminates the need for pliers for each conductor cross-sectional size.
Diaphragm pliers
The originality of the design of diaphragm crimpers lies in the comprehensive coverage of the tip shank. The principle of operation is similar to the movement of the aperture blades of photographic lenses. The only drawback of such devices is the impossibility of inserting pliers into the connection of the two ends of the wires.
The diaphragm tool is used as a press for pin or flat metal tips. The all-round clamp is much more effective than the plier type for covering the end switches of wire products.
Design features of adjustable pliers
Since adjustable pliers are the most versatile tool, it is worth getting to know their design features in more detail. Based on the type of mechanism used, adjustable pliers are divided into two categories of tools.
The adjustable mechanism can consist of an axis fixed to the movable jaw of the tool and a groove on a stationary clamping element, which is a series of aligned circles. On the axis, so that it can be moved along the groove and thereby adjust the degree of opening of the jaws, a sector is specially cut out. This adjustable mechanism works as follows: the axis for moving along the groove is rotated so that its bevel is parallel to the side of the cutout. Having positioned the axis in this way, the adjustable pliers are set to the required amount of jaw opening.
Pliers with grooves on the fixed part.
More common are adjustable pliers, the jaw opening mechanism of which is made according to the so-called American system. On the fixed jaw of such pliers there is a number of circular grooves along which the “tide”, made on the movable handle of the tool, moves.
Pliers with circular grooves.
To adjust the degree of opening of the pliers, you must perform the following steps:
- Remove the “tide” from its engagement with the side walls of the grooves.
- Place the mite lips as far apart as possible from each other.
- Place the tool handles in the required position and bring them together again.
Adjustable pliers equipped with a mechanism of the second type are considered more reliable and easier to use.
Many experts, when comparing adjustable plumbing pliers with conventional adjustable wrenches, emphasize that the former are easier to use and the required degree of opening of their working jaws is carried out more quickly. As a rule, adjustable pliers, equipped with adjustable mechanisms of both the first and second types, have about seven fixed positions of the clamping jaws.
Pliers
Pliers are a type of pliers that have a flat working surface. Often it is equipped with small notches. They are designed to grip and hold relatively small parts. For ease of working with parts, two such tools are sometimes used at once. They can have various shapes of working surfaces, which is why they got their name: long-nose pliers, duck-billed pliers, narrow-nose pliers. Often, pliers are equipped with cutting edges designed for cutting wire.
Combination pliers are also called pliers. Such tools include pliers equipped with a cutting edge for cutting nails and wire, and serrated grooves designed to hold tubes, nuts and other cylindrical parts.
Round nose pliers
The difference between round-nose pliers and pliers is the circular cross-section of the jaws, which taper towards the end (cone-shaped jaws). Round nose pliers are designed for curly bending of wire; the conical shape of the jaws makes it possible to make bends with different radii; they are an important tool for jewelers. Round nose pliers can have jaws of different sizes, both in length and thickness, and there are models that have jaws of different shapes in one tool, and there are round nose pliers with curved jaws.
Application area
Now let’s look at the main areas of using press pliers for terminating wires. Depending on the specific situation, choose a tool of the desired shape and design.
Stranded wires and thin-walled ferrules
Thin-walled lugs are used for small-section wires - from 0.5 to 3.5 mm2. The elements are marked NSHVI. The abbreviation stands for as follows:
- N – tip;
- Ш – pin;
- B – bushing;
- And - isolated.
NSHVI lugs are used for crimping stranded copper wires with subsequent insertion into sockets of various electronic devices. The crimper handles are compressed until the spring mechanism of the device is activated.
Note! Multi-stage clamp matrices allow you to work simultaneously with wires with a cross-section in the range indicated above. This eliminates the need for a large number of hand crimping tools.
Press pliers create a strong and reliable compression of the tips. Without them, one would have to twist stranded cores or solder the terminals of switchgear devices. The use of pressed end switches completely eliminates problems associated with breakage of thin wires, wire breakage, and the risk of short circuit.
Stranded wires and thick-walled ferrules
Thick-walled shanks are used for crimping multi-core power cables. Their maximum cross-section reaches 16 mm². Press pliers PK-16 are used only for multi-core wires. The tool can compress the sleeve so tightly that it can easily break a single core.
The cable crimping process occurs in several stages:
- At the end of the wire, mark the length of the sleeve.
- Using special nippers, remove the insulation from the marked area.
- Place a piece of heat-shrinkable tubing so that it does not touch the exposed wire.
- The cleaned end of the cable is inserted into the sleeve. The insertion of the wire should be tight, but without force.
- The tip is crimped using pliers.
- The protruding veins are bitten off.
- Use a hair dryer to heat the heat shrink tube until it tightly grips the cable.
If the letter “U” is indicated in the marking of the tool, this means that the ratchet mechanism is located inside the handles, which creates a large force on the jaws of the crimper. The PK-16-U pliers compress more easily during cable crimping.
Pliers PK-16-U
For large cables
In the case of large cross-section power wires, a large hydraulic press should be used instead of pressing tongs. This type of crimper appeared much earlier than crimpers, but, as in the case with them, what kind of high-voltage cable can be crimped depends on its dimensions. The tool is not used in the domestic sphere, since the crimped bushings, tips and sleeves have considerable dimensions. This option, for example, is suitable for laying and switching power wires in electrical panels in the entrances of houses, etc.
To compress the matrix, you need to apply a lot of force to the lever. If the valve is slightly open, the rod begins to slowly move away. A fully open valve allows the stem to be quickly removed all the way to the stop. During full compression of the matrices, blocking occurs. In this case, there is no possibility of excess pressure forming, which could damage the mechanism.
Since the dies are selected depending on the overall dimensions, the hydraulic press is produced together with a cassette of several dies. The upper part is magnetized, so it automatically returns to its original position. Only the lower element of the press changes. Regardless of the position of the equipment, parts will not fly out. The tool has a rubberized handle that increases electrical safety.
Main varieties
Modern manufacturers offer various modifications of crimping pliers, which may differ in both design and functionality. So, depending on the main purpose, two types of such instruments are distinguished:
- press pliers designed for stripping insulation from electrical wires and cables;
- tool for crimping tips and sleeves.
Press pliers for stripping insulation from conductors
Tools belonging to the first category are also usually divided into the following types:
- manual crimper is a fairly simple design, but effective device, which can be used to crimp cable lugs and sleeves of various sizes, as well as install contact connectors and terminals (some models are equipped with special blades installed in the place where the handles are attached; the presence of such blades in the design pliers can also be used to cut electrical cables and wires);
- electric pliers are a tool intended for primarily professional use (it is possible to use such universal pliers not only for crimping cable lugs and connecting sleeves of insulated and non-insulated type, but also for stripping insulation from electrical conductors);
- crimpers are tools with which you can install connectors and crimping lugs for wires, as well as crimp twisted pair cables (such pliers are equipped with two long handles, of which either one or both can be movable, a massive working part consisting of two working jaws, between which there are sockets for cables and wires of a certain diameter; the design of certain models of crimpers may also contain blades used for cutting electrical cables and wires).
Crimper for crimping ferrules with a set of replaceable dies
To perform crimping, a manual hydraulic press and electrically driven equipment can also be used.
Different models of crimping pliers used as a crimper for tips and sleeves may differ from each other in the shape of the working sockets, as well as the presence or absence of plastic flanges in such sockets.
The use of a crimper for tips and sleeves, the working sockets of which are equipped with such flanges, allows you to crimp stranded conductors with its help more efficiently.
Depending on the type of contact elements that the pliers are designed to work with, such a tool may be one of the following types:
- press pliers designed for crimping insulated sleeves;
- a crimping tool used to crimp connecting pipes that are not covered with insulation.
Tool for standard non-insulated terminals
The crimper for insulated terminals has a different jaw profile for neat crimping of the terminal without damaging the PVC tube
The design of the first type of crimping pliers has three oval-shaped working sockets, each of which is marked with its own color - yellow, red and blue. Insulated sleeves, for crimping which this type of pliers are used, are produced in the same color, so choosing the appropriate working socket for them is not difficult. In order to form high-quality and reliable contact between the tube and the electrical conductor placed in it when using such crimping pliers, the following nuance must be taken into account: the edge of the joint during the crimping process should be located in the middle of the upper profile of the working jaws of the crimping pliers.
The punch of crimping pliers, intended for working with non-insulated sleeves, is a metal rod, which must be located at the dividing joint during crimping. Thus, the compression of the connecting tube when using a tool of this type is carried out in its central part.
How to work with crimping pliers - important nuances
The process of crimping wires is intuitive - a sleeve or tip is put on the wire(s), a pliers matrix is attached to it, the handles of the tool are closed and the contact is ready. In practice, most often the “first pancake”, or even several, turn out “lumpy”, and almost in the literal sense - the connections may be far from ideal. There have also been cases when contact in a seemingly well-crimped wire deteriorated over time.
If the shape of the terminals is not maintained
In the first case, the culprit is the settings for the compression force of the matrix parts, which can be different both for individual wires and for the tips themselves. Because of this, professionals prefer to have at least two tools so as not to have to reconfigure the spring to work with different wires or sleeves.
The quality of work is also influenced by the material from which the sleeves are made and their thickness. Crimping for dense terminals is always much easier and they subsequently hold their shape better than those made of soft materials.
The correct orientation of tips with a “U”-shaped cross-section is a requirement that lies on the surface, but is often ignored, and the misalignment of parts in any mechanism does not always fall within the zone of permissible error.
Twisting stranded cores before crimping
For every experienced electrician who started with twisting and soldering wires, this movement is most likely already a reflex, but when crimping for stranded lugs is performed, then you need to get rid of it. The validity of this statement can be verified by a simple experiment - take a pair of single-core single-wire wires, arrange them crosswise and squeeze them with pliers.
In some cases, both wires are deformed, and sometimes only one, but in this case it will be almost completely broken and begin to dangle on a thin isthmus. Of course, the conductivity of this vein will decrease significantly. If the wires do not twist, then when crimping the tip they will be located parallel to each other and when deformed they will simply fill all the voids without squeezing each other.
Color marking of sleeves and dies
Some manufacturers mark different sizes of sleeves with separate colors and the same marks are applied to the plier matrices. We must remember that a unified system for this has not yet been developed, so if you purchase cartridges based only on color, you may end up with consumables that are not entirely suitable.
Press tongs CTB
The CTB set includes:
- the press pliers themselves
- five numbered matrices
- plastic case
Press pliers have a mechanism for quick removal and replacement of dies.
Keep in mind that any matrix, like any part, has the property of running-in. And during the first few dozen crimping cycles, it is quite possible that the tip may bite.
Sometimes a jam occurs such that the matrix jumps out of its quick-release mechanism. This does not at all mean that the instrument is of poor quality, and over time, after breaking in, you will forget about this inconvenience.
In general, quick-release dies are, of course, a positive thing, but in practice there really is a lack of some kind of mechanism for their rigid fixation. And the longer you use the crimper, the more this mechanism weakens.
STV press tongs are made of high quality steel. Equipped with a ratcheting mechanism that provides a full crimping cycle. There is also an asterisk with which you can adjust the clamping force.
At the top there is a lever that allows you to unlock the tool from any position. If you choose the wrong die size and start crimping, the press pliers may not reach the very end, thereby blocking the handles in an intermediate position. This is where the unlocking lever is needed.
The handles are elongated to make it convenient to squeeze with two hands. For relatively large sections and a large volume of work, this is very helpful.
Compared to other manufacturers, the small opening angle of the KVT crimper handles plays a significant role. With other models, in order to achieve a girth, sometimes you need not arms, but large paws. A small setting angle allows you to use the tool with much greater convenience and comfort.