A miter box is an irreplaceable tool during construction work, which is very convenient to use. It is used for precise cutting of boards and other materials at any desired angle. When producing a wooden frame, trimming casings and other works, such a tool is indispensable. It allows you to make a perfectly even angle. That's why many people try to do it themselves.
Step-by-step instructions: how to make a miter box
Finishing an apartment is not complete without installing skirting boards and door frames. For an aesthetic appearance, the joints are sawn at an angle of 45. Doing this yourself without a special device is problematic, especially if the material has a relief profile.
A miter box is an auxiliary device for cutting boards at the correct angle. It looks like a tray with a U-shaped profile and side cuts at the required angles. The knife blade or saw blade will move along them. You can buy a miter box at a hardware store or make it yourself, saving your budget.
Modern models are made from durable materials: plastic, hard chipboard, wood, metal. Advanced - equipped with rollers to prevent the cloth from moving, this allows you to reduce errors to a minimum.
To make a miter box, you need to select a hardwood: ash, oak, pine needles. In addition to the material, you need to prepare a tool for the job. First we decide on a hacksaw. It should have a thin blade with fine teeth.
Then we select the rest of the tool:
- Ruler, pencil, protractor;
- Screwdriver, self-tapping screws;
- Vise;
- Sandpaper.
Next we move on to cutting out the side and base. Typically, the width of the structure is 150 mm, length 250 mm, and the height of the sides reaches 50 mm. Then they move on to marking the cuts.
Algorithm of actions:
- 2 sidewalls are applied to each other;
- Align the edges;
- Fix with a vice;
- Mark the middle;
- Set aside an angle of 45 degrees and make markings so that you get a cross;
- 90 degrees are measured on the sides and marked with a line;
- Use a hacksaw to cut through 5 mm and replace it with a carpentry saw;
- Continue cutting to the base of the miter box, do not cut deeper;
- Do the same at 90 degrees;
- Use sandpaper to clean the inside of the cuts;
- The parts are released from the vice.
Next you need to assemble the box. The sidewalls are placed on glue and secured with self-tapping screws. If it is necessary to make a dismountable device, then glue is not used.
Top best models
The rating of the best models includes rotary miter boxes that have high-quality assembly, are time-tested and produced by well-known manufacturers.
Gross 22759
Price: 4,500 rub.
For convenience, this model of the tool is equipped with a removable two-plane saw blade made of high-strength Japanese steel 60 centimeters long. The saw blade is equipped with a comfortable handle. The tray is made of impact-resistant plastic and has a scale that allows you to make the most accurate horizontal or vertical cuts. On the working surface there are six limit stops for semi-automatic installation of frequently used horizontal angles. For vertical cuts, they are installed manually.
Santool 030203
Price: 2,700 rub.
The 550 mm miter box is used for cutting materials such as metal, plastic and hard wood. Angles are set in vertical and horizontal planes. The part to be cut and the saw blade are installed securely, resulting in an even and precise cut. The kit includes a sharp hacksaw with a closed metal handle. The tray is made of metal and the stand is made of wood. This model is often used in home workshops.
Gross 22757
Price: 3,500 rub.
The tool of this model has two clamps and a limiting stop, which allows for the most accurate cutting of wood, plastic and metal workpieces at different angles. The kit includes a hacksaw made of high quality Japanese steel. There is a quick installation of frequently used corners. The tray is made of impact-resistant plastic and is securely fixed on a special stand. The maximum cutting height is 10 centimeters, and the thickness is from 8.5 to 13.7 centimeters.
FIT Pro 41315
Price: 2,500 rub.
The cheapest model of the tool is sold complete with a hacksaw made of high-quality steel, which has adjusting screws for changing the tension of the blade. This means that for cutting the material you can select a certain tension of the blade. For a secure grip, the handle is made of plastic and has a comfortable shape. The tool is made in the form of a rotating design, which allows you to saw parts no more than 15 centimeters wide.
FIT Pro 41321
Price: 3,800 rub.
Unlike the previous model, the length of the blade of this miter box is 60 cm. It is used for cutting parts at angles from 45° to 135°. During cutting, the workpieces are securely fixed, which prevents defects. The maximum width of the workpiece is 12 centimeters. Due to the fact that the tool is made of durable and high-quality materials: plastic, aluminum and steel, it can last for several years.
NOBEX Champion 180
Price: 13,000 rub.
The expensive model of the miter box from the rating is a bow saw 63 cm long. The kit includes a hacksaw blade with a pitch of 1.5 mm. It has a high-precision scale that allows you to make the most accurate workpieces. The tray has two clamps that securely hold the part while cutting. Thanks to the presence of an extension, it is possible to saw long parts. The height of the sawn parts is 18 cm, width is from 12.6 cm to 20 cm. For convenient storage, the saw blade can be installed parallel to the miter box.
BISON 15442
Price: 3,100 rub.
The miter box of the domestic manufacturer is a professional device for sawing hard materials in the vertical and horizontal plane. Made from lightweight and durable aluminum. On the working surface there is a high-precision scale in inches and centimeters. The 56 cm long saw is made of high quality steel and heat treated. For a secure grip, the saw handle has a rubberized insert. If necessary, the blade can be replaced quickly. Thanks to the special design with small backlashes, high precision cutting of the workpiece is ensured. If you use a steel saw blade, you can cut metal workpieces.
Correct work with a miter box
You don't just need to make a miter box. To cut a skirting board well, you need to know how to handle it. Before performing the main work, it is better to practice on scraps of wood or leftover foam.
Angles are divided into external and internal, and joints have a right and left side. The right plinth is placed in the miter box on the right side, the corner is made on the left. The left one is placed on the left side, the corner is sawed off on the right.
There are 4 main mistakes made by beginners:
- Incorrect measurement.
- Confusion with internal and external angles.
- Lack of knowledge of the features of sawing ceiling and floor skirting boards. The technology is different.
- Lack of matching angles after cutting.
To make the inner corner of the floor plinth, the miter box is placed on the tabletop, and the plinth is pressed against the far side. The right part is placed on the right and brought to the diagonal, the cut is made from right to left. The part that is placed on the left side is cut from left to right. To cut the part evenly, the cut is made with smooth movements. The pressure is directed towards the thrust wall. The skirting boards are joined together. The angles must match, the top is directed in the opposite direction from the observer.
Grinder machine
They probably prefer to make trims with their own hands. A homemade installation has undeniable advantages, which we will talk about later.
Trimming saws can work on wood, metal, polymers and other materials. But the harder the material being processed, the higher the power requirements for the device.
The most popular trimming is based on the use of an angle grinder. Almost every craftsman has circular tools in his garage or at home, so finding the original tool for wood or metal will not arise.
If you manage to do everything correctly, then your broaching machine, made from a manual grinder, will have the following capabilities:
- The rotation speed of the circular disk is 4500 rpm;
- The length of the cut is about 350 mm.
Diagram of a wood trimming device
Read:
If necessary, circular saws are removed from the machine and used with your own hands as a regular hand tool. A huge plus is that a homemade trimmer of this type is universal and can be easily disassembled.
The process looks like this.
- Install the angle grinder's rotating device on the turning axis of the machine's wheel. Its fixation is carried out by a ball bearing. Preferably 150mm in size, but larger ones will also work.
- The ears are welded on the outside of the bearing by welding. They will serve for fixing to the base of the machine. Fasten with M6 type screws.
- It is recommended to cover the clip with a protective box so that when you work the grinder on wood or metal, shavings do not interfere with you.
- The issue with broaching is easily resolved. To make it, use another element from a truck - shock absorbers. Even if they are broken, it's not a big deal. Remove all oil from the shock absorbers, make ventilation holes and tighten with mesh to prevent dust and chips from getting inside.
- Install the soft start module. Due to this, you will not feel sudden jerks when turning on the circular.
- The assembly of the machine with a grinder-based broach is completed by the assembly of a protection that can protect the saw blade.
Depending on the installed disk, a grinder machine is capable of working on soft wood or metal and cutting the ends of pipes. But be prepared for the fact that the power of your circular saw may not be enough to cut pipes. Focus on the technical parameters of your manual grinder to understand whether the machine can cut pipe elements, or whether the unit is suitable exclusively for woodworking.
External and internal corners
The technology for sawing off the internal ceiling plinth is similar to the floor plinth. The difference is in the location of the fillet in the miter box.
Work rules:
- The miter box is placed on the table;
- The plinth is pressed against the near side;
- The right element is placed on the right side, the cut goes from left to right;
- Left - on the left side, sawing from right to left.
The angle must be joined - the vertex is directed away from the observer. For convenience, you can draw drawings to speed up the work. Next, the plinth is fixed to the ceiling. The corner should be smooth. The fillets can be glued to the ceiling surface or wall.
The outer one is made in a similar way, but the plinth is placed on the far side of the miter box. The right one is cut from right to left, but the left one is cut from left to right.
Sometimes it is not possible to remove the fillets accurately, and small gaps remain. Cover the corner joint with gypsum putty, mixed with water-based paint. You can install decorative corners.
If you have a good eye, use a paper template. To do this, on a thick sheet of paper you need to draw a model of the miter box in the form of a rectangle, and mark the corners. Next, draw bold lines. The plinth is trimmed as in a miter box. In this case, it is not inserted, but placed on the template, the lines are aligned, and the cut is made in accordance with the markings.
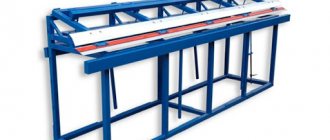
Designing a table for a circular saw
Table diagram for a circular saw
The main component of the future design is a table made by yourself. It will house the power unit, cutting tool, control unit and additional components to perform the work.
There are two fundamentally different schemes for constructing a table. In the first case, it is designed to work with a hand saw. The main task of the support frame is to fix the workpiece and the ability to change the direction of cuts. Most often, wooden components are used to make a table with your own hands - chipboard sheets, slats and timber.
Circular saw table
The sawmill is one of the types of circular saws. The difference lies in the lower location of the disk. In this case, the table serves as a bed. It houses the power unit, there is a disk mounting unit, as well as a control system.
During design, the following points must be considered:
- electric motor power. For housework, it is enough to choose a model with a power density of up to 800 W;
- depth of cut. Depends on the geometric parameters of the disk;
- rotation frequency. To form an even color, this characteristic must be at least 1600 rpm;
- location of the control unit. It should be as far away from the disk as possible.
The dimensions of the homemade design depend on the size of the parts being processed. To make a manual sawmill, it is recommended to use a metal sheet as a tabletop. Additionally, stiffening ribs are mounted at its base.
A simple way: how to correctly make a corner of a plinth for a ceiling
There is another way to make a corner on a ceiling decorative strip without using a miter box. To do this, markings are applied to the wall and ceiling.
Work order:
- The fillet is applied to the ceiling surface, pressing the smooth edge tightly to the corner;
- Draw lines above and below, one on the ceiling, the other on the wall under the baseboard;
- Similar actions are carried out on the opposite side;
- Dots are placed at the intersection of the upper and lower lines;
- The plinth is applied again, pressing it into the corner, and the marks are transferred to it;
- The points are connected into one line;
- They are cutting.
Next, the fillet is checked for alignment. If the walls are not level, make an allowance of 1 cm. In case of errors in measurement, the corners are joined first. Additional insertions must be made on the periphery.
Even with all your efforts, the angles are not always perfect. Therefore, it is necessary to make a homemade miter box, install and fix the plinth in it. It’s better to spend time on manufacturing, so that later the work will go faster. Correctly adjusted corners look neat and aesthetically pleasing, completing the design composition.
DIY miter box: choice of wood, tools and drawings. How to properly install and use the tool.
During repairs, a variety of tools are required. Sometimes it is necessary to cut parts at an angle of 45. This can be done with high precision using a special device. A DIY miter box will help you save your budget and will be an excellent assistant in repairs.
Practical advice
Unfortunately, this method is not ideal, and no matter how hard you try, you may end up with a gap at the joint.
You can fix this in the following ways:
- Take your time when gluing the cornices along straight sections. Take care of the corners first - in this case, you can trim them if necessary, or sand them until you get a good joint.
- If the task of cutting did not work out perfectly, simply fill the cracks with a compound suitable for the material of the cornice, and then paint it.
Cutting ceiling plinth is not a complicated process at all. The main thing is to do everything carefully, following the rules for performing work. After this, all the butt seams of the ceiling moldings will be practically invisible, and apartment renovation will bring pleasure to its owner.
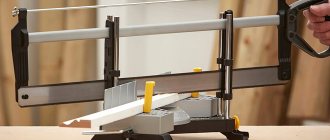
A miter box is a carpentry tool designed for sawing material at a certain angle. The use of this device greatly facilitates the work of cutting skirting boards.
The tool is fixed on a workbench or table, pressed with a clamp, and is completely safe and easy to use. In this article we will look at how to use a miter box, how to make a tool with your own hands and its types.
Read also: Soldering lead with a torch video
Step-by-step instructions: how to make a miter box
Finishing an apartment is not complete without installing skirting boards and door frames. For an aesthetic appearance, the joints are sawn at an angle of 45 degrees. Doing this yourself without a special device is problematic, especially if the material has a relief profile.
A miter box is an auxiliary device for cutting boards at the correct angle. It looks like a tray with a U-shaped profile and side cuts at the required angles. The knife blade or saw blade will move along them. You can buy a miter box at a hardware store or make it yourself, saving your budget.
Modern models are made from durable materials: plastic, hard chipboard, wood, metal. Advanced - equipped with rollers to prevent the cloth from moving, this allows you to reduce errors to a minimum.
To make a miter box, you need to select a hardwood: ash, oak, pine needles. In addition to the material, you need to prepare a tool for the job. First we decide on a hacksaw. It should have a thin blade with fine teeth.
Then we select the rest of the tool:
- Ruler, pencil, protractor;
- Screwdriver, self-tapping screws;
- Vise;
- Sandpaper.
Next we move on to cutting out the side and base. Typically, the width of the structure is 150 mm, length 250 mm, and the height of the sides reaches 50 mm. Then they move on to marking the cuts.
Algorithm of actions:
- 2 sidewalls are applied to each other;
- Align the edges;
- Fix with a vice;
- Mark the middle;
- Set aside 45 degrees and make markings so that you get a cross;
- 90 degrees are measured on the sides and marked with a line;
- Use a hacksaw to cut through 5 mm and replace it with a carpentry saw;
- Continue cutting to the base of the miter box, do not cut deeper;
- Do the same at 90 degrees;
- Use sandpaper to clean the inside of the cuts;
- The parts are released from the vice.
Next you need to assemble the box. The sidewalls are placed on glue and secured with self-tapping screws. If it is necessary to make a dismountable device, then glue is not used.
Trimming from a grinder
miter saw from a grinder
Technical characteristics of a miter saw with a broach, assembled by yourself:
- disk revolutions - 4500;
- cutting length - 350 mm (much higher than that of a middle-class factory tool).
The tool can be removed from the table and the grinder can be used for its normal purpose.
Manufacturing details:
- The turning device of the tool is installed on the turning axis of the car wheel (pin), it is held by a 150 mm ball bearing (if you can find more, it will do).
- We weld lugs onto the outside of the bearing to secure it to the base. It is fixed using M6 screws.
- To protect against chips, the clip is covered with a box.
- We make the broach from shock absorbers from a truck (broken ones will do). Oil is poured out of them, holes are drilled for ventilation, which should be covered with a mesh to remove dust and chips.
- To prevent a jerk from being felt when starting work, the saw is supplemented with a soft start module, which slightly reduces the speed.
- The last stage of work is the manufacture of protection for the disk.
Design disadvantages:
- very noisy;
- To adjust the accuracy of wood cuts, scraps of timber are used, after which the rod is fixed firmly and you can work cleanly.
Correct work with a miter box
You don't just need to make a miter box. To cut a skirting board well, you need to know how to handle it. Before performing the main work, it is better to practice on scraps of wood or leftover foam.
Angles are divided into external and internal, and joints have a right and left side. The right plinth is placed in the miter box on the right side, the corner is made on the left. The left one is placed on the left side, then it is sawed off on the right.
There are 4 main mistakes made by beginners:
- Incorrect measurement.
- Confusion with internal and external angles.
- Lack of knowledge of the features of sawing ceiling and floor skirting boards. The technology is different.
- Lack of matching angles after cutting.
To make the inner corner of the floor plinth, the miter box is placed on the surface of the table, the bar is pressed against the far side. The right part is placed on the right and brought to the diagonal, the cut is made from right to left.
Left - placed on the left side, the cut is made from left to right. To cut the part evenly, the cut is made with smooth movements. The pressure is directed towards the thrust wall. The skirting boards are joined together. The angles must coincide, the top is directed in the opposite direction from the observer.
Principle of use
In essence, the miter box for skirting boards is quite simple to use, however, the fact that the work is carried out with dangerous, sharp objects obliges the user to read the instructions.
If this is a simple design, then the handling rules will be noticeably shorter than the technical documentation supplied with electric models. The structure itself must be placed on a flat, stable surface to prevent mistakes during cutting. You also need to prepare the following things:
- hacksaw, saw blade, disk (depending on the type of structure);
- correction knife for working with soft materials;
- measuring instrument (tape measure, ruler, measuring angle), pencil for notes;
- a grinding machine or “sandpaper” to clean the cuts from unevenness.
In order for the work to proceed without problems and defects in the end, you need to take care of the saw, namely, its compliance with the material of the object being cut. Often many problems arise due to incorrect selection of the tooth pitch on the tool. You can also take care of clamps that can provide reliable stability during the work process.
The principle of operation itself is quite simple. Take a plinth or other object, measure it, mark the location of the cut, then place it in the opening and secure it (if possible). The saw is placed in the required hole and sawed to the required location. Position the object so that the saw is on the side of the working hand, this will make cutting most comfortable
External and internal corners
The technology for sawing off the internal ceiling plinth is similar to the floor plinth. The difference is in the location of the fillet in the miter box.
Work rules:
- The miter box is placed on the table;
- The plinth is pressed against the near side;
- The right element is placed on the right side, the cut goes from left to right;
- Left - on the left side, sawing from right to left.
The angle must be joined - the vertex is directed away from the observer. For convenience, you can draw drawings to speed up the work. Next, the plinth is fixed to the ceiling. The fillets can be glued to the ceiling surface or wall.
The external version is made in a similar way, but the plinth is placed on the far side of the miter box. The right one is cut from right to left, the left one is cut from left to right.
Sometimes it is not possible to remove the fillets accurately, and small gaps remain. Cover the corner joint with gypsum putty, mixed with water-based paint.
If you have a good eye, use a paper template. To do this, on a thick sheet of paper you need to draw a model of the miter box in the form of a rectangle, and mark the corners. Next, draw bold lines. The plinth is trimmed as in a miter box. In this case, it is not inserted, but placed on the template, the lines are aligned, and the cut is made in accordance with the markings.
Safety precautions
When working with a hacksaw using a miter box, it is advisable to use thick gloves and safety glasses to prevent sawdust from getting into your eyes.
The tool must be fixed on the desktop.
If it is not equipped with any clamps, the workpiece is held in the required position by hand.
To do this, at a safe distance from the groove with the inserted saw, the thumb rests on the material being cut, presses it against the side of the miter box, and the remaining fingers clasp this same side.
When starting a cut, the saw should be inserted into the grooves at least to the height of the teeth.
Marking with a canvas is carried out with slow, even movements, which will protect the master from jumping out of the groove.
A simple way: how to make an angle correctly
There is another way to make a corner on the ceiling plinth without using a miter box. To do this, markings are applied to the wall and ceiling.
Work order:
- The fillet is applied to the ceiling surface, pressing the smooth edge tightly to the corner;
- Draw lines above and below, one on the ceiling, the other on the wall under the baseboard;
- Similar actions are carried out on the opposite side;
- Dots are placed at the intersection of the upper and lower lines;
- The plinth is applied again, pressing it into the corner, and the marks are transferred to it;
- The points are connected into one line;
- They are cutting.
Next, the fillet is checked for alignment. If the walls are not level, make an allowance of 1 cm. In case of errors in measurement, the corners are joined first. Additional insertions must be made on the periphery.
Even with all your efforts, the angles are not always perfect. Therefore, it is necessary to make a homemade miter box, install and fix the plinth in it. It’s better to spend time on manufacturing, so that later the work will go faster. Correctly adjusted corners look neat and aesthetically pleasing, completing the design composition.
DIY installation
After the corner is correctly cut, it must be attached to the wall. You can do this in the following ways:
- Thin carnations. This method is suitable for wooden baseboards attached to wooden walls. You can no longer drive a nail into a concrete or brick partition.
- On self-tapping screws. This is also more suitable for wooden walls, but if you use drilled holes with wooden plugs driven into them, you can also attach the plinth to walls made of strong materials.
- On glue. There are now a lot of types of glue for construction work - and therefore you can use it to glue any elements. This method is suitable for skirting boards made of any material.
Circular saw made from a manual circular saw
To ensure maximum safety when working with a circular saw, it is recommended that the table be screwed to the floor. The tabletop should be as thick as possible. To increase the degree of strength, you can sheathe it with thin metal sheets. This will also increase the sliding of workpieces and make work more comfortable. The main difference between the machine and the tabletop type of design is that the grinder is mounted not above the table, but under its surface.
For reliable fixation, self-tapping screws, clamps and other specially prepared parts are used. The gap in the tabletop should also be about 4 mm from each side of the circular disk. If necessary, you can equip the machine with guide elements made of timber, secured with self-tapping screws.
It’s very easy to make a circular saw from a grinder
It is important to follow safety rules. It is advisable to equip the machine with protective plexiglass
Serve the blanks with other blanks. Remember that the bottom of the disk should rotate towards the master. When working, you must not stand in line with the circle, since at very high speeds it can jump off. During work, the master must be as vigilant and careful as possible.