From the author: Hello, dear masters! Many people who are often involved in construction work deal with a variety of drills that sometimes require sharpening. This element can be used for a long period of time, but sometimes there comes a time when it begins to work worse. Then a person may have a question about how to sharpen a wood drill.
People who have never done such an activity find it difficult. But those who have repeatedly resorted to sharpening tools know that this process is quite simple.
Features and types of wood drills
So, first you need to figure out what this item is. Many people know that high-quality work with any material requires a special type of construction tools, this also applies to drills.
This item is divided into several types, each of which is used for different categories of work. The following modifications are distinguished:
- feather ( feather). This type of drill is used for drilling holes of medium diameter - up to twenty-five millimeters. Typically, this element is used when the accuracy of the geometric parameters and the quality of the hole made are not important. It is not very expensive and, on top of everything else, is very easy to use,
- spiral ( screw ) - the working part of such a drill is somewhat reminiscent of an auger; it is used for drilling holes of small diameter. The design is practical in that the process removes wood chips very well. And, in addition to the above, the screw drill accurately and efficiently fulfills its role,
- screw - a variation of the previous option. Designed for working with wood, but the peculiarity is that it drills against the grain,
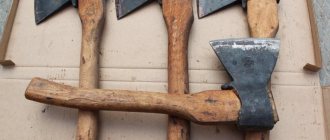
- Lewis drill is a subtype of auger drill. It has a serpentine shape. The diameter of the drilled holes is from ten to sixty millimeters,
- crown - designed for making holes of larger diameter,
- Forstner drill - this item helps to make a hole with a bottom. This is its difference from previous types - it is not intended for through drilling. When working with such an element, the bottom turns out to be perfectly flat.
How to sharpen a feather drill
Wood is a material that can be easily processed with various tools. One of their types may be a drill. You have to use a drill quite often when processing material.
The holes that need to be drilled can be of different diameters, as well as blind or through.
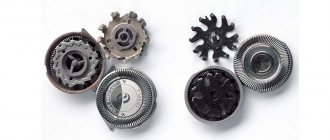
- Twisted or single-stranded
- Ballerina
- Crown
- Forstner drill bit for wood
- Feather drill
- What is a drill?
- Features of use
- How to sharpen a feather drill?
For small sizes, a metal tool is usually used, but for larger diameters, a specialized large-diameter wood drill is used.
There are several types:
There are, but are rarely used, drills for cutting conical tenons, cork drills, etc., etc. Let's look at some of them.
Twisted or single-stranded
A spiral, or screw, wood drill is available with two types of working tips: conical and special scoring tips.
The basis is a cylindrical rod, the working part of which is formed by helical spiral grooves.
The grooves effectively remove chips during operation.
Used for making deep holes. Using this tool, the holes are even, smooth and neat.
Ballerina
It is an adjustable device with cutters.
The gimlet in the center carries out preliminary drilling, and the cutters cut around the circumference.
When setting the desired diameter, the cutters move along the guide at the same distance from the gimlet and are securely fixed.
Due to the design features, deep holes cannot be made . The maximum hole size does not exceed 300 millimeters.
Crown
Used for drilling shallow through holes.
A disk is used as a base, in the center of which a spiral gimlet is installed.
Saw blades are installed in special places. Usually produced in sets with canvases of different sizes up to 100 mm.
Forstner drill bit for wood
The Forstner drill is mainly used in furniture production to drill holes of precise diameter. It makes it easy to make a blind hole.
Milling cutters are available with different working surface diameters: 10, 16, 24, 27, 32, 36, 38, 40, 45, 50 (mm). The price depends on the diameter, the larger it is, the higher the price.
It is a drill consisting of a cylindrical shank with two cutting edges and a circumferential edge. The cutter is characterized by perfectly smooth hole edges and a long service life.
Feather drill
Quite often, feather drills are used for drilling any type of wood.
A feather drill is designed to make through holes of different diameters. Of course, you can drill with other types of drills, but the advantage of a feather drill is the following:
- low price;
- good diameter selection step;
- easy to use, no pre-coring required;
- high performance;
- possibility of using an extension cord.
The disadvantages include the quality of work and fairly rapid wear of the cutting parts, and therefore are usually used for rough operations that do not require a clean surface.
What is a drill?
Structurally, the drill is made in the form of a rod. The upper part of the rod is a hexagon designed to be clamped into the drill head.
The lower part, the working one, has the shape of a blade, which has two specially shaped cutting blades sharpened on its sides. Thanks to this shape, the blade cuts into the wood, removing chips around the circumference.
In order for the drill to be stable during operation, a centering point is made in its very center below the blade.
By their type, drills can be single-sided or double-sided. The bevel angle of the cutter for one-sided is 70−90 degrees, and for double-sided it is 115−135 degrees.
The drill has a standard length of 150 mm. Using a special extension, the depth can be increased to thirty centimeters.
So, we can distinguish the following parts of the tool:
- hex shank;
- shoulder blade;
- cutting blade;
- trimmer;
- centering point.
At points of sale you can purchase both a set of feather drills for wood and single ones. They are produced in different diameter sizes.
On the blade there is a number indicating the diameter of the hole in millimeters that it can make, for example, 50. The maximum usable diameter is sixty millimeters.
No longer produced, as the tool would simply break under such a load. The most popular set consists of diameters: 10, 12, 16, 18, 20, 25 (mm).
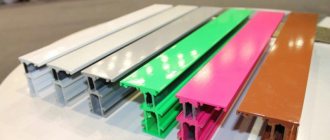
The tool is distinguished by color:
- Golden. The material was processed with internal pressure removal.
- Dark. Heated steam treatment was carried out to increase the strength of the material.
- Bright gold. The surface is coated with titanium nitride, which increases the service life of the tool.
- Steel. No additional processing.
Features of use
It is better to use such a drill with a drill that has adjustable speed.
They must be set to medium mode, since when working at high speeds, the likelihood of drill breakage increases.
It should be noted that the larger the diameter of the drill, the lower the rotation speed should be set.
During operation, the middle of the drill should be set strictly perpendicular to the workpiece, the pressing force is light.
The chips that appear in the hole created, due to the design of the drill, must be periodically removed.
If this is not done, it will become impossible to control the drilling process, and the load on the drill and tool will also increase.
I would like to highlight such an interesting tool as an adjustable pen drill. This tool allows you to make holes with a diameter of 22 to 76 mm.
This device is very convenient to use for non-standard diameters, for example, 23 mm, 52 mm, etc.
Work is exclusively carried out at low rotation speeds using power tools.
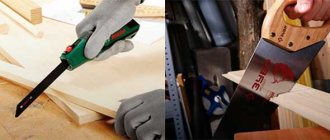
How to sharpen a feather drill?
As mentioned above, the disadvantage of a pen tool is the rapid wear of the cutting edges, but at the same time, sharpening them yourself is not difficult.
Any abrasive material can be used for sharpening . Sharpening can be done manually or on a machine.
It is best to sharpen the cutters according to the sample, and try to sharpen the tip in the center.
When sharpening a pen drill for woodworking, you must be very careful not to accidentally damage the tip.
After finishing the sharpening process, it is necessary to perform a test drilling and, if necessary, adjust the cutting blades or alignment.
For one-time work, you can use a cheap tool, while for permanent work it is better to use drills produced by well-known manufacturers Bosch, Makita, DeWalt, Heller.
They are made from high-quality materials, which will ensure a clean cut and a longer service life.
Wood drill: how to choose and sharpen correctly?
The modern market offers customers a huge number of different types of drills.
Some of them are used exclusively for wooden structures, let's figure out how to choose them correctly and how to sharpen a wood drill in the best way.
Features of choosing a drill for wood
When it becomes necessary to choose the right drill, the first thing you need to pay attention to is the color.
So, for example, each shade of the product is responsible for the type of final processing, which shows the life of the drill and its strength.
- The worst option can be considered gray products, which are not processed in any way and their performance parameters are quite low.
- The color can be golden, which indicates titanium coating and a fairly long service life.
- Black drills treated with steam during creation are no worse in performance.
In addition, it is worth carefully visually examining the object.
If there are visible signs of deformation on it, then it is better not to use such a product.
It is important to choose a drill without a single scratch or crack; its surface should be perfectly flat and smooth.
Types of wood drills
Types of wood drills
Typically, high-quality drills are used by experienced craftsmen who require various types of products in their work to create holes in wood.
These could be holes, for example, for tenons, bolts or dowels.
Moreover, the drilling process itself can be very diverse in quality, which will lead to thoughts about how to properly sharpen the drill after use and whether it will have to be sharpened at all.
The most common types of drills today include: screw, spiral, feather, center, ring and Forstner drills.
What you need to know before you start sharpening
Sharpening is a fairly important process that affects the subsequent operation of the tool. But it's important to know that you don't need to sharpen it if you don't need to. This is a waste of time and effort (especially when sharpening by hand). That is why it is necessary to familiarize yourself with the signs that the tool has become dull.
Firstly, it quickly heats up during operation, becomes deformed and interferes with its normal use. This is one of the signs that it is time to sharpen.
Secondly, if during the process it feels like the holes are taking much longer to drill than before, then it is worth examining the drill for dullness.
And finally, thirdly, the hole made is too uneven. This is probably one of the most important signs indicating the need for sharpening.
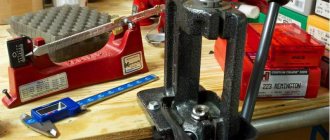
Use of special equipment
One should take into account the fact that it is impossible to sharpen a drill without special equipment. This is due to the unusual configuration of the cutting edge. As a rule, a special machine is used for sharpening. While sharpening the surface, the metal may become hot. That is why it is necessary to provide for the possibility of timely cooling of the surface.
A device for sharpening drills at home.
Note! If you do not have the required machine, you can sharpen it with a regular file. However, a regular file will not allow you to do the job quickly.
It is worth considering that if the shape of the drill is changed, it cannot be used in the future.
Sharpening methods
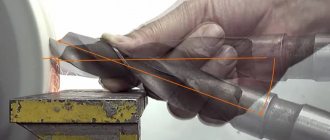
It's time to get closer to the main question - how to sharpen a drill correctly? There are two available ways to do this:
- using a file,
- electric machine.
Carrying out the procedure with a file is more problematic and time-consuming, so many people prefer an electric machine. But some are conservative and use exclusively manual methods.
The disadvantage of the machine is that the tool will have to be cooled frequently (during sharpening it will heat up too much, which can lead to deformation). With a file this problem will not arise, but as mentioned above, the process will take much longer.
Drilling
Basic elements of a twist drill
Drilling is one of the oldest and most common methods of making holes, although the modern twist drill appeared only in 1825. The shapes and designs of modern tools for making holes have achieved significant development in connection with numerous technological problems in various branches of mechanical engineering. But the most widely used are twist drills, which are complex cutting tools that operate under more severe conditions compared to a cutter in terms of chip formation and removal, power and temperature stresses, and ease of monitoring the operation of the cutting edge.
A twist drill consists of a working part (cutting and calibrating parts), a neck, a shank and a foot (Fig. 11.1, a).
Geometry of the cutting part of the drill (Fig. 11.1, 6-d)
characterized by the following angles.
Apex angle
2ср is formed by two main cutting edges; it is measured in projection onto the main plane. As this angle increases, you will increase
Rice. 11.1.
Twist drill:
A
— drill design;
6
-
g
- geometry of the cutting part of the drill
axial force is generated, and reducing it can lead to breakage of the cutting tool.
The following vertex angle values are accepted:
- 2(p = 90-I00 0 for processing light alloys;
- 2f = 130-I40 0 for processing aluminum alloys;
- 2(p = 115-I18 0 for carbon steels;
- 2f = 125-Н40 0 for heat-resistant steels.
Front corner
y in the
N-N
in the normal cutting plane is the angle between the tangent to the front surface at the point of the main cutting edge and the normal at the same point to the circle of rotation around the axis of the drill. The rake angle decreases towards the axis of the drill and can be negative or equal to zero at the transverse cutting edge, which increases the deformation of the cut chips, the friction force, and, consequently, the heat generation in the cutting zone.
Main rear angle a -
this is the angle between the tangent to the flank surface of the tool at the considered point of the main cutting edge and the cutting plane coinciding with the direction of relative movement of the cutting edge.
For a drill, the direction of the relative motion velocity is tangent to the helical line described by a given point on the cutting edge. The clearance angle increases from the periphery to the center of the drill, which has a positive effect on the cutting process. In the 0-0
, the angles y and ω are related to each other.
In the N-N plane,
the normal rear angle a/a. (Fig. 11.1,6):
where a = 8-I2°.
Helical groove angle
с is the angle between the axis of the drill and the tangent to the helical line along the outer diameter of the drill. As the angle of inclination increases, friction on the front surface and the degree of plasticity of deformation decrease. But you can increase the angle of inclination to a certain limit, с = 3(Н35), since its further increase can lead to breakage of the drill.
Angle of inclination of the transverse cutting edge
y = 5(Н55°.
Cutting edge angle X
is the angle between the main cutting edge and the perpendicular to the cutting speed vector.
Angle X
is measured in the cutting plane and takes values
X
= 7-I2°.
Front surface
- the helical surface of the groove along which the chips flow.
Rear surface
- surface facing the cutting surface.
Main cutting edges -
these are the lines formed by the intersection of the front and main back surfaces.
Ribbon
- a narrow strip on the cylindrical surface of the drill along the helical groove. The ribbon provides direction for the drill when cutting, reduces friction against the walls of the hole and plays the role of an auxiliary cutting edge.
Cross cutting edge
formed as a result of the intersection of both back surfaces and is present only at the drill.
Using an electric machine
To begin with, it is worth clarifying that this process will be quite complicated for those who have never sharpened before. If you are one of these people, then try to practice and sharpen an already worn out tool that you have not used for a long time. Only after a little training will you get an idea of how things are going with the process. You can get down to business directly.
The work is painstaking - one extra movement can ruin the instrument, which, of course, you don’t want. Therefore, it is very important to follow the instructions below, it will help you complete the procedure most correctly.
During execution, you need to follow several rules that will ensure you a good outcome:
- place a container of cold water nearby - it will be useful for cooling an overheated drill,
- 45 degrees - this is the most correct angle. Therefore, try to keep the element in this position,
- the drill is installed on the edge of the machine disk - this is the most correct option,
- if you want sharpening to be carried out most accurately, then place the element in the washer - this way you will be confident that the work will go smoothly,
- the rear edges of the drill must be turned a few millimeters and then ensure their evenness,
- the tool bridge should be thin, this will provide you with the greatest ease of operation,
- after the process is almost complete, slow down the machine speed a little and continue sharpening,
- After finishing, cool the finished item with water, make sure it works properly. If this is not the case, then continue the process until the instrument is in optimal condition.
Classification of drills
Some types of drills: A - for metal; B - wood; C - for concrete; D — feather drill for wood; E - universal drill for metal or concrete; F - for sheet metal; G - universal drill for metal, wood or plastic. Shanks: 1, 2 - cylindrical; 3 - SDS-plus; 4 - hexagon; 5 - tetrahedron; 6 - trihedron; 7 - for screwdrivers.
Center drill
Step drill
Hollow drills According to the design of the working part
there are:
Spiral (screw) drills are the most common drills, with a drill diameter from 0.1 to 80 mm and a working part length of up to 275 mm, they are widely used for drilling various materials. Zhirov’s designs - on the cutting part there are three cones with apex angles: 2φ = 116…118°; 2φ0=70°; 2φ0'=55°. This increases the length of the cutting edge and improves heat dissipation conditions. A groove 0.15D wide and deep is cut into the jumper. The jumper is sharpened at an angle of 25° to the axis of the drill in a section of 1/3 of the length of the cutting edge. As a result, a positive angle γ≈5° is formed.
Flat
(
feather
; slang
perki
) - used when drilling holes of large diameters and depths. The cutting part has the form of a plate (blade), which is mounted in a holder or boring bar or is integral with the shank.
Forstner drills
— an improved version of the feather one, with additional cutters.
For deep drilling (L≥5D)
— elongated screw drills with two screw channels for internal supply of coolant.
Screw channels pass through the body of the drill or through tubes soldered into grooves milled into the back of the drill. The designs of Yudovin and Masarnovsky
are distinguished by a large angle of inclination and the shape of the helical groove (ω=50...65°). There is no need to frequently remove the drill from the hole to remove chips, thereby increasing productivity.
Single-sided cutting
— used to make precise holes due to the presence of a guide (support) surface (the cutting edges are located on one side of the drill axis).
Cannon blades
are a rod whose front end is cut in half and forms a channel for removing chips. To guide the drill, a hole must first be drilled to a depth of 0.5...0.8D.
Rifle
- used for drilling deep holes. They are made from a tube, which, when crimped, produces a straight groove for removing chips with an angle of 110...120° and a cavity for supplying coolant.
Hollow
(also annular, crown) - drills that turn only a narrow annular part of the material into chips.
Centering
- used for drilling center holes in parts.
Stepped
— for drilling holes of different diameters in sheet materials with one drill.
According to the design of the tail section
there are:
- with cylindrical shank (GOST 10902-77, DIN 338)
- with tapered shank (GOST 10903-77, DIN 345)
- with three-, four- and hexagonal shank
- SDS, SDS+, etc.
By manufacturing method
there are:
- Solid
- spiral drills made of high-speed steel grades R9, R18, R9K15, R6M5, R6M5K5, or carbide. - Welded
- twist drills with a diameter of more than 20 mm are often made welded (the tail part is made of carbon and the working part is made of high-speed steel). - Equipped with carbide inserts
- available with straight, oblique and helical grooves (including ω=60° for deep drilling). - With replaceable carbide inserts
- also called cased (the mandrel to which the inserts are attached is called the body). Mainly used for drilling holes of 12 mm or more. - With replaceable carbide heads
- an alternative to case drills.
By purpose
According to the shape of the holes being machined
there are:
- Cylindrical
- Conical
According to the processed material
there are:
- Universal
- For processing metals and alloys
- For processing concrete, brick, stone
- it has a carbide tip designed for drilling hard materials (brick, concrete) with rotary impact drilling. Drills designed for a conventional drill have a cylindrical shank. The drill shank for rotary hammers has different configurations: cylindrical shank, SDS-plus, SDS-top, SDS-max, etc. - For processing glass, ceramics
- For wood processing
Practical training
If you feel that you are unable to sharpen the tool correctly, then you should practice more. This can be done through a lot of practice - take a few drills that you no longer use and try to sharpen them correctly. Through trial and error, you can learn to perform the procedure perfectly.
Sharpening a tool is not a difficult process, although some people think otherwise. Many online resources describe in detail and even show the steps of this process. Here you can watch a video that very accurately shows exactly how to sharpen a drill.
The video shows how to sharpen correctly. By following the man's instructions, you can get the job done efficiently. The tool should turn out the same as it was purchased. Only if the procedure is correctly performed will you be able to use it in the same way as before.
If you make a mistake, you will have to throw away the drill. But everyone makes mistakes, so don’t be upset if you weren’t able to sharpen your tool the first time. Every person learns from their mistakes. The main thing is not to abandon unfinished work because something doesn’t work out for you.
In order to learn how to perform an action with the highest quality, try to get involved in the process as much as possible, to understand how it works. Only competent consideration of every detail can lead you to success.
Selection rules
Finding a high-quality nozzle at an affordable price is not so difficult. If we are talking about trusted companies, such as Bosch, Hitachi, then with a high degree of probability the product is of high quality and reliable. To determine the quality of drills from lesser-known brands, there are several rules that can be easily checked by visual inspection:
Geometric dimensions. The cutting edges must be symmetrical to each other and be the same size. Quality of sharpening of cutting edges. It is checked by touching it with your finger, similar to checking the sharpness of the blade of a kitchen knife. The quality of the nozzle. Any irregularities in the working or tail part should alert you. Reliable products have an almost perfect sheen. Metal color
An important parameter to pay attention to first is:
Gray steel is highly likely to be completely untreated.
Black - the metal is calcined with steam. This treatment increases the strength and wear resistance of the nozzle.
Golden – internal stress has been removed from the metal. This significantly increases strength.
Bright golden – the drill is coated with a thin layer of titanium nitride. It will last a long time and will cope with the toughest wood.
Design
The Lewis drill is included in the basic tool kit of a professional carpenter, being lightweight, it does not load the motor of an electric drill, and allows you to make blind and through holes in hard-to-reach places: corners of beams, places where wooden parts are overlapped, etc.
The twist drill consists of the following sections:
- A shank that has a hexagonal profile and is designed to fix the drill in the chuck of a drill or drilling machine.
- The main working part, which is a spiral tape of a constant cross-section and a relatively small angle of inclination. For the Lewis spiral, it is selected in such a way as to ensure reliable removal of chips from the drilling zone.
- Centering, ending with a tip with a conical thread, which allows reducing the axial load during the operation. For a tool of relatively low rigidity (and a twist drill is just that), high axial loads become the main cause of failure.
Due to the complexity of the Lewis drill profile along its length, such equipment is almost never manufactured in a welded version. The material is high-speed steel grades 10Р6М5, Р6М3 and the like, according to GOST 19265-74.
A special feature of the Lewis spiral is its single-thread nature, which provides the drill with the ability to spontaneously retract into the cavity of the resulting hole. At the same time, the direction of the drill improves, and as the hole deepens, the edge is trimmed to obtain a smooth generatrix.