In this review we will talk about how to properly install a rivet nut. But first, let's figure out what they are and what they are needed for.
Also, probably, many of you will be interested in learning how to choose the right rivet nut for specific types of work. Well, let's talk about everything in order.
A rivet nut is a type of fastener that is designed for installation in products made of thin sheet metal in order to form a threaded connection in them.
It is impossible to cut a thread in a thin plate with a regular tap, so a rivet nut is an ideal solution for workpieces and products made of thin sheet metals
Rivet nuts differ in their shape. They come in cylindrical, hexagonal or half-hexagonal shapes, cylindrical with grooves and even rubber.
What is riveting
The mechanical connection of parts using a series of rivets is called riveting, and the connection itself is called a riveted seam. It is used where it is inconvenient to weld parts or where non-weldable materials are joined. Not only metals are riveted, but also parts in clothing, accessories, etc. are connected in this way. But there it is more of a finishing touch than a loaded connection. So next we will talk about riveting in construction or home improvement. In principle, you can use a screw connection instead of riveting, but bolts and nuts are more expensive, and their installation takes longer.
This is what a rivet joint looks like
If we talk about installing fences made of corrugated sheets, rivets are more reliable, since they can only be removed by drilling out the fasteners. When installing screws or self-tapping screws, they can be unscrewed and both metal and hardware can be removed. In some cases, riveting is more convenient when installing a roof made of corrugated sheets or metal tiles. On the roof, installing screw connections is problematic and time consuming. But rivets, and with a good tool, can be done in an hour or even less.
Most common use in private households
How are parts connected using rivets? The rivet is installed in the prepared through hole. It has a head that rests on the material and the rod. During the riveting process, the end of the rod is flattened, changing shape under the influence of force. Therefore, ductile metals are used for these hardware.
Tools
Using rivets on clothes, you can significantly transform the appearance of the product. Most often, metal fittings are used on jeans, leather jackets and other items made of thick fabric. To install the blocks, you will need the following tools:
- Press for punching holes. A special device made of steel allows you to instantly punch a hole. Before making a hole, the master marks it. Then he brings the textile to a special area under the tool and presses the press. Under the weight of the press, a hole is formed - it is always smooth and small. Workshops often use a large number of attachments for different button diameters;
- Manual punch. This tool looks like an oblong cylinder of small diameter; it is also equipped with attachments. The punch helps to obtain smooth and beautiful holes;
- Hammer. Without a hammer, the punch will not work. When installing buttons on clothes, the master fixes the punch at the site where the future hole will form and hits it with a hammer several times;
- Chalk or soap. These tools are necessary for marking future holes. Usually soap and chalk are used, since the blocks are placed on jeans. If the fabric is painted in a light color, use a fabric marker.
In addition to the listed devices, you need a mini anvil where the punch will work, an awl for making holes and scissors.
Soap or chalk
Press
Manual punch
Hammer
Types of rivet seams
If we talk about the method of joining sheets, then riveted seams can be overlapped (one sheet overlaps another) and end-to-end. Joint seams can have one or two overlays. With overlays they are more reliable and are used in critical and loaded places.
Types of rivet seams: overlapped and butted with overlays
According to the location of the rivets:
They can be located opposite each other or in a checkerboard pattern. Seams can be strong, tight (sealed) or durable-tight. Dense ones are made using elastic gaskets placed between the parts to be connected. Durable and dense ones are used mainly in boilers. Now they are more often replaced by welding.
Principles for installing blind rivets using a rivet gun
The above tool has several technical features:
- several nozzles for rivets of various diameters;
- wrench for changing attachments;
- handle lock.
To use a rivet tool, you must first drill holes whose diameter exactly matches the diameter of the selected rivet.
Next, the long part of the rivet is installed inside the rivet. Both surfaces to be joined are squeezed as tightly as possible with your free hand. To avoid injury, it is recommended to use pliers or any other similar tool.
All that now remains for the user of the riveter to do is to sharply and forcefully connect the two handles together (squeeze them towards each other). Thanks to this movement, the rivet unravels inside the hole and tightly connects the two surfaces.
In this case, the riveter will “bite off” the excess from the exhaust part.
Types of rivets
What is a rivet? It is a cylindrical rod of ductile metal (may or may not be hollow) with a shaped head at one end. This head is called a mortgage. During the installation process, due to the flattening of the metal of the rod on the second side, a second head is formed. It is called closing (closing).
There may be composite rivets (such as the popular blind or screw rivets), which consist of a body and a shank. But this does not change the essence: the embedded head rests on the material, and at the other end, due to the plasticity of the metal, a second head is formed. It is simply formed due to the fact that the rod is extended and the expanded part crushes the second part.
Types of cores and embedded heads
Rivets differ in the shape of the head and the shank. According to the type of rod they are:
- with a solid rod (high load capacity, but difficult to install);
- semi-hollow (part of the rod near the embedded head is solid, part is hollow);
- hollow (the head and rod have a cylindrical solid hole, they are easily riveted, but cannot withstand high loads).
Types of rivets by type of rod and head
Rivets have the following types of heads (pictured above):
- Semicircular (high and low). Sometimes also called spherical. The most reliable, create a strong seam.
- Cylindrical and conical (flat). Used if the connection is in an aggressive environment.
- Secret and semi-secret. Installed when fasteners should not protrude above the surface. The most unreliable connection, used only when necessary.
Different rivets can be installed nearby
Each type of embedded head is found with each type of core. They are selected depending on the planned load. For maximum loads, hardware with a solid rod and a semicircular head is needed. Hollow seams can also be used for seams that are not too loaded, but they do not provide tightness. If such a characteristic is important, then semi-hollow ones are installed.
Types of rivets
Despite the fact that welding has become accessible even to a layman, riveting does not lose popularity. After all, not all metals can be welded, and the welded seam is susceptible to corrosion. Therefore, new varieties of rivets are constantly appearing, so there is definitely no complete list. Let's look at the main and more popular ones.
- Classic or ordinary. Universal, used for all types of seams. They can be distinguished externally - they resemble fungi.
- Semi-tubular (the rod is half hollow). They require less effort during installation, but their strength is low. Used in connections with low mechanical load.
Classic and threaded rivets
Nut and rivet rivets
These are the main types of rivets that are used in construction, mechanical engineering and other fields. Each species has its own subspecies that differ in nuances.
Blind rivets
Let's say a few words separately about blind rivets. They are used for fastening corrugated sheets and metal tiles. These are the ones you most often encounter when arranging a site. The blind rivet consists of a tubular body and a solid rod inserted inside. They are called composite because they have two independent parts. Also, this fastener is reinforced - after installation, part of the rod remains inside, which increases the strength of the connection.
How does a blind rivet work?
The length of the blind rivet body must be greater than the thickness of the parts being connected. It is inserted into a hole made in advance, after which the riveter grabs the rod and pulls it through the hollow body. At the far end of the rod there is a ball that forms the closing head from the flared edge of the body. The excess rod is removed with a tool, but some of it remains inside, which makes this connection quite strong.
As is clear from the description, it is important to choose the correct rivet size. Too short will not allow a normal bead to form, which will weaken the connection. A body that is too long will give a lot of play, which is also not good. So when selecting this type of fastener, carefully look at the recommended thickness. Ideally, your connection is in the middle of the range.
Read also: Pressure regulator for airbrush
Rivets for joining loose and soft materials
The hardware listed above is not suitable for joining soft and plastic materials - plastic, chipboard. There is another type of similar fastener for them. It is not as large in size and less durable. But, during installation, less force is created so as not to destroy the materials.
There are the following types of rivets for joining plastic or soft materials:
- Petalaceae. When installed, the rivet body opens into several petals. The large contact area of such a closing head allows the load to be redistributed.
Such rivets can be placed on plastic, fiberboard and other “non-metals”
There are also plastic rivets. They are usually made for furniture, sometimes for fixing decorative panels. These rivets are more like screw rivets. The lower part is cut into several petals; inside there is a thread through which the rod is screwed. As it twists, the rod pushes the body apart, which is held in place by friction.
Installing buttons and rivets without a press
How to properly install an iron door in a wooden house: video
If you are smart, you can do without a press and special tools. To install the button, you will need a hammer, a bat (bolt) or even a simple needle and thread. It all depends on the type of fittings.
Sew on buttons
Does not require the use of special tools. The easiest way to attach sew-on snaps to clothing is. All you need is a sewing needle, thread to match the fabric and the buttons themselves. The more holes they have, the better.
Instructions:
- Place the metal piece with the bolt on the smooth side against the face of the bottom of the product. Sew on.
- Place the metal part with the recess on the wrong side of the top of the product. Use a needle and thread.
Ring
Perhaps the most common type of button. They are used in tailoring clothes, including jackets, as well as in the manufacture of wallets and bags. They come in different sizes and colors and are mostly made of metal.
The ring button consists of 4 parts and looks like this:
It is connected by inserting a small ring into a large one. Hence the name.
How to install a ring button without a press?
- From the inside of the bottom of the fabric, insert a metal piece with a leg (more inconspicuous in appearance).
- Place a wooden block or something hard under it.
- Cover with a piece with a narrow ring.
- Armed with a bat and hammer, carefully flatten the protruding leg. You can use a suitable size bolt.
- Take the remaining part with the leg (it is usually prettier and better built) and insert it from the front side of the top of the product.
- From the wrong side, place the part with the ring on the leg. Place it on the beam and flare it again. Ready!
In a similar way, you can install plastic ring buttons without special pliers. Only instead of flattening the legs, they should be melted. At home, a soldering iron or a hot nail is used for this.
Alpha buttons
No less popular buttons. They have a spring mechanism and a convex pin. You can see the difference between the ring (2) and “alpha” buttons (1) in the photo:
Inserting them into a jacket or other product with your own hands is more difficult. The reason for this is the pin, which can become wrinkled when flared. To prevent this from happening, you should drill a recess in a wooden block for the convex part of the button.
What to do next:
- Install the part onto the bottom of the product. To do this, take a simple rivet with a leg and thread it from the inside out. Attach the part with the bolt on the front side. Turn it over and place the convex side into the hole drilled in the block. Tap lightly with a hammer on the top (from the inside).
- Next you need to assemble the front part of the button. Insert the rivet with the leg into the hole. Install the part with the recess from the inside out. Armed with a bat (bolt, blunt nail), flatten the leg from the wrong side.
Rivets
Along with functional buttons, decorative rivets are often used in clothes: figured, with pebbles, spikes. They usually have sharp protrusions on the reverse side.
Inserting them is as easy as shelling pears:
- Pierce the fabric with the teeth.
- Press something hard against the rivet. The fabric should be taut and the rivet should fit snugly against it.
- Fold the teeth from the inside out. The easiest way to do this is with a flat screwdriver.
There are also rivets used to secure fabric stitching. Holnitens are often used in products made from denim and leather. This is what they look like:
Installation of this type of rivets is quite simple. The main thing is that the length of the leg matches the thickness of the fabric.
- Insert the part with the leg into the hole from the wrong side.
- Cover with a cap and place face down on a wooden surface.
- Lightly tap the rivet from the inside out with a hammer.
The buttons are inserted into jeans in the same way. The only difficulty is preserving the front part. To prevent it from being wrinkled or scratched, the rivet is hammered in from the inside out, and a rubber or leather gasket is placed under the front side.
Now you know how to install buttons yourself. Home renovations will save you time and money. If you doubt your abilities, try practicing on an unnecessary piece of fabric. You will succeed!
Metal riveting
The process of riveting metals consists of two stages: preparatory and the actual installation of hardware. Preparation - drilling holes, countersinking for countersunk heads if necessary. Please note that countersunk heads can be on one (either) side or on both.
The riveting process itself is as follows:
- insert the rivet;
- tighten the parts to be connected;
- form a closing head using a tool;
- check and clean the connection.
This is how blind rivets are installed
With a good tool, work goes quickly. For private use and one-time work, manual riveters are usually used. And even with them, the process itself (without drilling holes) takes a matter of seconds. If we talk about installing corrugated sheets or metal tiles, it is recommended to coat each hole made with paint to prevent corrosion. It is these processes - drilling and painting - that take a lot of time.
In general, there are two ways to install rivets: cold and hot. When hot, the joint is preheated to a certain temperature (determined by the metal and the thickness of the parts). In practice, it is used when installing rivets of large diameter - 12 mm or more.
The rivets are placed in rows. The minimum distance between adjacent ones is 4 diameters; from the edge of the sheet to the center of the hardware is no less than 1.5 times the diameter of the rivet. When attaching a profiled sheet, place it in a recess, not in a wave.
How to work with a riveter correctly?
September 29, 2020
In this article we will talk about a tool that is comfortable to work with in limited space.
A riveter is a hand tool that can be used to secure the required material. For example, sheets of metal.
In this article we will look at the types of this tool and note a couple of points that will be useful when working with it.
As a result, we will receive a short instruction for those who have not yet had to deal with a riveter.
Let's begin.
From the brief description it becomes clear that we will need this tool when we need to fasten something. In this case, the material should not exceed a thickness of 10 mm. This is one of the basic rules.
Why not use welding?
There are times when this is not possible.
You can’t use welding at home, and there’s a chance that you won’t have the necessary equipment at hand.
But the tool, shaped like pliers, is perfect for quickly implementing your project.
What does it consist of?
It does not have many components, but this does not prevent the riveter from performing all the necessary functions. You need to allocate a separate place for it in your tool organizer.
Head, handle and clamping mechanism.
That's the whole structure.
There are only three elements that provide quick fastening of the metal sheets we need.
The mechanism, by the way, is divided into two types: exhaust and threaded.
What types are there?
Electric, battery, pneumatic.
However, they are not as popular as manual ones. The point is that it's overpriced. And although they essentially do all the work for you, buyers are still not ready to go completely electric.
The manual riveter is more understandable to people. It is easy to use and affordable.
The first three types are more suitable for avid specialists.
Or in the case when large diameter rivets are used.
Exhaust riveter.
Cylindrical stud with rivets. That's the difference.
It is worth noting that this division is based on the type of rivets used, the mechanism of operation, and not on the distinctive characteristics.
With it, the holes will be completely closed. It should also be noted the low cost.
Fastening occurs through traction force.
First the holes are made and then the rivet is fixed.
Threaded riveter.
Rivet in the form of hollow tubes.
It allows for safe installation.
High quality fixation. You can also create fastening points. It's comfortable.
There are two more types.
This tool can be distinguished by the number of handles. It can be one-handed or two-handed.
In the first case, one of the handles always remains motionless. This riveter can be used for connections with a diameter of no more than 6 mm.
In a two-handed one, as we see, both handles remain movable.
So how to use a riveter?
Different types of this tool work approximately the same. The principle is similar, but there are still differences.
Let's start our instructions with the main (general) principle of operation.
- You need to direct the force to the lever mechanism, after which it will go to the head.
- We prepare in advance. hole for element. And then we insert the rivet using the clamping mechanism.
This ensures that the sheet metal is held together.
All forces must be directed to making holes. The tool will do the rest for you.
Let us designate all types of work that a riveter performs.
It can fix corners, pipes, and fasten profiled sheets.
Such fastenings will never question their reliability. And they won’t burst when you don’t expect it. This is a fairly pressing problem for welding.
The main principle has been discussed, and now about the stages of work.
- We take the materials (metal sheets) that we need and fix them prematurely. This will make the job easier.
- We make a hole that should be 1-2 cm larger than the rivet.
- We insert the consumable.
- We tighten the rivet head.
- We place the tool tightly against the base of the material, and then squeeze the handles.
- Repeat several times if it doesn’t work.
- For complete tightness we use additional special materials. Most often, putty is used.
You need to pay attention to the characteristics of the tool, materials and appearance. Even weight can tell a lot.
If you are buying through an online store and there is no way to see and touch everything in detail, then pay attention to the body of the riveter. The product characteristics will indicate the material from which it is made. Plastic is not the best option here.
We conclude that working with a manual riveter is not so difficult. This is a simple option that can be easily stored around the house.
But if you are engaged in repair and installation work, as well as plumbing work, then it would be better to purchase a threaded type tool.
A riveter is not a hammer. What is it for?
Don't underestimate this little tool. Here are a couple of ideas that you can use if you have a threaded riveter lying around.
- Installing doors, windows, shelves, whatever.
- Attaching decorative items: paintings, signs on the door, whatever.
- Installing handles for furniture, such as drawers and cabinets.
- Installation of window blinds, hanging hooks, etc.
- Auto repair, of course.
In this article, we got acquainted with different types of riveters, analyzed their differences and compiled brief instructions for using hand tools.
If you still have questions, we recommend watching a couple of videos on using a riveter for clarity.
Selection of rivet sizes
Rivets are selected based on the thickness of the metals being connected. The following are important: the parameters of the embedded head and the diameter of the rod. The diameter of the rod determines the diameter of the drill, which is used to prepare a hole in the parts to be joined. You can approximately determine the diameter of the rivet by doubling the thickness of the parts being connected. The length of the rod is at least 2 times the diameter of the rivet, and the protruding part must be at least 1.25-1.5 times the diameter.
| Rivet diameter | 2.0 mm | 2.3 mm | 2.6 mm | 3.0 mm | 3.5 mm | 4.0 mm | 5.0 mm | 6.0 mm | 7.0 mm | 8.0 mm |
| Hole diameter for precision assembly | 2.1 mm | 2.4 mm | 2.7 mm | 3.1 mm | 3.6 mm | 4.1 mm | 5.2 mm | 6.2 mm | 7.2 mm | 8.2 mm |
| Rough hole diameter | 2.3 mm | 2.6 mm | 3.1 mm | 3.5 mm | 4.0 mm | 4.5 mm | 5.7 mm | 6.7 mm | 7.7 mm | 8.7 mm |
In general, the diameter of the rivet rod can be from 1 mm to 36 mm, and its length can be from 2 mm to 180 mm. Moreover, a larger diameter does not equate to greater joint strength. Here, both the material from which it is made and its type (hollow or solid) play a role. How to choose? According to the characteristics of the rivets. After all, you choose them to connect certain materials of a certain thickness. You also know approximately the load that will be applied to the connection. Therefore, when selecting, pay attention to what the manufacturer recommends.
How to select a rivet according to the thickness of the material being fastened? According to the manufacturer's instructions, but in general, the diameter of the rod should be at least twice the thickness of the materials
- Recommended diameter for connection. All you have to do is select a drill and make a smooth hole without burrs.
- Minimum and maximum thickness of the connected package. It is important that your connection is within the specified range.
- Shear force. This is the load applied perpendicular to the connection that the rivet can withstand without destruction.
- Breaking force. Under what load along the rivet will it fail?
It is the tensile and shear forces that determine the strength of the future seam. The higher these values, the greater the load it will withstand.
Popular master classes by Valery.
DIY pendant made of wire and stone. Master Class.
How to make a cone for a Christmas tree out of paper with your own hands.
Paracord bracelet for beginners.
general information
Hammer rivets are used to create a reliable connection. To do this, the builder must have access to all sides of the elements that need to be connected. It is important to note that the holes in the materials being joined must be similar to the diameter of the rivet (possible errors are determined by GOST).
Rivet sizes can vary significantly. Thus, the diameter ranges from 1 to 36 millimeters, and the length ranges from 2 to 180 millimeters. This spread makes it possible to use parts in various fields to connect materials of different thicknesses. However, at the same time, it is worth remembering that the size must correspond to the loads that the rivets will experience during operation. This is why experienced builders often advise and recommend using rivets with a “size margin” - it is better to take a larger part than a smaller one.
In general, all the requirements put forward for these building elements are specified in the relevant construction GOSTs adopted by the Russian Federation, and are also established by various documents legalized at the international level (for example, the production of hollow rivets is regulated by GOST 12639-80).
Fastening corrugated sheets
The last and important point in installing a fence is attaching the corrugated sheeting to the frame.
How to choose the right corrugated fence
Profiled sheets differ in metal thickness and wave height.
To select fasteners, you must proceed from the following parameters:
- Strength of the structure after fastening
- Installation speed
- Price
- Aesthetics (appearance of fastenings)
It is not for nothing that the strength of the fence after fastening comes first - this is the main characteristic that must be taken into account. If you save a little on fasteners, you can ruin the corrugated sheet, which will rust over time or simply fly off. The remaining three criteria - price, appearance and time spent on installation - are more important to whom. Everyone has their own values.
So, we will look at the most common methods of fastening corrugated sheets to a fence: self-tapping screws and rivets, taking into account these parameters.
Material of manufacture
Hammer rivets can be made from various materials. For consideration are the most popular varieties.
Aluminum
This type of building parts is also often called exhaust. Their production is regulated by several domestic standards:
- with countersunk head - GOST 10300-80;
- with semicircular – GOST 10299-80;
- with flat – GOST 10303-80;
- semi-hollow - GOST 12641-80.
The size grid is quite varied: diameter - from 1 to 10 millimeters, length - from 5 to 45 millimeters. Moreover, these indicators may vary depending on the type of rivets (hammer, pull, threaded).
It is also important to note the fact that such aluminum parts can be made from several grades of material. Thus, the most popular raw materials are considered to be aluminum grades D18, V65, AMts, D19P, AMG 5P. They can also be duralumin.
Steel
Stainless steel parts occupy a special place among all hammer rivets. The production of these elements is carried out not only in Russia, but also abroad.
Most often, steel rivets are produced without any additional coating, and their sizes may vary. So, for example, the diameter of the cap can be from 1.8 to 55 mm, the height of the cap can be from 0.6 to 24 mm, the height of the entire element can be from 2 to 180 mm.
Due to such diverse indicators, these parts can be used for connecting sheets made of metal, for fastening facade plates to substructures, as well as for connecting metal structures with parts made of other materials.
Copper
Construction parts made from this material are characterized by several distinctive features:
- due to their antimagnetic properties, they are widely used in the radio industry;
- due to the fact that copper does not rust, rivets made from it are in demand in almost all areas (especially in cases where the materials fastened with them often come into contact with water and air);
- Copper elements are used to assemble apparatus and tools for the chemical industry, as they are quite resistant to the action of various substances manufactured artificially.
Most manufacturers produce copper rivets in standard sizes: from 2 to 8 mm in diameter.
Brass
Brass parts are quite flexible, but at the same time durable. And thanks to their appearance, they can perform not only their direct functions, but also serve as a decorative or design element. Most often, such elements are used in the industrial and instrument-making fields.
The length of brass rivets reaches 4–70 mm, and the diameter is 2–8 mm.
In order to choose the right crimp (mandrel) for brass parts with a semicircular head, you should choose crimps that have:
- long service life;
- uniform hardening;
- working ends are polished;
- Impact heads are inductively annealed.
Features and types of metal riveting in plumbing
Metal riveting and plumbing are two inseparable concepts. Using a riveter, you can connect metal parts of different thicknesses. Depending on the type of fasteners, different technical parameters can be achieved from the finished connection.
Master riveting metal
Metal riveting is a technological process that involves joining parts using rivets. The tool can be manual or pneumatic. Used when parts cannot be welded.
Types of jobs
Experts distinguish two riveting technologies - hot and cold. Each of them is used in different situations.
Hot riveting
Before connecting the parts, the rod of the fastener is heated. The craftsman determines the heating temperature by color - the metal must be red-hot. Rods with a thickness of 8 mm or more are suitable for hot riveting.
Cold riveting
Standard technology used in different situations. More often, cold riveting is carried out at home, in small workshops for the manufacture of products that will not be subject to heavy loads. To perform this, rods with a thickness of no more than 8 mm are used.
Sheet of metal with rivets
Types of cores and filling heads
Based on the type of shank, rivets are:
- Hollow. Inside the rod there is a free cylindrical cavity. They do not withstand high loads, but are easily riveted.
- Semi-hollow. In the area of the mounting head the rod is solid.
- Solid rod. Rivets are difficult to install, but they can withstand high loads.
Possible types of heads are conical, cylindrical, semicircular.
Rivets for metal (Instagram / stroimarket_erme)
Types of seams
Types of riveting seams:
- Lasting. It is used if you need to obtain a high-strength connection. The finished part will be subject to heavy loads during operation.
- Dense. They are used in the manufacture of sealed containers for storing or pumping liquids. Withstands slight pressure.
- Durably dense. They are used in the assembly of metal structures and products that will be subject to high pressure.
Depending on the location of the fasteners, the seams can be multi-row, double-row, or single-row.
Principles for choosing rivet sizes
You need to choose rivets for connecting metal parts depending on the thickness of the sheets being joined. In this case, you need to take into account the diameter of the rod.
To determine the required diameter of the fastener, you need to double the thickness of the metal blanks that will be connected. The length of the rod should not be less than 2 diameters.
Standard size ranges:
- diameter - 1–36 mm;
- length - 2–180 mm.
The opinion that the larger the diameter, the higher the strength, is erroneous. The strength indicator depends on the material of the rivet.
Riveters and riveter (Instagram / suburbblues)
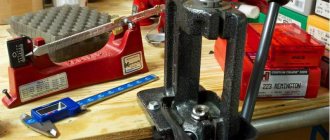
Tool for work
Tools:
- Set of mechanic's hammers. It must be selected depending on the diameter of the rivets. It is better to use a hammer with a square head.
- Minting. A mechanic's chisel, which has a flat working part on one side.
- It's a stretch. A beard that has a hole in the working part.
- Crimping. Tool for shaping the closing head.
Additionally, you will need a vice, a drilling tool, and a hand riveter.
Stages of work
Stages:
- Preparation of parts to be joined.
- Marking holes.
- Drilling holes.
- Countersinking of finished nests.
- Installation of fasteners.
- Crimping
Before starting the main stages of work, you must:
- Clean surfaces from plaque, dirt, and rust.
- Mark the locations of future holes. Before drilling, they need to be marked so that the drill does not go to the side.
Preparation of metal structures (Instagram / start_blasting)
Drilling holes
You can drill holes in metal surfaces using a drill press or hand-held power tool. It is better to use a drill press because it can drill holes in thicker parts.
When using a hand-held power tool, it is important to accurately control its position when drilling so that it does not deviate to the sides. When drilling, it is necessary to use special coolants. You can only work with a sharpened drill.
Inserting rivets
Stages:
- The fastening element is inserted into the hole with the rod from bottom to top.
- A support is installed under the embedding head. If it is hidden, it is necessary to use flat support.
- The parts are compacted. They are seated at the riveting site. Gaps between metal sheets are eliminated with a hammer.
Formation of the closing head
How to do it:
- Direct method. Hammer blows are applied to the rivet shaft from the side where the closing head is formed.
- Reverse method. The hammer blows are applied to the mortgage head.
Bench hammers (Instagram/inforce_tools)
Recommendations
If the installation of rivets on metal is performed by a beginner, a person without practical experience, he may make various mistakes. Defects and their causes:
- The closing head does not adhere tightly to the metal surface. Distortion during crimping.
- The heads are shifted in one or different directions. The holes were drilled with a slight slope.
- The closing head has ragged edges. Low-quality material was used to manufacture the fastening element.
- The head is shifted to the side. The rod is uneven or longer than required.
When carrying out work, you must adhere to safety rules:
- The pneumatic tool cannot be used until the adjustment is completed. It will be difficult to hold the crimp with your hands due to the powerful pneumatic shock. This may cause hand injuries.
- When riveting, sharp, loud sounds are heard that negatively affect the nervous system and hearing. You need to use thick headphones.
- The tool must be checked before starting work. It must be in good working order. The desktop should not be cluttered with unnecessary objects or tools.
- The parts to be fastened should be fixed in a vice.
There are often situations when it is necessary to first remove old fasteners and then reattach the part to the same place. A sharp chisel can be used to remove the round head of the rivet. The remaining fasteners must be knocked out with a punch.
When riveting metal, you must use protective gloves and goggles. The parts should be secured in a vice or console so that they do not move. When working, do not touch the crimp with your hands. Compliance with safety precautions will help to protect yourself from injuries and perform better work.
Countersunk rivets
Similar elements have other names - impact, driving. Riveting with this part is carried out in several cases:
- when welding is prohibited;
- when joining non-metallic materials.
Rivets can be riveted overlapping, end-to-end, as well as using the chain and staggered method.
For more information on hammer rivets, watch the video below.