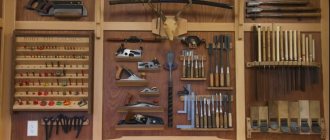
Often a situation arises when it is necessary to sharpen a tool or sharpen knives. To perform these works, a sharpening machine is best suited - it is also called a sharpener or an emery machine. This is the simplest power tool, which consists of an electric motor and an abrasive wheel. There are many options sold in the retail chain, which differ from each other in price and manufacturer, but are designed to perform one function - sharpening a cutting tool. Do not rush to purchase a factory-made electric sharpener: any home craftsman can make it with his own hands if he has the necessary spare parts.
What is sandpaper used for?
An emery machine is useful for the following work:
- Restoring the cutting qualities of the drill. To avoid buying new drills, you need to know how to sharpen old ones. When working with a drill, the drill gets very hot, which is why it constantly becomes dull. Once you sharpen it on a machine, you can use it many more times.
- Sharpening knives, scissors, shovels and other tools. Thanks to a homemade machine made from a washing engine, your knives will always be sharp and your scissors will cut perfectly. You don't need to use any special effort for this.
- If you replace the emery wheel with a polishing wheel, you can easily process products and parts.
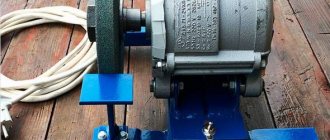
Using the motor from the washing machine, you can make a sharpening machine with your own hands. To do this, you will have to buy just one part - an emery wheel. All other components are located in the motor.
Other sharpening methods
There are many ways to sharpen a knife. A sharpening stone, a metal rod and all kinds of electrical means are used.
Special devices
An electric sharpener is not cheap. But even a housewife can use the device. Sharpening is quick and effortless. The developers have provided various nuances. Therefore, operating the device does not require much experience and knowledge.
An electric sharpener will do the job like a professional. By changing special abrasive belts during processing, a sharpened, polished blade surface is obtained.
Sharpening with a drill.
Manual method
For the manual method use:
- whetstone;
- sandpaper;
- Musat.
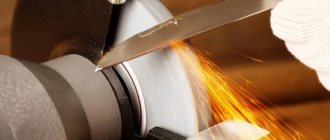
The blade is moved along the surface of the sharpening stone, alternately changing sides. This is a labor-intensive process. To achieve the desired result, it will take 30 minutes of work. After finishing the work, the stone is washed with a soapy solution and sand.
Musat is a corrugated round metal rod. The tool is used for straightening or finishing the cutting surface.
Sharpening stones.
Which engine is suitable for making emery?
Wondering what engine you can use? You can use any motor from a washing machine, even the brands “Vyatka”, “Riga” or “Volga”. The main thing is that it has sufficient power.
For normal operation of the sharpening machine, a power of 100-200 W, with 1000-1500 rpm, is enough. For particularly large parts, a 400 W motor is suitable. But if the engine speed reaches 3000 rpm, it needs to be adjusted or a very durable disc installed.
What you need to create emery from a washing machine motor
To make a simple sharpening machine you will need:
- washing machine motor;
- flange;
- sleeve;
- attachment to the electric motor (emery wheel);
- casing for protection;
- support;
- starting device.
When purchasing, it is better to choose a product with two circles: a finishing and a rough version.
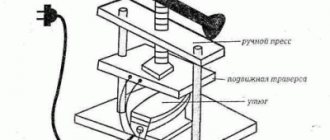
You also need to make an adapter with a flange. Since the size of the shaft does not match the hole of the grindstone, an adapter must be made. It can be done on a lathe, having previously determined the dimensions and completed the drawing. On the diagram you need to mark the diameter of the shaft and the emery hole.
You can make a flange for the shaft yourself. A piece of pipe with a diameter of 32 mm, no more than 200 mm in length, will do. It should fit perfectly on the motor shaft. On one side of the flange there is a thread, the direction of which depends on the direction of movement of the shaft. When sent to the engine, the other end of the flange is heated and pressed.
After installation, be sure to secure the flange. This can be done by welding or bolting, drilling the flange with the shaft.
The shaft adapter is ready. It remains to install the element for sharpening the cutters.
Manufacturing process
Flange undercut
As you know, the flange connects the engine and the stone. If you do not have experience working on a lathe, seek help from a specialist by providing a detailed drawing of the future device, with measurements of the diameter of the stone on the inner surface and the size of the shaft.
The made flange must be correctly placed on the shaft, the result must be secured with fasteners, for example, a bolt and a nut; it is preferable to use an additional threaded washer located on the left side.
Depending on the vector of rotation of the shaft, a thread is formed on the fasteners. Clockwise rotation requires left-hand threading, counterclockwise rotation requires right-hand threading. This is the principle of tightening the nut; if you neglect it, the part will unwind, and the stone will most likely fly off from its installed place, which is dangerous for the person who works with the emery.
However, not everyone has the opportunity to make emery with their own hands with point bushings of a certain size, as required by technology. Pieces of pipes will help to cope with this situation at home; cracks and voids formed between the bushings and the shaft can be hidden by wrapping them with textile tape. Another option is to sequentially place a smaller bushing in a larger one.
When winding the electrical tape, follow the uniformity. The sleeve is made from a pipe whose diameter is 32 mm, coinciding with the inner diameter of the emery circle. After which the circle must be placed on top of the sleeve.
Taking into account the direction of the emery work
Before you make emery with your own hands, decide on the vector of its work. For convenience, you can independently change the direction of the rotations the rotor makes. If the engine is taken from a washing machine, it can be considered asynchronous, which means there are no obstacles to changing the direction of rotation.
Find the windings intended for starting and operating, use a tester. How to distinguish the starting and working windings? The resistance indicator of the first reaches 30 Ohms, the working one - 12 Ohms. The working element is connected to a 220 W power supply, the trigger works when one end is connected to one of the terminals located on the coil, with the other end it is enough to touch the next terminal for a short time and immediately put it aside.
Steps for creating emery from a washing machine engine with your own hands
For a homemade device, a belt-driven motor is useful.
All that remains is to assemble the device correctly. After installing the flange, put the nut and washer on the shaft, then a large emery wheel, and then the nut and washer again.
Motor connection
How to connect the motor from an automatic washing machine:
- Using a multimeter tester, look for the tachogenerator wires that show a resistance of 70 ohms (usually they are white). We will not use them.
- There are four wires left. Using a multimeter, you need to identify paired wires.
- Connect the wires leading to the stator and to the electric brushes. The remaining wires need to be connected to a wire and a plug at the end, and then connected to the network.
- Connections must be insulated.
Immediately after connection, the motor for home emery will start working, and you will be able to evaluate the functionality of the device.
Connecting the electric motor of Soviet-made washing machines differs from the previous version.
- Here you will find only 4 wires. We need to find pairs.
- Take a multimeter and measure the readings of each wire. You need paired wires with lower resistance that go to the working winding.
- Connect these wires to a plug and connect to the network.
- Now we need to make a trigger element. You can use any button, for example, a door lock. Connect one wire coming from the button to the starting wire (PO), and the other to the working wire (OB).
The motor is now connected. But before starting work, you need to thoroughly secure the machine to avoid an emergency.
Connecting (checking) the motor
You can check the engine without capacitors and starting winding at all: voltage 220 V. supplied directly to the working winding. With this connection, the motor will start without load in any direction. To set the direction of shaft rotation, you need to connect the starting winding and capacitor. For emery, you need to set the direction counterclockwise
. The connection diagram is shown below, if the shaft rotates clockwise, you need to change the connection of the starting winding.
How to set up an emery machine and make a protection
How to secure the sanding machine and put protection on it? You can screw it to a workbench.
To do this, use the bracket that is in the washing machine. To reduce vibration during operation, rubber gaskets are placed on the corner, which can be made from a piece of hose.
If the device is installed on a wooden workbench, cover it with a sheet of metal on top to prevent fire.
For your own protection while using the machine, install a metal arc over the disk. You can also enhance the protection by attaching 5 mm thick plexiglass to the pendants. The glass can be raised and lowered using hangers.
Making a sharpening machine yourself is not difficult. The main thing is to secure it and connect it correctly. Also follow safety rules when working, use safety glasses and special clothing.
Design features and operating principle of the machine
The design of a wood sanding machine is not complicated, since the main task of any model is to process one or another type of wooden part, forming the necessary surface parameters for finishing. Thanks to processing with a grinding machine, the surface of the wood becomes perfectly smooth, and the parameters of the workpiece are additionally calibrated.
In production, they use a device of this type, which is equipped with a disk, a belt, and a bed (for processing at an angle). Homemade devices do not have such wide functionality, but this is usually enough for processing wood parts. There are several options regarding how homemade woodworking sanding machines are designed.
Typically, homemade grinding machines are made using improvised tools. But in any case, you need either an axis for attaching the grinding wheel, or 2 shafts between which the sanding belt will be tensioned. To set the base with the grinding element in motion, you need to additionally prepare a motor with a power of no more than 1 kW.
A do-it-yourself wood sanding machine has the following operating principle: by using a belt with different abrasive coatings, the desired surface treatment occurs. If a belt abrasive element is used, it is fixed by tensioning between two drums. A rigid base is required to secure the round abrasive.
How to choose a motor for a sharpener
It is advisable to assemble some tools with your own hands. Most home DIYers know that an electric sharpener is too expensive. Therefore, craftsmen independently assemble this product from a frame with an electric motor, but choosing the right power plant is too difficult. This is worth doing for the following reasons:
- Models offered on the market disproportionately increase their cost as power increases. Usually, almost the most powerful modification is required, but it simply costs unrealistic money.
- The product has too many unnecessary accessories that increase the price significantly. These are various curtains for the button, protection that interferes with operation and a beautiful casing for the engine, which, to be honest, is completely unnecessary.
- There are often gaps in product lines. You need some power with the ability to hook a variety of circles, but the manufacturer does not offer what you need.
All these troubles can be removed if you select the engine yourself. This is not difficult to do if you have certain skills. Now you can quickly create a high-quality product, but for this you will need to apply a little intelligence and your own working hands.
What qualities should a sharpening engine have?
We do not take into account the possibility of modifying certain elements, because all this can be too dangerous. Try to choose a model that has the following characteristics:
- It is advisable to have an independent shutdown when jammed. This will avoid burnt brushes and self-starting after the work is completed. All this is fraught with unpleasant consequences.
- The engine must be protected from dust or be insensitive to it. Moreover, in most cases this dust is an excellent conductor of electric current. You can simply get burnt windings literally out of the blue. This fate often awaits craftsmen who try to adapt a household power plant from a washing machine or vacuum cleaner to their small industrial needs.
- There is no need to take a model with too many revolutions. Torque is important to you. Nowadays, defective sharpening stones are not uncommon. Centrifugal force can tear them apart, and the pieces fly with enormous force in different directions. Usually 1500–2000 per minute is enough; you can also set it to smooth adjustment to provide solutions to various types of problems.
- The motor shaft must be suitable for clamping the wheels. It will have to cut a thread for a bolt and a pressure washer. The direction of twisting must coincide with the direction of the circular movement, otherwise the circles will fall off all the time. The shaft must also allow holes to be drilled. Some models already provide this by default.
- If we talk about power, then 2 kW will be enough for almost any task. Don't forget that a circle has the ability to maintain momentum. You can compare it to a kind of flywheel that constantly helps maintain the moment of inertia. Moreover, the heavier the circle, the greater the impact it will have on the part being turned. The most important thing is that the engine has power reserves. The proposed option is optimal for turning blanks of knives and garden tools.
- Try to choose a model with a good support heel. This will allow you to correctly attach the product to the workbench tabletop or intermediate spacer made of PCB. When fastening, it is advisable to use spring washers to prevent unwinding. Some experts recommend pre-coating the threads with a special varnish. You can even install welding points, because the grinding machine is usually installed in one place for life.
Device for sharpening drills at home
The quality and accuracy of drilling depends on the sharpness of the working tool.
In addition, unlike a table knife, the drill must be sharpened correctly. Experienced mechanics can straighten the cutting edge on a regular sharpening machine by simply holding the drill in their hands (at least according to them). But this method requires skill and many years of experience.
Even if you have a steady hand and an excellent eye, without understanding the process, you will simply ruin the instrument.
A few basic rules for sharpening (using the example of twist drills for metal):
For a better perception of the material, let’s remember the structure of the drill.
- Do not press the tip against the sandpaper for more than 2-3 seconds at a time. The metal heats up and the so-called “tempering” occurs, that is, deprivation of hardening. Accordingly, the necessary hardness of the metal is lost. The first sign is the presence of temperature discoloration on the edge.
- For drills with a diameter of up to 4 mm: each time the sandpaper plane touches the drill, the drill is held in one position: rotation around its axis is not allowed. For larger diameters, the sharpening geometry is slightly different.
- On twist drills, only the back surface of the cutting part is sharpened.
- The cutting edge should be directed towards the rotation of the sharpener (for mechanical sharpening).
- The main angle (2φ in the illustration) depends on the type of material being processed.
Which drills should I sharpen and how often?
Feather and other special wood drills cannot be repaired at home, and they do not become dull so quickly. Pobedite tips for concrete cannot be sharpened in principle. The most popular tool remains - twist drills for metal. Of course, they are also used for processing wood (plastic, rubber and even stone), but this is not relevant to the topic.
Twist drill. The cutting edge is small in size, so during operation it quickly heats up due to friction (there is no dissipation area). The main reason for dullness is overheating. When used correctly, wear does not occur as intensely. Characteristic signs of a blunt drill:
- A creaking sound is heard during operation.
- Instead of curled shavings, sawdust comes out of the hole.
- Instant heating of the tool without moving deeper.
Important: Do not use a dull drill; wear from overheating will only progress.
So, it's time to sharpen the tool. You don't want to ruin the drill and want to mechanize the process.
Mini sharpening machines are at your service:
All devices are divided into two types: attachments or stops for universal tools, and independent devices of narrow specialization. Let's look at the most popular of them, from simple to complex:
Hand holder
This is just the device for those who have a steady hand and a diamond eye. In fact, it only allows you to hold the drill in a given position without fear of injuring your fingers.
Angle control is visual, according to the position of the “wings” relative to any landmark. There are few advantages: instant readiness for work, compactness and price.
The disadvantages are obvious: manual control of the process does not add accuracy.
Stop for electric sharpener
In fact, this element is not a special device for drills. It simply allows you to fix the tool at a certain angle. The accuracy will be higher than in the previous version. Most stops allow you to set the angle of inclination, and even have a marking scale. And yet you have to rely on firmness of hands.
There are also more advanced stands: with replaceable elements and adjustment of not only the angle, but also the height. The devices are mounted not on the emery body, but on the workbench: which makes them more versatile.
In fact, such a stop can be adapted to any electric sharpener. An additional bonus is that with the help of such a stand you can sharpen knives, cutters, screwdrivers, chisels, etc.
Semi-professional guides for all types of drills
This is a fairly advanced tool that allows you to control sharpening characteristics with micron precision. All linear parameters are securely fixed, the values are set according to the markings. The drill is mounted in the groove, accidental displacement or rotation around its axis is excluded.
For sharpening, the possibility of both linear movement and movement of the edge along the arc path is provided (for conical sharpening of large diameter drills). Linear movement (along the axis) can be controlled by a master, or a limit stop can be installed.
From the point of view of processing quality, the device has practically no shortcomings. But for proper sharpening, the operator must know the parameters of the drill. That is, there is no automation: therefore the tool belongs to the professional category.
As a development of the line - a guide with its own sharpening unit. There is no need to install a stop on the workbench and change discs. In fact, you have a semi-automatic tabletop sharpening machine.
Important note: All listed devices are designed to work with standard electric sharpeners. Therefore, before starting to process drills, it is advisable to install a special emery disc.
Electric sharpening machines
They are specialized power tools for performing a single task: sharpening twist drills.
Even a person who is far from technology can use the machine (although why does he need sharp drills?). The operator only needs to determine the diameter of the drill and immerse it in the appropriate hole.
It is convenient to work, errors are practically excluded. However, all drills are sharpened with the same comb. The price to pay for ease of use is the lack of flexibility in settings.
For home use - the best choice: especially if there is an additional attachment for sharpening knives and scissors.
There are versions for masters. The drill is installed taking into account the sharpening parameters, the process can be controlled by the operator.
The sharpening angle, the method of edge processing (linear or conical), and the depth of metal removal are selected. The drill is not located in a common holder, but in an individual cartridge.
Industrial sharpening equipment for a metalworking shop
During intensive use of drilling machines, a separate post is required to restore the functionality of the tool. Professional stands for sharpening drills of any diameter save time and effort, but the cost of such equipment is too high for home use.
The information obtained will help you choose a sharpening device without extra financial costs. In addition, there are replaceable attachments for hand-held power tools (for example, a drill). But this is a topic for another article.
How to make homemade emery for your own workshop
Often a situation arises when it is necessary to sharpen a tool or sharpen knives. To perform these works, a sharpening machine is best suited - it is also called a sharpener or an emery machine. This is the simplest power tool, which consists of an electric motor and an abrasive wheel. There are many options sold in the retail chain, which differ from each other in price and manufacturer, but are designed to perform one function - sharpening a cutting tool. Do not rush to purchase a factory-made electric sharpener: any home craftsman can make it with his own hands if he has the necessary spare parts.
Selection of electric motor
To make emery yourself, you first need to select a suitable electric motor. Most often this is a motor from an old-style washing machine, for example, Malyutka - it is perfectly suitable for this purpose . Such a motor meets certain requirements: its power is in the range of 100-200 W, and the speed does not exceed 1500 rpm. If the rotation speed is higher, there is a risk of destruction of the abrasive wheel.
High engine speeds are needed for polishing parts, but they are not suitable for sharpening.
To make homemade emery, you can use any other electric motor. It must meet certain parameters.
- Shaft rotation should be minimal. Motors with no more than 1,000 rpm are best suited.
- The motor power should be between 100 W and 1 kW. The most commonly used motors are 400 W motors.
- It is desirable that it has legs for fastening.
- A single-phase or asynchronous motor, designed to be connected to a 220-volt network, is best suited.
Calculation of grinding machine power
Before you begin assembling the machine, you must calculate its power. To correctly make such an assessment, it is necessary to determine the following parameters:
- power consumed by the electric motor;
- rotation speed of the selected engine;
- the area of contact of the entire surface of the part with the moving abrasive belt;
- grinding ratio;
- coefficient of friction between the back side of the belt used and the surface of the drums.
Based on data on these parameters, the power of the future unit can be determined.
Algorithm for assembling emery from a Malyutka washing machine motor
First of all, we make the frame of the future mechanism. It can be made from a thick wooden board, wood slab, suitable plastic, but a thick metal slab is best. The electric motor is attached to it using brackets, corners or clamps. The connection between the electric motor and the stone occurs via a flange.
Making a flange is one of the technically difficult operations when assembling homemade emery. It is usually done using a lathe. To do this, it is necessary to measure the diameter of the output shaft and the abrasive wheel that will be used in the sharpening machine. However, if you don’t have a lathe at hand, you can do without it. In the video below you can see how to make an emery flange from scrap material yourself:
The flange is secured to the shaft using a nut, bolt and washer. In this case, it is necessary to take into account the direction of rotation of the shaft: the thread on the nut should be in the opposite direction.
This is done for safety reasons so that during operation the nut does not unwind under the influence of vibration of the machine, which can cause the abrasive wheel to fly off and cause injury.
Finally, all that remains is to mount the electric sharpener in a permanent place and supply electricity. The emery from the Malyutka engine is ready.
In the case of using an engine removed from an automatic washing machine, you can make a sharpening machine in a similar way, the only difference is in connecting the electricity . The motor from an ordinary washing machine has four wires: two are connected to the working winding, and the other two are connected to the starting winding. To determine the working winding, it is enough to measure the resistance of both. The resistance of the starting winding is 30 Ohms, and the working winding has only 12 Ohms. The engines of modern cars have six terminals, two of which are the output of a tachometer with a resistance of 70 Ohms. Finding them won't be difficult. These wires must be insulated.
The connection diagram is as follows: both windings are connected in parallel and connected to the network, and a button is connected to the gap in the starting winding. To do this, you can take a starter or adapt a button from a doorbell.
Application areas of the machine
Each of the manufactured machines performs a predetermined list of technological operations.
The drum-type system produces high-quality sanding of flat wood pieces. Processing of chipboard, OSB or MDF, including those covered with veneer, is allowed.
Application of Drum Sanding Machine
Processing of large, long, non-standard wooden wood products (for example, molded structures) is carried out using profile grinding equipment. Finished workpieces are fed to the grinding unit via a conveyor chain.
To grind the surface of wooden products that have a complex geometric shape (decorative frames, artistic products), belt sanding machines equipped with a freely moving table are used.
How to adapt a drill and grinder to an electric sharpener
You can make emery not only from a suitable electric motor available. You can use a power tool for this - it could be an electric drill or a screwdriver.
The latter is less suitable for these purposes: it has insufficient power and a short battery life.
Making a sharpener from a drill begins with purchasing an attachment.
The sharpening stone is secured in it and then clamped into the chuck. All that remains is to secure it to a stationary base using a special mount, which can be purchased at a store that sells power tools. With the help of such an electric sharpener you can straighten an ax, sharpen a kitchen knife or thread a drill.
In case of emergency, a sharpener can be made from a grinder. To do this, you do not need to purchase special devices and mandrels necessary for attaching the emery. You just need to secure it in a horizontal position on a massive base, install a standard cutting or sharpening disk, and the sharpener is ready for use.
Making a support and auxiliary table
The tool requires a support frame. To make it you will need a large pipe and an angle grinder. Manufacturing process:
- Following the drawing, a groove is cut out on the pipe for installing the capacitor. To do this, use an angle grinder. The groove is made on the rectangular section of the pipe from the wide edge.
- To fix the electric motor, small holes are cut out in the corners of the part.
Then the prepared corners and pipe blanks are welded using a welding machine. This creates a frame.- The required number of holes are drilled in the frame to install the engine. An electric drill is used for this.
- In order for the table to move to the desired position, two grooves are cut on the surface of one metal plate. The grooves are drilled with an electric drill. Their shape should be longitudinal. In this case, there is no need to make grooves in the second plate, which will be on top.
- A square pipe and 2 metal plates are welded using a welding machine. It turns out to be a table.
- The table and frame are connected by bolting.
- All irregularities and rough places on the structure are cleaned. A metal brush is attached to the grinder and grinding is carried out.
- All metal elements of the structure are coated with paint.
For stability, rubber shock absorbers are installed on the bottom side of the frame. They are fixed with self-tapping screws. The switch is attached to the structure according to the electrical diagram.
Mini sharpening machine
An electric sharpener is sometimes necessary if the master is engaged in modeling: during work it is often necessary to sharpen small parts. A large sharpener is not suitable for doing small work, so they often make mini-emery with their own hands. The assembly algorithm is as follows:
- take the motor from a computer hard drive or a children's toy;
- the tension sleeve of the spoke from the moped is soldered to the engine axis;
- a small grinding wheel is screwed to the shaft with a screw and washer;
- connect the power supply;
- fix the device on the bed, and the emery is ready.
Often, electric motors from a faulty sewing machine are used for these purposes. The advantage of this machine is that the motor has a speed controller, and this expands the capabilities of the device. It can also be successfully used as a polishing machine.
Principle of operation
The operation of a belt-type grinding machine is based on the principle of counter-movement of an abrasive belt located on two rotating drums and the processed wooden part. Both drums are located at a certain distance from the desktop surface. To ensure the required grinding quality, the following parameters must be correctly taken into account:
- size (number) of abrasive applied to the tape;
- the tension force of the belt on the rotating drums;
- the speed of its movement;
- the force of pressure on a moving wooden part.
Working with a belt sander
Incorrect selection of these parameters significantly degrades the quality of grinding. For example, if the pressure on the workpiece is insufficient or the rotation speed of the drive drum is too high, some places on the workpiece will remain unprocessed, that is, they will not be polished. On the contrary, if there is excessive pressure from the belt on the surface and insufficient speed of the belt, burns and changes in the color of the wood are possible. Therefore, when assembling a grinding machine with your own hands, it is necessary to provide for the possibility of adjusting these parameters.
Safety precautions when working with a homemade device
When making power tools yourself, you should strictly follow safety precautions. If industrial units are equipped with protective equipment, then in home-made devices you will have to make them yourself. You should be aware that operating a sharpener from a washing machine engine without a protective casing is prohibited. It can be made from sheet metal 2.5 mm thick.
The working wheel experiences strong vibration during sharpening. To prevent the sandpaper from being destroyed during work, when installing the stone, cardboard spacers are placed under the metal washers. You should also make sure that the disc has no cracks.
While working, you should stand to the side of the circle so that if it breaks, the fragments do not fly towards the operator.
Do-it-yourself sharpening device: how to assemble emery from a washing machine motor
An old washing machine is an excellent material for constructing a large number of useful household appliances. From different parts of the unit you can make a barbecue, a smokehouse, a sterilizer for preservation, a grinding wheel and even a concrete mixer. Quite often, owners of Soviet-style washing machines assemble a sharpening device or emery from the engine. This is not difficult if the motor is in good working order, you have thought through the method of attaching the emery wheel to the shaft, and you have prepared all the auxiliary parts, tools and fasteners.
Sharpening device from a washing machine: selecting a motor for emery
In terms of its power and configuration, the electric motor from old-style washing machines is ideal for portable homemade emery. As a rule, motors from units such as Siberia, Volga or Vyatka are used for this purpose. Approximate characteristics should be:
- mains voltage - 220 V;
- power - up to 370 W;
- rotation speed - no more than 3 thousand rpm.
Attention! If you construct an emery from a more powerful engine, a significant number of revolutions can simply break the whetstone during operation.
The parameters of the engine are necessarily indicated on its body. To make emery, a device with a power of 100-150 W and 1-1.5 thousand rpm is sufficient. It will cope well with household sharpening of repair equipment and kitchen utensils.
Old engine
A faster grinder (for example, an emery machine based on common engines with 2.8 thousand rpm) is appropriate to use for grinding or polishing parts. In this case, the emery stone should be stronger, and the main fastening element, the flange, should be of better quality and stronger.
Bushing (flange)
The bushing for seating the whetstone is the most complex component of our device. This sleeve is also called a flange
.
What is a flange? This is a piece of metal pipe, the inner diameter of which ideally fits the electric motor shaft and is securely fixed to it. The outer diameter of the flange must coincide (with small errors) with the mounting diameter of the grinding disc. A thread is cut along the outer diameter to secure the disk; the thread must be opposite to the direction of rotation of the shaft
. In other words, if the motor shaft rotates clockwise, then the threads must be left-handed. And vice versa, if the shaft rotates counterclockwise, then the thread on the sleeve should be right-handed, normal. That is why, just above, I advised connecting the motor with counterclockwise rotation.
The best option would be to contact a turner you know and order the production of this bushing. Usually, a turner just needs to bring a pulley from the engine and tell him the mounting diameter of the grindstone. Most modern stones have an internal diameter of 32 mm. But it’s not for nothing that our web resource is replete with the motto “do it yourself” and it is quite possible to make a flange yourself. Of course, the quality will be worse than from a professional turner, but this does not require special skills or special tools.
You can also buy a suitable bushing from the Chinese.
Now it’s time to fit the bushing onto the motor shaft. The problem is that usually the shafts of electric motors from washing machines made in the USSR were produced in two diameters: 11 mm. and 14 mm. and these figures had quite large errors in the form of tenths of a millimeter. For example, in the photo in this publication the engine has an 11.9 mm shaft. Therefore, you need to look for a way to increase the shaft diameter to 15 mm.
Assembling emery from a washing machine motor
The process of assembling the base of the future sharpening device takes place in a vice. After almost every action, fitting and adjustment are required so that in the future the device works without failures. When assembling the emery, you can rely on supporting photos and video instructions.
- Make a drawing based on the basic parameter - the dimensions of the engine. Consider the dimensions of the support and frame.
- Make a pattern of elements of supporting and fastening structures.
- Transfer the outlines to the metal corner. Cut out the parts using a grinder.
- Make a sandpaper support frame. Fix the rectangular-section corrugated pipe blanks on the workbench with a clamp. Cut where needed using a grinder. In a pipe with a larger cross-sectional area, grooves must be cut along the edges in order to connect it to the side of the pipes with a smaller area.
- In the larger pipe, cut a window, which will be a technological hole for the capacitors. You need two of them. Connect the terminals of the parts together with parallel wiring.
- Insert the capacitors into the notch. If everything fits together perfectly, disassemble the structure and carefully sand all metal surfaces.
- Weld all elements of the emery structure to each other.
- Make a table on which the part will be placed during the turning process. Metal 3 mm thick will be strong enough for these purposes.
- Paint the bed. Secure the motor housing with the wheel to the machine, protecting it from sparks and scale. To do this, cut out a round casing from galvanized sheet metal.
The work is completed by assembling the electrical circuit and connecting it with capacitors. This is the easiest way to assemble emery from a washing machine motor yourself. The tool turns out to be reliable. If used correctly, it will serve you for more than one year.
Base
The frame on which the engine will be mounted does not require any special material costs, but this does not make it any less significant. The base must be well thought out, since making emery is not an end in itself; you still have to work on it. At the same time, all attention should be focused on sharpening the tool, and not on holding the motor jumping all over the workbench with your hand. Working like this is, at the very least, inconvenient, and in this case there is no talk of compliance with safety regulations at all.
Therefore, the base of the emery should be heavy enough, and most importantly, allow the motor to be fixed in the same way as it was fixed to the washing machine. It is best, of course, to make the frame metal. True, you will have to use welding for this. If this is not possible, then you should take a suitable piece of chipboard and bolt metal corners onto it to mount the engine. Even better, remove the motor from the washing machine along with the standard bracket and screw it to the base. The main thing is to use bolts and nuts for this; self-tapping screws can become loose and unscrew due to vibration.
There is one more key point. The height of the motor mounting should not only allow the emery wheel to rotate freely, but also provide a gap of 4 - 5 cm between it and the base. After the motor is securely mounted on the frame, you need to think about the support table. It must be metal; welding can be replaced with a bolted connection. If the starting capacitor on the washing machine was moved outside the motor housing, you need to provide a place for it on the base of the sandpaper.
Once the motor is securely fastened to the frame and all auxiliary elements are installed, you can proceed to the electrical connections. But first you need to make sure that the grinding wheel is securely fastened to the motor shaft, as well as that there are no various beats.