Home / Welding technique
Back
Reading time: 5 min
0
1297
The band saw is a multi-cutting cutting tool. It looks like a closed flexible steel ring with notched teeth on one of its faces.
The tape is mounted on two friction wheels rotated by an electric motor, which allows you to make not only straight cuts, but also curved ones.
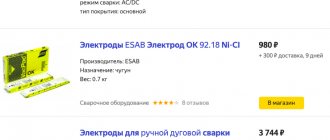
The cutting strip for metal and non-metallic parts is regulated by P54924-2010. Frequent use of this cutting tool does not exclude its rupture along the body or weld seam.
To connect the ends of the saw, you will need the services of a welder, but having some experience in metalwork and an apparatus for welding band saws, you can join them at home.
- General information
- Equipment
- Welding technology Cutting
- Stripping
- Securing the fabric into clamps
General information
When joining the ends of the saw, it is necessary to take into account its load when processing parts, subjecting the tape to constant stretching and bending.
A band saw strip made from alloy or carbon steel can withstand the force of the material being processed, which sometimes cannot be said about a welded joint.
After a period of working hours, the seam bursts. Therefore, the latter must be made of a material of the same composition as the ring with teeth itself.
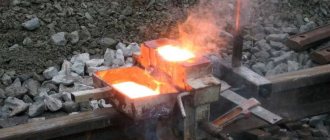
The creation of a high-quality connection will be helped by the use of a special device for welding band saws, using resistance arc welding.
The latter is caused by uniform heating of the joints of the two parts being connected. After the described thermal operation, the ends are tightly joined, forming a one-piece ring.
What materials and tools are needed to make a saw?
The set of tools and consumables for creating a band saw with your own hands at home may vary depending on the features of the chosen design. But, as a rule, the construction of a machine requires the following:
- boards or sheets of plywood for the frame;
- bearings;
- motor - electric or gasoline;
- metal corners;
- metal cutting blade - homemade or purchased;
- self-tapping screws and bolts with nuts;
- rubber from a bicycle inner tube;
- wooden blocks and slats, they are needed for the supporting frame of the structure;
- bushings;
- belt for transmitting torque;
- a steel rod that will serve as a shaft for the pulleys;
- steel sheet or piece of PCB;
- varnish or paint, they are needed at the final stage of creating the machine.
READ How to cut polyurethane skirting boards
Also, when making a band saw with your own hands, you will need to use the following tools:
- grinder;
- screwdriver;
- pliers;
- wrenches - sizes are selected in accordance with the bolts;
- jigsaw;
- screwdrivers;
- hammer.
How to assemble a band saw from a jigsaw with your own hands
Another simple scheme suggests making a mini band saw for wood with your own hands from an electric jigsaw. The algorithm is proposed as follows:
- A jigsaw is applied to a small square workpiece with the handle down and the metal corners are fixed on both sides. Using a drill, holes for the screws are made in the marked places. The corners are fixed on a wooden stand. Any hard board or small sheet of chipboard will be suitable as a base for a tabletop machine.
- A jigsaw is inserted between the corners, slightly lifted and a piece of rubber is placed between the edge of the metal elements and the body. Since the tool is not pressed flush against the board, there is space underneath to make adjustments using the buttons. Long screws secure the jigsaw between the corners so that it does not wobble or play. The rubber gasket softens possible vibrations when operating the jigsaw.
- Theoretically, something like a band saw can already be used, but it is more convenient to bring the design to perfection and give it the appearance of a classic machine. To do this, a compact tabletop is attached to the jigsaw base using screws. First, you need to cut a narrow hole in it through which the tape blade of the tool will protrude. Any hard material is suitable for the countertop - steel, textolite, ebonite
For serious work and cutting logs and large boards, a band saw
made from a jigsaw with your own hands will not work. But it will be very convenient to process small workpieces with its help.
simple things - Band saw welding
Selection of tape material
If you wish, you can make a saw blade for a band saw with your own hands from U8 or U10 tool steel. The material should be strong but flexible, with a thickness of 0.4-0.8 mm for cutting hardwood. When creating a blade yourself, you will need to use a grinder to cut out the teeth in the metal, spread them apart and sharpen them, and then solder the tape into a solid ring with a gas torch and sand the seam.
Equipment
For welding the ends of band saws, there are special resistance welding machines, which have varying degrees of automation.
Inexpensive devices are characterized by manual adjustment of the type of welding and seam formation. The high cost of the device guarantees automatic welding without human intervention.
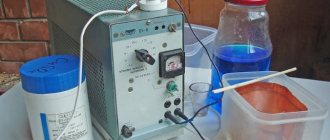
The simplest apparatus designed for welding joints of band saws, regardless of the nature of their use, is shown in the photograph. Its design is quite simple:
- device casing - 1;
- welding transformer for power regulation - 2;
- clamping mechanism - 3-4;
- start button or key - 5.
A craftsman who constantly works with saws can assemble the device himself from industrial elements.
DIY band saw welding
Reading time: ≈10 minutes
The band saw is a one-piece closed product, with frequent teeth on one of the sides. Simply put, it is a ring of flexible metal that has teeth on one side. Band saws are widely used in the construction of wood and metalworking machines.
If there is a demand for saws of this type, then their preliminary welding is necessary. In this article we will describe in detail how to weld band saws with your own hands.
general information
At first glance, welding and soldering band saws for wood or metal does not seem such a difficult task. The work is simple and straightforward. This is true, but there are some nuances.
You must take into account that the band saw experiences significant loads during operation. These loads constantly stretch and bend the saw. And if the saw copes successfully, then the welded joint may not withstand these loads. And the point here is only in the quality of work.
In order for the seam to withstand all the loads, it must be as strong as the saw itself.
How to achieve a quality connection? Of course, by entrusting the welding to a special apparatus. To achieve a strong permanent seam, you can use flash butt welding technology. But at the same time use a special machine for welding band saws. Let's talk about this in more detail.
Equipment used
There is a separate group of welding machines for working with band saws. That's what they're called - a machine for welding band saws. They all differ only in the degree of automation. The simplest budget models have on board manual adjustment of the welding mode and control of seam formation. And the most expensive models are capable of welding automatically without an operator.
We will tell you about the simplest machine for welding band saws on wood or metal. It is shown in the picture below. The design is simple: 1 - housing, 2 - welding transformer, 3 - clamping mechanism with electrodes, 4 - start button.
Installing the saw into the clamps
Above, we could already familiarize ourselves with the components that make up a machine for welding band saws. We said that there is a clamping mechanism. This is where the saw blade needs to be installed. The clamp has a movable and a stationary part.
Place one end of the blade in the movable one and the other end in the fixed one. There is free space between the clamps. You need to install the canvas so that its joints are exactly in the middle of this space.
Naturally, the joint must be smooth and precise.
Welding mode selection
Next you need to select the welding mode. If you have a simple welding machine, then all parameters need to be configured manually. The welding mode is selected based on the size of the saw and its cross-section. The larger the cross-section, the greater the welding current. These are general recommendations.
Typically, the welding machine comes with instructions that describe all welding modes depending on the size of the saw blade. Also pay attention to the setting of the speed of current pulses.
For budget models, it must be controlled manually, otherwise the metal will heat up too much. The recommended current supply time is 1-2 seconds. In more expensive devices, this parameter is adjusted automatically.
Quality control
Do-it-yourself band saw welding is completed. But if you lack experience, you will probably have visible defects. So do visual quality control. Carefully inspect the seam and make sure there are no defects.
The most common defects are displacement of edges, release of molten metal onto the blade and lack of penetration. The edges move due to insufficient current. The release of molten metal, on the contrary, when the current is too high.
And lack of penetration is formed due to low pressure or low current.
Welding technology
Welding a band saw blade has several stages.
The material provides a detailed description of each of them.
cutting
The saw blade is sold in coils, which means purchasing a blade of a certain length. To cut metal with teeth, a guillotine and a cutting table are used, which give an even cut.
The tape is cut along the upper edge of the teeth, with an allowance of 2 mm on the cut side. This will allow you to maintain your pitch and draft.
Welding mode
The selection of the magnitude and polarity of the current, electrode diameter, soldering speed and arc voltage on the simplest apparatus is done manually. The process depends on the size of the canvas and its cross-section.
An increased value of the latter implies an increase in current strength. Band cutting tools are made from various metals and their alloys, which are difficult to weld.
Saw manufacturers do not provide information about the type of material for public use, which makes it difficult to select a welding mode. It, the masters, is established experimentally.
To facilitate the work of welding a band saw, the user manual supplied with the welding machine will help, which indicates all types of modes.
You will also have to manually regulate the speed of current pulses on a budget device; lack of control can lead to overheating of the metal.
It is recommended to apply current for no more than 2 seconds. Expensive welding devices adjust the time automatically.
Do-it-yourself band saw welding
Band saws are used in many areas of production related to cutting wood. Essentially, it is a flat cutting blade with a cutting edge with teeth on one edge.
According to its technical purpose, this fabric is welded into a ring. The place of welding is the two extreme ends of the tool. A band saw welding machine is used to join the joining edges.
This is special equipment, it is highly specialized, and is used only for welding band saws.
Welding machine
There are several types of machines for welding band saws, which mainly differ from each other in performance.
The simplest apparatus is a small machine, which includes a transformer, electrodes, clamps (one fixed, the other movable - it is supported from behind by a spring).
The electrodes are connected to the clamps, so current from the transformer is supplied directly to the junction of the bandsaw parts.
The mobility of one of the clamps creates conditions for adjusting the gap between the ends of the blade. It is very important that the end result of welding is a neat weld bead that is strong and reliable. After all, the band saw experiences repeated cyclic bending and tensile loads.
So, the band saw is installed in the welding machine. One end of it is clamped into a fixed clamp, the other into a movable one. It is very important that the cut ends are tightly connected to each other.
After that, using special handles, the clamping force is set, that is, the movable clamp moves towards the stationary one. The welding current value must be set. These two parameters - upsetting force and current value - directly depend on the dimensions of the web cross-section.
The larger it is, the greater the current should be, the greater the clamping force should be applied.
It should be noted that manufacturers of welding machines made sure that consumers did not look for current and clamping parameters. The instructions for each device include a table of the dependence of the cross-section of the band saw on the parameters of current and draft. So there should be no problems with choosing welding modes.
Band saw welding process
If the band saw is installed, the welding mode is selected, all that remains is to press the start button for the welding process.
In this case, the current from the electrodes is supplied to the clamps, and through them, in turn, to the ends of the welded parts of the band saw. They begin to melt, that is, they become soft.
In this case, a movable clamp supported by a spring pushes one of the edges of the canvas towards the other. This creates a weld bead.
It is necessary to point out that in addition to the correctly selected welding mode, there is another parameter that affects the quality of the final result. This is welding time. In simple machines it is controlled by the worker who welds the band saws. If welding is carried out on automatic models, the welding time takes 1-2 seconds.
By the way, the cleanliness of the electrodes also affects the welding quality of band saws. Therefore, the machine must be kept clean. Even the slightest contamination of the ends of the electrodes results in resistance to the passage of current through them, which reduces the latter’s performance. This means that the current at the ends of the saw sections being welded is also reduced.
It should be noted that welding band saws with your own hands is not the easiest process. The difficulty lies in the fact that fabrics with different cross-sections and different materials from which they are made have to be joined. That is, for each criterion you need to correctly select the welding mode. Which is very difficult, and sometimes simply impossible to do.
Therefore, often the first welding of an unknown saw leads to an unsatisfactory result. After which the operator begins to select the welding mode using the “poke” method. Sets different modes one by one and looks at how well the welding occurred and how well the joint meets the strength requirements.
Experienced operators thus create a table for themselves so as not to repeat their mistakes in the future.
Band saw annealing
During the welding process, the band saw joint becomes strong but brittle. One blow with a hammer destroys the connection immediately. The thing is that under the influence of high current the metal changes its structure.
To return it to a state of plasticity and viscosity, it is necessary to carry out an annealing operation. This process is carried out on the same welding machine, without removing the fabric from the clamps.
The current mode simply changes and the upsetting force is removed.
A large current is supplied to the electrodes, and the joint itself is heated to a temperature of +600C. Many machines are equipped with a pyrometer that monitors the temperature in the welding zone. It will be necessary to control the annealing mode using it.
After heating, the current is turned off and the saw slowly cools down. If the ambient temperature is sub-zero, then during the cooling process it is necessary to periodically turn on the current supply so that the cooling proceeds more slowly.
Typically, the temperature decreases within 3-5 minutes.
Some blades require double annealing, it all depends on the grade of metal. Some experienced operators combine welding and annealing. That is, the blade is heated to the temperature at which welding is performed, then the tool is slowly cooled. Here it is important to increase the cooling time, for which the current supply to the electrodes is periodically turned on.
The main requirement for stripping is to remove the metal deposit and give the correct geometry to the cavity between two adjacent teeth at the welding site.
Cleaning can be done with any abrasive tool. It is important that the canvas does not lose its flatness in the plane, and that the metal of the joint is flush with the adjacent areas.
Therefore, it is recommended to carry out stripping not across the joint of the saw blade, but along it.
What to pay attention to
When welding band saws, various defects can occur.
- The edges of the welded ends may be joined unevenly. This happens if the clamp pressure was very strong, which affected the displacement.
- A large amount of metal on the surface of the welding site. This means there was too much current.
- Lack of penetration of the web means low current and low clamping force.
By the way, the quality of welding can be checked manually; you just need to fold the saw into a ring so that the joint is located at the very top. If the arc has the correct shape and the joint is not cracked, then the welding process was carried out correctly.
If cracks appeared in the welding zone, it means that the blade cooled quickly during the annealing process. If a curved “V” shape appears at the welding site, this means that the joint is too soft.
This was influenced by the slow annealing.
In addition, we invite you to watch a video on how to properly weld a band saw.
Share with your friends
Welding
The process of soldering the joints of the fabric is carried out on a welding machine, which, depending on the modification, is started using a key or a special handle.
After turning on the unit, welding current is supplied to the ends of the tape through the clamps to melt the metal in the area of the intended seam.
The end of heating will mean that the travel clamp should be moved slightly to form the weld bead.
To obtain a strong connection, the surface of the conductive rod must be cleaned. There is no point in cleaning along its entire length; the main thing is that the surface in contact with the tape does not have traces of dirt or other unwanted deposits.
Failure to comply with this condition will disrupt the circuit resistance, which will negatively affect the quality of the connected part.
Welding band saws: a homemade welding machine and how to use borax for soldering
Saws are widely used in the woodworking industry, the main feature of which is a continuous cutting surface. It is a ring made of tape with metal teeth.
Welding of band saws is the basis of their manufacture, since they are obtained by joining a pre-prepared band into a ring. This process is also used in their repair. This article will talk about the main features of welding such devices.
Welding work
Welding of band saws is divided into several stages. At each technological stage, it is necessary to strictly adhere to the methodology in order to achieve the best result.
There are several types of devices that allow the connection process to be carried out. They usually function as follows: the edges of the ends of the saw are connected by joining them and passing current through them.
Such equipment is perfect for small volumes of work; it will be especially effective in repairing saws in industrial sawmills.
Band saw connection drawing.
This method assumes high quality preparation of the joint and electrodes, as well as the correct choice of modes. Devices operating on the reflow principle offer higher productivity. In addition, they are able to work with all types of fabrics. Such devices are classified as middle class.
The method also requires good surface preparation, correct choice of modes and consideration of metal consumption.
Automatic devices using reflow technology require the machine operator to only install high-quality materials, as well as remove them after processing is completed. This tool is widely used in professional workshops and service centers.
The saw welding process, as noted above, is divided into stages, each of which will be described below.
Installation
After preparing the web in accordance with the steps listed above, the web is installed in the welding equipment. The edges of the product must coincide with each other.
Equipment parameters such as force, mode and course of upsetting are set based on the material selected for the web. The required modes are contained in the tables given in the documentation for the equipment.
Band saw soldering
Band saw soldering is also an acceptable method of joining blade edges. If you carry out this process in accordance with all the rules, you will ultimately be able to obtain a high-quality and durable saw that can be safely used in a band saw or, for example, in a wood saw.
This method is most preferable for use at home.
Preparation
Features of welding band saws. Soldering a band saw at home is a cheap and affordable way to make a cutting tool. The first thing you need to do before joining is to clean the edges of the canvas from any dirt.
The ends of the fabric should be joined end to end. It is important that they are beveled. You can obtain the edges of the required shape on an abrasive wheel.
The shape of the bevel is a right triangle, the length of one of the legs of which is determined by the thickness of the metal.
The beveled surfaces should be as smooth as possible and fit perfectly against each other. Don't forget about the pitch of the teeth. When forming a bevel, you need to ensure that the step is maintained.
Soldering process
Band saw welding machine.
By and large, soldering this tool is very similar to the same process of working with high-temperature solders for other products.
The beveled edges of the blade are coated with flux and clamped in the machine so that the edges fit tightly against each other. It is important to ensure that the flux covers only the edges of the tool. If this procedure is done poorly, the flux will flow where it is not needed. Subsequently, you will have to spend extra time removing it.
Then the connection is heated with a burner to the required temperature. Solder is applied to the joint. Due to the action of capillary forces, the solder flows between the edges. As a result, a strip appears along the entire perimeter of the joint.
It is very important that the solder melts not from the burner flame, but from the temperature transmitted from the heated metal.
The product should be given a few minutes to cool down before removing it from the machine. If the entire sequence of actions is performed correctly, there should be no solder sagging. If they are, then the excess must be carefully removed.
This method is great for home use, for example, when creating a homemade tool and using it as a wood saw.
Re-stripping
The process of tempering the metal creates visible sagging on it. They can be removed by repeated stripping. The latter is not so necessary for improving technical characteristics as for aesthetic purposes.
The band saw is cleaned with a grinder or any abrasive tool until the seam is visually erased.
It is also recommended to correct the recesses between the teeth, giving them the correct geometric shape.
Soldering control
It would not be superfluous to inspect the seam of a welded band saw if it was made by a novice craftsman. Control is carried out visually. The articulated area should be carefully inspected to identify possible defects.
The latter may be:
- displacement of the ends;
- splashes of molten material onto the belt;
- lack of weld penetration, which impairs technological qualities.
Displacement of the ends occurs due to low current strength, splash - due to excessively increased current. Lack of penetration occurs at low pressure or insufficient current.
Processing of sheets after welding: annealing and cleaning
During the welding process, the joint, along with strength, also acquires fragility. One targeted blow with a heavy tool breaks the integrity of the seam.
To restore elasticity to the joint, it is necessary to anneal it.
Annealing
The implementation of such a process is carried out on the same machine equipment without disconnecting the web from the clamping mechanisms.
Annealing is performed by changing the current mode and reducing the forces on the blade.
With a gradual increase in current, the connection point is heated to a temperature of 500-550 degrees. Carrying out such a procedure involves the preliminary installation of a pyrometer that controls the increase in temperature exposure at the connecting point.
After reaching the required values, the electricity supply is stopped, after which it is necessary to wait for the canvas to cool.
When installing equipment and carrying out work in an unheated room, when the saw cools down, it is necessary to periodically turn on the current supply.
A sharp change in temperature on the surface of the canvas will lead to disruption of the technology and loss of strength characteristics. Normal cooling of the metal should take from 3 to 5 minutes.
Do not forget that some types of metal require double processing. Experienced specialists simultaneously carry out annealing during welding.
Stripping
Cleaning after welding
The main requirement for such a procedure is the maximum removal of metal deposits and the creation of a clear weld geometry.
The procedure is performed with any abrasive material or tool.
The decisive factor here is the absence of any roughness on the surface of the saw. In this regard, the surface should be cleaned not in the classical way across the canvas, but along it.